Knee arthrodesis offers an excellent salvage option for an infected total knee arthroplasty (TKA), periarticular tumor, posttraumatic arthritis, and chronic sepsis in the knee. It is a viable solution that allows for stable and painless lower extremity ambulation.
 The energy expenditure for an arthrodesed knee is 30% higher than required for normal walking. Nevertheless, walking with a knee fusion requires 25% less energy expenditure than walking with an above-the-knee amputation (AKA). This is an important consideration particularly for elderly patients with associated comorbidities who are often unable to walk with an amputation.14,18
 In the younger, posttraumatic population, knee fusion may allow for participation in more physically demanding activities as opposed to AKA.
 Relative contraindications are marked contralateral limb dysfunction, marked back pain and arthritis, contralateral knee amputation, and severe ipsilateral hip or ankle degenerative changes.
ANATOMY
 The relevant anatomy depends on previous surgical procedures that the patient has undergone. For example, in the case of an infected TKA-required knee arthrodesis, the extensor mechanism is often no longer present and a soft tissue defect may occur anteriorly.
 To obtain the best bone contact for a knee arthrodesis, elevating the posterior capsule off of the distal femur and the proximal tibia allows the knee to be brought into full extension and allows achievement of the best bony contact between the femur and tibia.
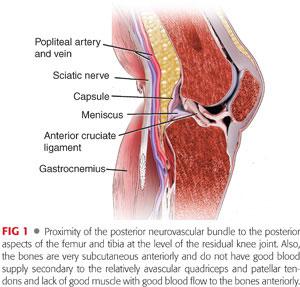
 The structures in the popliteal region, posterior to the posterior capsule, are the popliteal artery, popliteal vein, and sciatic nerve as it branches into the posterior tibial and peroneal nerve (FIG 1).
 When using a long intramedullary rod for a knee fusion, the recommended landmark for nail entry is the piriformis fossa.
PATHOGENESIS
 At present, the most common indication for knee arthrodesis is a failed, unrevisable TKA. These conditions may be secondary to persistent infection, gross instability, massive bone loss, inadequate soft tissue coverage, deficient extensor mechanism, or when the patient is unwilling to consider revision arthroplasty. Additionally, other conditions necessitating knee arthrodesis include periarticular tumors and severe posttraumatic degenerative joint disease.11,18
 Trauma, aggressive periarticular tumor destruction, or débridement as a result of infection can lead to extensive bone loss of the distal femur and proximal tibia.
 The most common method to fill bony defects is by acutely shortening the limb.
The mean limb shortening associated with knee arthrodesis is 4 cm, which can be addressed with a shoe lift to equalize the limb lengths.12
In cases with marked shortening (5 to 6 cm), concomitant lengthening can be performed in the proximal femur.
In cases with substantial bone loss (7 to 10 cm) with adherent soft tissues and vessels that do not allow acute compression, gradual compression of 2 mm/day with an external fixator is an option for knee arthrodesis. However, even with this procedure, the limb may remain markedly shortened.
NATURAL HISTORY
 The underlying pathology of severe traumatic and infectious processes occurring within the knee is poor. Without a stable lower limb, the patients are unable to bear weight.
 Survivorship of a knee arthrodesis is generally for the duration of the patient’s lifetime.3
As patients with knee arthrodesis age, increased pelvic tilt, hip abduction, and ankle dorsiflexion on the ipsilateral side may lead to degenerative changes of the contralateral joint.
 The alternative to knee fusion is AKA, which allows the young, healthy posttraumatic population to walk with an above-the-knee prosthesis.
However, AKA in the elderly population with infected TKAs may result in a patient becoming nonambulatory.14
PATIENT HISTORY AND PHYSICAL FINDINGS
 Preoperative assessment for knee arthrodesis should include an evaluation of all surgical and traumatic events relating to the patient’s knee.
 An evaluation of comorbidities, including peripheral vascular disease, smoking, diabetes, ambulatory status, social resources, and corticosteroid use, are also important as they may affect the patient’s ability to heal following arthrodesis.
 Physical examination of the knee joint should consist of assessing the alignment, range of motion, extensor lag, fixed deformities, and ligamentous stability. Assessment of other joints such as the hips and ankles is important to assess the integrity of the remaining joints that will be compensating for the resultant lack of knee motion.
The presence of any equinus contracture can be addressed at the time of surgery with Achilles tendon lengthening or gastrocsoleus recession.
 Dorsalis pedis and posterior tibialis pulses should be palpated; if they are poor, a vascular evaluation may be obtained.
 The cutaneous integrity over the anterior knee is assessed for scars, previous flaps, and any defects. If the skin condition is poor, the surgeon should consider alternative wound closure techniques postoperatively, such as a wound vacuum or preoperative plastic surgical consultation.
IMAGING AND OTHER DIAGNOSTIC STUDIES
 The most important imaging studies are long-standing anteroposterior (AP) and long lateral view radiographs of the lower limbs (FIG 2).
These radiographs allow the surgeon to assess the present as well as predicted limb length discrepancy after knee fusion.
Due to the risk of bony defects greater than 5 or 6 cm leading to vascular compromise from vessel kinking, radiographs are essential for determining the method of fusion.4
Any residual bone cement in the medullary canals can also be visualized on these views, allowing the surgeon to plan for proper removal at the time of surgery.

 Magnetic resonance imaging may be helpful in determining the extent of any infection in the distal femur or proximal tibia. Care must be taken when interpreting the images because bone edema can be misinterpreted as osteomyelitis and result in an aggressive resection.
 Furthermore, if the dorsalis pedis and posterior tibialis pulses are weak or cannot be palpated, a Doppler ultrasound may permit the visualization of the blood supply of the limb. If this cannot be done, a computed tomographic (CT) angiogram may be a better alternative.
INDICATIONS FOR KNEE FUSION
 Infected revision TKA
 Severe trauma to the knee, preventing reconstruction
 Reconstruction after tumor resection
NONOPERATIVE MANAGEMENT
 Nonoperative management of a knee with a marked bone defect following trauma or joint infection is quite difficult. These patients typically have an unstable limb for weight bearing and require a cast or brace for support.
 Resection arthroplasty is usually reserved for patients who are not able to ambulate or are too medically ill to undergo a major surgical procedure.
 The presence of advanced degenerative changes to the ipsilateral hip/ankle or an amputation of the contralateral knee should preclude undergoing a knee arthrodesis. Additionally, the presence of an arthrodesis of the contralateral hip or knee is a contraindication.
SURGICAL MANAGEMENT
 Knee arthrodesis requires a patient who is medically stable enough to undergo a 2- to 6-hour procedure with a potential blood loss of 500 to 2500 mL.4
Preoperative Planning
 Proper preoperative planning begins with the critical points outlined in the Patient History and Physical Findings and Imaging and Other Diagnostic Studies sections.
 Employing sound fracture fixation principles can help achieve a successful arthrodesis. Thus, it is imperative that good bony contact is achieved with rigid fixation while preserving vascularity.
 It is also paramount that proper alignment is obtained. The aim should be to achieve an overall limb alignment of the knee in 5 to 7 degrees of valgus and 15 ± 5 degrees of flexion.6,18 TKA cutting instrumentation may help facilitate achieving the desired alignment, but its usefulness is limited in the presence of extensive bone loss.11,18
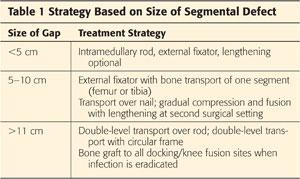
 Essential to preoperative planning is the determination of the resultant gap that will be present at the site of the knee fusion, especially with the presence of infection (Table 1).
Acute compression of any bony loss with an intramedullary rod fusion should be reserved for bony gaps of no more than 5 to 6 cm. Acute compression greater than that degree can cause vessel kinking and ischemia of the lower extremity.
Bony gaps greater than 5 to 6 cm can be managed with gradual compression or bone transport to fill in the defect. Bone transport with a fixator allows the limb to remain at a desired length (ideally 1 cm shorter than the contralateral limb) and fills the gap with healthy bone from the proximal tibia or femur.
In cases with large gaps, gradual compression without lengthening, achieved by using an external fixator, will eliminate vessel kinking. However, the resultant limb length discrepancy might require the use of a 2- to 3-inch shoe lift, which could become uncomfortable for ambulation.
Discussions with the patient regarding the goals of knee arthrodesis before surgery are vital. The surgeon must be sure that the patient is willing to accept a large shoe lift; if not, they must be willing to undergo additional steps to ensure that the limb is of acceptable length.
The strategy for knee fusion is patient dependent. The lengthening can be performed at a second surgical setting or during the same surgical setting. It is important to realize that with concomitant lengthening, the rate-limiting step in the complete healing process is typically the fusion site, not regenerate bone formation.
 Knee arthrodesis after infected TKA requires bone grafting. This is used to address loss of bone stock from the distal femur or proximal tibia. However, this is performed when there is no evidence of infection.
At the time of surgery, bone loss can be classified according to the system proposed by Klinger et al10 and Somayaji et al18:
• Mild: Full bony contact is possible.
• Moderate: There is incomplete bony contact.
• Severe: There is minimal or no bony contract.
In cases of extensive bone loss, a vascularized fibular graft may be used to bridge the gap from the distal femur to the proximal tibia. In situations of marked bone loss (≥10 cm) from the femur, a free fibular graft is often needed. This fibular graft is used as an onlay graft and is fixed via plate and screws.10,11,18
Knee arthrodesis in the setting of infection can be performed either as a single-stage or a two-stage process. Single-stage fusion consists of adequate débridement of infected tissue and insertion of a fixation device.
In cases of failed infected TKA, a two-stage knee fusion is preferred. A thorough surgical débridement with removal of components and insertion of an antibiotic-impregnated cement spacer should comprise the first stage. This is followed by a course of antibiotics for multiple weeks. When eradication of infection is confirmed, progression to the second stage commences and consists of performing the knee arthrodesis with the chosen fixation in mind.
For patients undergoing two-stage procedures (infection eradication and spacer plus clean fusion with intramedullary rod or plates), bone grafting is performed at the time of fusion.
In patients who have external fixation and in whom fusion is initiated at the time of the infection eradication surgery, bone grafting is performed at a second surgical setting.
Regardless of the method used, fusion after infection typically requires two or more surgical procedures.
Hardware Considerations
Long Knee Arthrodesis Rods
 Intramedullary rods allow for early mobilization, rigid fixation, and shorter times to fusion and can be either short or long nails. The long intramedullary rod is an excellent method of fixation for knee arthrodesis. It is well tolerated by patients and provides good neutralization of the forces generated by the muscles around the knee.
 Common complications are the risk of infection and, specific to intramedullary nails, the risk of nail migration.
 There are three companies that offer long knee fusion rods: Biomet Trauma (Warsaw, IN), Smith & Nephew (Memphis, TN), and Stryker Orthopaedics (Mahwah, NJ).
 The Stryker intramedullary rod offers 5 degrees of valgus to counteract the mild varus mechanical axis of the limb with insertion of the straight rod. It also has the ability to compress the fusion site after rod insertion and locking.
Compression is performed by a proximal compression bolt end cap inserted in the proximal rod. The compression bolt end cap sinks into the rod and engages the proximal interlocking screw in the dynamic slot, which allows for an additional 1 cm of compression at the fusion site.
Short Intramedullary Fusion Rods
 Short intramedullary devices function as a modular system that form a stable couple at the arthrodesis site.
 This system avoids a surgical approach at the piriformis fossa of the hip. Additionally, the surgical site at the knee offers an advantage of débridement followed by insertion of the nail and bone grafting, employing the same surgical incision.
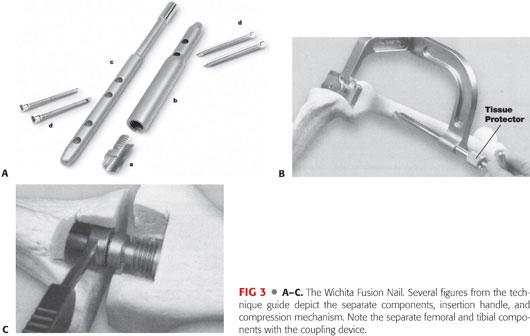
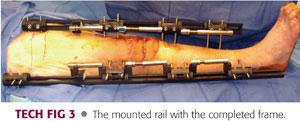
 The Wichita Fusion Nail (Stryker) device (FIG 3) has two separate segments of different diameters for the femur and tibia to allow for a more accurate intramedullary canal fit. Each segment is fixed with interlocking screws, and a coupling device is used to engage and compress the bone ends.
 The device works quite well for a primary knee arthrodesis that has good metaphyseal bone.2
However, with poor metaphyseal bone and tight-fitting rods in the femoral and tibial canal, this system does not provide enough stability to neutralize the long lever arms across the knee.
 Preoperative planning is essential to ensure that the tibial and femoral rods will achieve good fit in the bone. The femoral rod is 14 cm long and the tibial rod is 16 cm long.
External Fixation
 In the setting of a failed infected TKA, external fixation offers a viable option for knee arthrodesis.
 Many systems are available for external fixation: monoplanar, biplanar, and circular frames.
 Monoplanar fixators consist of two femoral and two tibial pins. They allow for good bony contact between the femoral and tibial segments but offer minimal stability.
 Circular frames modify alignment of the arthrodesis and provide mechanical stimulus for bone formation while also providing rigid fixation. However, they require considerable surgical skills while applying this fixation device and the bulkiness of the frame can become cumbersome for daily activities.
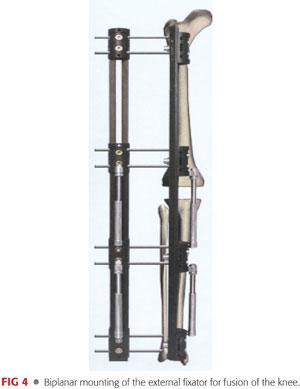
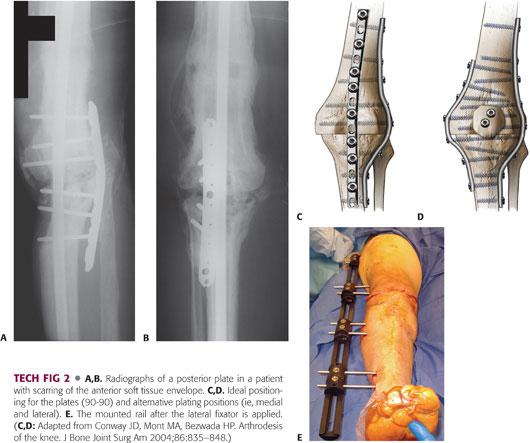
 The biplanar Orthofix LRS external fixator (Verona, Italy; FIG 4) system has two long, smooth rails (65 and 80 cm) that are mounted anteriorly and laterally from the hip to the ankle to adequately neutralize the long lever arms across the knee.
 The advantages of external fixation are that at the completion of the fusion, no hardware remains as a nidus for recurrent infection and the external fixator can be applied at the same surgical setting as the removal of infected TKA components or débridement of osteomyelitis. This allows for immediate initiation of bone contact and knee fusion.
 It is not recommended to perform bone grafting at this time but to wait until the soft tissue envelope is stable and there is minimal concern for infection at the knee fusion site. This is often done 6 to 8 weeks after the application of external fixation.
 With a circular or biplanar system, external fixation can be set up so that as the fusion occurs, the resultant limb length discrepancy can be diminished by performing an osteotomy of the proximal femur or distal tibia at the same surgical setting.
 Circular fixation, with the rings sitting at the medial aspect of the thigh, can be cumbersome for large or elderly patients; therefore, the biplanar Orthofix external fixator can be a good choice.
 Any monolateral system can be set up in a biplanar fashion. The system used must span the length of the femur and tibia to achieve rigid fixation.
Plates
 Plates are not commonly chosen implants for knee fusion because of their bulkiness and the lack of soft tissue envelope in the anterior aspect of the knee. However, plates might be preferred for patients with a total hip arthroplasty above the desired fusion site.
 The ideal construct for plates should be 90-90 in which an anterior plate is used to counteract the flexion–extension forces and a medial or lateral plate is used to counteract the varus–valgus forces.
 The plates should initially be used in compression mode and the remaining screw holes should be inserted in a locking manner into a locked plate.
 Many plating systems with locking capability are commercially available (eg, Synthes, Smith & Nephew).
Arthrodesis Prostheses
 Prostheses consisting of cemented tapered femoral and tibial stems that couple with a cam and post mechanism that lock at the joint line preclude the need for bony contact at the distal femoral/proximal tibial joint. The Stanmore Knee Arthrodesis Prosthesis (Middlesex, United Kingdom) is a commercially available implant.1
 It is helpful for cases with massive bone loss due to a failed tumor endoprosthesis or after multiple failed revision TKA, where conventional arthrodesis techniques are not able to establish adequate bone contact for a successful fusion.
 It serves as an alternative to vascularized fibular grafts, allografts, and bone transport techniques.
 This prosthesis incorporates a 6-degree valgus angle, has customizable augments, and allows recreation of the desired limb alignment and length.
Positioning
 A bump is placed under the buttock to allow for visualization of the femoral neck and head on the lateral radiograph.
 The entire limb, including the foot, needs to be visualized to ensure proper rotation of the limb and assess pulse during surgery (FIG 5).

Approach
 The most common approach to knee fusion is anterior.
It should be noted that a longitudinal incision can become difficult to close once the bone ends are shortened.
 If knee fusion is performed as a solution for infection, the fusion can often be performed within the same surgical setting as the débridement.
 The preferred technique is to use a separate area for the débridement.
When débridement is completed, this “dirty” area is moved away, the limb is reprepared, and clean drapes and new gowns are used.
 A high-speed burr with continuous cooling irrigation is used for débridement of clean, healthy, bleeding bone and to obtain good bone surfaces for maximum bone contact during compression.
 A VersaJet hydroscalpel (Smith & Nephew, London, United Kingdom) can be used to achieve thorough débridement of the soft tissue, especially the posterior capsule.
 The back of the capsule is freed from the posterior aspect of the bone to allow good bone contact without compromising vasculature behind the capsule. This is usually done very carefully with a Cobb elevator.
 Once the bone ends are prepared, any of the methods described in the following discussion can be used to stabilize the fusion.
TECHNIQUES
 Long Intramedullary Rod Insertion
Incision and Exposure
This technique begins with an incision at the knee, centered between the tibia and femur as determined using fluoroscopy.
All soft tissue tethering the bone ends’ ability to compress must be released without compromising the blood supply to the fusion site.
As mentioned earlier, this includes freeing the capsule from the posterior aspects of the femur and tibia in a very careful fashion with an elevator to allow direct contact of the bone ends.
Bone is resected, particularly necrotic bone, in a careful manner to minimize resultant shortening of the limb and to achieve the maximum bone contact possible.
Reaming the Tibia and Femur
Once the bone ends are prepared, the tibia is reamed first.
The femur must be reamed to the same diameter as that of the tibia so that maximum stability of the fusion can be achieved with the nail.
Overreaming the femur will prevent the best tight fit of the nail into the femoral canal.
Previous generation knee fusion rods had different diameters for the femur and tibia but are no longer commercially available. If this type of rod were available, the femur would be reamed to 1 mm more than the available diameter for the femur (TECH FIG 1).

The tibia and femur are reamed separately over a guide rod.
The tibia is reamed in an antegrade fashion, whereas the femur is reamed in a retrograde fashion.
The guide rod is tapped out of the proximal femur through the piriformis fossa, which facilitates visualization of the nail insertion site at the proximal femur.
However, care must be taken to ensure that the starting point is not too medial. If this seems to be the case, the proximal starting point is found with a Steinmann pin proximally to ensure that femoral neck fracture will not occur from too medial a starting point.
The guide rod that was inserted in a retrograde fashion through the piriformis fossa is pushed out through the skin through a small incision.
The proximal 8 cm of the antegrade knee arthrodesis nail is usually 13 to 14 mm in diameter. The proximal portion of the femur is reamed in an antegrade fashion to preserve the tight fit of the nail in the remainder of the femoral canal.
Inserting the Rod
Rod insertion is the most important part of the case.
It is important to ensure that the bone ends are lined up and there is compression at the fusion site with insertion. It is critical that the bone ends are lined up evenly with the guide rod inserted the entire distance from the femur to the ankle because the rod can still deviate in the soft bone with insertion and violate the cortical wall. Holding the bone ends compressed will also ensure maximum contact at the fusion site after the nail is completely inserted.
Following proper rotational alignment of the limb at this stage is critical. The initial position of the limb when prepared is on a bump to internally rotate the limb. When inserting the rod, the limb is adducted. Because of the internal rotation from the bump, the final position for the foot once the limb is adducted is perpendicular to the floor. This ensures that there is external rotation of the limb once the bump is removed (TECH FIG 1B).
The rotation is fixed once the nail has engaged the tibia and should not be manually rotated. Due to the tight fit of the nail in the tibial canal and the anterior bow of 5 to 7 degrees, rotating the tibia once the rod is fully engaged in the tibia can lead to tibial fracture.
Once the rod is inserted and locked proximally with a guide arm, additional compression can be achieved at the knee fusion site by holding the foot and driving the rod in further.
The limb is taken out of adduction and locked distally with the use of a fluoroscopy-guided freehand technique.
It is important to make sure that adequate compression is maintained until the locking screws are inserted.
Some knee arthrodesis rods have a compression screw that can be inserted proximally and allow up to 1 cm of additional compression after the distal interlocking screws are inserted.
Wound Closure
After nail insertion, the incisions are closed with absorbable monofilament sutures.
If minor gapping is present at the fusion site, bone graft, bone morphogenic protein, or both can be added to the fusion site before closure.
 Short Intramedullary Rod Insertion
The surgical approach can be a standard medial parapatellar approach.
Once the bone ends are exposed, an intramedullary guide is used to align the distal femoral and proximal tibial cuts in about 5 degrees of flexion and neutral varus–valgus alignment.
A trial reduction of the bone ends is performed after the bone cuts to check the bone position and alignment.
Another factor to keep in mind is the resultant limb shortening. The mean knee arthrodesis is 4 cm shorter. Too aggressive a resection will result in more shortening and the patient will need to wear a larger shoe lift.
An additional way to ensure some flexion in the system is to ream the femur from distal posterior to proximal anterior. Because the tibial canal is smaller, it is more difficult to ream the tibia in a fashion similar to the femur.
Once the femur is reamed, the femoral rod is inserted and locked with the targeting arm, with the placement of two screws in a lateral to medial fashion.
A slot is then cut into the tibia to allow for a coupling mechanism between the two rods and the tibial guide arm for the interlocking screws.
The bone plug may be saved for grafting at the end of the case.
There are two options for the tibial screws. It is preferred to use screws that will capture the best bone.
The tibia is inserted and locked in a medial to lateral fashion.
When inserting the screws, placing a bump underneath the knee will ensure that the femur and tibia are locked with the rods in some flexion, ideally 5 degrees.
Once the rods are placed and locked, an additional femoral slot can be removed to allow further visualization of the coupling mechanism. This bone plug can also be saved for grafting at the end of the case.
It is important to make sure that the rotational alignment is in neutral to 5 degrees external before completely engaging the tibial rod in the femoral rod and screwing down the compression mechanism. Tighten the screw to get good compression at the bone ends. However, overtightening may fracture the bone.
Once the fusion site is compressed, the bone plugs are replaced as bone graft and the incision is closed.
Full weight bearing is allowed after this procedure if the surgeon is satisfied with the amount of bone contact at the fusion site.
 External Fixation
Application of the Lateral Rail
The first step after adequate exposure of the bone ends and débridement of any residual infection is the application of the lateral rail.
The lateral rail is set up with four clamps: two for the tibia and two for the femur.
The most proximal clamp is placed at the level of the lesser trochanter, perpendicular to the femoral shaft on the AP view, and in the midshaft of the femur.
When placing the proximal femoral pins, ensure that they are not positioned too anteriorly in the femoral shaft. This is a major stress riser and can cause a femoral fracture.
Once one proximal pin is inserted, the most distal tibial pin is inserted perpendicular to the shaft of the tibia in the AP view. Rotation of the limb is set with this pin insertion.
After the pin insertions, the middle clamps are positioned (TECH FIG 2A–D).
Positioning of the clamps is variable and based on the bone quality at the proximal tibia and distal femur. Better fixation is usually achieved with a greater span of the clamps.
A lateral view radiograph is obtained to check the middle clamps.
The clamps are often too posterior to hit the bone and need to be moved proximally or distally accordingly.
The clamps can also be adjusted by adding a half or full “sandwich” to the clamps to raise the pin insertion site more anteriorly. It is preferable to use the sandwiches to raise the pin insertion sites as opposed to moving the clamps further away from the knee joint.
It is at this stage that flexion of the knee can begin. More flexion will necessitate raising the middle lateral two clamps more anteriorly to hit the bone.
Positioning at 5 degrees of flexion minimizes any additional limb shortening from excessive flexion. In this position, the two middle clamps need one full sandwich to hit the bone.
After the insertion of one pin in each clamp, the remaining pins are inserted for a total of eight half-pins (two pins per clamp).
The preferred half-pins are hydroxyapatite-coated and inserted so that the thread distance is the same as the diameter of the bone.
If the threads remain outside the bone, the pin is weaker than if the threads were buried to the shank.
Alignment and Mechanical Axis
Once all the pins are inserted, the mechanical axis of the limb is checked. The limb is first placed in the “patella forward” position. Under fluoroscopic guidance, a straight line from the center of the femoral head to the center of the ankle indicates mechanical alignment. After confirming these points, fluoroscopy is used to check where this line or mechanical axis lies at the knee. It should be at the center of the knee or slightly medial. If not, the tibial pins can be moved in the clamps more medial or more lateral until the mechanical axis is acceptable.
Once this has been performed, the pins are secured in the clamps and the tibial clamps are linked with a compression–distraction device. The proximal femoral clamps are secured to the rails.
A second compression–distraction device is placed between the tibial and femoral clamps and compressed.
The knee fusion site is visualized during the compression to ensure good bone contact and make sure that there is no soft tissue interposition at the bone ends.
Wound Closure
Once the bone ends are opposed and compressed, the anterior knee wound is closed, usually over a drain.
Once the lateral rail is applied and the wound is closed, an anterior fixator is applied. The long rail is placed anteriorly with four clamps set up in the same fashion as the lateral rail. The clamps are placed so as not to hit the other pins upon insertion of the anterior pins (TECH FIG 2E).
Additional compression can be obtained at the knee fusion site in the office by using the compression–distraction device between the femoral and tibial clamps.
 Plating
Plate Size
The number of holes in the plates chosen depends on the bone available for fusion in the tibia and femur.
If a total hip arthroplasty was performed, stopping the plate immediately distal to this can be a stress riser. In such cases, sliding the plate a few holes past the total hip arthroplasty stem and using unicortical screws in the region is helpful.
The ideal number of holes is 11:5 for femoral fixation, 4 for tibial fixation, and 2 left empty at the fusion site.
Exposure
The surgical technique begins with the same exposure as previously mentioned.
The plates can be inserted percutaneously in both the anterior and mediolateral plane.
Fluoroscopy is used to ensure that the plates are securely fastened to the bone.
The important step is preparation of the bone ends and good bone contact.
When using plates, the area must first be sterilized with the two-stage approach of using an antibiotic-coated cement spacer followed by 6 weeks of antibiotics.
Once this stage is completed, the plates are inserted as a “clean procedure.” This allows autogenous bone graft to be inserted at the fusion site with bone morphogenic protein.
After preparation of the bone, the alignment is assessed.
Anterior Plate
When good bone contact and good alignment are achieved, the plates are applied.
The first step is ensuring that the proximal and distal ends will be well approximated to the bone. This is done with a provisional fixation pin at both ends.
Great care must be taken to ensure that the rotational, sagittal, and coronal alignments are maintained while the plate is applied.
A four-pin temporary lateral fixator can be helpful to achieve alignment and to hold the alignment while the anterior plate is applied.
Once the alignment is good and the plate is applied with the provisional pins, the next pins to be inserted are close to the fusion site—one on the femoral side and one on the tibial side—placed in compression mode.
This compresses the fusion site and pulls the plate down to the bone.
Once the two screws are inserted, the remaining screws can be placed in a locked mode.
This allows for maximum rigidity of the construct so that some weight bearing can be initiated immediately postoperatively.
Medial or Lateral Plate
After anterior plate insertion, the medial or lateral plate can be applied. This is the easier of the two plates to be inserted because the alignment is rigid.
Medial or lateral is best determined by the amount of soft tissue coverage, with the plate applied where there is the chance for the best soft tissue envelope.
Occasionally, a posterior plate can be applied on the lateral side of the knee when the anterior soft tissue is too deficient to cover the plate (TECH FIG 3).
This requires repositioning the patient in a prone position to apply the plate.
 Strategy for Substantial Bone Loss: Transport over a Nail
For bone loss of more than 5 cm and noncompressible soft tissue defects at the knee secondary to extensive scarring, bone transport is the best option to fill the defect.
The technique begins with determining the extent of the gap. If the gap at the knee will be more than 10 cm, a double-level transport can be performed.
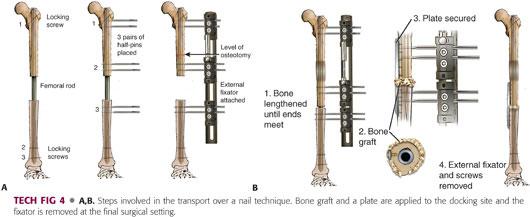
The first step for transport over a nail is to insert the long intramedullary rod as described earlier.
When inserting the rod, make sure that the limb does not inadvertently lose any length. This can best be accomplished by preoperatively determining the rod length to be used with an erect lower limb radiograph. The length of the normal side can be used as a reference as long as significant shortening of the affected limb is not also present. The affected limb cannot be acutely lengthened because the soft tissues near the knee are not compliant.
Ideally, the affected limb should be 1 cm short to allow clearance of the foot when ambulating. The mean knee fusion shortening is 4 cm and is tolerable. Any limb shortening more than this can be addressed with the lengthening over a nail technique at the completion of the transport.
The rod diameter chosen for the transport is 10 mm. This allows the transport segment to slide over the rod when the canal is reamed to 12 mm.
Determine the segment to be transported.
When determining which segment to be transported, the femur is preferred because of the need to perform only one osteotomy and because of the detrimental effects that proximal tibial transport can have on the ankle (equinus).
If proximal tibial transport is necessary because of the large segmental defect, the fibula should also be osteotomized at the midshaft and a distal syndesmotic screw should be placed to prevent any proximal fibular migration.
Mark out the osteotomy site of the transported segment.
Once the guide rod is inserted into the femur and tibia, the rod is backed out past the level of the osteotomy, which is predrilled with multiple holes before reaming. This allows the reamings to exit out the osteotomy site and for bone graft of the regenerate site.
The first step is reaming the intramedullary canal of the tibia and femur to 12 mm.
This can be done through the knee, reaming the tibia and femur separately, or from the hip using long, 80-cm reamers.
Once the rod is inserted and locked at the desired length, the monolateral external fixator is applied.
Applying the monolateral frame to move the transported segment over the nail requires inserting the pins so that there is no contact between the rod and the pins. With this technique, because the rod and pins are so close, there is a 5% chance for infection of the rod.13
The cannulated wire technique starts with a 1.8-mm wire inserted perpendicular to the rod on the AP view fluoroscopic projection but away from the rod by a few millimeters on the lateral view projection.
The most common location in the femur for these pins is proximally and posteriorly at the level of the lesser trochanter (TECH FIG 4).
Once the wire is inserted, it is visualized using fluoroscopy. This is to confirm that when the pin is drilled and placed, it will not be touching the rod.
Fluoroscopy must be used frequently to confirm that the pins are placed away from the rod.
Once the wire is in a satisfactory position on the AP and lateral view projections, a 4.8-mm cannulated drill bit is used to drill the near cortex. This drill bit and the wire are removed and a solid 4.8-mm drill bit is used to complete the tract for the pin.
Drilling with the cannulated drill bit and the solid drill bit is important because the cannulated drill bit is not end-cutting and sharp enough to go through the cortical bone of the far cortex. Often, these pins are placed entirely in the cortical bone.
When using the drill, it is imperative that the drill bit not heat up and cause osteonecrosis of the bone. If this happens, the pin will become infected and a ring sequestrum will develop. Also, an infected pin places the intramedullary rod at risk for contamination.
To prevent this, the drill bit is removed at regular intervals while the drill is cooled and cleaned with a wet, cool laparotomy sponge.
Once the bone is drilled, a 6-mm hydroxyapatite-coated pin is inserted.
After insertion of the pins with use of the clamp as a guide, the frame is removed and the bone is cut with an osteotome.
A small incision is used laterally at the level of the femur. Often, the bone cannot be completely cut through one incision around the rod. A second incision is placed anteriorly to complete the osteotomy along the medial femur.
If the tibia is chosen, the incisions are placed anteriorly and medially to obtain access to the lateral cortex and posteromedial cortex, respectively.
Once the bone is cut, the pins are used to carefully rotate the bone and determine that the osteotomy is complete.
When the osteotomy is complete, the fixator is reapplied and the osteotomy site distracted to ensure that the bone ends will separate. This is confirmed by using fluoroscopy, and the osteotomy site is reapproximated.
Postoperatively, the pins are cleaned daily with saline and redressed with a Kerlix dressing wrapped tightly around each set of pins.
The dressing prevents skin pistoning around the pins and limits soft tissue trauma, which leads to pin tract infections.
Postoperatively, minimal weight bearing for balance only is permitted.
Full weight bearing is permitted once two cortices are present at the regenerate site on the radiographs and the consolidation phase of bone healing has begun.
Distraction is begun at postoperative day 5 and is continued until the gap is closed at the knee region.
When the gap has closed, the patient is brought back to the operating room for insertion of bone graft at the docking site and percutaneous locked plating at the docking site. The locked plating is essential to prevent the transported bone end from migrating.
Custom rods with predrilled holes to lock the transported segment weaken the rod and are not recommended.
Once the bone graft and locked plate are inserted, the external fixator is removed.
If the limb is still markedly short after the docking of the transported segment, the distal interlocking screws are removed from the rod and the external fixator is left in place to continue lengthening.
Once the desired length is achieved, the patient is returned to the operating room for insertion of the locking screws and removal of the external fixator.
The patient is allowed full weight bearing once two to four cortices are present on the radiographs.
PEARLS AND PITFALLS | |
Poor bone approximation on one side of the fusion or anteriorly |
|
Difficulty holding the position of the knee fusion with rod insertion |
|
Femoral neck fracture |
|


POSTOPERATIVE CARE
 Regardless of the surgical technique, the patient is encouraged to undergo physical therapy for muscle strengthening of the hip postoperatively.
 For patients with external fixators, pin tract infections that may occur are initially treated with orally administered antibiotics.
All patients are given a prescription for an antibiotic, most commonly cephalexin, to be taken orally before discharge and are instructed to start the antibiotic at the first sign of redness, increased tenderness at the pin site, or drainage.
 Follow-up office visits are every 2 weeks for patients who undergo bone transport or lengthening. Once the consolidation phase starts, only monthly follow-up visits are required.
 For patients with external fixation, once the bone has consolidated, the frame is then dynamized in the office 1 month before removal.
Dynamization of the frame is usually performed by taking the tension off the compression–distraction devices. This allows the bone to accommodate more loads and become stronger before the frame is completely removed.
 For patients with external fixation, if bone graft was not performed at the time of fusion, a second-stage bone grafting procedure can be performed once there is no longer any evidence of infection, approximately 6 to 8 weeks after the index procedure.
 Most patients will need shoe lifts added to the outside of their shoe during the postoperative period.
OUTCOMES
 Harris et al6 compared the function of knee arthrodesis after tumors with that of constrained TKA and found that knee arthrodesis patients had better stability and performed more physically demanding activities.
 Rud and Jensen16 examined 23 knee arthrodesis patients and found that 18 had returned to normal physical activities and returned to work.
 Most patients should expect to have difficulty with stairs, rugs, and ladders17; patients who performed strenuous work before the arthrodesis rarely resume that strenuous work postoperatively.
 Rand et al15 reported that seven patients with knee arthrodesis could walk one to three blocks and nine successful knee arthrodesis patients were able to walk more than six blocks.
 Compared with AKA, knee fusion offers a stable, painless, and uninfected limb for weight bearing. Most knee arthrodesis patients are able to ambulate normally, whereas according to Pring et al,14 of 23 patients who underwent an AKA for infected TKA, only 7 were able to ambulate.
 The best way to achieve optimal patient satisfaction for those with difficult problems is to be thorough during preoperative discussions regarding what knee arthrodesis can achieve for them.
Realistic patient expectations are critical in achieving successful outcomes.
Although revision TKA might be the more attractive alternative, many patients are not proper candidates secondary to poor soft tissue envelope, bone loss, or recurrent infections.
Hanssen et al5 documented that 50% of patients with infected revision TKA eventually went on to undergo knee arthrodesis.
 Conversion from arthrodesis to a TKA is fraught with complications such as infection, ligamentous instability, and the need for refusion.7,9,11
COMPLICATIONS
 The complications associated with knee arthrodesis are related to the increased stress placed on the hip, back, and ankle. Concomitant osteoarthritis of these joints can often occur.
Takedown of the knee fusion in these circumstances is not recommended secondary to the extensive complications reported in the literature.8
 Other complications that occur include recurrent infection and nonunion.
These complications can be extremely difficult to treat, considering the many medical comorbidities in the older population.
REFERENCES
1. Bartlett W, Vijayan S, Pollock R, et al. The Stanmore knee arthrodesis prosthesis. J Arthroplasty 2011;26:903–908.
2. Christie MJ, DeBoer DK, McQueen DA, et al. Salvage procedures for failed total knee arthroplasty. J Bone Joint Surg Am 2003:85(suppl 1):S58–S62.
3. Conway JD, Mont MA, Bezwada HP. Arthrodesis of the knee. J Bone Joint Surg Am 2004;86:835–848.
4. Enneking WF, Shirley PD. Resection-arthrodesis for malignant and potentially malignant lesions about the knee using an intramedullary rod and local bone grafts. J Bone Joint Surg Am 1977;59:223–236.
5. Hanssen AD, Trousdale RT, Osmon DR. Patient outcome with reinfection following reimplantation for the infected total knee arthroplasty. Clin Orthop Relat Res 1995;321:55–67.
6. Harris IE, Leff AR, Gitelis S, et al. Function after amputation, arthrodesis or arthroplasty for tumors about the knee. J Bone Joint Surg Am 1990;72:1477–1485.
7. Henkel TR, Boldt JG, Drobny TK, et al. The knee arthroplasty after formal knee fusion using unconstrained and semi-constrained components: a report of seven cases. J Arthroplasty 2001;16: 768–776.
8. Kim YH, Kim JS, Cho SH. Total knee arthroplasty after spontaneous osseous ankylosis and takedown of formal knee fusion. J Arthroplasty 2000;15:453–460.
9. Kim YH, Oh SH, Kim JS. Conversion of used knee with use of a posterior stabilized total knee prosthesis. J Bone Joint Surg Am 2003;85:1047–1050.
10. Klinger HM, Spahn G, Schultz W, et al. Arthrodesis of the knee after failed infected total knee arthroplasty. Knee Surg Sports Traumatol Arthrosc 2006;14:447–453.
11. MacDonald JH, Agarwal S, Lorei MP, et al. Knee arthrodesis. J Am Acad Orthop Surg 2006;14:154–163.
12. Oostenbroek HJ, van Roermund PM. Arthrodesis of the knee after an infected total knee arthroplasty using the Ilizarov method. J Bone Joint Surg Br 2001;83:50–54.
13. Paley D, Herzenberg JE, Paremain G, et al. Femoral lengthening over an intramedullary nail. A matched-case comparison with Ilizarov femoral lengthening. J Bone Joint Surg Am 1997;79(10):1464–1480.
14. Pring DJ, Marks L, Angel JC. Mobility after amputation for failed knee replacement. J Bone Joint Surg Br 1988;70:770–771.
15. Rand JA, Bryan RS, Chao EY. Failed total knee arthroplasty treated by arthrodesis of the knee using the Ace-Fischer apparatus. J Bone Joint Surg Am 1987;69:39–45.
16. Rud B, Jensen UH. Function after arthrodesis of the knee. Acta Orthop Scand 1985;56:337–339.
17. Siller TN, Hadjipavlou A. Knee arthrodesis: long-term results. Can J Surg 1976;19:217–219.
18. Somayaji HS, Tsaggerides P, Ware HE, et al. Knee arthrodesis—a review. Knee 2008;15:247–254.
< div class='tao-gold-member'>


