(1)
Plastic Aesthetic and Laser Surgery, Hygeia hospital, Athens, Greece
Keywords
Where, when, why, laserWhenWhy laserEyelid preoperative markingEyelid AnesthesiaEyelid Skin excisionTransconjunctival incisionOrbicularis Occuli Muscle excisionInferior oblique muscleEyelid Fat compartmentsWound closure4.1 Where, When, and Why Laser
In the previous chapter, I have described enough evidence regarding the use, controversies, indications, contraindications, advantages, and disadvantages of the laser technology in blepharoplasty.
I summarize my personal views in the following lists to make the understanding of my perspective for this procedure easier. The aim is to show the unparalleled effect of the laser technology in specific steps of the operation compared to the conventional technique, and also to justify the unique efficiency of the technology which cannot be achieved with other conventional instrumentation or technology in terms of controlled thermal effect, low complication rates, patients’ and surgeon’s satisfaction.
4.1.1 Where Laser
In upper blepharoplasty
In the OOM contraction for improved upper eyelid crease postop
Bloodless dissection of tissues specially in fat excision
In lower blepharoplasty
Bloodless, precise, and safe transconjunctival incision
Bloodless dissection and fat excision
Contraction of posterior wall of OOM for overlying eyelid skin texture enhancement
4.1.2 When Laser
In upper and lower blepharoplasty
When the surgeon is experienced, familiar, and understands the laser tissue interactions for safe and efficient surgery
When the conventional procedure with scalpel is not the indication; multiple skin lesions, patients in anticoagulant therapies, or ablative properties are indicated (Fig. 3.8)
Because it is proved to be the most suitable technology when a transconjunctival approach is the indication
4.1.3 Why Laser
In upper and lower blepharoplasty
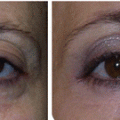
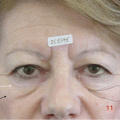
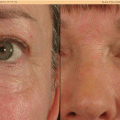
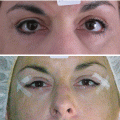
Because the bloodless surgical plane minimizes ecchymosis, edema, and reduces downtime to minimum (Fig. 4.1)
Because the contractive properties on selected tissues, with minimal heat conduction and tissue damage, offer excellent final outcome
Fig. 4.1
(L) Patient before surgery for upper and lower blepharoplasty. (R) Patient 5 days after surgery with a transconjunctival lower blepharoplasty approach. Skin laxity of upper and lower eyelids dramatically corrected. Fat protrusion of lower eyelids treated with minimal fat excision. OOM contracted in defocused laser beam in upper and lower eyelids. Observe the sutures of the upper eyelids still in place. Suture removal takes place in 5 days postop. As shown, patient admitted with no ecchymosis, obvious edema, or other postoperative signs on the fifth postop day
4.2 Conventional and Laser Blepharoplasty: Comparison of Techniques
In the previous modules, several referrals to the advantages and disadvantages of the conventional and the laser-assisted technique have been advocated. All these views and opinions are a conclusion of the experience and personal observations of the surgeons who had the opportunity to apply both techniques in patients.
There is no doubt that the laser-assisted technique offers plenty of advantages compared to the conventional one as previously stated.
A lot of controversies have been raised, however, to justify whether one or the other is better for the patient in terms of reduced downtime period.
Biesman and colleagues [1] have performed the only prospective, multicenter, double-blind study to evaluate this issue. Surgeons who were experienced in both laser-assisted and traditional techniques performed blepharoplasty procedures on patients using laser on one side and scalpel on the other. The side treated with laser was randomly selected and the patients were blinded to the surgeon’s choice. Patients were clinically examined 1, 2, and 4 weeks postoperatively. Assessment of results was performed by a questionnaire given to patients and by evaluation of photographs by an experienced, masked observer. Two weeks after surgery, there was no significant difference in the amount of swelling, discoloration, or wound appearance, according to this study. The surgeons, however, preferred performing surgery with the laser when possible due to the improved intraoperative hemostasis.
However, other authors [2] believe that laser-assisted transconjunctival lower blepharoplasty is full-value alternative to the conventional transcutaneous lower blepharoplasty, requires shorter operating time and causes less bleeding, less patient discomfort, and less postoperative downtime.
My point of view is that the introduction of technology in aesthetic surgery, on this occasion the CO2 laser, can produce results closely and strongly related to its lege artis implementation (i.e. laser parameters, duration of tissue exposure to heat, precise surgical manipulations, etc.) in combination with other small but efficient additions in surgical procedures (i.e. anesthetic solutions, respect of tissue during surgery, postoperative care, etc.) which in our hands have proved to be very beneficial to our patients, both regarding the final outcome and the postoperative downtime [3].
4.3 Step-by-Step Upper Blepharoplasty
4.3.1 Marking, Globe Protection, and Local Anesthesia
Marking is a very important part of the operation. I believe that this step of the procedure, provided it is performed meticulously and correctly, guarantees one half of the high-standard final outcome. It has always to be performed with a good and fluid-proof marker, as during surgery tissue fluids, local anesthesia, and surgeons’ manipulation can distort the marked lines. This, taking into account the intraoperative edema of the tissue, can result in nonprecise dissection and resection. Marking should be done with the patient in upright position.
In upper blepharoplasty, the key point line is the existing upper eyelid crease, which should not be violated and should be rejuvenated and defined postoperatively. This crease is located 8–9 mm above the ciliary line in women and 7–8 mm in men. The upper part of the incision should be located at a point of 10 mm below the inferior border of the eyebrow, always bearing in mind that in female patients, in most cases, eyebrow shapes vary for cosmetic reasons (epilation, hair removal, alteration of the eyebrow line, permanent tattoo, etc.). In these cases, the upper part of the incision should be located at a point, which will be selected after requesting the patient to open and close the eye and judging the correct location by evaluating the borders of the orbital rim and the existing skin laxity of the upper eyelid. The fullness of the upper eyelid, related to skin remainder tissue, should in general be achieved by preserving a vertical eyelid height of 19–20 mm postoperatively. The distance of the eyelid margin to the brow cilia defines the eyelid height.
The upper part of the incision line should extend from the medial to the lateral canthus. To avoid medial webbing, we draw a gentle upturn of the medial incision, and laterally we extend the line approximately 5 mm above the medial canthus, upturning again.
The connection of the upturning lines of the incision laterally and medially is very important. The lateral upturning line, if marked correctly, will induce an upward lift of the lateral canthal area, and the medial one will help in avoiding medial incision webbing of the epicanthal folds, which is very annoying for the patient (Fig. 4.2).
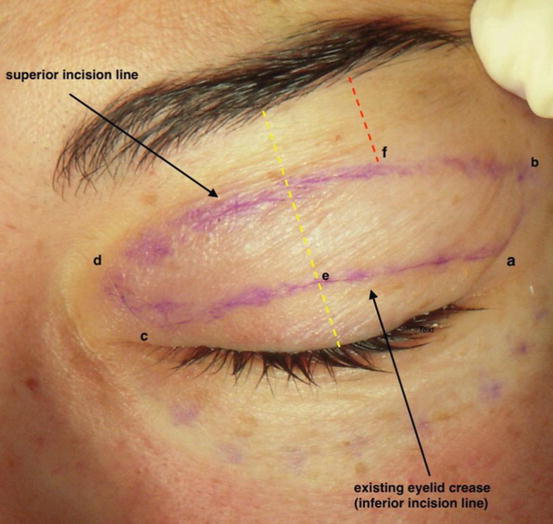
Fig. 4.2
The inferior (existing eyelid crease) and superior location of the upper eyelid incision is shown. The yellow line indicates the upper eyelid vertical height and the red the distance of the superior incision line to the eyebrow cilia at the level of the lateral limbus of the eyelid. This line may vary depending on the eyebrow shape and cilia border, but approximately should be 10 mm (point f). Points a, b, c, and d show the upturning lines’ location. Point a is the end point of the existing eyelid crease when the eyelid is open, located approximately 6 mm above the ciliary line. Point b is located approximately 6 mm above the lateral canthus. Point c is the medial end of the existing eyelid crease with the eyelid open. Point d should always be located in the eyelid-bearing skin and not in the adjacent nasal skin to avoid medial incision webbing of the epicanthal folds. Point e indicates the eyelid crease at the level of the midpupillary line
The three points to start with marking of the inferior incision line are a, c, e, and of the superior incision line, point f (Fig. 4.3).
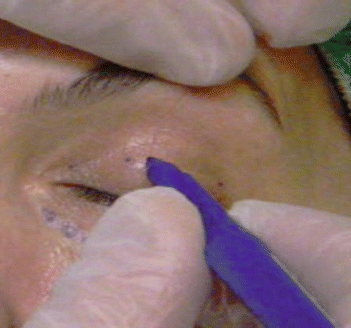
Fig. 4.3
Key points a, c, and e are marked, as described above, along the eyelid crease
The three points of the inferior line are then connected to form the eyelid crease corresponding to the inferior incision line. The superior marking is then completed by drawing a gentle line parallel to the inferior one and connecting points b and d (Fig. 4.4).
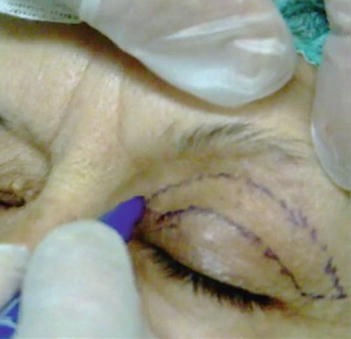
Fig. 4.4
Final appearance of upper eyelid marking. Notice the inferior and superior lines located in the existing crease and 10 mm below the eyebrow cilia, respectively. The upturn lines ab and cd, as described in Fig. 4.2, are also shown
Tip
When marking, attention should be focused on existing asymmetry between the eyelid folds of the two upper eyelids. In this case, marking should be performed in the manner that symmetry should be achieved postoperatively, by removing different amounts of skin and/or muscles from each eyelid.
The protection of the eye globe with eye shields is also a very important step of the operation. I adapted eye globe protection from the very beginning of my blepharoplasty procedures, when laser was not yet in practice, to secure the globe from accidental injury. In laser, blepharoplasty is a very essential step since laser beam can accidentally produce irreversible damage to the cornea. Eye shields are lubricated with eye ointment prior to insertion in the orbit (Fig. 4.5)
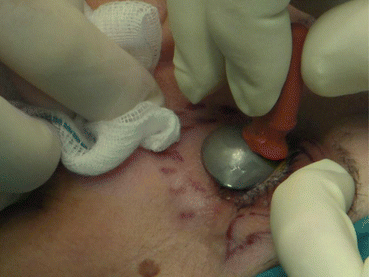
Fig. 4.5
Metallic eye shields for globe protection
Infiltration of the upper eyelid skin with anesthetic solution is then performed. Patient, prior to the local anesthetic infiltration, can be sedated by the anesthesiologist and administered perioperative antibiotic protection.
I use a solution of 15 cc of lidocaine 2%, 5 cc of Bupivacaine hydrochloride 0,25%, and 1 cc of epinephrine in 250 cc of normal saline.
Infiltration is performed in a subdermal plane, avoiding puncturing of the marginal vascular arcade (see Fig. 1.3) and deep tissues, to minimize risks of hematoma and bruising. Moreover, subdermal administration of the anesthetic solution contributes to easy and safe hydrodissection. Anesthetic solution must stay for 7–10 min before incision to achieve maximum vasoconstriction. I am using the single-puncture technique for infiltration to minimize damage of the marginal vascular arcade and risks of bruising and hematoma (Fig. 4.6).
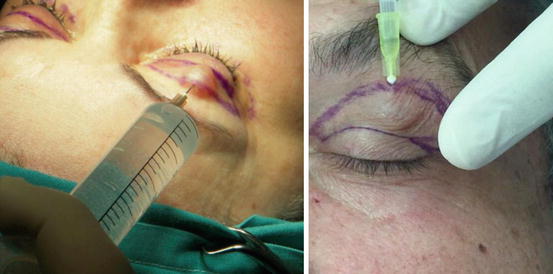
Fig. 4.6
(L) Infiltration with the single-puncture technique, avoiding marginal vascular arcade puncture. (R) Solution bulge is gently squeezed with finger during injection, to equally disperse in the tissue. Infiltration plane is under the skin and over the orbicularis oculi muscle
4.3.2 Incision and Dissection
Following infiltration and leaving adequate time for vasoconstriction, skin-only incision is performed with cold steel along the premarked lines.
The skin flap is then dissected and excised with scissors starting from the lateral canthal area and moving toward the medial canthus. The initial dissection at point b (as shown in Fig. 4.2) can be performed with cold steel for easier detachment. Scissors can be used following elevation of this part of the skin flap (Figs. 4.7 and 4.8)
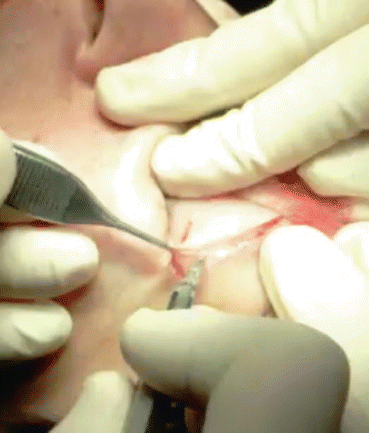
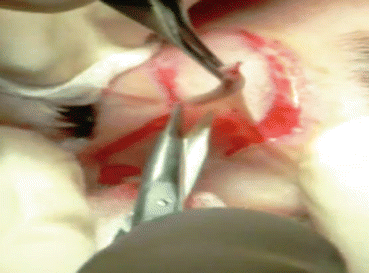
Fig. 4.7
Skin flap elevation starts using cold steel at the area of the lateral canthus for easier detachment
Fig. 4.8
Scissors are used for the dissection and excision of the skin flap
At the point of skin detachment in the lateral canthal area, attention should be focused to avoid bleeding from the branches of the lateral palpebral artery and the marginal arcade. Usually, a gentle blunt cauterization of the area located at the angle created by the inferior incision line and the lateral upturning line will secure hemostasis at this point.
4.3.3 The Fat Compartments and Orbicularis Oculi Muscle Surgical Management
When the skin flap is excised, the underlying orbicularis muscle is exposed along the surgical plane.
If fat from the compartments of the upper eyelids is to be removed, applying mild pressure on the globe, we visualize the location of the fat compartments, and we proceed to a gentle, accurate, and bloodless incision with the laser. This incision, which includes orbicularis muscle and septum en block should be done at the upper part of the skin incision to avoid injury of the levator aponeurosis, which is present posterior to the orbicularis muscle along the lower incision in the eyelid crease.
Attention should be paid to avoid over-resection of fat pads, which will, by time, create hollow eyes and unnatural look. Laser creates high temperature at the site of the incision; so, there is no need of clumping the fat to be removed as in the conventional fat removal. However, I advise that vessels present at the incision site are better to be cauterized with diathermy, as after a certain dimension of diameter, laser heat conduction will not be enough to coagulate, and bleeding can occur. Usually, vessels of more than 1 mm of diameter are advisable to be cauterized to avoid risk of bleeding.
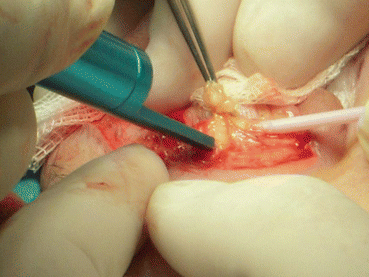
The central upper eyelid fat pad, termed also as preaponeurotic, is yellow in color (Fig. 4.9) due to decreased content of fibrotic tissue compared to the medial fat pad which is white in color due to increased amount of fibrotic tissue. The central fat pad is less vascularized compared to the medial one and serves as a landmark of the underlying levator muscle and levator aponeurosis. It is surrounded by a connective tissue capsule, which easily breaks with blunt dissection using the laser handpiece tip.