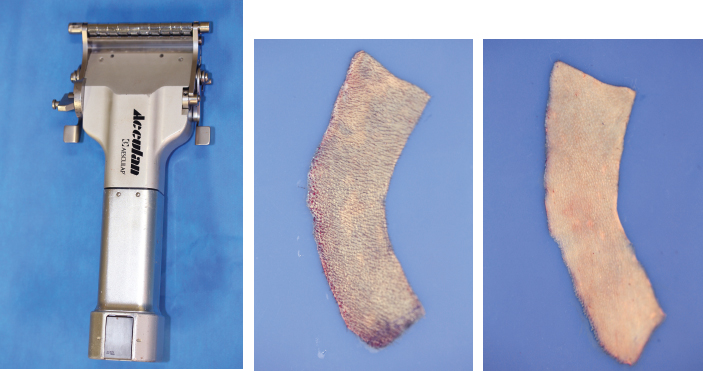
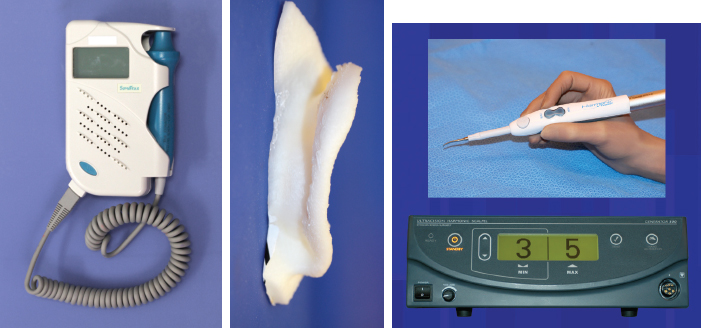
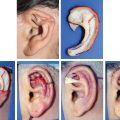
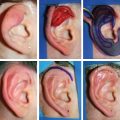
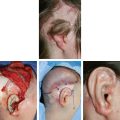
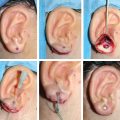
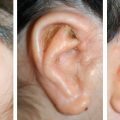
CHAPTER 3 After the first stage, all the contours of the normal ear have been reproduced, and the ear seems reconstructed on the profile view but lacks projection on the frontal view. Elevating the reconstructed ear might seem like a simple stage, but precise indications are needed to obtain a good result. Reconstruction of the retroauricular sulcus should accomplish two objectives: 1. To provide projection of the reconstructed ear that is symmetrical with the normal ear 2. To create a retroauricular sulcus with normal depth Fig. 3-1 The successful outcome of these two objectives is well demonstrated in this young girl who underwent reconstruction at 10 years of age and is shown at 14 years of age. A, Preoperative appearance. B, After the first stage. C-F, Final result. She wears her hair short and is clearly comfortable with her ears. • It is available in a large quantity. • It is an ideal color match. • The donor site heals in 7 days. • No scars are visible at the donor site. • It can be harvested again if necessary. The sulcus created with a split skin graft and retroauricular flap advancement is common to all methods of second-stage reconstruction we employ. A disadvantage of using a split skin graft is the potential for skin graft retraction and loss of depth of the sulcus. We have found this to be very variable from one patient to another. Fig. 3-2 We use clippers to shave the hair to a fine depth. Next, a portable dermatome is used to harvest the skin (0.4 mm thickness). We always preserve the hair follicles so the hair will regrow without problems and the donor site is not visible. Pearl The fine amounts of remaining hair attached to the graft are removed easily using a dry sponge in a light rotating movement on the outer surface of the skin. Wiping from the dermal side damages the dermis and removes hairs less effectively. The graft is accurately measured to be sufficiently long to cover the posterior surface of the ear and any defect of the mastoid area. After harvest of the graft, a biologic dressing known as Pangen, is applied to the raw surface of the scalp. The main function of this dressing is hemostatic, and an additional benefit is that it is painless to remove at the first dressing change. After this, the scalp reepithelializes very quickly. Four days later, the Vaseline-impregnated gauze placed on the Pangen is removed without adherence to the wound bed and without bleeding or pain. Fig. 3-5 The patient must be informed that the skin graft harvest performed at the second stage necessitates shaving a large area of scalp. However, this technique prevents a visible scar elsewhere on the body. Patients routinely ask if hair will grow on the ear. “No” is the correct response, because only the very superficial outer layers of skin—not the hair follicles that generate the new hairs—are grafted onto the ear. The hair will start to regrow through the donor site very soon after surgery. The image in C shows the donor site 2 weeks postoperatively. Good cleaning of the raw surface and regular combing to remove excessive buildup of keratin are essential during the healing phase. We have divided the methods for reconstructing the retroauricular sulcus into four types. Some surgeons perform each technique routinely. In our practice, each technique has specific indications. Once the second-stage techniques are well understood, it will be clear that one of the four categories is appropriate for each patient. Type A: Temporofascial flap Type B: Brent technique Type C: Mastoid fascial flap Type D: Tunnel technique To understand the second-stage techniques, it is useful to thoroughly understand the regional anatomy of the auricular region. The basis of the second-stage procedure is to utilize the rich network of well-vascularized fascia to provide coverage of the posterior surface of the framework, allowing application of a skin graft. The three-layer fascial network of the auricular region is known by many names, leading to a great deal of confusion among surgeons. Furthermore, the anatomy varies slightly in the temporal, parietal, and occipital areas. Fig. 3-6 We find the most useful nomenclature is to relate the fascial layers to the well-known galea aponeurotica of the scalp: 1, Galeal fascia (temporoparietal fascia); 2, subgaleal fascia (innominate fascia); and 3, temporal aponeurosis (deep temporal fascia). The most superficial layer of fascia comprises the galea aponeurotica in the scalp; galeal fascia in the temporal, parietal, and occipital region; and the superficial musculoaponeurotic system in the face. In the temporoparietal region, the galeal fascia is most commonly known as the temporoparietal fascia (TPF) and, when harvested with the superficial temporal artery (STA), it is known as a TPF flap. We prefer a more anatomically accurate term (galeal fascia flap) in the temporoparietal region or in the occipital area. However, we will refer to the TPF flap throughout this text for ease of communication. We routinely use audible Doppler ultrasonography preoperatively to determine the position of the STA. Although the second layer is often called the innominate fascia, a more accurate anatomic term is subgaleal fascia. This layer is rarely used for reconstructive purposes, but it can be elevated as a separate random-pattern flap. Many perforating vessels traverse this layer communicating between the deep and superficial temporal arteries; therefore it is possible to raise this layer with the TPF flap to reinforce vascularization. The third fascial layer in the auricular region is the temporal aponeurosis, which is also known as the deep temporal fascia. It covers the temporal muscle and is strictly limited to the temporal area. Posteriorly, overlying the mastoid bone, these three fascial layers become adherent to one another and to the postauricular musculature. During elevation of the ear, the dissection should therefore begin superiorly in the temporal region, where the three layers are well defined. It is then straightforward to elevate the galeal and subgaleal fascia together and to continue inferiorly by dissecting on the superficial surface of the temporalis aponeurosis. Throughout three decades of experience in ear reconstruction, we have modified our technical approach to the second stage. We first used Brent’s technique. This consisted of elevation of the posterior surface of the framework covered with adherent vascularized fascia, which was used as a bed for a split skin graft. The retroauricular skin was advanced to the depth of the retroauricular sulcus, and no cartilage block was used to improve projection. We call this technique type B and still use it when further projection of the framework is not needed. Satoru Nagata described a technique for creating more projection to adequately match the contralateral ear. The technique consisted of placing a cartilage block under the framework and simultaneously harvesting a TPF flap. Placing a cartilage block under the framework provided more projection but required coverage with vascularized fascia to allow skin grafting. Influenced by Nagata, we have used this technique but with some technical modifications. This technique is called type A (Firmin’s modification of Nagata’s technique). Although we routinely used the type A technique for many years, we were disappointed with the scarring in the temporal region and sought to prevent it, particularly in boys with short-cropped or very fine hair. We started to use a mastoid fascial flap to cover the cartilage block and called this technique type C. However, eventually, we stopped using mastoid fascial flaps, because the rate of vascular problems and graft failure was higher for this random-pattern flap. We also found that the pedicle of the flap filled the retroauricular sulcus and, along with the delayed wound healing of the graft, may have contributed to poor depth of the sulcus. Our final evolution has been in cases in which projection is significant after the first stage. We often achieve this by placing the projection piece PII under the antihelix, creating excellent projection in the middle third of the ear. Frequently, the upper and/or lower third need minor adjustments in projection at the second stage but do not justify the harvest of a TPF flap. In these patients, we perform dissection as we do for type B (leaving the vascularized fascia attached to the deep surface of the cartilage). We create subtle changes to the projection in the upper and lower thirds by making small tunnels under the framework anteriorly, which can be used as pockets for small cartilage grafts. We call this type D. Fig. 3-8 The type A technique involves elevating the costal cartilage framework, exposing its posterior surface. A cartilage block is fixed with wire sutures under the framework in the position of the posterior wall of the concha to maintain the projection. A TPF flap is raised based on the STA, turned down to cover the cartilage block and the deep surface of the framework, and covered with a split-thickness skin graft harvested from the scalp. Type A leaves a scalp scar and is a longer operation, but the temporal fascia is a very reliable flap. Turning down the temporal fascia also has the advantage of reconstructing the sulcus without filling the base with flap pedicle (as in type C). The type A technique improves the projection of the ear by re-creating the posterior wall of the concha, which is a key aesthetic feature of the ear. This improves the quality of the projection of the ear from the frontal view with the visual effect of a deeper concha. In contrast to Nagata, we prefer to elevate the cartilage framework without any attached soft tissue. This facilitates mobilization of the framework all the way forward to the conchal bowl, providing more space for the cartilage block. The block is sculpted to reproduce the posterior wall of the concha and secured with wire sutures directly to the posterior surface of the framework, under the antihelix. These modifications of Nagata’s technique have several advantages: • The framework can be mobilized extensively, and some adjustments to the axis or the position of the reconstructed ear are made possible. • Direct coverage of the posterior surface of the framework without interposition of soft tissue results in a thinner ear, as seen from behind. • Wire sutures can be removed, and the framework can be thinned, if necessary. Fig. 3-9 Perioperative photographs demonstrate the technique step by step. Fig. 3-10 The following materials are needed: a Doppler, a three-dimensional model, and the harmonic scapel (see video 3-1). Before the patient is prepped, the projection of the patient’s contralateral ear should be examined. From the frontal view, determining the most prominent contour of the normal ear (antihelix or helix) and the height of the concha is critical to achieve a symmetrical result. Pearl A three-dimensional model used during the first stage to carve a framework should not be discarded, because it can be of great help in determining the desired amount of projection and depth of the sulcus. If a three-dimensional model is not available, the use of frontal-view photographs and measurements is sufficient to achieve the correct projection.
Stage II: Creation of the
Retroauricular Sulcus


OPTIONS FOR RECONSTRUCTING THE SULCUS
ANATOMY OF THE FASCIAL LAYERS IN THE AURICULAR REGION

First Layer
Second Layer
Third Layer
EVOLUTION OF OUR TECHNIQUE
TYPE A TECHNIQUE: TEMPOROFASCIAL FLAP


Performing Type A Second Stage With Harmonic Scalpel
Preparing the Patient


Related posts:

Stay updated, free articles. Join our Telegram channel

Full access? Get Clinical Tree


