Photodocumentation in facial plastic surgery is essential in the perioperative setting, and with meticulous uniformity and standardization it serves as the primary tool for surgical planning and critical analysis of results. Accurate photodocumentation is dependent on strict and consistent use of equipment, lighting, and patient positioning. The purpose of this article is to review the principles of standardization in perioperative patient photography for common facial plastic procedures and to provide the facial plastic surgeon with the tools necessary to develop consistent and accurate patient photographs.
The famous adage “a picture is worth a thousand words” could not be more fitting in the realm of facial plastic surgery. Surgical planning and assessment of successful outcomes would be impossible without use of consistent and accurate photodocumentation. In addition, assessments of novel techniques are inherently dependent on proper patient photographs and are critical to promote scientific development and surgical education. Clinical portrait photographs have become as integral a part of the patient’s record as radiographs, and it is critical that strict standardization of photographic technique is employed at all times. It is the purpose of this review to elucidate methods to consistently achieve standardized, high-quality images for specific facial plastic surgery procedures by describing proper equipment, lighting, and patient positioning.
Camera and lens
Single-lens-reflex (SLR) 35-mm cameras had been the gold standard for patient photodocumentation, but with the advent of digital SLR photograph technology 35-mm film SLR cameras are no longer recommended. Digital cameras offer many new advantages such as instantaneous pictures, ability to crop and adjust on a computer, and provision of images that can be easily stored and filed. Although point-and-shoot cameras are less expensive, the resolution of these models is generally lower than that of the digital SLR cameras. Digital SLR cameras also afford the ability to change lenses and adjust settings that control aperture size, shutter speed, and exposure. While digital resolution technology is approaching the level of resolution of 35-mm film (the equivalent of 35 million pixels), a resolution of 1.5 million pixels (megapixels) is acceptable for medical photography. The authors generally recommend a 5-megapixel camera or higher.
In terms of choice of lenses, a lens with a longer focal length, in the range of 90 to 105 mm with macro capability, is recommended to capture pertinent details of facial anatomy. These lenses produce the best balance of distortion and provide the largest depth of field to ensure the whole face is in focus.
Lighting
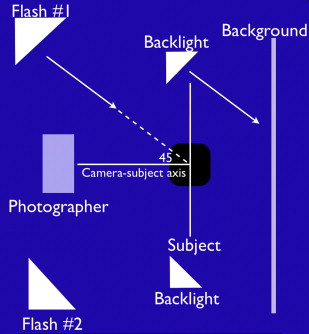
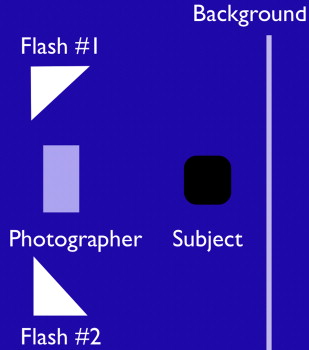
A single mounted camera flash, while inexpensive, will produce harsh shadows and uneven lighting. Therefore, a studio setup of lighting is preferred. Specifically, the quarter-light system was designed for medical photography, and consists of 2 lights of equal intensity, positioned at 45° from the subject-camera axis ( Fig. 1 ). The downside of this system is cost and requirement of a large space. The authors have used a modified version of this system, illustrated in Fig. 2 . The authors have found that this system works well in small spaces and that the backlights are not necessary. A distance of 12 to 18 inches is maintained between the subject and background to minimize shadow effects of the subject on the background.

Lighting
A single mounted camera flash, while inexpensive, will produce harsh shadows and uneven lighting. Therefore, a studio setup of lighting is preferred. Specifically, the quarter-light system was designed for medical photography, and consists of 2 lights of equal intensity, positioned at 45° from the subject-camera axis ( Fig. 1 ). The downside of this system is cost and requirement of a large space. The authors have used a modified version of this system, illustrated in Fig. 2 . The authors have found that this system works well in small spaces and that the backlights are not necessary. A distance of 12 to 18 inches is maintained between the subject and background to minimize shadow effects of the subject on the background.

Background
The purpose of the background is to eliminate distractions and place full focus on the patient. It is important that the background is void of shiny material and without folds or creases. In terms of choice of color, a blue background is ideal for medical photography. A blue background provides sufficient contrast, is complementary to all skin colors, is pleasant to the eye, allows for a greater depth of field, and moderates shadows without overwhelming the subject. A white background produces harsh shadows, whereas a black background provides less contrast and diminishes the image’s 3-dimensional quality.
Consent
Consent for photodocumentation must be obtained prior to any photography. The consent should include a statement describing the justification of the photographs. Patients must understand that their photographs are tools for surgical planning and will become part of their medical record. Additional statements regarding patient confidentiality are necessary if the photographs are to be used for educational purposes, lectures, exhibits, and publications.
Patient preparation and positioning
Proper preparation for photodocumentation is critical to maintaining consistency and producing photographs that capture the essential anatomic details. The patient’s hair should be pulled away from the face to expose the forehead and both ears, and can be accomplished with hair clips or flexible hair bands. Eyeglasses and jewelry should be removed and, depending on the procedure, it may be beneficial to have the patient wear only a surgical gown so collars and distracting clothing do not obscure pertinent anatomic detail.
Although some patients may be reluctant, removal of makeup before taking photographs may be required in cases whereby the makeup itself is distracting or excessive. An added benefit is that removal of makeup can reveal skin irregularities or fine rhytids that can be addressed as part of the surgical plan.
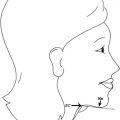
Patient positioning is critical to maintain standardization between the different views. Proper positioning is difficult to master, and is often the culprit of substandard photographs. Identical views should be obtained for each type of surgery that is being considered. There are 5 standard views that apply to most, if not all, facial aesthetic procedures, comprising the anteroposterior (AP) view, the oblique view from right and left, and the lateral view from right and left ( Fig. 3 ).
Related posts:


Stay updated, free articles. Join our Telegram channel

Full access? Get Clinical Tree


