Consistency of photographic documentation is essential for facial plastic surgery, a visual surgical subspecialty. Photographs are often used to validate surgical outcomes but have many other uses including education, publication, and marketing. Utilization of a properly equipped medical portrait studio will dramatically increase the quality of photographic images. In this article, the authors discuss the steps necessary to set up and use an officebased portrait studio.
Medical photography has existed for nearly 150 years. In 1840, the first medical images were produced by Alfred Donne with a microscope-daguerreotype. The first surgeon to use preoperative photography was Gurdon Buck in 1845, with orthopedic surgeon Berhend following shortly thereafter, capturing pre- and postoperative pictures of his patients. The first recognized medical documentation of a reconstructive procedure was in 1863, with 7 pictures demonstrating a 2-stage nasal reconstruction by Balossa. The importance of medical photography was recognized early on by one of the pioneers of plastic surgery, Sir Harold Gillies, who gave a speech at the first International Congress of Plastic Surgery in 1955 and claimed photography was one of the most important advances in plastic surgery.
Photographic documentation in reconstructive and facial plastic surgery is essential both for the surgeon and patient. Uses include documentation for medical records, insurance companies, legal needs, preoperative planning, intraoperative reference, surgeon self-assessment, sharing results with colleagues, patient communication, presentations, and publications. Besant-Matthews suggests the idea of surgeons serving as “functional photographers,” a term he designates for someone at a level between a professional and an amateur. He states that functional photographers, while not dependent on pictures as a career, use photography as an essential element of their occupation. By expanding his knowledge of photography, lighting, and medical portrait studio setup, the facial plastic surgeon can obtain more consistent and higher quality images. This article discusses the authors’ approach to setting up a medical portrait studio in the clinical setting.
Choice of photographer
Ideally, a single individual should be designated as the photographer for all pre- and postoperative imaging sessions. This individual must have a basic understanding of and ability to operate all equipment in the studio. Larger practices may be able to hire a professional photographer. However, in many cases the surgeon is most attentive to his own imaging needs and will be the best person to photograph patients. Although it may initially seem that photography is a waste of the surgeon’s valuable time, additional anatomic observations are often made while taking photos that assist in preoperative analysis and planning. Interactions with the patient during the photographic session may provide valuable and at times interesting insights into the patient’s suitability for an operative procedure. Whoever is designated to do the photography must appreciate the importance of consistent camera settings, careful patient positioning, and knowing the correct views to obtain for specific procedures.
Equipment
The equipment needed to successfully start a medical portrait studio includes a camera, lens, lighting, background, and a dedicated space.
Camera and Lens
The advantages of digital photography are numerous but include ease of image retrieval and storage. These advantages, improvements in technology, and decreasing cost have made the 35-mm film camera obsolete. The first decision to be made when selecting a camera is between a point-and-shoot or single lens reflex (DSLR) model. Whereas some may prefer the point-and-shoot camera for ease of use, the authors would argue that the lack of control and consistency limits its role in a medical portrait studio. Conversely, a DSLR offers the benefits of interchangeable fixed focal length lenses, complete control over camera settings, and the highest image quality. DSLR cameras lenses are available in both zoom and fixed focal lengths. The authors would discourage the use of a zoom lens for pre- and postoperative photodocumentation because the variable focal length introduces unnecessary inconsistency. For medical portraiture, a lens with an effective fixed focal length of 90 to 105 mm is ideal.
Lighting
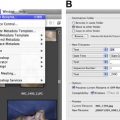
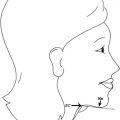
Choice of lighting is a major determinant of ultimate image quality. Although every camera includes a built-in pop-up flash or can be fitted with an on-camera flash, this method of lighting is unacceptable for medical portraiture. Because facial photographs are taken in the vertical, or portrait, position, a camera-mounted flash results in harsh and uneven lighting ( Fig. 1 A). Conversely, a ring flash produces flat lighting and should be reserved for intraoperative photography (see Fig. 1 B). To produce high-quality images in a medical portrait studio, a minimum of 2 light sources are needed. Ideally, the light sources should be electronic strobes (see Fig. 1 C). Strobe lighting in a professional photography studio is typically provided by using individual flash heads powered by a separate power supply. In the medical office setting, self-contained flash/power units save space and minimize unsightly cords. Electronic strobes produce sufficient light of the correct color temperature (5600 K) to overpower any uncontrollable ambient light. By contrast, other light sources distort normal skin color. For example, fluorescent light causes a green hue and tungsten light (3400 K) produces a yellow/orange hue. Although a strobe may overcome most indoor lighting and sunlight, every attempt should still be made to minimize ambient light (eg, windows). Because strobe light is harsh and directional, it should be diffused by an umbrella or soft box. The authors prefer soft boxes measuring 16 × 20 inches as a space-saving measure. Flash units elevated 1 to 2 inches above the height of the average patient’s eyes will place subtle shadows below the nose and chin. These soft shadows accentuate facial contours and will aid the surgeon in pre- and postoperative analysis. Ideal flash unit distance from the patient is typically 1 to 2 inches behind the camera at 45° angles to the patient ( Fig. 2 ). If unwanted shadows persist despite the use of dual strobes, a third ceiling-mounted strobe may be helpful. The flash sources can be mounted from the ceiling or placed on light stands. The authors have found a strobe bracket can be fashioned readily from half-inch galvanized pipe and fittings readily available at most home improvement stores ( Fig. 3 ). Photographic supply houses also carry a variety of brackets suitable for installation. Once installed, the flash system can be triggered in several different ways. One option is to have the on-camera flash trigger the strobe light’s photo slave. The preferred option is to link the camera and strobe via a PC cord or wireless transmitter ( Fig. 4 ). Although most surgeon-photographers can readily set up a medical portrait studio, some may find the task too burdensome or time consuming, and a photographic consultant can be readily employed for assistance. The consultant can also be helpful for troubleshooting if image exposure is unacceptable or inconsistent. The Appendix includes a useful reference of the studio equipment used in all 5 of the authors’ practice locations.
Space and Background
If possible, a dedicated space should be reserved for the studio, ideally measuring at least 6 × 8 feet. The walls should be painted a neutral color, preferably soft white. If windows are present, light-blocking curtains should be installed. A dedicated photography space improves efficiency, consistency, and patient privacy; however, a consultation room or even a storage area can be utilized if clinic space is scarce.
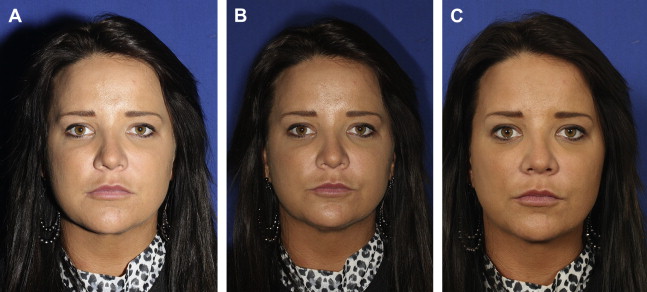
The background in the studio should be nondistracting, and most experts agree on a medium or light blue tone ( Fig. 5 ). Blue complements all skin tones and works well if the picture is converted to a black and white image. Neutral white and gray are also acceptable choices. Black backgrounds present challenges with dark hair and complexions unless a third light source is used to provide subject-background separation. Nonreflective wallpaper, matt paint, and cloth are all suitable background surfaces. Once a color has been selected it should not be changed.