Chapter 35 Pinn-ACL CrossPin System for Femoral Graft Fixation
Introduction
Graft fixation has been considered the weak link in the early postoperative period, especially with the soft tissue grafts. Initial fixation requires sufficient fixation strength during the rehabilitation period while the graft incorporates into the bone tunnels. Several techniques have been used for fixing hamstring grafts. Interference screw fixation for quadrupled hamstring grafts has failure strengths that may not be adequate for daily activities and a modern rehabilitation program1; suspension techniques are related to tunnel enlargement and the so-called “bungee effect.”2–4 A recent study demonstrated that four-bundle hamstring grafts fixed with modern techniques produced higher stability rates than bone–patellar tendon–bone (BPTB) reconstructions.5
Transfixation pin fixation techniques were developed to improve femoral graft fixation; these techniques put a pin across the femur traversing the femoral tunnel. Within the transverse femoral tunnel, the pins either penetrate the graft, as with Rigidfix (Mitek, Ethicon, Westwood, MA); the two bundles of the hamstring graft fold around the pin to create a quadrupled graft, as with Bio-TransFix (Arthrex, Naples, FL), Cross-Screw (Stryker, Kalamazoo, MI) and Bone Mulch (Arthrotek, Warsaw, IN); or the two bundles are looped through a graft harness that a pin transverses to create a quadrupled graft (ConMed-Linvatec, Largo, FL). Femoral fixation of hamstring tendon grafts using transfixing pins is an accepted technique that yields excellent biomechanical properties with failure loads over 800N,1,6,7 which clearly surpasses the 500N accepted to adequately follow an aggressive rehabilitation protocol8,9 and has demonstrated results in clinical trials comparable with other fixation methods.10–13
The ConMed-Linvatec Pinn-ACL Cross-Pin System is designed to provide transverse femoral fixation in anterior cruciate ligament (ACL) reconstruction using a soft tissue graft. With existing systems, transverse femoral fixation was a blind procedure, but this surgical technique and the implant’s innovative design allow the surgeon to visualize the transverse tunnel and exact point of femoral fixation. With this system the graft is suspended in a harness and the pin transfixes the harness, not the graft. Laboratory testing has showed greater than 1700N pullout strength,14 which is superior to that of other available designs.1,6,7
Instruments and Implant Design
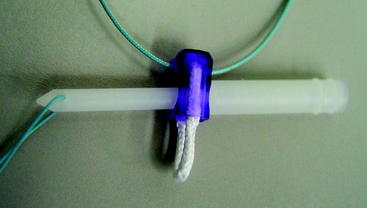
The Pinn-ACL CrossPin system for femoral graft fixation includes the implants and instrumentation to ensure accurate transverse fixation of the graft. The implant consists of two parts, the graft harness and the cross-pin implant (Fig. 35-1).
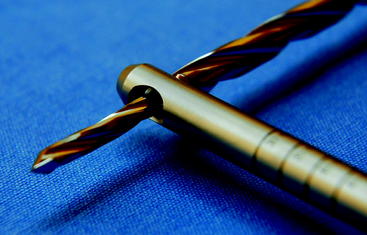
The graft harness is composed of self-reinforced poly-L-lactic acid (PLLA), it has an eyelet in which the cross-pin locks, it also has a closed loop of high-strength Dyneema suture in which the graft sits and folds, and in its proximal aspect it has a lead suture for graft construct passing. The graft harness is available in 8- and 9-mm diameters. The cross-pin implant is also composed of self-reinforced PLLA, is available in three different lengths (40, 45, and 50 mm), and has a lead suture in its tip for implant passing. A disposable transverse cannula fits in the blue frame and slides over the drill bit to maintain the entrance of the transverse tunnel as opened and accessible. The U-Guide is an external aimer with two components—the main blue frame and the positioning rod, which fit in the tunnels—and is available in 8 and 9 mm. A specially designed drill bit with two different diameters is used to create the transverse tunnel. This drill bit is the same for every procedure regarding the cross-pin implant length. Being a transverse fixation system, the tip of the drill bit engages in the tip of the positioning rod to ensure the engagement of the implants (Fig. 35-2).
Surgical Technique with Hamstring Tendons
Graft Harvesting and Preparation
Using the graft sizing block, the entire graft bundle diameter is measured. It is important to take measurements of the femoral and tibial ends (Fig. 35-3); these diameters will determine the proper sizes of the cross-pin graft harness and tunnel. The graft harness size (8 or 9 mm) should always be selected based on the diameter of the femoral end of the graft.
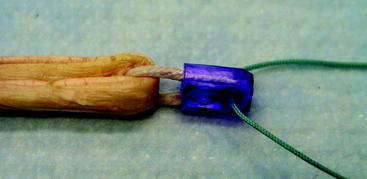
To load the graft strands into the graft harness (Fig. 35-4), place the graft harness onto the harness holder accessory and pass the graft strands individually through the continuous suture loop on the graft harness.
Tibial and Femoral Tunnel Creation
The Pinn-ACL tibial guide, set at 55 degrees, is inserted into the knee through the medial working portal. The tip of the guide is placed in the posterior aspect of the tibial ACL stump following an imaginary line along the posterior border of the lateral meniscus anterior horn and centered in the midline of the joint. The guide pin should enter the tibia 5 cm below the medial joint line and 2 to 3 cm medial to the anterior tibial tuberosity in a position adjacent to the medial collateral ligament; this alignment will create a tibial tunnel that allows a more oblique femoral tunnel, usually around the 65-degree angle.15,16 The guide pin is advanced into the tibia, and arthroscopic visualization is used to check the correct position of the guide pin in the joint. An AccuDrill reamer corresponding to the graft’s tibial size is used to create the tibial tunnel.
Stay updated, free articles. Join our Telegram channel

Full access? Get Clinical Tree


