Chapter 30 Tibial Fixation for Anterior Cruciate Ligament Hamstring Grafts
10 Techniques that Improve Fixation
Introduction
There are many reasons why tibial fixation is more challenging than femoral fixation. Bone mineral density (BMD) is higher in the distal femur than it is in the metaphyseal region of the tibia.1 Higher BMD provides more rigid fixation for soft tissue fixation devices such as interference screws and posts. Femoral fixation may include suspensory devices and posts that can provide more than twice the ultimate load to failure (LTF) compared with commonly used interference screws. Interference screws are more commonly used on the tibial side of the graft.2 Posts can also be used on the tibial side of the ACL graft, but this entails tying heavy sutures over the post or screw that is drilled into the tibia distal to the tunnel. The “weak link” then becomes the interface between the tendons and the sutures. When posts are used for femoral fixation, the grafts are draped over the posts and fail due to the post pulling through the cancellous bone. Tibial fixation is also more difficult because the reconstructed ACL forces are parallel to the tibial tunnel,3 requiring either a fixation point orthogonal to the tunnel (screw or WasherLoc distal to the tunnel) or an inner-tunnel fixation device that will provide enough wedge fit and compression to secure the graft from slippage and failure under cyclical loading. When inner-tunnel fixation or interference screws are used, they are inserted in a direction opposite to the tension being pulled on the ACL graft, which may squander valuable tension.4 This, coupled with management and equal tensioning of four separate whipstitched tendons, makes tibial fixation technically difficult.
Technique 1: Graft Preparation
Hamstrings can be harvested one of several ways. Many surgeons harvest the semitendinosus and gracilis tendons by making an incision between the tendons as they insert on the pes anserinus. The tendons are then retrieved proximally, where they are more distinct from each other. Extra length may be achieved by using some of the periosteum near the anterior crest of the tibia where the tendons attach.5 An equally popular way to harvest the hamstrings involves making a horizontal incision over the superior margin of the gracilis tendon, starting at the tibial crest and extending 2 to 3 cm medially. This is followed by an incision along the anterior margin of the tibia, creating a trapdoor by which the pes anserinus is reflected from the periosteum. The semitendinosus and gracilis tendons are easily visualized and dissected from the sartorius fascia. This technique better preserves the sartorius fascia that acts as a scaffold for later hamstring tendon regeneration. It also allows better visualization of the infrapatellar branch of the saphenous nerve, which is important to protect while harvesting hamstrings and performing meniscus repair.
The semitendinosus, being the broader and longer of the two tendons, is harvested first. Most surgeons harvest in this order in case the stripper accidentally damages the tendon that is not being stripped. Another potential reason for harvesting the semitendinosus first is the possibility that the semitendinosus may be long enough to be quadrupled, providing all four strands of the reconstruction. Preservation of the gracilis tendon may protect knee flexion strength; however, this is controversial.6 The gracilis is harvested in the majority of our ACL reconstructions.
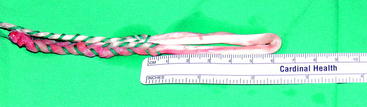
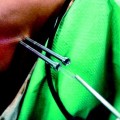
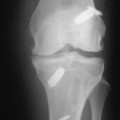
After tendon harvest, the sartorius fascia and pes anserinus are repaired to their origins using a #1 Vicryl suture. This protects the majority of the sartorius fascia from inadvertent destruction during tibial tunnel reaming. Gracilis and semitendinosus grafts are gently removed of their musculotendinous muscle attachments using a small key elevator. A #2 Ethibond or orthocord nonabsorbable suture is used to whipstitch each of the four arms of the tendon grafts. Usually, a running whipstitch up and down each side of the strand provides enough security for later tensioning. Occasionally one end of the graft may not have robust-enough tissue, and a locking whipstitch can be used as described by Krackow.7 Graft tunnels are measured accurately, and whipstitches are made along each arm of the four bundled graft such that the whipstitches will extend up the entire distance of the tibial tunnel (Fig. 30-1). By using whipstitches along the entire length of the graft that is occupying the tibial tunnel, fixation pullout is increased by approximately 15%.8 The tendons are then placed over a suture and drawn through an appropriately sized soft tissue guide or measuring device to determine the width of the tunnels.
Technique 2: Pretension and Cycling of the Grafts
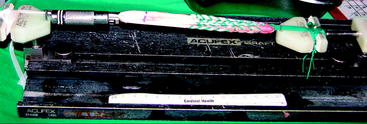
Tendons, when at rest, are in a crimped, wavy state. When tensioned, the fibers line up in a parallel fashion and the tendon elongates by 2% to 4%, depending on where the tensioning is taking place on the stress–strain curve. Once the “toe” region of the stress–strain relationship curve has been exceeded, any further stress makes the graft stiffer and therefore makes the knee tighter.9 By preloading the graft and tensioning with 30 lb over 3 dozen cycles and/or 30 minutes of time, the graft is stiffened and the relaxation that occurs immediately after fixation is reduced (Fig. 30-2) Grafts inserted after pretensioning and cycling are much stiffer than grafts that have not undergone this technique. By placing a stiffer graft and using stiffer fixation, less load can be placed on the graft, ultimately resulting in a tighter knee.10
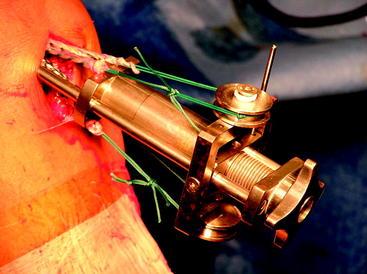
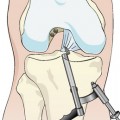
Recently, static tensioners have been developed to tension the graft while it is already fixed in the femoral tunnel. As the knee is cycled with the grafts under tension, the graft elongates and the grafts are retensioned prior to insertion of the interference screws.11 When using a static tensioner, we place no more than 15 lb on the graft, to be distributed equally among the four arms of the four-bundle graft (Fig. 30-3).
Yasuda et al tested their ACL hamstrings grafts tensioned to 20N and 80N at the time of surgery, 2 years later the grafts tensioned at 20N had significantly more laxity than the 80N group: 2.2 mm versus 0.6 mm, respectively.12 However, it is important to remember that grafts continue to elongate despite pretensioning. A recent study demonstrated that the viscoelastic properties of tendons cannot be completely eliminated. Hamstring and anterior tibialis allografts underwent no preconditioning, cyclical preconditioning, or isometric preconditioning, and the tension of the grafts was measured over 1 hour. The grafts continued to elongate for the entire 60 minutes. In all groups the grafts lost approximately 60% of their original tension over the 1-hour period.13 This has important implications for hamstring reconstruction physical therapy protocols. We recommend and the literature supports a less aggressive regimen in the first 2 months after reconstruction.
Technique 3: Maximize Length of the Tibial Tunnel
Related posts:
 Anatomical Anterior Cruciate Ligament Reconstruction with Double-Bundle, Double-Stranded Hamstring Autografts: A Four-Tunnel Technique
 Proprioception and Anterior Cruciate Ligament Reconstruction
 Anterior Cruciate Ligament Reconstruction Utilizing the Rigidfix for Femoral-Sided Fixation
 Revision Anterior Cruciate Ligament Reconstruction Using Autologous Hamstring Tendons
 High-Stiffness, Slippage-Resistant Cortical Fixation Has Many Advantages over Intratunnel Fixation
 Endobutton Anterior Cruciate Ligament Reconstruction Femoral Fixation
Stay updated, free articles. Join our Telegram channel

Full access? Get Clinical Tree


