Postprocessing of patient photographs is an important skill for the facial plastic surgeon. Postprocessing is intended to optimize the image, not change the surgical result. This article refers to use of Photoshop CS3 (Adobe Systems Incorporated, San Jose, CA, USA) for descriptions, but any recent version of Photoshop is sufficiently similar. Topics covered are types of camera, shooting formats, color balance, alignment of preoperative and postoperative photographs, and preparing figures for publication. Each section presents step-by-step guidance and instructions along with a graphic depiction of the computer screen and Photoshop tools under discussion.
Truly standardized photography is a challenging undertaking. Even under the best of circumstances, there are inevitably small variations in patient positioning or lighting that need to be adjusted to highlight the effects of surgery. Postprocessing of patient photographs is an important skill for the facial plastic surgeon. Postprocessing differs from manipulation as it is intended to optimize the image, not change the surgical result. Most of the success in standardized photography is a result of consistent lighting, camera settings, and positioning. Postprocessing should never be a substitute for good photographic technique. This article uses Photoshop CS3 (Adobe Systems Incorporated, San Jose, CA, USA) for descriptions, but any recent version of Photoshop is sufficiently similar.
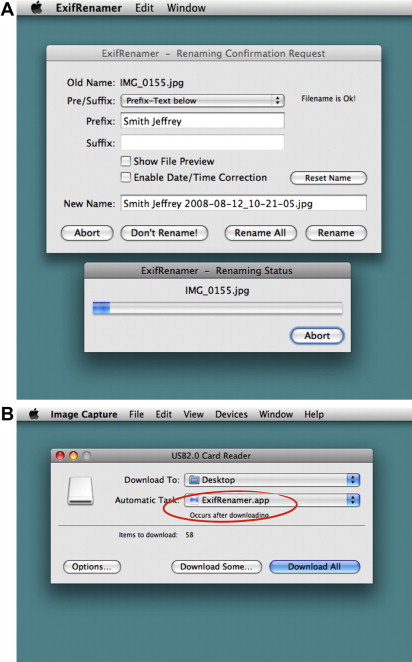
Naming photographs sensibly
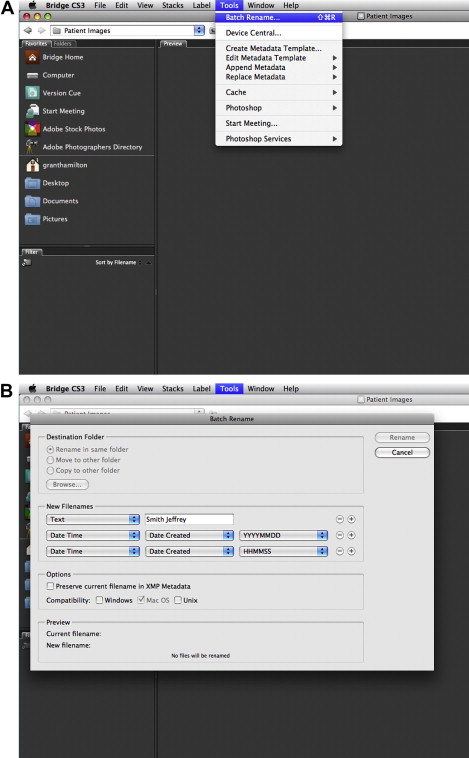
Most digital cameras automatically generate file names that follow the convention of “IMG_3485.” This system might suit the file structure of the camera but it does little to help identify the image. This naming method also puts you at risk of accidentally overwriting your files if you use multiple memory cards. There is a simple way to prevent this problem. Digital photographs contain information summarizing the camera settings used to make the photograph. This information is called EXIF data (exchangeable image file format). The EXIF data also record the exact time of exposure, based on the clock in the camera. Because the date and time of each photograph are unique, a naming scheme based on this information makes duplicate images easily identifiable. Intraoperative photographs with date-based names are also a convenient reminder of the date of surgery. A file name that begins with patient’s name followed by the date and time is a simple, sensible, and safe way to organize patient photographs. A suffix such as “PreOp” or “PostOp 1Y” may also be helpful. There are several ways to rename a batch of images easily. Adobe Bridge is a separate program that is bundled with Photoshop. Bridge is a robust media manager and image browser that permits easy batch renaming from its Tools menu.
Using metadata
Metadata is a nonspecific term for information that is appended to a digital image, such as the previously mentioned EXIF data. Other forms of metadata are also helpful. Keywords may be added to images to help with organization and search. For example, keywords could be as general as “rhinoplasty” or as specific as “spreader graft.” By tagging patient images with keywords, they can be quickly filtered and searched. Keywords may be added in Adobe Bridge, iPhoto, iView Media Pro, and many other digital asset management programs. Although the concept is the same across these programs, the specifics of the implementation vary. Consult the manual or help section for your digital asset manager.
Shooting RAW, JPEG, or both
Nearly every digital SLR (single lens reflex) camera offers the option of recording images as JPEG (Joint Photographic Experts Group) files, RAW files, or both. JPEG images have the benefit of being small files but are less flexible during postprocessing. RAW images are more easily corrected but have a larger file size. They must also be converted to another format before being manipulated during a patient consultation. Which format you choose depends on your storage space and desire for control over your images. Some cameras permit simultaneous recording of a RAW file for archival purposes and a JPEG for manipulation. If storage space is not at a premium, then this option might be the most flexible.
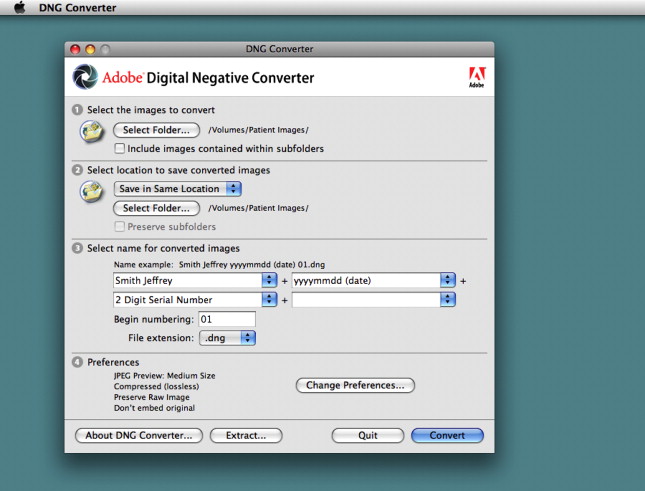
To convert a RAW file, it is necessary to use a separate program. Most camera companies offer bundled software capable of converting their RAW images into various formats. Alternatively, Adobe Photoshop can open nearly any RAW file format and is frequently updated as new cameras are released. It is necessary to update the software because different cameras create different RAW file formats. For example, Canon cameras create either a .crw file or a .cr2 file. To further complicate matters, the .cr2 file from one model is different from the .cr2 file from another. This difference is because the RAW file is simply the unprocessed series of zeros and ones that is recorded by the camera sensor. Because there are many different types of camera sensors, there are many different types of RAW files. Some photographers are justifiably concerned that, as the number of RAW files proliferates, their older files may some day be unreadable by the newest software. Consequently, Adobe has developed the DNG (digital negative) file format, which permits conversion of the various proprietary RAW file formats to the open and standardized DNG format. Because the DNG format is an open standard, adopted by multiple other companies, those images are much less likely to be orphaned. Adobe offers a free program called Adobe DNG Converter that creates DNG files from the RAW files of many different cameras. It is available for the Macintosh and Windows platforms.
- •
To convert a RAW file, open it with Photoshop. That action will launch the Camera RAW dialog.
- •
In the Camera RAW dialog, there are several distinct areas with which it is important to be familiar. The largest is the image preview. It shows the effects of the Camera RAW manipulations on your photograph. Along the top of the image preview is the toolbar. These tools permit zooming, cropping, rotating, color sampling, and other functions. If you hover the cursor over the tool, a small text description appears.
In the upper right corner is the histogram. The histogram gives a graphical description of the tonal values for each of the red, green, and blue (RGB) channels. Darker tones are represented toward the left of the histogram and lighter ones toward the right. The histogram is helpful when identifying clipping.
Clipping is when a dark or light value extends to the limits of the dynamic range. Pure white is given an RGB value of 255, 255, 255, whereas black is 0, 0, 0. All other color values fall between those numbers. The problem with clipping is that any detail in those areas is lost. If clipping is present, the histogram will about one of the edges of the histogram. Another way to see clipping is to click on the small triangles above the histogram. That action identifies the clipped pixels on the image. One of the benefits of shooting in the RAW format is that, if the image is improperly exposed and some of it is clipped, the RAW file may still have enough information to restore those parts of the image during adjustment.
Below the histogram is some limited EXIF information from the camera. The aperture (“f” number), shutter speed, International Organization for Standardization value (ISO), and focal length are shown.
RAW Image Adjustment. The lower right side of the Camera RAW dialog contains the slider controls for adjusting the image. The top part is for adjusting the white balance. Below that are controls for adjusting the exposure, highlight recovery, fill light for shadow recovery, black level, brightness, contrast, clarity, vibrancy, and saturation.
At the bottom of the dialog are the workflow options. These options allow adjustment of the color space, bit depth, crop size, and pixel density.
RAW Image Adjustment. This sample image needs some adjustment before it can be published. The first thing to do is to rotate it 90° so that it is in the proper orientation. This maneuver is easily achieved using the rotate tool in the toolbar. The image is significantly underexposed. Moving the exposure slider to the right brightens the image. Initially this can be done by eye but it is a good idea to check for clipping after adjustment.
RAW Image Adjustment. The image is significantly underexposed. Moving the exposure slider to the right brightens the image. Initially this can be done by eye but it is a good idea to check for clipping after adjustment.
RAW Image Adjustment. Adjust the white balance. This image is an intraoperative photograph that was shot with a ring flash, so selecting F lash from the White Balance menu eliminates the slight yellow color cast.
RAW Image Adjustment. RAW images are unprocessed by the camera, unlike JPEGs, and usually look a little flat. Increasing the contrast better defines the image and give it a little “pop.” A simple way to adjust the contrast is with the Contrast slider.
RAW Image Adjustment. A more complex, but more flexible, way is to click on the Tone Curve tab. There are presets selectable from the Curve menu. Otherwise, the curve can be manipulated by clicking on it to add a point then dragging it. Note that the tone curve is displayed over a histogram that is a composite of the RGB channels.
RAW Image Adjustment. Unprocessed RAW images are also soft, as they are not sharpened in-camera like a JPEG. The sharpening tab is an easy way to sharpen the image and also reduce noise that may be a result of shooting at a high ISO. Typically, the sharpening amount should be 50 to 100. Oversharpening creates distracting halos. For a properly focused image, the radius can be one or less. When adjusting the sharpness, be sure to zoom in to 100%. This action can be achieved with the magnifying glass tool or the menu in the lower left corner of the image preview pane. The hand tool allows you to move the zoomed image to show the area of interest. Detail and masking are not necessary to change for most applications. Luminance noise reduction is helpful in small doses. At large settings, the image starts to look plastic and artificial. Color noise reduction, on the other hand, may be adjusted all the way to 100 without any adverse effects.
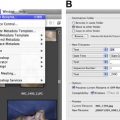
RAW Image Adjustment. This sample image is slightly off center and a little crooked. To center the image, it can be cropped. Select the crop tool and hold down the mouse button. A menu pops up allowing selection of the aspect ratio ( A ). Digital SLR images are 2:3, so selecting that option preserves the native proportions. Next, click and drag on the image to make a rectangle of the appropriate size to center the image. The corner handles can be used to fine-tune the crop ( B ).
RAW Image Adjustment. To straighten the image, select the straighten tool. Click and drag to create a line that is in the desired vertical or horizontal direction. When the mouse button is released, the image rotates to the new orientation. Sometimes the crop handles need to be readjusted after this step.
RAW Image Adjustment. If the size, bit depth (JPEG images need to be 8-bit color), pixel density, or image size needs to be adjusted, select the workflow options at the bottom. Once the parameters are satisfactory, click O pen I mage if you need to make further changes, such as adding a watermark or removing dust. Otherwise, selecting S ave I mage converts it to the format of your choice. Choosing D one updates the XML data in the RAW file to reflect your changes and close it. One of the benefits of shooting RAW is that all of the edits are nondestructive. Although the XML data are updated, no changes are made to the actual RAW file.
Correcting color balance
Color balance is frequently inconsistent when shooting photographs with different cameras or under different lighting circumstances. When shooting in the clinic, the easiest way to standardize the color is to designate a part of the office as a photography studio and control the lighting and camera settings. This space does not need to be big. Some facial plastic surgeons have repurposed closets as photography studios with good results. Digital cameras have a white balance setting that is calibrated for flash. At a minimum, fix that setting to improve the consistency in your photographs.