Key points
- •
Volume changes with aging.
- •
Restoration of volume for facial aging and rejuvenation.
- •
Planning for facial contouring.
- •
Managing the mimetic muscles in facial aging and contouring.
- •
Combination therapy for facial aging.
Introduction
The use of synthetic fillers to restore facial volume is one of the most important strategies in non-surgical rejuvenation, constituting one of the four pillars of rejuvenation ( ) or four ‘r’s’, these being: relax (muscles with botox), restore (volume with injectable synthetic fillers), redrape (sagging tissues with barbed sutures) and resurface (skin with non-ablative modalities).
Surgical rejuvenation of the periorbital area with volume has been described by numerous authors such as Flowers who used silicone implants to improve the tear trough ( ), who redistributed orbital fat into the groove, Little ( ) who used dermal fat grafts in the same region, and notably Coleman who introduced us to the concepts of and successfully used autologous fat to support the lower lid, improve malar volume, glabellar height and to elevate the eyebrows ( ).
In the non-surgical arena, the use of fillers in the periorbital region confers a greater degree of rejuvenation to the patient’s face than any other modality, the results often being dramatic and surprisingly simple to perform. This can be achieved almost painlessly within the space of minutes, with minimal downtime and with patients able to resume an active social life the same day. It is also rewarding to see an initially tired looking patient leaving the clinic with a refreshed periorbital region and hence rejuvenated appearance. However, to the inexperienced injector, injecting around the eyes is laced with numerous pitfalls and can conversely lead to disastrous results and extremely unhappy patients if improperly performed or if the wrong filler is chosen. This chapter aims to introduce the reader to the concepts of using fillers to create a beautiful periorbital area.
Definition
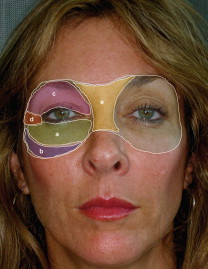
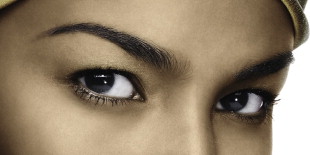
The periorbital region is a delicate and complicated three-dimensional zone, possessing numerous continuous contours of highlights and lowlights which fit into the area that sits under a Venetian mask or a pair of protective laser goggles ( Figure 8.1 ). This is the area we accept as youthful and mentally take for granted until aging distorts the contours and the region suddenly appears old or tired. It does not consist only of the upper and lower eyelids but also includes the neighbouring regions which contribute to the support of the lids and also help to define the visual start and stop points of the eyelids.
This complex periorbital region consists of:
- •
the lower lid and the infraorbital groove (including the nasojugal groove),
- •
the infraorbital soft tissue and malar mound,
- •
the upper eyelids, orbital sulcus and eyebrows,
- •
the lateral canthal region,
- •
the glabellar region and root of the nose.
Restoring volume to all of these regions where indicated creates a smoother more harmonious appearance than just concentrating on the nasojugal groove or the supraorbital sulcus alone. Aging affects all soft tissues around the eyes at the same time and if a nasojugal groove or supraorbital hollow has developed it is most likely that the other neighboring areas would similarly have been affected and undergone some deflation too.
The hollow zones
To assist in understanding the process of aging around the eyes and the reversal of this through the use of fillers, I introduced a zone concept of the periorbital and midface area called the lower eyelid midface hollow zones ( ) ( Figure 8.2 ). In the infraorbital area, zone 1 represents the medial infraorbital groove, zone 2 the middle infraorbital groove and zone 3 the lateral infraorbital groove. These three zones represent the junction between the eyebag and the cheek and lie directly over the infraorbital rim. They are easily seen in most patients and palpation of these zones will reveal that there is often just skin on top of bone. This area is an early casualty of the aging face as the soft tissues of the face deflate and descend, opening up the junction between the eyebags and the midfacial soft tissues that in youth are snugly adjacent to each other.
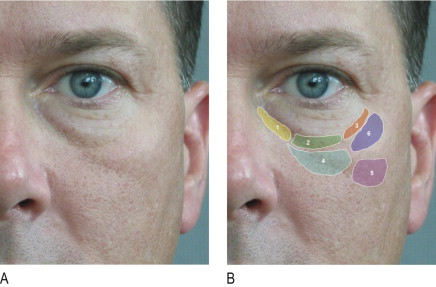
Zone 4 is the infraorbital hollow that occurs directly beneath zone 2. It corresponds to the position of the infraorbital foramen and occurs as the pad of fat around the infraorbital nerve attenuates or atrophies. It is in fact the first hollow to appear in the orbital-midface area even as early as one’s 20s. I call zone 4 the ‘first sign of aging’. The nasojugal groove or ‘tear trough’ which has become the intense subject of rejuvenation in recent years is actually zone 1 extending obliquely down into zone 4 and incorporating part of zone 2. Zone 5 is the infrazygomatic or submalar hollow and zone 6 the malar mound itself. Whilst these two areas may seem distant from the infraorbital groove, they are in fact related and important as one needs to fill continuously from the lower lids all the way to zones 4, 5 and 6 to achieve balance and a natural, smooth outcome. Zone 1, 4 and 5 also correspond clinically to the malar groove, which is an extension of the tear trough across the midface that creates a tired, fatigued appearance.
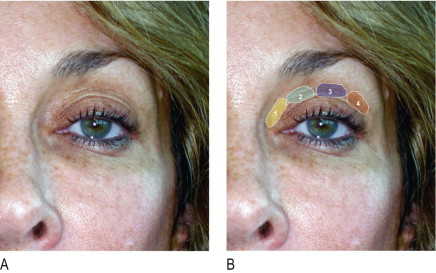
I use a chart of these hollow zones for every case of periorbital rejuvenation in order to analyze which zones are the most frequent zones filled and the relative amounts required in each zone. In our own analysis of more than 2000 cases of periorbital rejuvenation from 2000 to 2007, zone 4 was the most frequently filled followed by zones 2 and 5. In the upper lids, I use a similar chart of upper eyelid hollow zones ( Figure 8.3 ). Zone 1 is the region corresponding to the medial fat pad, zone 2 is the hollow that overlies the supraorbital foramen, zone 3 corresponds to the middle fat pad and zone 4 the lateral fat pad.
Characteristics of youthful eyes and the orbital ‘picture frame’
Youthful eyes are characterized by firmness, tautness and smooth contours in the upper and lower lids. In the upper lid there should be a crisp, well defined, supratarsal crease with fullness of the supraorbital area and a continuous, smooth contour all the way up to the eyebrows. The eyebrows should be full and low with the medial brow smoothly transitioning into the root of the nose thus creating a gently curved nose–orbit line. This aesthetic is no different today from 65 years ago.
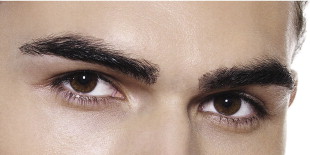
The differences between male and female upper lids must also be taken into consideration. Male eyebrows are lower and flatter with less apparent height between the supratarsal crease and the eyebrows ( Figure 8.4 ). In women, it is permissible for this height between the supratarsal fold and the eyebrow to be greater and for the central part of the eyebrow to arch upwards ( Figure 8.5 ). We must also be sensitive to the different aesthetics in different faces and different races and not try to fill every hollow in the periorbital region. Some faces due to the bony configuration and structure look attractive with less fullness of the upper lid whereas others just look hollow; oriental upper eyelids are naturally quite full and they may require more fillers than a caucasian upper eyelid.
In the lower lids there is less argument about how much volume is required and the end point of correction. There should be a smooth transition across the lid-cheek junction without evidence of the nasojugal, tear trough or the infraorbital groove in all races. There should be fullness of the lateral canthal area as this blends with the malar mound and the lateral aspect of the upper lid and brow. There should be a hint of the pretarsal infraorbital muscle bulge creating the impression that the lid-cheek junction is high and close to the lash-line. Together with a well defined, low supratarsal crease, this has the effect of creating a ‘picture frame’ around the eye which itself is the painting. The narrower the frame, the more youthful the eye looks. Hollowing of the supraorbital area adds unflattering shadows to the upper lid and weakens the supratarsal crease spoiling the effect of this picture frame in the upper lid. The development of eyebags or skeletonization of the infraorbital rim also distorts this picture frame by lowering the lid cheek junction and making the eyes look old, tired and unattractive.
Choice of filler
There are so many fillers available today that a beginner can be at a loss as to which to choose. In my opinion, it is always best to use a resorbable filler around the eyes and nose. I prefer a hyaluronic acid (HA) filler of which there are a few I use frequently. All fillers can give the same initial good result and correction but it is what happens subsequently that determines my choice of which filler to use. Some HA fillers have less cross linking or are less viscous and after injection have a tendency to absorb water. This can result in a swollen, waterlogged appearance which takes many days or even weeks to subside. I always use the most viscous HA fillers (those that require injection through a 27 G needle) for the periorbital region but switch the needle to a 30 G needle. This slows down the flow of injection which is good as it provides the injector with more control. I also find these more viscid fillers to have less post injection swelling or oedema and thus to be more stable, especially when injecting in the nasojugal area or in the upper lid.
I seldom use fillers with permanent particles any more. I have done so many times in the past with good outcomes but, on occasion, patients have developed granulomas, lumps or unusual hardening several years after the injection. Using these fillers, many of my patients have received excellent long lasting corrections of the periorbital area, some lasting up to 7 years without requiring refilling but the unpredictable nature of these fillers has made me switch to pure HA fillers. I will only use a filler with permanent particles if the patient is fully aware of the consequences and that complications may develop many, many years later.
Where to inject: superficial or deep?
I always prefer to inject as deeply as possible (under the muscle) but sometimes this is not possible. In certain areas, the nature of the groove or hollow dictates that the filler be placed just beneath the skin. In the infraorbital grooves and the infraorbital hollows (zones 1–4), I prefer to use the inverted cone (vertical withdrawal) technique. Here, I introduce the needle perpendicular to the skin surface and advance it all the way down till I touch bone. I then start to inject a small bolus on top of the bone and then continue injecting as I withdraw the needle such that there is less fill as the needle approaches the skin. Vertical columns of inverted cones (broader at the base, narrower at the top) are created which I believe provide better structural support. I then repeat this process at adjacent points until filling is complete. Placement of the filler subperiosteally is a myth and I do not think that this is possible! If one is familiar with how much effort is required to raise the periosteum from the bone, you will realize that the pressure from an injection alone will not be able to achieve this.
Anaesthetic technique
For all filling around the eyes, I first administer local blocks with 2% lidocaine mixed with 1 : 200,000 epinephrine to the infraorbital, zygomatico-facial and supraorbital nerves. The first is easily detected by palpating for the bony depression just beneath the infrorbital rim whilst the zygomatico-facial foramen is located about 1.5 cm below the lateral canthal tendon. The supraorbital foramen can be palpated just under the supraorbital rim where there is usually a significant notch. Only 0.25 mL is injected at each point so as not to distort the contours of the periorbital region with too much anesthetic. I try to inject to the side of where the nerve emerges from the bone to reduce bruising and trauma to the nerve itself. I also feel that the epinephrine helps to constrict the blood vessels in this region diminishing the risk of any retrograde injection and embolism of these vessels by the filler material.
Correcting the lower lids and the infraorbital groove
The lower lid and infraorbital area is the most important area to correct when performing periorbital rejuvenation. All other areas are refinements. This is because the development of hollows under the eyes or in the mid malar area confers a debilitated look to the patient that does not improve with facelifting, threadlifting, botox or even skin resurfacing. Surgically, we can correct this area by performing lower lid blepharoplasty with or without fat redistribution or tightening of the lid cheek complex to the lateral canthal tendon. However, downtime is significant and patients today want the same results with minimal to no downtime. Fillers have become the most important tool in this respect.
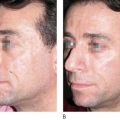
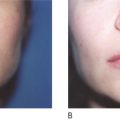
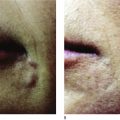
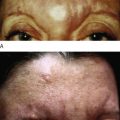
Patients are often unable to verbalize what is wrong with them, resorting to telling the surgeon that despite adequate rest, they look tired and not fresh. Invariably, there will be infraorbital hollowing and shadows. This is where the judgment of the surgeon has to be exercised to determine the best strategy for the patient. The first thing the surgeon must decide is whether the patient has significant eyebags or not and whether the shadows created are due to the bulging of the eyebags or whether there is predominantly an infraorbital groove or both. If the eyebags are bulging and large, these may have to be removed first and a simple transconjunctival removal of the fatpads can achieve this. If the eyebags are modest and the infraorbital groove more prominent due to periorbital skeletonization or midface sagging and volume depletion then these are good candidates for filling (see Case Study 1 , Figure 8.7 ). Even young patients in their late teens to twenties can show signs of early aging and this is characteristically in zones 1, 2 and 4. Correction of these areas restores a youthful appearance (see Case Study 2 , Figure 8.8 ).
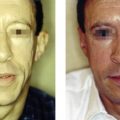
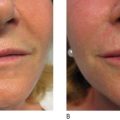
We must realise that the eyebags and the infraorbital groove are two separate entities. Removing the eyebags alone may not improve the infraorbital groove or tear trough but it does make it easier to subsequently fill these zones in. When assessment reveals that the patient has both eyebags and a groove, I first perform a simple transconjunctival blepharoplasty and then a month later when the swelling has completely resolved, fill in the infraorbital groove to smoothe out the lid cheek junction (see Case Study 3 , Figure 8.9 ).
For those patients with modest to no eyebags yet but who have significant shadowing of the infraorbital groove and tear trough area, filling is a good solution. After administering the local blocks I commence with the filling of the infraorbital area using the vertical withdrawal technique described above. It is easier to start with deep injections in zones 4 and 2 before moving on to zones 1 and 3. This is because zone 4 is fleshier and zone 2 directly overlies the bone. Injecting here first gives the surgeon a good idea of the tissue resistance and expansibility of the soft tissues. Very little filler is required with each plunge of the needle. In zones 1 and 3 it is treacherously easy to overcorrect these areas. This must be avoided. If after filling zones 4, 2 and 1 deeply there is still grooving of the skin, then the injections have to be delivered in very tiny droplets just under the skin. This is so especially in the upper part of zone 1 where the groove tends to be away from the bone and more in the superficial soft tissue. In this case, the vertical column technique is not used and instead microdroplets of the filler are seeded into the subdermal area of the groove.
In all injections of the infraorbital groove it is important to palpate the underlying bone, palpate for the eyebag and visualize where the orbital septum is attached to the infraorbital rim. You do not want to inject deeply above or behind this as you will only be making the eyebag and the infraorbital groove worse. After each injection, pressure should be applied to each point to contour the filler and blend it with the surrounding tissue. What is to be avoided is to retrogradely inject the filler along the line of the infraorbital groove as this creates a tube like effect of the filler. If this is too close to the skin, a bluish appearance can develop which disturbs patients greatly. Injecting too much filler into zone 1 muscle should also be avoided as this creates a sausage like bulge which becomes more prominent when the patient smiles and when there is contraction of the orbicularis muscle.
After injecting zones 1–4 it may become apparent that there is concomitant hollowing of zones 5 and 6 and these must also be filled in order to create a smoothly contoured effect. For modest infraorbital grooves, 0.3–0.5 ml per side is all that is required but in more severe cases, this can go up to 2 mL per side especially if filling in zones 4,5 and 6 at the same time.
Related posts:
 Third generation polymethylmethacrylate (PMMA) aesthetic soft tissue fillers for the correction of nasolabial folds and other applications
 Injectable silicone: current role
 Poly -l-lactic acid (Sculptra®)
 Avoidance and treatment of complications after dermal filler injections
 Possible causes and treatment options of dermal filler granulomas
 Shaping the future: new outcomes in Europe
Stay updated, free articles. Join our Telegram channel

Full access? Get Clinical Tree


