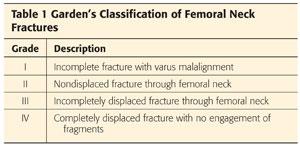
Femoral neck fractures are classified according to the Garden classification (Table 1).9
This classification divides these fractures into displaced or nondisplaced fractures. Guidelines for treatment of nondisplaced femoral neck fractures are beyond the scope of this chapter.
 The indications for a hemiarthroplasty of the hip include displaced femoral neck fractures and salvage for massive acetabular osteolytic defects in revision total hip arthroplasty (THA). Ideally, hemiarthroplasty should be reserved for elderly patients with low functional demands with displaced femoral neck fractures. Younger, more active patients may have improved outcomes with THA.16
 Published reports suggest that bipolar hemiarthroplasty has poor outcomes when used as a primary prosthesis for failures with degenerative joint disease, and this technique currently is not recommended. Similarly, poor results have been noted in osteonecrosis of the femoral head.11
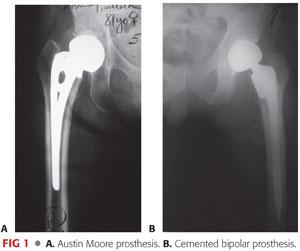
 The two types of hemiarthroplasty implants are the unipolar type (eg, Austin Moore; FIG 1A) and the bipolar type (FIG 1B).
The bipolar prosthesis has been favored because of its theoretical reduction of wear on the acetabular side. Motion between the inner and outer heads of the prosthesis leads to less motion at the acetabulum–implant interface.13
ANATOMY
 The neck–shaft angle is about 130 ± 7 degrees in adults and does not vary significantly between genders.
 The femoral neck is anteverted 10.4 ± 6.7 degrees with respect to the femoral shaft in Caucasians.
Some ethnic groups (eg, Asians) have a propensity for higher degrees of anteversion, up to 30%.
 Femoral head diameters range from 40 to 60 mm.
 Femoral neck length and shape vary considerably.
In cross-section, the femoral neck is cam-shaped, with a shorter anteroposterior (AP) than mediolateral diameter.
 The calcar femorale is a condensed, vertically oriented area of bone that originates superiorly toward the greater trochanter and fuses with the cortex at the posterior aspect of the femoral neck.
 The major vascular supply of the femoral head comes from the lateral epiphyseal branch of the medial femoral circumflex artery.
Other contributing vessels include the inferior metaphyseal artery, arising from the lateral femoral circumflex artery, and the medial epiphyseal artery through the ligamentum teres, arising from the obturator artery.
PATHOGENESIS
 In elderly persons, a femoral neck fracture is usually the result of a fall.
 Several mechanisms have been proposed:
A direct blow to the lateral aspect of the greater trochanter from a fall
A sudden increase in load with the head fixed in the acetabulum along with a lateral, rotatory force. This causes impaction of the posterior neck on the acetabulum.
A fatigue fracture that precedes and causes a fall
The incidence of femoral neck fractures increases as bone density falls to osteoporotic levels.
 Femoral neck fractures in young patients typically are the result of high-energy mechanisms.
The mechanical explanation is axial loading of the distal femur or the foot if the knee is extended.
The amount of bony displacement and associated soft tissue injury can be much higher.
 Displacement of a femoral neck fracture can lead to disruption of the vascular supply of the femoral neck.
This vascular compromise may contribute to the high incidence of avascular necrosis (AVN) with this injury.
 If femoral neck fracture occurs, the intraosseous cervical vessels are disrupted.
The risk of AVN generally corresponds to the degree of displacement of the fracture of the femoral neck on initial radiographs.
In displaced fractures, most of the retinacular vessels are disrupted. Femoral head blood supply is then dependent on remaining retinacular vessels and those functioning vessels in the ligamentum teres.
The role of early fixation and joint capsulotomy in prevention of AVN remains controversial.
 The incidence of nonunion following a displaced fracture is as high as 60% with nonoperative treatment in some reports.
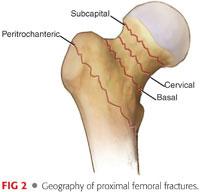
 Femoral neck fractures can be divided into subcapital, transcervical, and basicervical types, based on the location of the injury.
Basicervical fractures can often be treated in a manner similar to intertrochanteric fractures with regard to fracture fixation (FIG 2).
NATURAL HISTORY
 Femoral neck fractures are most commonly seen in patients older than age of 50 years.14
 Patients with a single femoral neck fracture have an increased risk of sustaining a second hip fracture.
 Bateman2 and Gilberty10 reported the use of a bipolar prosthesis.
The rationale was that less erosion and protrusion of the acetabulum would occur because motion is present between the metal head and polyethylene socket’s inner bearing.
Acetabular wear is diminished by reduction of the total amount of motion that occurs between the acetabular cartilage and metallic outer shell with interposition of the second low-friction inner bearing within the implant.
Overall hip motion also may be greater because of the compound bearing surface.
 Barnes et al1 showed that mortality in the first month postoperatively was substantial: as high as 13.3% in men and 7.4% in women.
More importantly, delaying surgery beyond 72 hours led to a substantial increase in the mortality rate.
 Factors influencing mortality in cemented bipolar hemiarthroplasty include cardiac history, residence in a nursing home, chronic pulmonary disease, elevated serum creatinine, pneumonia, history of myocardial infarction, duration of surgery, and gender.8
 Associated injuries may include subdural or epidural hematoma and ipsilateral upper extremity injury for low-energy fractures.
High-energy fracture patterns have a higher incidence of associated injury, including closed head injury, pneumo- or hemothorax, spinal fracture, visceral injury, and ipsilateral lower extremity bony injury.5
PATIENT HISTORY AND PHYSICAL FINDINGS
 A complaint of groin, proximal thigh, or, rarely, lateral hip pain following a fall in an elderly patient should raise suspicion for a low-energy femoral neck fracture.
 If a patient has fallen on the floor and is unable to ambulate, that should also raise suspicion for a femoral neck fracture.
 The patient’s preinjury ambulatory status must be ascertained when the history is taken. His or her preoperative activity level can help determine the most appropriate type of surgical management.
 Care must be taken to evaluate other possible sources of injury about the hip as well as associated ipsilateral injury.
Pelvic fracture: Associated injury to the pelvic rami is common. Radiographs are useful in diagnosing these associated injuries.
Acetabular fracture: In a low-energy injury, acetabular fracture is an uncommon association with a femoral neck fracture. However, this is not the case in high-energy injury patterns. Thin-slice computed tomography (CT) may be useful for diagnosing this injury.
Inter- and subtrochanteric fracture: Injury to the intertrochanteric area is commonly seen about the hip in elderly patients. Subtrochanteric fractures are less common. Usually, the limb is held in extension, not in a flexed, externally rotated position. Radiographs again are useful for establishing the diagnosis.
 A thorough physical examination should include the following:
Observation of the lower extremity. If it is shortened, externally rotated, and painful to move, a joint effusion secondary to fracture hematoma is most likely responsible, which increases the available space in the joint capsule.
Logroll maneuver, which is the most sensitive physical finding. A positive result elicits pain at the groin due to the side-to-side movement of the lower extremity, which creates shear forces across a femoral neck fracture, leading to exquisite pain.
Axial load test, which is positive if the maneuver elicits pain at the groin. This test is less specific than the logroll test.
Range-of-motion tests. Pain at the end points of the range of motion may be the only clue to detect a nondisplaced occult fracture.
IMAGING AND OTHER DIAGNOSTIC STUDIES
 Plain radiographs of the AP pelvis and injured hip should be obtained.
If possible, the legs should be immobilized in internal rotation for the film.
A shoot-through lateral radiograph is useful for determining the degree of displacement of the fracture fragment, especially for fractures that appear minimally displaced on an AP view.
 A radiograph taken while applying axial traction is helpful to determine location of the fracture along the femoral neck if displacement of the fracture fragments obscures a view of the fracture pattern.
 CT scanning is useful for identifying nondisplaced fractures when clinically suspected as well as associated injuries. However, it usually is not employed for an isolated, low-energy femoral neck fracture.
 Radionucleotide uptake bone scans are helpful in identifying occult femoral neck fractures but may take up to 72 hours to be apparent on film.
 Magnetic resonance imaging is more sensitive to identifying occult femoral neck fractures than CT scan or bone scan within the first 72 hours.
It also is highly sensitive to identifying occult fractures at the ipsilateral intertrochanteric area.
DIFFERENTIAL DIAGNOSIS
 Intertrochanteric fracture
 Subtrochanteric fracture
 Pelvic fracture
 Acetabular fracture
 Hip contusion or traumatic trochanteric bursitis
NONOPERATIVE MANAGEMENT
 Femoral neck fractures are rarely managed nonoperatively. Both nondisplaced and displaced fracture patterns have better functional and overall outcomes when treated surgically.
Nonoperative management may be relatively indicated in the patient with severe medical comorbidities who is unable to tolerate anesthesia for surgical intervention.
Because nondisplaced fractures can be internally fixed with percutaneous techniques under local anesthetic and monitored sedation, nonoperative treatment is usually not indicated for this fracture type.
 In most cases, nonoperative treatment should be limited to initial management of the injury before surgical stabilization.
A soft pillow should be placed under the patient’s knee and leg to keep them in a comfortable position.
 All patients with femoral neck fractures should be placed on strict bed rest with a Foley catheter and intravenous fluids on admission.
 Axial traction of the injured lower extremity is contraindicated for femoral neck fractures because it can increase displacement of the fracture fragments.
SURGICAL MANAGEMENT
 The best method of surgical fixation of femoral neck fractures is controversial. The debate between internal fixation versus hemiarthroplasty versus THA continues and is beyond the scope of this chapter.
 General indications for surgical management using hemiarthroplasty include the elderly patient with low functional demands or poor bone quality not amenable to internal fixation.
 Hemiarthroplasty is indicated for patients with displaced femoral neck fractures who meet the following criteria:
Reasonable general health
Pathologic hip fractures
Neurologic diseases including Parkinson disease, previous stroke, or hemiplegia
Physiologic age older than 75 to 80 years
Severe osteoporosis with loss of primary trabeculae in the femoral head
Inadequate closed reduction
Displaced fracture
Preexisting hip disease on the femoral side, namely osteonecrosis, without any acetabular disease
 Contraindications include the following:
Preexisting sepsis
Young age
Failure of internal fixation devices, mainly because of acetabular damage that often occurs in that situation
Preexisting acetabular disease. Even patients with normal preoperative cartilaginous space may become symptomatic after about 5 years due to degradation caused by friction between the metal and the acetabular cartilage.
 Indications for cementing a femoral stem vary from surgeon to surgeon and institution to institution.
Primary candidates for this approach are patients with poor bone quality, such as those with a stovepipe femur or Dorr type C femur.6 These patients can be difficult to manage with uncemented implants because they require either massive, canal-filling, uncemented implants that often produce significant stress shielding of the femur or have proximally filled implants that can make accurate adjustment of limb lengths very difficult.
Antibiotic-impregnated cement may be advisable for certain high-risk groups of patients. Some patients, such as those on dialysis, may be more prone to sepsis, and use of antibiotic-impregnated cement may be considered appropriate.
• Appropriate antibiotics include tobramycin, vancomycin, cefazolin, and erythromycin.
Cemented stems also should be considered for patients with pathologic fractures. For these patients, the use of cement with a bone-replacing prosthesis may be the preferred treatment, regardless of age or bone quality.
The first-generation cementing technique involved finger-packing without the use of pressurization and a reduction of porosity. Modern cementing techniques use a medullary brush, cement restrictor, medullary pulsatile lavage, the insertion of epinephrine-soaked sponges, reduction of cement porosity (ie, vacuum mixing), cement centralizers, and a cement gun for retrograde cement insertion, after which pressurization can be performed with a surgeon’s gloved finger or, alternatively, with a wedge-shaped pressurization device.
Because of the embolic load secondary to pressurization, many surgeons avoid cemented components in patients with a history of cardiopulmonary disease.
Preoperative Planning
 It is important that the preoperative x-rays are reviewed and templated for appropriate size and for fixation.
 Appropriate implant selection should be undertaken, whether to proceed with a tapered stem, a fully coated medullary-locking stem, or a cemented stem.
 The patient should undergo an appropriate preoperative workup including medical, cardiac, and anesthesia evaluations.
Banked blood should also be available.
Important preoperative laboratory studies include complete blood counts, electrolytes, and coagulation studies.
Additional blood tests could include total protein, albumin, and appropriate liver studies to evaluate the patient’s overall nutritional status.
 Electrocardiogram, chest radiograph, and possibly, further cardiac studies, including echocardiogram, may be appropriate preoperatively.
 The femoral head size must be evaluated to establish the correct component size.
If the component is too large, equatorial contact occurs, which can result in a tight joint with decreased motion and pain.
If the component is too small, polar contact occurs, leading to increased contact stresses, and, therefore, to greater erosion and possible superomedial migration.
 It is also important to template neck length and offset.
If the neck length is too long, reduction can be difficult, and the increased soft tissue tension could lead to increased pressure on the acetabular cartilage.
The offset should be reproduced postoperatively. It can be created by evaluating the distance between the center of the femoral head and the greater trochanter, thereby restoring the length of the abductor mechanism and decreasing postoperative limp.
 These procedures can be performed under spinal or combined spinal and epidural anesthesia because hypotensive anesthesia can have the benefit of reducing blood loss.
 Prophylactic antibiotics are administered before the surgery.
 The procedure must be performed in a clean operating room with laminar flow. Vertical laminar airflow in conjunction with operating suite and body exhaust systems is helpful.
 Associated injuries should be addressed concurrently if possible.
Positioning
 Patient positioning is important and should be done very carefully.
 General positioning principles include padding all bony prominences, positioning the patient in a stable position for implant placement, and creating a range-of-motion arc so that implant position and stability can be tested intraoperatively.
Supine Position for Direct Approach (Smith-Petersen) Approach
 Once the patient is adequately anesthetized, he or she is placed in a supine position, which allows for direct measurement of leg length.
 The operating table is placed in a flat position.
 The patient is brought down the table so the leg break is at the level of the midthigh. In order to facilitate this positioning, the headpiece is often placed at the foot of the bed.
 A bump is placed beneath the sacrum. This sacral pad is constructed of folded sheets or a gel bump approximately 1.5 to 2 inches in height and rectangular with an approximate dimension of 12 × 10 inches (FIG 3).
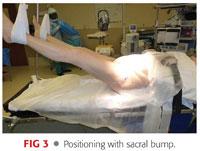
The modest elevation of the sacrum allows the femur to drop posteriorly when sizing and inspecting the acetabulum.
It also allows hip stability to be evaluated in extension.
 Both arms are placed on arm boards secured at 90 degrees of abduction.
Supine Position for Direct Lateral (Modified Hardinge) Approach
 Once the patient is adequately anesthetized, he or she is placed in a supine position, which allows for direct measurement of leg length.
 The operating table is placed in a flat position.
 The patient is brought to the edge of the table so that the operative hip slightly overhangs the edge of the table.
 A bump is placed beneath the sacrum. This sacral pad is constructed of folded sheets or a gel bump approximately 1.5 to 2 inches in height and rectangular with an approximate dimension of 12 × 10 inches.
 The modest elevation of the sacrum allows the fat and soft tissues from above the trochanter to fall posteriorly away from the incision, thereby minimizing the amount of tissue that must be dissected in a lateral approach.
It also allows hip stability to be evaluated in extension.
 A footrest is fixed to the operating table, so that the surgical hip is flexed 40 degrees.
 Both arms are placed on arm boards secured at 90 degrees of abduction.
 The operating room table is inclined 5 degrees away from the operating surgeon to improve visualization of the acetabulum.
Lateral Position
 The lateral position is used for a posterolateral approach to the hip and can also be used for an anterolateral approach.
 Once the patient is adequately anesthetized and a Foley catheter is inserted, they are placed in the desired position in a gentle, organized fashion.
The anesthesiologist controls the patient’s head and neck, holding the endotracheal tube securely.
One surgical team member controls the patient’s hands and shoulders, and another controls the patient’s hips.
 The ipsilateral arm is positioned in no more than 90 degrees of forward flexion and slight adduction.
 An axillary pad is placed by lifting the patient’s chest and positioning the pad distal to the contralateral axilla.
 The contralateral arm must be kept in no greater than 90 degrees of forward flexion.
 Extremities are padded over all bony protuberances.
 The operating room table must be kept in an absolute horizontal position, parallel to the floor.
 A number of holders can be used to hold the patient in a lateral decubitus position.
A beanbag can be used, although it is not as rigid as a variety of other types of holders. The pubis and sacrum must be secured in the holder.
Placement of the pubic clamp must be done cautiously, with the pad directly against the pubic symphysis.
• Placement of the pad more inferiorly causes occlusion or compromise of the femoral vessels in the opposite limb, which may go unrecognized.
• Placement of the pad superiorly may compromise ipsilateral femoral vessels and may prevent adequate flexion and adduction of the operated hip.
 A sacral pad is placed over the midsacrum. It should be at least 3 to 5 inches away from the most posterior end of the skin incision (FIG 4A).
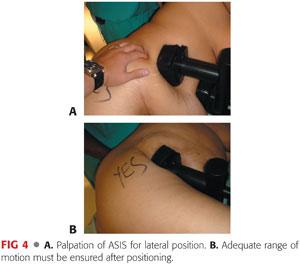
 When the patient is securely positioned in lateral decubitus, the position of the pelvis is checked to make sure that it is not tilted in the AP direction (FIG 4B).
 A chest positioner and pillows between the arms are helpful in preventing anterior displacement of the torso.
 The perineum is isolated using an adhesive U-shaped plastic drape.
Approach
 Hemiarthroplasty can be performed through a number of different approaches.
 There are four commonly employed approaches to the hip joint:
Anterior (Smith-Petersen)
• This approach uses the interval between the sartorius and the tensor fascia superficially and between the rectus femoris and tensor fascia deeply.
• Risks include injury to the lateral femoral cutaneous nerve.
• Allows the surgeon direct access to the anterior hip capsule
• Femoral preparation may be more challenging and require traction, hip extension, and the use of a hook to deliver the femur anteriorly for preparation.
Anterolateral (Watson-Jones)
Lateral (modified Hardinge)
Posterior (Southern)
 Choice of approach is highly dependent on surgeon preference.
I use a modification of the direct anterior as described by Smith-Petersen, Heuter, and Judet. Previously, I preferred a lateral muscle-splitting approach to the hip, as originally described by Hardinge, and the use of a cementless tapered stem.3
 A cemented stem can be implanted through a number of surgical exposures.
TECHNIQUES
 Anterior Approach (Modified Smith-Petersen)
Preparation of the Surgical Site
Both lower extremities are prepped into the surgical field. Plastic adhesive drapes are used to isolate the operative field from the perineum and adjacent skin.
A large U-drape is placed, isolating the perineum and abdomen from the hip and repeated for the opposite side.
A second drape is placed transversely above the level of the iliac crest, completing the isolation of the wound area from the abdomen and thorax. This is also done for the nonoperative side but to a lesser degree.
The excess drapes are debulked down the center (perineum) with silk tape.
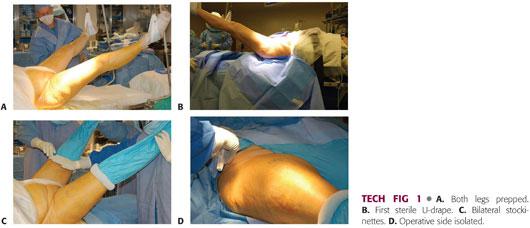
Both lower extremities are scrubbed with a chlorhexidine brush, followed by a preparation with chlorhexidine and alcohol (TECH FIG 1A).
The incision area is dried to allow better adherence of Ioban drapes (3M, St. Paul, MN).
A down sheet is placed and a surgical towel is placed over the crotch and perineum. Both limbs are removed from the leg holders and the surgeon grasps the foot with a double-thickness stockinette.
Impermeable drape is placed across of the bottom of the operating table up to the level of the patient’s buttock. This U-drape is placed bilaterally. A second U-drape is placed only on the operative side. A bar drape seals the upper portion of the surgical site (TECH FIG 1B).
The stockinette is unrolled to the level of the upper thigh and higher on the nonoperative side. A bilateral extremity drape is placed over both legs, not to exceed the stockinettes. The stockinettes are secured with a Coban dressing (3M) (TECH FIG 1C).
A rectangular window is cut off the drape over the surgical site and the sides are secured with staples. The surgical site is additionally prepped with a chlorhexidine and alcohol or Betadine and alcohol solution (TECH FIG 1D).
Skin Incision
The anterior superior iliac spine (ASIS) and greater trochanter are marked and an oblique skin incision approximately 3 to 4 inches in length and starting a finger’s breadth distal and lateral to the ASIS is outlined. This window is then sealed with Ioban drapes (TECH FIG 2A).
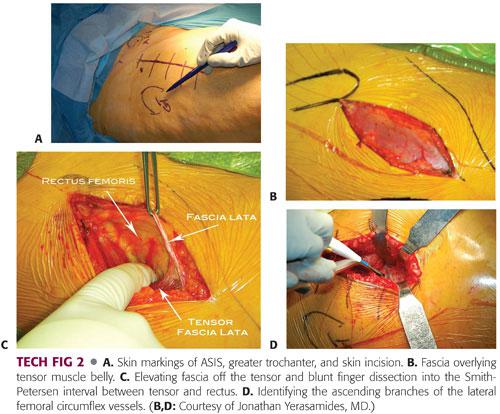
The skin incision is taken down through subcutaneous tissue to the tensor fascia. The fascia over the muscle is identified. The fascial incision is directly over the tensor muscle not directly in the interval. Too medial is over the interval and too lateral is over the fascia lata (TECH FIG 2B).
The fascia is incised and elevated bluntly medially with a pickup and finger dissection. The finger must wrap around the tensor medially, dropping into the interval between the tensor and rectus. This should be done bluntly (TECH FIG 2C).
A blunt Hohmann retractor is placed around the lateral side of the femoral head and a second double-angled Hohmann retractor is placed around the lateral femur (greater trochanter). Hibbs retractors are placed medially retracting the rectus. Ascending branches of the lateral femoral circumflex vessels are identified and coagulated or tied (TECH FIG 2D).
The distal fascia between the rectus and tensor is released, allowing the rectus to slide medially and allowing a second blunt Hohmann retractor to be placed around the medial side of the femoral neck. The rectus is then dissected from the anterior hip capsule with a Cobb elevator and a final blunt cobra retractor is placed on the anterior column.
Acetabular Preparation
The anterior hip capsule is fully exposed. Perforating vessels are coagulated. The capsule is opened in an H fashion and excised. Both blunt Hohmann retractors are placed intracapsularly. The femoral neck fracture is identified. A femoral neck osteotomy is performed distal to the fracture, using the saddle as reference at a 45-degree angle. Typically, a blunt osteotome can be used at both the osteotomy and fracture site to remove the fractured neck segment. A more proximal osteotomy may be performed as well in the subcapital area, if necessary, to remove that segment. The femoral head is removed with a power corkscrew.
The leg is then placed in a figure-4 position with a pointed Hohmann retractor below the lesser trochanter in order to assess the osteotomy level and perform medial capsular release (capsule above the lesser trochanter is released from the calcar). Once the level is determined to be satisfactory, the leg is placed back in a neutral position. Additional neck resection is performed if necessary.
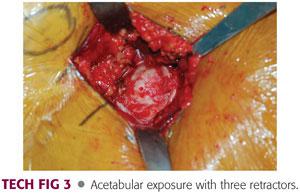
Three retractors are placed around the acetabulum. A blunt cobra retractor is placed on the anterior column above the labrum and beneath the capsule and rectus. A double-angled Hohmann retractor is placed at the level of the transverse acetabular ligament. A pointed Aufranc retractor is placed along the posterior acetabulum (TECH FIG 3).
The acetabulum should be inspected to remove any bony fragments and debris and then should be sized. The acetabulum should be sized with a trial bipolar or unipolar component to ensure that there will be good fit without overfilling the acetabulum.
This can be achieved with a good suction-tight feel with placement of the trial component.
Femoral Preparation
Attention is then placed to the femur.
The leg of the table is then extended 30 degrees. The nonoperative leg is placed on a padded Mayo stand. The operative leg is placed in a figure-4 position under the nonoperative leg (TECH FIG 4A).
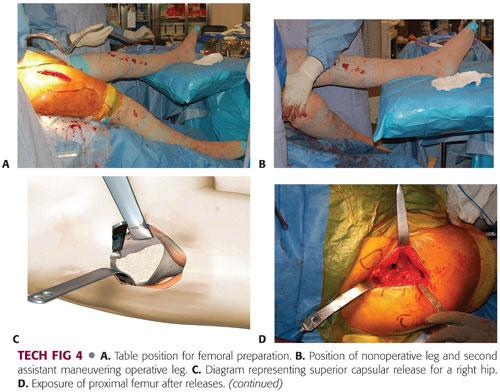
The second assistant places a hand on the knee, pushing down and adducting the leg, thereby creating external rotation, extension, and adduction of the operative femur. A double-footed retractor is placed along the posterior femoral neck and a double-angled retractor is placed along the anterior femoral neck (TECH FIG 4B).
The next step is to perform the femoral releases in order to prepare the femur. The releases include the superior or lateral capsule, which is draped in front of the inside of the greater trochanter when the leg is in externally rotated position. The medial aspect of the greater trochanter should be exposed. Additionally, the conjoint tendon, which consists of the inferior gemellus, obturator internus, and superior gemellus, may need to be released. Occasionally, the piriformis tendon may need to be released in a contracted hip (TECH FIG 4C).
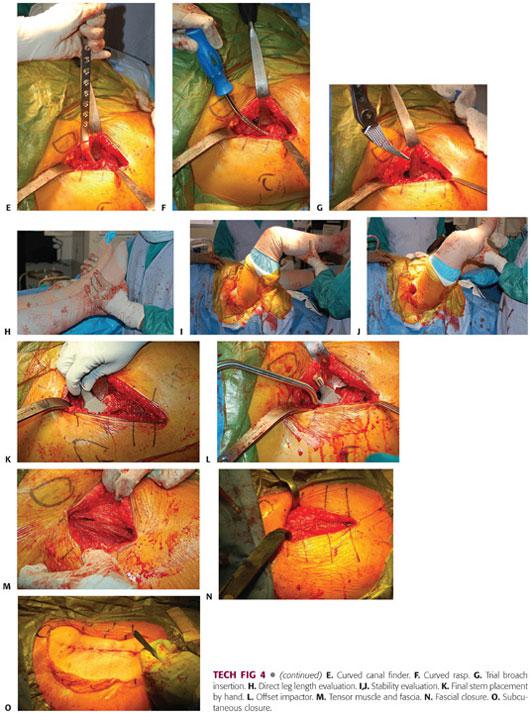
Once the proximal femur is adequately exposed, the proximal femur is sometimes opened with an offset box osteotome. More commonly, it is opened with a curved canal finder, a curved rasp, and a rongeur to further open the canal. A curette can be used to clear the medial side of the trochanter and the rongeur again in this area. The curved rasp should be used to open the canal as well as feel the cortices and appreciate the orientation of the femur (TECH FIG 4D–F).
The canal is sequentially broached until there is a tight feel. The broach should be stable to rotation.
• The femoral broach is introduced in a neutral position and neutral version of the rotation is judged in relation to the position of the knee and the calcar as well as the posterior femoral neck (TECH FIG 4G).
Broaching is begun with the smallest broach and then increased until appropriate fit and fill is achieved. This can be gauged by preoperative templating and tactile feedback.
The broach is introduced each time to its full depth.
If significant resistance is met, broaching should continue with a series of small inward and then outward taps.
Broaching is continued until full cortical seating has been accomplished. This is indicated by an upward change in pitch as the broach is being seated.
Final seating and sizing is determined by pitch, tactile feedback, and lack of progression.
Trial reduction is performed with a minus neck trial and a standard neck offset to start. The head should be carefully reduced. This will require flexion, traction, and internal rotation. The surgeon must carefully turn the bipolar head so that it may be reduced under the rectus and anterior soft tissue sleeve. If it is a difficult reduction, then the trial construct is typically too long and a smaller broach needs to be countersunk and the femoral neck recut. If it reduces too easily, then the trial construct may be too short or have inadequate offset.
Once a reasonable trial construct has been established, leg lengths are measured directly near the medial malleoli and heels. Anterior stability is checked with external rotation and extension in a neutral and adducted position. Posterior stability is checked with flexion and internal rotation. Once satisfactory stability is achieved, the final components are placed (TECH FIG 4H–J).
The final stem is placed by hand and impacted until final seating. The final bipolar hemiarthroplasty is assembled on the back table and impacted onto a clean trunnion (TECH FIG 4K,L).
The final prosthesis is reduced with flexion, traction, and internal rotation. The table is placed in a level position with a new downsheet. The wound is thoroughly irrigated and a medium Hemovac drain placed with a distal exit site.
Wound closure begins with interrupted absorbable sutures in the tensor fascia. Interrupted absorbable sutures are used for the subcutaneous tissues. Skin staples are applied to the skin, sealed with Dermabond and a final sealed hydrofiber dressing (TECH FIG 4M–O).
 Lateral Approach (Modified Hardinge)
Preparation of the Surgical Site
Plastic adhesive drapes are used to isolate the operative field from the perineum and adjacent skin.
A large U-drape is placed, isolating the perineum and abdomen from the hip.
A second drape is placed transversely above the level of the iliac crest, completing the isolation of the wound area from the abdomen and thorax.
The foot also is sealed with a plastic 10 × 10 drape, isolating the foot above the level of the ankle.
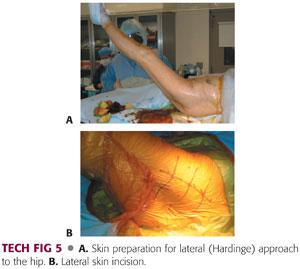
The operative field is scrubbed with a chlorhexidine brush, followed by a preparation with chlorhexidine and alcohol (TECH FIG 5A).
The incision area is dried to allow better adherence of Ioban drapes.
The limb is removed from the leg holder and the surgeon grasps the foot with a double-thickness stockinette.
An impermeable drape is placed across of the bottom of the operating table up to the level of the patient’s buttock.
The stockinette is unrolled to the level of the midthigh and secured with a Coban dressing.
The limb is draped sterilely using two full-sized sheets brought beneath the leg and buttock and held above the level of the iliac crest.
A double sheet is placed transversely across the abdomen above the level of the iliac crest.
A clean air room is sealed at the head of the operating table with sterile adhesive drape.
The hip area is marked using a sterile pen.
The greater trochanter is outlined.
The iliac crest and femoral shaft are palpated, and the skin incision, centered over the trochanter and slightly anterior, is drawn with large cross-hatchings (TECH FIG 5B).
The hip is flexed to 40 degrees and slightly adducted. The foot is placed on the footrest.
Incision
The skin incision is approximately 5 inches in length.
It is slightly anterior to the apex of the vastus ridge.
The length of the incision also depends on the patient’s degree of obesity.
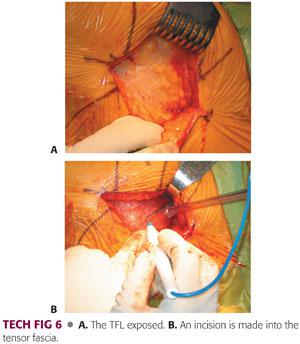
The skin incision is taken sharply through subcutaneous tissues down to the tensor fascia lata (TFL) (TECH FIG 6A).
The fascia is exposed to a small degree to allow the incision and subsequent closure.
Hemostasis is achieved in the subcutaneous tissue with electrocautery and bayonet forceps.
The incision through the fascia lata is in line with the skin incision.
A scalpel is used to penetrate the fascia lata and allow a safe entrance to the compartments.
The incision is continued with the use of heavy Mayo-Noble scissors. It is not undermined beyond the skin incision or distal or proximal to the skin incision (TECH FIG 6B).
Proximal Dissection
More proximally, the fibers of the gluteus maximus muscle are split using firm thumb dissection.
A Hibbs retractor is used to retract the anterior flap of the fascia lata.
Once that is done, the gluteus medius, greater trochanter, and vastus lateralis are clearly visualized.
The abductor mass is split.
The basic premise of the modified Hardinge approach is to develop an anterior flap, composed of the anterior portion of the vastus lateralis, anterior capsule, anterior third of the gluteus medius muscle, and most of the gluteus minimus muscle to allow exposure of the hip joint.
The muscle split is usually located in the anterior third of the gluteus medius.
The muscle split is made using electrocautery through the gluteus medius (TECH FIG 7A,B).
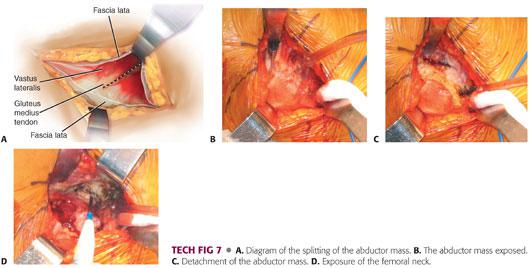
Once the gluteus medius is penetrated, the surgeon encounters a fatty layer, beneath which is found the gluteus minimus.
The gluteus minimus is isolated and a more posterior incision is made with the electrocautery through the gluteus minimus and the capsule onto the acetabulum (TECH FIG 7C).
A blunt Hohmann retractor is placed posteriorly to expose the gluteus minimus and capsule. The blunt end of the Hibbs retractor is used to retract the anterior aspect of the gluteus medius.
The capsule then is visualized in the depths of the wound.
The capsule is incised parallel to the superior aspect of the femoral neck and the incision is extended to the bony rim of the acetabulum with care not to damage the labrum.
This area is then packed with an E-tape sponge (TECH FIG 7D).
Distal Dissection
Attention is turned to the more distal aspect of the wound and the vastus lateralis.
The anterior third of the vastus lateralis is incised longitudinally using electrocautery, beginning at the trochanteric ridge and extending 2 to 3 cm beyond.
Once this is dissected subperiosteally in the anterior direction, a blunt Hohmann retractor is placed around the femur medially to reflect the vastus lateralis anteriorly.
An anterior bridge of soft tissue remains along the greater trochanter between the incision in the vastus lateralis and the incision in the gluteus medius and superior capsule. This bridge consists of the anterior fibers of the gluteus medius, minimus, and capsule.
This bridge is incised through the tendon in a gentle arc along the anterior aspect of the greater trochanter, connecting the incisions.
Healthy soft tissue must be present on both sides of this arc to allow effective repair during closure.
The bridge is dissected using electrocautery in the anterior aspect of the greater trochanter to develop a flap in continuity consisting of the anterior portion of the gluteus minimus and going around the gluteus medius, anterior hip capsule, and gluteus minimus. This exposes the femoral neck and head.
The dissection is carried medially until the medial aspect of the neck is exposed (TECH FIG 8).
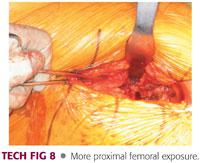
Exposure is usually adequate to allow for dislocation of the hip, femoral neck, or proximal femur.
A bone hook is placed around the neck of the femur anteriorly and the leg is externally rotated to allow for dislocation of the hip (ie, the hip is placed in the figure-4 position).
At this point, with a femoral neck fracture, the proximal femur will often dissociate from the femoral neck.
An initial rough cut of the femoral neck can be performed in line with appropriate preoperative templating.
Two blunt-tip retractors are placed around the femoral neck to protect the soft tissues.
Electrocautery is used to mark the femoral neck and an initial cut of the femoral neck is made with an oscillating saw.
Placement of Acetabular Retractors
Attention is turned to the acetabulum.
The first retractor is placed in the anterior acetabulum.
A small plane is created between the anterior wall of the acetabulum and the anterior capsule using a Cobb elevator.
A blunt-tip Hohmann retractor is placed in the 12 o’clock position anterior to the acetabulum beneath the capsule.
An assistant can then easily retract the anterior soft tissues.
The second spiked Mueller acetabular retractor is placed in the superior aspect of the acetabulum, retracting the superior capsule in the cranial direction.
The retractor is placed at 10 o’clock position for the right hip and 2 o’clock position for the left hip.
The exact placement of the retractor is outside the labrum and inside the capsule.
Using the impactor mallet, the surgeon drives this retractor into the ilium in a slightly cranial direction.
The tip is not driven perpendicular to the axis of the body because it may perforate the dome of the acetabulum.
To facilitate appropriate exposure prior to placement of the third retractor and to allow posterior mobilization of the proximal femur, a medial capsular release must be performed.
A curved hemostat is placed between the iliopsoas and capsule, anterior and in line with the pubofemoral ligament.
The capsule is incised medial to lateral, thereby increasing the mobilization of the femur in a posterior direction.
A third, double-angled acetabular retractor is placed inferiorly in the ischium.
It is placed with the blade of the retractor resting on the neck of the femur rather than on the cut surface.
Femoral Head Removal and Implant Sizing
At this point, the femoral head and neck are clearly visualized in the acetabulum.
The femoral head and neck fracture can be removed using a corkscrew in combination with a Cobb elevator or a tenaculum.
This should be done carefully so as not to damage the acetabular cartilage or the labrum (TECH FIG 9A,B).
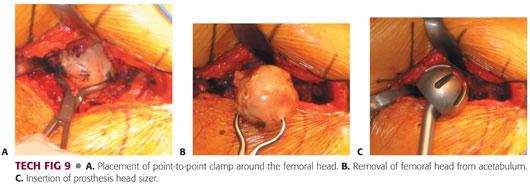
Once the femoral head is removed, it should be measured to enable the surgeon to estimate the size of the acetabulum.
The acetabulum should be sized with a trial bipolar or unipolar component to ensure that there will be good fit without overfilling the acetabulum.
This can be achieved with a good suction-tight feel with placement of the trial component.
It should move freely without resistance.
If it floats freely in the acetabulum, the trial component is undersized (TECH FIG 9C).
Femoral Reaming
The femur is exposed with the use of two double-footed retractors, one beneath the greater trochanter and a second retractor medially in the area of the calcar.
The leg is placed in a figure-4 position, crossed over the opposite thigh.
The femur should be easily exposed.
If there is difficulty in this exposure, the leg should be placed in a greater degree of figure 4 and rotation.
Excess soft tissue is removed from the tip of the greater trochanter to allow for reaming and broaching. This will prevent varus positioning of the component.
A large rongeur is used to open the femoral canal slightly.
A small, straight curette is introduced into the femoral canal in neutral orientation.
The second assistant should use his or her hand to create a target at the distal femur in line with the femur.
As the surgeon places the small curette, he or she can place his or her opposite hand on the patient’s knee to help direct the small metal curette in the appropriate orientation (TECH FIG 10A).
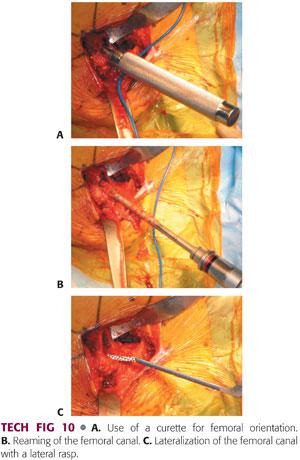
An entry reamer is then introduced into the femoral canal, pushed into valgus, and worked into the trochanter to ensure appropriate component positioning (TECH FIG 10B).
The bone within the area of the greater trochanter in the lateral aspect of the femoral canal is removed using a lateral rasp or a curette (TECH FIG 10C).
Femoral Broaching
The femoral broach is introduced in neutral position and neutral version of the rotation is judged in relation to the position of the knee.
Broaching is begun with the smallest broach and then increased until appropriate fit and fill is achieved. This can be gauged by preoperative templating and tactile feedback.
The broach is introduced each time to its full depth.
If significant resistance is met, broaching should continue with a series of small inward and then outward taps.
Broaching is continued until full cortical seating has been accomplished. This is indicated by an upward change in pitch as the broach is seated.
Final seating and sizing is determined by pitch, tactile feedback, and lack of progression (TECH FIG 11A).
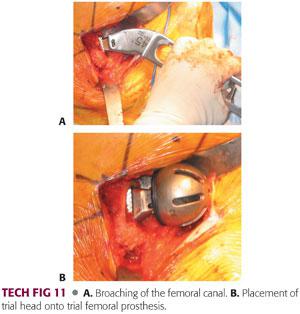
Once the final seating of the femoral broach is accomplished, an initial reduction with the appropriate-sized hemiarthroplasty bipolar or unipolar trial component is performed (TECH FIG 11B).
Evaluation of Trial Prosthesis
The hip is reduced for evaluation.
Hip stability is evaluated in full flexion and in internal and external rotation.
One finger is kept in the joint to evaluate for anterior impingement.
Anterior stability is evaluated with external rotation, adduction, and extension.
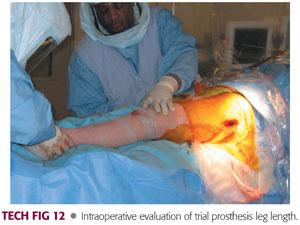
Leg lengths are measured directly.
The position of the pelvis, shoulders, and knees must be evaluated as the assistants help with orientation (TECH FIG 12).
Stability also is evaluated with a longitudinal shuck test, with a goal of 1 or 2 mm of shuck.
Excessively tight soft tissues about the hip cause difficult or incomplete extension of the hip; excessive laxity leads to increased shuck.
For inadequate soft tissue tension and appropriate leg length restoration, a lateral offset can also be used.
It is important to achieve stability, which takes precedence over leg length.
Placement of the Femoral Stem
Once stability is satisfactory, the trial components are removed.
The wound and the femur are irrigated with pulsatile lavage.
Excessive debris is removed.
The femur is prepared again with the curette only, to clear any soft tissue debris from the lateral aspect of the femur.
The femoral canal must be copiously irrigated.
The surgeon and assistant change outer gloves.
The appropriately sized femoral component is placed in the femoral canal with the use of an impactor.
Varus positioning must be avoided. It can be prevented with appropriate valgus positioning of the stem on insertion, with attention paid to maintaining the appropriate version.
The femoral component is seated into position using firm taps with a mallet.
A pause between taps may allow some plastic deformation of the femur.
Final seating is determined in relation to the last broach, tactile feedback, pitch change, and lack of progression (TECH FIG 13).

Completion of Implant Placement
Once the stem is placed, a second trial reduction can be performed with the trial next segment and trial bipolar shell, or a final component can be placed if the broach and stem achieve the same position.
If the trial bipolar shell is desired, trial reduction is performed again.
The reduction is performed with the patient held in position by the second assistant and the first assistant.
The surgeon reduces the hip with distraction, internal rotation, and adduction.
The surgical technician can assist the reduction with longitudinal traction.
The bipolar is assembled on the back table with the outer acetabular bipolar shell impacted on the appropriately sized head.
This can be a 22-, 28-, or 32-mm head, depending on the implant system, with a polyethylene insert and bipolar shell that sits over it (TECH FIG 14A).
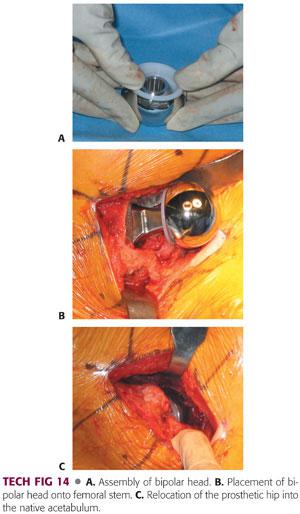
Once that is assembled on the back table, the trunnion is cleaned and dried and the bipolar shell is impacted on to the trunnion of the neck of femoral prosthesis.
The acetabulum is checked one last time before final reduction for any debris or any soft tissue (TECH FIG 14B).
Once it is checked and cleared, the hip is reduced, and the bipolar shell is reduced and checked for appropriate position, after which the wound is thoroughly irrigated and copiously irrigated with pulsatile lavage (TECH FIG 14C).
At this point, drains can be used according to the preference of the surgeon. I prefer not to use drains.
Wound Repair and Closure
The abductor mass is repaired.
The vastus lateralis is repaired to the remaining tissue sleeve with interrupted absorbable sutures in figure-8 fashion with no. 1 Vicryl.
The gluteus medius tendon and capsule are repaired to the tissue sleeve on the bridge of the trochanter.
This is done with heavy absorbable sutures in figure-8 fashion.
The repair is done at the corner of the gluteus medius tendon and then extended into the proximal split with simple sutures (TECH FIG 15A).
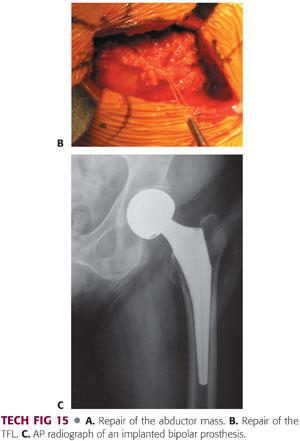
Once the hip abductor is adequately repaired, the TFL is approximated with absorbable sutures in figure-8 fashion.
This must be done to both the proximal and distal extents of the fascia lata.
The potential dead space is obliterated with heavy absorbable sutures, and smaller absorbable 2-0 sutures are placed in subcutaneous tissue (TECH FIG 15B).
Skin staples are applied.
Sterile dressing is applied with Microfoam surgical tape (3M).
An abduction pillow is placed between the legs and loosely secured.
The patient is awakened from anesthesia and brought to the recovery room if, or as soon as, his or her condition is stable.
Postoperative radiographs are taken in the recovery room (TECH FIG 15C).
 Posterior Approach (Southern)
Incision and Dissection
Exposure of the hip begins with appropriate identification of the bony landmarks.
The posterolateral corner of the greater trochanter and the anterior and posterior borders of the proximal femoral shaft are marked 10 cm below the greater trochanter (TECH FIG 16A,B).
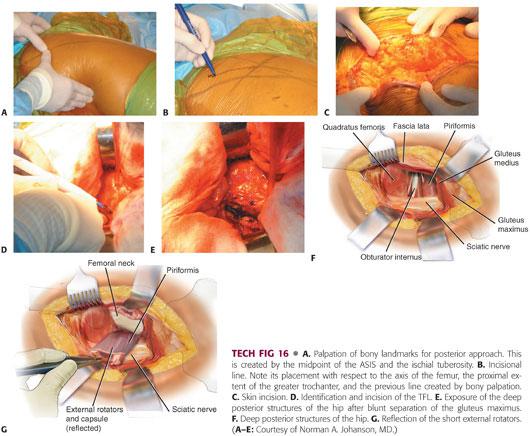
The incision begins at this point and extends obliquely over the posterolateral corner of the greater trochanter, continuing proximally, so that the acetabulum is centered in the incision.
The incision usually is 15 to 20 cm, although this will vary depending on the patient’s body habitus (TECH FIG 16C).
Once the subcutaneous tissue is divided, the fascia lata is identified and incised in line with the incision.
The fibers of the gluteus maximus belly are bluntly separated with firm finger pressure (TECH FIG 16D,E).
A Charnley self-retaining retractor is placed to retract the gluteus maximus and tensor fascia. The gluteus maximus tendon may be released from the femur.
The hip is internally rotated to offer exposure to the posterior structures.
The piriformis tendon is identified by palpation and a curved retractor is placed deep into the abductors just superior to the piriformis (TECH FIG 16F).
A cobra retractor is placed inferior to the femoral neck.
The short external rotators and piriformis may be released separately from the capsule and tagged.
The piriformis and conjoint tendons should be divided as close to their insertions as possible.
Alternatively, the external rotators and capsule can be taken down as one continuous sleeve off the trochanter and femoral neck (TECH FIG 16G).
Following the reflection of the short external rotators, the capsule is isolated by repositioning the superior and inferior retractors.
The curved superior retractor is placed deep to the gluteus minimus just over the superior femoral neck and capsule.
Site Preparation
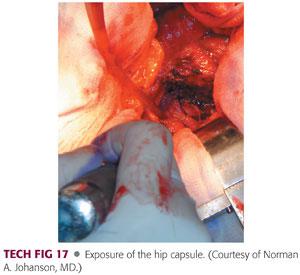
A capsulotomy is performed from this posterosuperior acetabulum and continued to the tip of the trochanter in line with the posterior border of the abductors.
It is continued inferiorly along the femoral neck instead of making oblique posterior limit of the capsulotomy in favor of reflecting this capsule as continuous sleeve to the level of the lesser trochanter (TECH FIG 17).
The quadratus femoris can be released along with the capsule, leaving a small muscular cuff with later reattachment. The capsule can be tagged with a suture.
The hip is gently dislocated using a combination of flexion, internal rotation, and adduction.
The leg is held at 90 degrees of internal rotation so that the femoral neck is parallel to the ground.
At this point, the proximal femur usually dissociates from the femoral neck and head, which often remain in the acetabulum.
Two retractors can be placed around the proximal femur and a fresh cut of the femoral neck can be performed with an oscillating saw.
Alternatively, if this is a low femoral neck fracture, this area can be smoothed with a rongeur and attention turned to the acetabulum.
At this point, the retractors are placed around the acetabulum. Initially, a curved retractor is placed anteriorly, retracting the proximal femur out of the view of the acetabulum.
The operated extremity is placed in slight flexion, which aids in exposure.
Occasionally, the reflected head of the rectus femoris must be released.
A Steinmann pin can be placed in the ilium to reflect the abductors and a small capsulotomy can be made inferiorly to allow for placement of a cobra retractor deep to the transverse acetabular ligament.
A bent Hohmann retractor can be placed posteriorly, taking care to first palpate the sciatic nerve to ensure that it is out of harm’s way.
At this point, the acetabulum is exposed and the femoral head can be removed again with a corkscrew and a Cobb elevator.
This step should be done very carefully to avoid damaging the acetabular cartilage.
Component Placement
The femoral head is measured. A trial shell can be placed in the acetabulum for appropriate sizing, which is performed as described for the modified Hardinge approach.
Once an appropriate size has been determined, the leg is flexed and internally rotated to expose the proximal femur.
The leg is held at approximately 90 degrees of internal rotation and 70 degrees of flexion, bringing the osteotomized neck into the surgeon’s view.
A trochanteric elevator is placed with the teeth under the anterior aspect of the femoral neck, lifting it out of the wound. This allows for unencumbered preparation of the femoral neck (TECH FIG 18A).
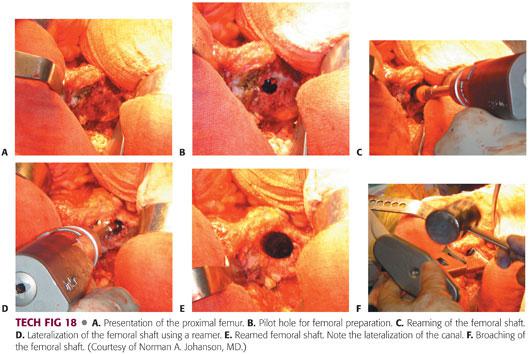
The femur is then prepared in a fashion similar to that described for the modified Hardinge approach (TECH FIG 18B–F).
In cases where cemented femurs are preferred, a trial of reduction for leg lengths can be performed and a final component can be cemented into place.
The component must be cemented in the appropriate version and the neck of the prosthesis must sit on the femoral neck, which can be additionally prepared with a calcar planer.
Completion of the Procedure
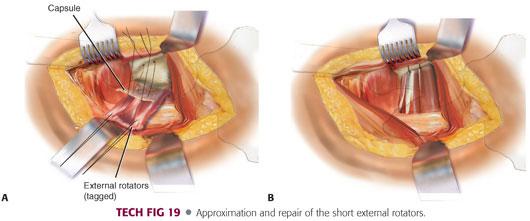
Once the final components are placed and the hip is reduced, two drill holes can be made in the posterior aspect of the greater trochanter for repair of the capsular and short external rotators.
Two nonabsorbable sutures are placed in the capsular flap.
The capsular and external rotator tagging sutures are brought through the drill holes and the greater trochanter tied in layers.
The quadratus femoris and gluteus maximus tendon also can be repaired if that is the surgeon’s preference (TECH FIG 19).
Subsequently, the Charnley retractor is removed and the TFL and gluteus maximus fascia are reapproximated.
Dead space is closed with absorbable sutures in the subcutaneous fat and absorbable sutures are placed in the subcutaneous tissue.
Skin staples and a sterile compressive dressing are applied at the skin level.
The hip must be held in an abducted position. An abduction pillow is placed and the patient is moved from the lateral position to the supine position at the end of the operation.
 Cemented Technique
The trochanteric fossa is cleared of soft tissue and a pilot hole is made in it with a small metal curette.
An entry reamer is inserted along this pilot hole to seek the long access of the femoral canal.
The residual femoral neck is cleared with a rongeur or box osteotome. Sometimes, a lateralizing reamer is used to ensure direct access to the femoral canal and minimize the possibility of varus implantation.
Broaches often are oversized relative to the final implant size, thereby ensuring a minimum cement mantle all around the implant.
The final broach is determined when it adequately fills the proximal femur; it also serves as a trial component for reduction.
Once the stability, limb length, and offset are satisfactory, cementation can be performed. The canal is gently curetted to remove any loose cancellous bone.
The canal is irrigated with a long, pulsating, irrigating tip.
High-quality cancellous bone remains in the femoral canal following this preparation.
It is important to centralize the prosthesis to ensure an uninterrupted cement mantle around the implant.
A plug is placed after the canal is irrigated.
I prefer to allow 1 to 2 cm of cement below the tip of the implant so that the plug may be placed at that level.
It must be secure enough to withstand pressurization.
Three 40-g packs of cement are typically mixed with a vacuum system.
The canal is packed with sponges to keep it dry during the cementation. Alternatively, continuous suction may be used.
The viscosity of the cement is an important consideration. The cement should be somewhat doughy and delivered through a cement gun.
Appropriate cement viscosity has been reached when the cement no longer sticks to the surgical gloves.
Once the cement reaches the appropriate viscosity, the packing sponges are removed and the canal is suctioned. Cement is delivered in a retrograde fashion into the canal.
Once the canal is filled with cement, a pressurizing unit can be placed over the proximal femur, or pressurization can be achieved with a gloved finger.
The prosthesis is inserted into the doughy mass of cement with the centralizer attached to the tip.
The leg is placed in a secure position and the prosthesis is inserted.
The prosthesis must be inserted with the appropriate anteversion from insertion all the way down.
It is preferable not to rotate the femoral component within the canal because this will create undesirable cement voids.
The prosthesis must be inserted with great care to avoid varus malpositioning.
All the excess cement is removed and the stem is held in place until the cement has fully hardened. The femoral trunnion should be cleaned at this point and the hemiarthroplasty component should be inserted onto the stem.
The hip is then reduced and the appropriate closure is performed.
 Anterolateral (Watson-Jones) Technique
One major difficulty with the Watson-Jones technique is dealing with the gluteus medius and minimus.
The hip abductors lie over anterior hip capsule and could be damaged in an effort to obtain adequate exposure.
The original approach used by Charnley placed the patient in a supine position and required a trochanteric osteotomy. This approach is used less commonly now because of problems associated with trochanteric reattachment.
The skin incision is made 2.5 cm behind the ASIS to the tip of the greater trochanter and extended vertically along the anterior margin of the trochanter.
The intraneural interval is between the TFL and gluteus medius. An incision is made in the underlying iliotibial band, after which the TFL is retracted medially and the gluteus medius is retracted laterally.
Deep dissection may require release of the anterior parts of the gluteus medius and minimus, which are raised from the femur and retracted posteriorly.
The upper part of the capsule at the hip joint is seen with a reflected head of the rectus femoris attached to the upper part of the acetabular rim.
It can then be detached with greater exposure of the capsule, which may be incised.
The ascending branch of the lateral femoral circumflex artery and the accompanying veins run deep to the muscles and must be ligated.
A longitudinal incision is made in the joint capsule along the femoral neck and transversely from the proximal femur.
A bone hook can be used to apply a direct lateral force to disimpact the femoral neck fracture. The femoral head can be carefully removed from the acetabulum.
The acetabulum is then sized as previously described.
After the femur is externally rotated, adducted, and extended, it can be prepared.
Femoral preparation in this approach may require specialized instruments.
Consider detaching or splitting along the anterior third of the gluteus medius to eliminate the risk of damage to the superior gluteal nerve, which passes 4.5 cm above and 2 cm behind the tip of the greater trochanter.
PEARLS AND PITFALLS | |
Acetabular reaming |
|
Varus malalignment |
|
Implant orientation (anteversion) |
|
Cement technique |
|
Posterior approach |
|


POSTOPERATIVE CARE
 All patients are placed into a soft hip abduction pillow, and bilateral thromboembolic stockings are put on with sequential venous compression devices.
 Antiembolic prophylaxis is started according to the surgeon’s preference.
Extended prophylaxis may be considered for these patients.
OUTCOMES
 Bipolar hemiarthroplasty was introduced in the 1970s in an effort to prevent or retard acetabular wear.
These femoral prostheses have a 22- to 32-mm head that articulates with a polyethylene liner.
The liner is covered with a polished metal outer shell that articulates with the acetabular cartilage.
Depending on implant design, about 45 degrees of angular motion is achieved before the prosthetic neck impinges on the liner and axial rotation is restricted.
 Theoretically, hip motion occurs primarily at the prosthetic joint and only secondarily at the metal-cartilage interface.
The polyethylene liner may help to protect the native acetabular cartilage by cushioning the high-contact pressures that occur across the bearing.
 LaBelle et al13 reported no acetabular protrusio or articular cartilage wear greater than 2 mm in 49 femoral neck fractures treated with cemented bipolar hemiarthroplasties at 5- to 10-year follow-up.
 Wetherell and Hinves15 reported a 50% reduction in acetabular erosion for patients treated with a cemented bipolar prosthesis when compared to those treated with a unipolar prosthesis.
 Research attempting to demonstrate that motion occurs within a bipolar prosthesis has yielded conflicting results.
Drinker and Murray7 fluoroscopically evaluated 13 hips in 10 young patients following bipolar reconstruction for AVN and noted that only a minor amount of motion occurred at the inner bearing and that motion tended to decrease over time.
They further demonstrated that in this group most implants functioned as a unipolar prosthesis and concluded that motion will occur at the interface where there is the least frictional resistance. They found that this location is not the same in arthritic hips as in fractured hips.
In patients with acute hip fractures with normal articular cartilage, primary intraoperative or intraprosthetic motion occurred in only 25% and most implants functioned as unipolar.
 Brueton et al4 whose radiographic analysis of 75 bipolar prostheses compared 32-mm and 22-mm heads, showed that the smaller head was associated with more motion.
COMPLICATIONS
 Thromboembolism (eg, deep vein thrombosis or pulmonary embolism)
 Kenzora et al12 reported a mortality rate of 14% during the first year following hip fracture.
When compared to 9% mortality in a population of similar age, the mortality after hemiarthroplasty is 10% to 40%.
 The incidence of intraoperative femur fracture is 4.5%. Most are nondisplaced and involve either the trochanter or calcar.
When an intraoperative femur fracture occurs, treatment options include methylmethacrylate combined with long-stem prosthesis or, alternatively, a fully coated cementless stem and cables.
 The rate of dislocation is less than 10%. Dislocation is more common with incorrect version, posterior capsulectomy, and excessive postoperative flexion or rotation with the hip adducted.
 Postoperative sepsis has been reported to range from 2% to 20% and may be more common with the posterior surgical approach. Infections may be superficial or deep.
 Loosening or migration may be suspected with the presence of a radiolucent line around the prosthesis.
If clinical signs and symptoms are present, or loosening or migration is present, a revision arthroplasty may be considered.
 Cementation presents some hazards, and, in some cases, the application of pressurized cement is associated with an embolization phenomenon with cement elements (ie, monomer, polymethylmethacrylate elements, or fat). Embolization of these materials may result in hypoxia, cardiac arrest, or death.
The risk factors include older age or patent foramen ovale.
The use of pulsatile lavage can reduce that risk by removing fat and marrow from the femoral canal.
In older patients with substantial medical comorbidities, it may be wise to avoid pressurization of the cement within the canal because the risk of acute embolization may be high.
REFERENCES
1. Barnes JT, Brown JT, Garden RS, et al. Subcapital fractures of the femur: a prospective review. J Bone Joint Surg Br 1976;58:2–24.
2. Bateman JE. Single assembly total hip prosthesis preliminary report. Orthop Dig 1974;2:15.
3. Bezwada HP, Shah AR, Harding SH, et al. Cementless bipolar hemiarthroplasty for displaced femoral neck fractures in the elderly. J Arthroplasty 2004;19(7 Suppl 2):73–77.
4. Brueton RN. Effect of femoral component head size on movement of the two-component hemi-arthroplasty. Injury 1993;24:231–235.
5. Dedrick DK, Mackenzie JR, Burney RE. Complications of femoral neck fractures in young adults. J Trauma 1986;26:932–937.
6. Dorr LD, Faugere MC, Mackel AM, et al. Structural and cellular assessment of bone quality of proximal femur. Bone 1993;3:231–242.
7. Drinker H, Murray WR. The universal proximal femoral endoprosthesis: a short-term comparison with conventional hemiarthroplasty. J Bone Joint Surg Am 1979;61:1167–1174.
8. Eiskjaer S, Ostgard SE. Risk factors influencing mortality after bipolar hemiarthroplasty in the treatment of fracture of the femoral neck. Clin Orthop Relat Res 1991;270:295–300.
9. Garden RS. Stability and union in subcapital fractures of the femur. J Bone Joint Surg Br 1964;46:630–647.
10. Gilberty RP. Bipolar endoprosthesis minimizes protrusio acetabuli, loose stems. Orthop Rev 1985;14:27.
11. Ito H, Matsuno T, Kaneda K. Bipolar hemiarthroplasty for osteonecrosis of the femoral head. A 7-18 year followup. Clin Orthop Relat Res 2000;(374):201–211.
12. Kenzora JE, McCarthy RE, Lowell JD, et al. Hip fracture mortality. Relation to age, treatment, preoperative illness, time of surgery, and complications. Clin Orthop Relat Res 1984;186:45–56.
13. LaBelle LW, Colwill JC, Swanson AB. Bateman bipolar arthroplasty for femoral neck fractures. A five- to ten-year follow-up study. Clin Orthop Relat Res 1990;251:20–25.
14. Robinson CM, Court-Brown CM, McQueen MM, et al. Hip fracture in adults younger than 50 years of age—epidemiology and results. Clin Orthop Relat Res 1995;312:238–246.
15. Wetherell RG, Hinves BL. The Hastings bipolar hemiarthroplasty for subcapital fractures of the femoral neck. J Bone Joint Surg Br 1990;72:788–793.
16. Yu L, Wang Y, Chen J. Total hip arthroplasty versus hemiarthroplasty for displaced femoral neck fractures: meta-analysis of randomized trials. Clin Orthop Relat Res 2012;470:2235–2243.
< div class='tao-gold-member'>


