Fractures that occur above or around the femoral component of a total knee arthroplasty (TKA).
 The rates of periprosthetic fractures for TKA vary.
 The incidence is reported to be 0.3% to 5.5% after primary TKA and up to 30% after revision TKA.3,5,6,13
 Supracondylar femur fractures are the most common type and the most widely reported with an incidence of 0.3% to 2.5% for primary TKA and 1.6% to 38% for revision TKA.5,6,8,13
 Can occur in the setting of a stable prosthesis or an unstable prosthesis
 Periprosthetic fractures can create substantial difficulty with regard to management and outcome.
 Reduction and fixation of these fractures is a complex undertaking, primarily as a result of the preexisting implants that can obstruct reduction and placement of fixation devices.2
ANATOMY
 The distal femur is a trapezoidal shape.
 The lateral distal femur is larger in the anteroposterior (AP) diameter than the medial distal femur.
 The lateral femoral condyle has a 10-degree slope.
 The medial femoral condyle has a 25-degree slope (FIG 1).

 The origin of the gastrocnemius on the distal femur acts as a deforming force leading to a recurvatum deformity.
 The insertion of the adductors on the distal femur acts as a deforming force leading to a varus deformity (FIG 2).

PATHOGENESIS
 Most periprosthetic femur fractures typically result from a low-energy fall in the elderly or a high-energy trauma in a young person.1
 Multiple risk factors have been identified.
 Metabolic issues such as osteoporosis are known risk factors for the development of periprosthetic fractures about a TKA.
 Many studies have demonstrated a decrease bone mineral density after TKA.11
 Surgical technique has also been implicated, specifically notching of the distal femur.
 Violation of the anterior cortex of the distal femur has been thought to be an important risk factor for periprosthetic distal femur fracture after TKA.
 There is a theoretical increased risk due to the change of the geometry of the femur and the decrease radius of curvature leading to higher stresses on the distal femur.
NATURAL HISTORY
 The goals of treatment, whether surgical or nonsurgical, are fracture healing, restoration and maintenance of knee range of motion, and pain-free function.
 A good result is a minimum of 90 degrees of knee motion, fracture shortening less than or equal to 2 cm, varus/valgus malalignment less than or equal to 5 degrees, and flexion/extension malalignment less than or equal to 10 degrees.14
 Nonsurgical management using skeletal traction, casting, or cast bracing has been used in primary fractures; however, due to the prolonged immobility and risks associated, surgical intervention is preferred unless the patient is too sick to undergo the procedure.
PATIENT HISTORY AND PHYSICAL FINDINGS
 It is important to get a history and try to elicit any preexisting symptoms that may indicate whether or not an implant is loose, such as pain or instability.
 Medical records are helpful to identify surgical approach as well as type of implants.
 If there is suspicion for infection based on preexisting symptoms or preinjury films demonstrating loosening, further investigation should take place to include complete blood count (CBC), erythrocyte sedimentation rate (ESR), and noncardiac C-reactive protein (CRP).
 If the infection workup is suspicious, then intraoperative biopsy or staged procedures should be planned.
 Following a general medical examination, a comprehensive examination of the affected limb should be performed.
 The condition of the skin and neurovascular status should be documented.
 Specifically, ankle–brachial index (ABI) should be performed and documented.
 An ABI less than 0.90 warrants further investigation.9
IMAGING AND OTHER DIAGNOSTIC STUDIES
 Standard AP and lateral of the affected extremity should be obtained (FIG 3).

 It is also routine practice to get images of the joint above and below the injury.
 Mechanical axis series can also be beneficial in certain instances.
 Advance imaging can be helpful to determine bone stock but are not routinely required (FIG 4).

DIFFERENTIAL DIAGNOSIS
 Loose TKA
 Infected TKA
 Periprosthetic tibial fracture
 Periprosthetic patellar fracture
 Periprosthetic fracture around a total hip arthroplasty (THA)
NONOPERATIVE MANAGEMENT
 Indication for nonoperative management include truly nondisplaced fractures with a stable prosthesis or a patient that is too medically unstable for surgery.
 Nonsurgical management includes skeletal traction, casting, or cast bracing.
 Nonsurgical management does eliminate the surgical risks such as bleeding, infection, loss of fixation, and anesthetic complications.
 With nonsurgical management, the extremity should be kept immobilized in extension for 4 to 6 weeks and the patient kept non–weight bearing.
SURGICAL MANAGEMENT
 Once surgical management has been decided, it is crucial to determine if the implant is stable or not.
 Fractures about a stable femoral component are typically treated with intramedullary nailing (IMN) or laterally based locked plating.
 Retrograde IMN represents a good option when there is adequate bone stock and an “open box” TKA femoral component.
 Locked plates represent a significant advance in the treatment of periprosthetic fractures of the distal femur.
 Advantages of locked plating include the ability for multiple fixed-angle points of fixation in osteoporotic bone, increased biomechanical strength over conventional plates, and the ability for insertion in minimally invasive techniques.10
 When minimally invasive techniques are used, it is crucial to avoid the typical malalignment of valgus and hyperextension of the distal fragment.4
 When periprosthetic fractures above a TKA are associated with a loose component, revision arthroplasty is the treatment of choice.
Preoperative Planning
 The history and physical is reviewed.
 Preinjury radiographs are reviewed if available to determine if there was any evidence of loosening or infection.
 Evidence of infection requires further workup as mentioned earlier.
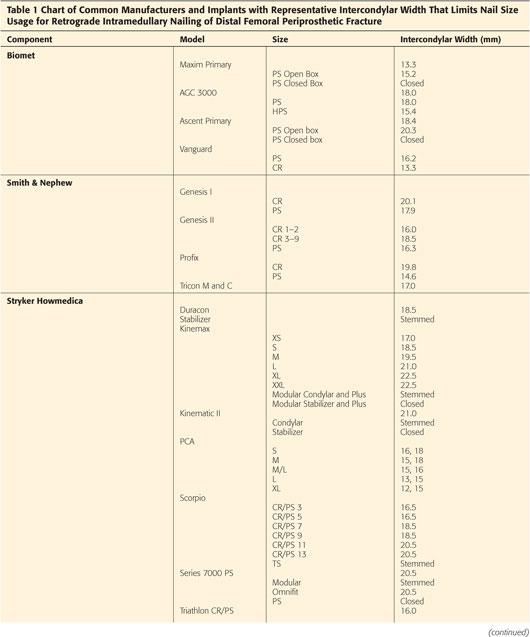
 Prior operative reports are obtained and reviewed specifically looking for type of implant to determine if the femoral component is an open box or not (Table 1).

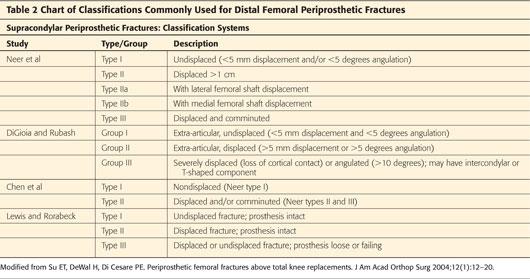
 Injury films are reviewed and classified (Table 2).
 Key factors in decision-making process for operative treatment:
Is the bone stock adequate?
Does the implant have an open or closed box?
Is the implant loose or stable?
 If the implant is stable and there is adequate bone stock, then open reduction and internal fixation (ORIF) is treatment of choice:
If implant has open box, then IMN versus laterally based locked plate
If implant has closed box, then laterally based locked plate
 If the implant is loose, then revision arthroplasty
Positioning
 When performing operative fixation of a periprosthetic femur fracture above a TKA (plate or IMN), the patient is usually positioned supine on a radiolucent flat-top Jackson table (FIG 5).

 Position the patient to the ipsilateral side of the table.
 One rolled blanket bump is placed under the ipsilateral hip.
 Tape the ipsilateral arm over the chest.
 Sequential compression devices (SCDs) on contralateral extremity
 Secure the patient with safety belt at abdomen level and 2-inch silk tape over blue towel on contralateral leg.
 Make sure all bony prominences are padded.
 C-arm will enter from contralateral side, perpendicular to the operating room (OR) table.
 When plating, a black ramp can be placed under the ipsilateral leg.
 When nailing, a radiolucent triangle is used to support the femur.
 For difficult fractures to reduce, sterile skeletal traction can be placed and weight hung off the end of the bed over a pipe bender.
Approach
 For lateral locked plating, a standard lateral approach to the femur can be used. This can be extended into a subvastus approach if extension proximally is desired.
 For retrograde IMN, a standard midline incision can be used with a medial parapatellar arthrotomy.
TECHNIQUES
 Laterally Locked Plating
Exposure—Lateral Approach to Femur
Mark out landmarks of joint line and femoral shaft/condyle (TECH FIG 1A).
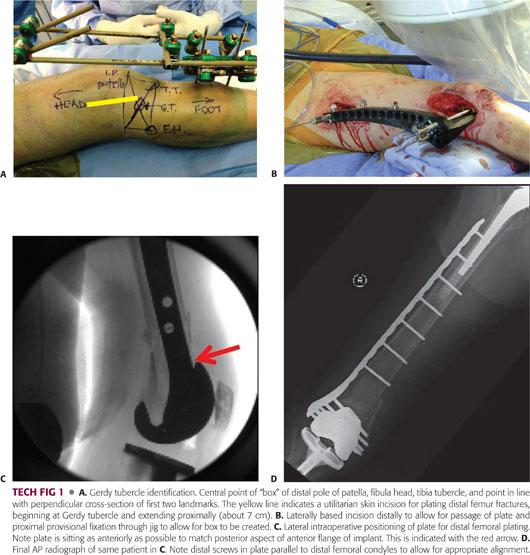
Mark lateral incision in line with the femoral shaft starting at Gerdy tubercle and extending proximally to include fracture site (TECH FIG 1A).
Incise skin along marked incision down to level of iliotibial (IT) band fascia.
Incise fascia in line with the skin.
Expose vermillion border and/or border of femoral component.
Be mindful to remain extra-articular and avoid violation of the joint capsule.
If plan to bridge fracture, do not expose fracture site.
If plan for direct anatomic reduction, extend proximally to subvastus to directly visualize the fracture.
Reduction/Fixation
Length, alignment, and rotation are assessed using fluoroscopy.
A bump is used to control the sagittal balance. This should be placed strategically to counteract the forces of the gastrocnemius and the recurvatum deformity (TECH FIG 1B,C).
Length is achieved and maintained by longitudinal traction either manually or with the use of skeletal traction.
Once the length, alignment, and rotation are adequate, the appropriate length plate is determined. The goal is to have at least six holes of the plate proximal to the fracture site (TECH FIG 1D).
The plate is then slid submuscularly below the vastus lateralis along the lateral border of the femur. It is important to feel the plate contact the femur throughout the entire course.
Using AP fluoroscopy, the appropriate plate height is determined.
The plate is then pinned to the distal segment using a K-wire through the center hole of the plate. Ultimately, this will be replaced with a screw that will be parallel to the distal femoral condyles, aiding in achieving appropriate coronal alignment (TECH FIG 1D).
Using fluoroscopy to get a good lateral, the sagittal plate balance is evaluated and adjusted.
The plate is then pinned to the proximal femur in the second to last screw hole of the plate using a K-wire through perfect circle technique or an external jig and a stab incision.
The plate height and balance is then confirmed using AP and lateral fluoroscopy.
The plate is then secured to bone with a nonlocking screw distally to bring the plate to bone.
A nonlocking screw is then placed immediately proximal to the fracture site through the plate to bring the plate to bone and make fine adjustments to the coronal balance.
The overall length, alignment, and rotation, as well as the plate balance, are confirmed.
The plate is then secured distally using locking screws. It is important to remember the trapezoidal shape of the distal femur as to not place screws that are too long.
The plate is then secured proximally with hybrid fixation of non-locked and locked screws spread evenly throughout the shaft of the plate. The most proximal point of fixation is either a unicortical locked screw or a bicortical non-locked screw to ease the transition of stiffness from the plated bone to the remaining host bone. If there is a concomitant hip arthroplasty, then the plate and fixation should overlap by at least 2 femoral cortical diameters (TECH FIG 1D).
Final fluoroscopic evaluation is performed.
Closure
Place a Hemovac drain if necessary.
Irrigate wounds.
No. 1 Vicryl for the fascial layer
A 2-0 Vicryl for superficial and subcutaneous layers
A 3-0 nylon mattress for skin
Sterile dressing and Ace wrap from toes to thigh
 Retrograde Intramedullary Nailing
Exposure
Place a sterile radiolucent triangle under the ipsilateral leg so that the knee is roughly 30 to 40 degrees of flexion.
Mark out landmarks: inferior pole patella, tibial tubercle, medial and lateral margins of the patellar tendon, previous TKA incision
Mark out new surgical incision through previous TKA incision roughly 3 cm in length (two fingerbreadths below inferior pole of patella to one fingerbreadth above the inferior pole of the patella).
Incise skin down to paratenon of patellar tendon.
Raise small medial and lateral flaps to identify the medial and lateral border of the patellar tendon.
Make a medial parapatellar arthrotomy to expose the intercondylar notch.
Débride any scar tissue to clearly visualize the box of the femoral component of the TKA.
Reduction/Fixation
Length, alignment, and rotation are assessed using fluoroscopy.
A bump is used to control the sagittal balance. This should be placed strategically to counteract the forces of the gastrocnemius and the recurvatum deformity (see FIG 5B).
Length is achieved and maintained by longitudinal traction either manually or with the use of skeletal traction.
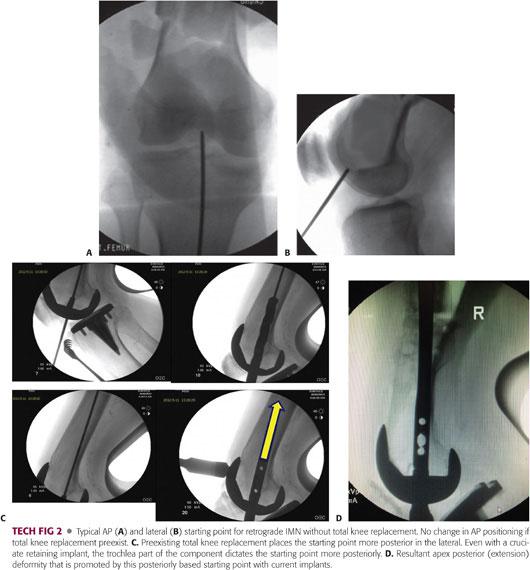
Insert the guidewire through the incision to the appropriate starting point and confirm fluoroscopically (TECH FIG 2A,B).
AP view: slightly lateral to midline aiming straight up the intramedullary canal
Lateral view: slightly anterior aiming straight up the intramedullary canal
Insert the guidewire until the pin is past the fracture site and into the metaphyseal region of the femur.
Confirm location of guidewire and reduction on fluoroscopy.
Open the distal femur with the appropriate opening reamer. Due to implant designs, it is sometimes necessary to enlarge the box with a metal-cutting burr in order to fit the appropriate size reamers and nail through the box.
Remove the opening reamer and guidewire.
Place the ball-tipped guidewire through the entry site and up the entire length of the femur.
Use the depth gauge and determine the length of the nail.
Begin reaming with the end-cutting reamer and increase by 0.5 mm until 1 mm over the diameter nail being inserted.
Assemble the nail and targeting jig on the back table.
Insert nail over the ball-tipped guidewire as far as possible by hand then advance until fully seated with mallet assistance.
Be sure nail is buried deep to femoral component.
Locking the Nail
Insert the trocar assembly through the targeting jig and make small stab incision at the site of screw insertion.
Drill both cortices with the pilot drill and measure the screw length using the calibrations on the drill it and confirm with a depth gauge. Again, be aware of the trapezoidal shape of the distal femur to avoid long screws.
Insert the appropriate length screw.
Repeat this step for two to three interlocking screws depending on the location of the fracture.
Confirm the length, alignment, and rotation prior to continuing with the proximal interlocking screws.
Bring the C-arm proximally and obtain perfect circles of the proximal AP interlocking holes.
Make small incision at the site of screw insertion. Place drill and confirm with fluoroscopy in two planes the trajectory prior to drilling.
Drill bicortical hole.
Use depth gauge and measure screw length and confirm on fluoroscopy.
Insert appropriate length screws.
Repeat steps for second interlocking screw.
Closure
Irrigate wound and be sure to get any debris out of the knee joint to prevent third body wear.
No. 1 Vicryl to close arthrotomy
A 2-0 Vicryl for superficial and subcutaneous layer
A 3-0 nylon for skin
Sterile dressing and Ace wrap from toes to proximal thigh
PEARLS AND PITFALLS | |
Obtain complete radiographs including mechanical axis when appropriate. |
|
If implants are stable, consider indirect reduction techniques. |
|
For retrograde IMN, be sure to check box status of implant. |
|
Use polyaxial locking plates. |
|
Do not accept axis deviation. |
|
Do not leave loose implants. |
|
Do not use incompetent fixation. |
|
Do not delay postoperative range of motion. |
|
Do not delay surgery in the elderly. |
|


POSTOPERATIVE CARE
 Obtain postoperative radiographs in the OR prior to waking the patient up.
 For laterally locked plating, toe-touch weight bearing for 6 weeks
 For retrograde IMN, weight bearing as tolerated
 Knee range of motion as tolerated
 Hinged knee brace for varus/valgus support
 Deep vein thrombosis (DVT) prophylaxis per surgeon preference
 Twenty-four hours of IV antibiotics
 Pain control
 Physical therapy (PT)/occupational therapy (OT)
 Postoperative follow-up
Two weeks for wound check
Six weeks for x-rays
Three months for x-rays
Six months for x-rays
One year for x-rays
OUTCOMES
 A 16.4% malunion rate with retrograde intramedullary nails12 (see TECH FIG 2C,D)
 A 7.6% malunion rate with locked plating12
 A 3.6% nonunion rate with retrograde intramedullary nails12
 An 8.8% nonunion rate with locked plating12
 A 9.1% secondary surgical procedure rate with retrograde intramedullary nails12
 A 13.3% secondary surgical procedure rate with locked plating12
 Comparable long-term complication and survival rates compared to primary TKA7
 Worse midterm functional outcomes compared to primary TKA7
COMPLICATIONS
 Infection
 Malunion
 Nonunion
 Decrease functional outcomes
 TKA failure
REFERENCES
1. Berry DJ. Epidemiology: hip and knee. Orthop Clin North Am 1999;30:183–190.
2. Della Rocca GJ, Leung KS, Pape HC. Periprosthetic fractures: epidemiology and future projections. J Orthop Trauma 2011;25 (suppl 1):S66–S70.
3. Figgie MP, Goldberg VM, Figgie HE III, et al. The results of treatment of supracondylar fracture above total knee arthroplasty. J Arthroplasty 1990;5:267–276.
4. Haidukewych GJ. Innovations in locked plate technology. J Am Acad Orthop Surg 2004;12:205–212.
5. Healy WL, Siliski JM, Incavo SJ. Operative treatment of distal femoral fractures proximal to total knee replacements. J Bone Joint Surg Am 1993;75:27–34.
6. Inglis AE, Walker PS. Revision of failed knee replacements using fixed-axis hinges. J Bone Joint Surg Br 1991;73:757–761.
7. Lizaur-Utrilla A, Miralles-Muñoz FA, Sanz-Reig J. Functional outcome of total knee arthroplasty after periprosthetic distal femoral fracture. J Arthroplasty 2013;28(9):1585–1588.
8. Merkel KD, Johnson EW Jr. Supracondylar fracture of the femur after total knee arthroplasty. J Bone Joint Surg Am 1986;68:29–43.
9. Mills WJ, Barei DP, McNair P. The value of the ankle-brachial index for diagnosing arterial injury after knee dislocation: a prospective study. J Trauma 2004;56(6):1261–1265.
10. Nauth A, Ristevski B, Bégué T, et al. Periprosthetic distal femur fractures: current concepts. J Orthop Trauma 2011;25(suppl 2):S82–S85.
11. Plazter P, Schuster R, Aldrian S, et al. Management and outcome of periprosthetic fracture after total knee arthroplasty. J Trauma 2010;68:1464–1470.
12. Ristevski B, Nauth A, Williams DS, et al. Systematic review of the treatment of periprosthetic distal femur fractures. J Orthop Trauma 2014;28(5):307–312.
13. Ritter MA, Faris PM, Keating EM. Anterior femoral notching and ipsilateral supracondylar femur fractures in total knee arthroplasty. J Arthroplasty 1988;3:185–187.
14. Rorabeck CH, Taylor JW. Periprosthetic fractures of the femur complicating total knee arthroplasty. Orthop Clin North Am 1999;30:265–277.
< div class='tao-gold-member'>


