3Nose
Abstract
Mastering nasal reconstruction requires a thorough understanding of nasal anatomy, flap dynamics, and proficiency with repair options depending on defect location, skin type and nasal topography, and patient expectations. Herein, the authors begin by presenting a review of nasal anatomy, a prerequisite for any surgeon endeavoring to master nasal reconstruction. Next, the authors review repair options according to each nasal cosmetic subunit, starting with the nasal tip and ending with the nasal sidewall. While innumerable repair options exist for each particular nasal defect, those that are presented are the result of the senior author’s trove of reconstructive experience, which has allowed him to arrive at a set of repair options that, when executed correctly, consistently produce the most reproducible results. Finally, the authors review complications as well as revisions, because even the best reconstructive surgeon will encounter occasional complications despite a perfect effort and should know how to manage these should they occur. After reviewing this chapter, the reader should have a sound understanding of nasal reconstruction and a framework to approach any nasal defect he or she should encounter.
Keywords: nasal reconstruction, flap, graft, nose
Capsule Summary and Pearls
•Superficial defects on any nasal location can have an excellent aesthetic outcome when allowed to heal by second intention, especially when augmented by the use of the “shave and sand” technique.
•Deeper defects on concave areas like the alar crease and nasal root/inner canthus can also achieve good results when left to heal.
•While full-thickness skin grafts are a remarkably versatile option for range of defects on the nose, defect size, depth, neighboring skin quality, and patient preference dictate when their use is most appropriate. The conchal bowl provides the best match for wounds of the lower third of the nose, whereas postauricular skin is favored for wounds on the upper two-thirds.
•Primary closure is an outstanding option for small to medium midline wounds on the nasal tip and dorsum, though several modifications of the classic fusiform closure must be employed to attain an optimal result.
•Local transposition flaps are the most reliable repair options for full-thickness defects on the nose not amenable to primary closure.
•The bilobed transposition flap is the preeminent flap choice for small to medium full-thickness defects on the lower third of the nose, especially the tip, whereas the rhombic flap is preferred for the upper two-thirds.
•The forehead flap is the ideal choice for larger defects of the nasal tip and ala, especially when used in conjunction with cartilage grafts in the cases where functional integrity of the nose is compromised.
•For full-thickness perforating defects, all three nasal layers including skin, cartilaginous or fibrofatty structural support, and nasal lining must be repaired in order to thwart damaging aesthetic and functional repercussions.
•Before and during repair, nasal valve competency should be assessed and restored as needed.
•In order to decrease risk of pincushioning, wide undermining to promote formation of a platelike scar, aggressive flap defatting, and use of buried vertical mattress sutures to pull deep tissues back to suture line are required.
•At the time of surgery, patients should be informed of their need to return in 3 months for potential dermabrasion in order to correct any visible incision lines or contour asymmetry.
3.1 Introduction
Repairing the nose poses one of the greatest challenges for the reconstructive surgeon. The combination of the nose’s complex topography, unique sebaceous texture, minimal laxity, and freely mobile free margins requires a mastery of the skills necessary to repair this complex structure. The nose plays a pivotal role aesthetically as the centerpiece of the face while also having a significant role in respiration. Thus, a poor reconstructive effort may have both cosmetic and functional repercussions for the patient. Approaching nasal defects algorithmically based on size, skin type, and location can assist in selecting the most appropriate repair option for a given patient. However, because noses drastically differ among patients, one should simply not apply a “cookie cutter” approach to nasal reconstruction. The surgeon must therefore address each nasal defect individually when selecting the optimal repair option for a particular patient.
3.2 Anatomy
Possessing a thorough understanding of nasal anatomy is essential to achieve operative success and avoid complications. The unique nasal topography, an elegant synthesis of convexities, concavities, inflections, and grooves, allows its division into aesthetic subunits. These aesthetic subunits include the tip, dorsum, sidewalls, alar lobules, and soft triangles.1 It has been advocated that superior results are achieved when skin within an aesthetic subunit is repaired with like skin possessing similar texture and color. However, many flaps on the nose that do not adhere to the subunit principle will still accomplish highly aesthetic results. A quintessential example is the bilobed flap, which uses lax donor skin from the upper sidewall to repair defects on the tip. Furthermore, many, especially in plastic surgery literature, advocate resurfacing an entire subunit even at the expense of enlarging a defect. While the authors will often employ this technique for larger staged flaps, excellent outcomes can still be attained without sacrificing more skin. Similarly, while the borders of aesthetic subunits are theoretically an ideal place for scar placement, scars placed elsewhere with the intention of preventing distortion should be a preferred goal.
The nose can be thought of as a three-layered structure consisting of skin, cartilage or fibrofatty tissue, and a mucosal lining. The nasal lining consists of a thin layer of vascular mucosa that is tightly adherent to overlying cartilage and bone. Failure to repair the mucosal portion of a full-thickness perforating nasal defect can have grim complications including flap contraction, nasal distortion, and airway obstruction.
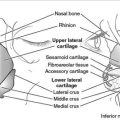
The majority of the nasal “skeleton” consists of cartilage with a small bony base comprising the most proximal aspect (Fig. 3.1). This bony base is formed by two symmetric nasal bones, which correspond with the nasal bridge. The nasal bones are bordered superiorly by the skull’s frontal bone at an intersection point termed the nasion (corresponding to the nasal root on the skin’s surface) and are bordered laterally by the frontal processes of the maxilla. After extending anteriorly and inferiorly, the nasal bone attaches to the septal cartilage, which continues to extend in an anterior and inferior direction to form the spine of the nose. The upper lateral cartilage projects laterally from the nasal septum to form the overlying nasal sidewall. Inferiorly, the lower nose is reinforced bilaterally by the lower lateral cartilages. Each lower lateral cartilage possesses both a lateral crus, which supports the nasal tip and medial ala, and a medial crus, which supports the nasal columella. Importantly, while the bulk of the nasal ala is not supported directly by cartilage, the rigid quality of its unique fibrofatty tissue allows it to resist collapse upon inspiration. The nasalis muscle extends superiorly and medially from the maxilla and is responsible for flaring the nostrils. Its incorporation into various flaps on the nose allows for excellent flap viability.
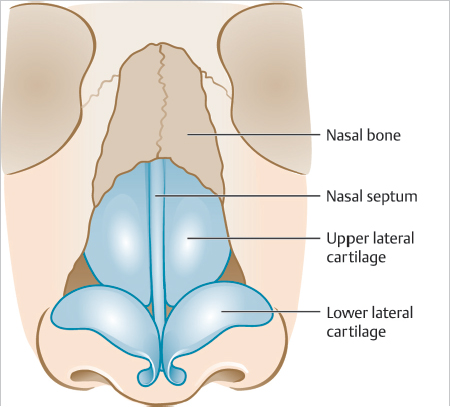
Fig. 3.1 Cartilage and bony “skeleton” of the nose.
When executing a nasal flap or graft, an understanding of the zones of skin thickness is critical when selecting ideal donor skin (Fig. 3.2). The skin on the upper half of the nose (zone I) is thin, shiny, nonsebaceous, and relatively lax. On the tip, supratip, ala, and lower sidewall, skin tends to be significantly thicker, more sebaceous, and rigid (zone II). Moving caudally down the nose, starting at the infratip and continuing onto the soft triangles and columella, the skin transitions back to being thin and nonsebaceous (zone III), similar to that of the upper nose. While it is important to understand the zones of the nose conceptually, the size of each zone on a particular patient may vary. Likewise, the degree of sebaceous composition and size of the various nasal cartilages account for the heterogeneity of nasal shapes and sizes that exist among patients.
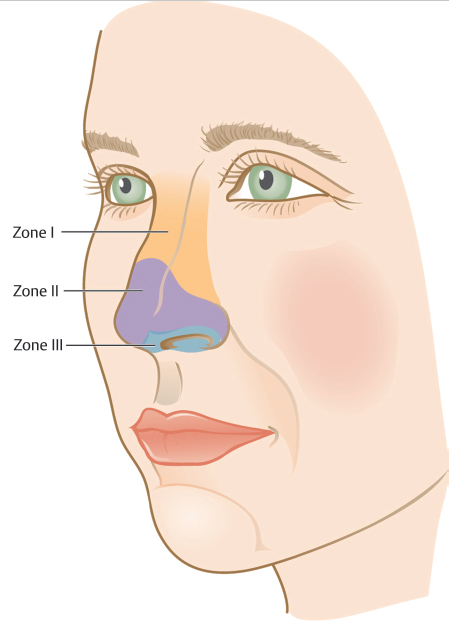
Fig. 3.2 Zones of the nose used to describe areas of the nose with similar skin thickness and sebaceous quality.
The nose has a rich vascular system, owing to a blood supply that comes from branches of both the external and internal carotid artery systems with extensive anastomoses (Fig. 3.3). At the level of the lateral lip, the facial artery (external carotid system) gives off its two terminal branches: the superior labial artery and the angular artery. After coursing medially along the upper lip, the superior labial artery gives off septal branches to supply the anterior portion of the nasal septum and ultimately a branch that supplies the columella. In its upward course, the angular artery gives off the lateral nasal artery and provides blood supply to the lateral portion of the lower one-third of the nose. The external nasal branch of the anterior ethmoidal artery is a branch of the ophthalmic artery (internal carotid system) and provides part of the blood supply to the nasal tip. The dorsal nasal artery branches off the ophthalmic artery and pierces through the orbital septum superior to the medial canthal ligament supplying a large portion of the upper sidewall and dorsum. The nose’s extensive vascular network allows for excellent viability of both flaps and grafts.
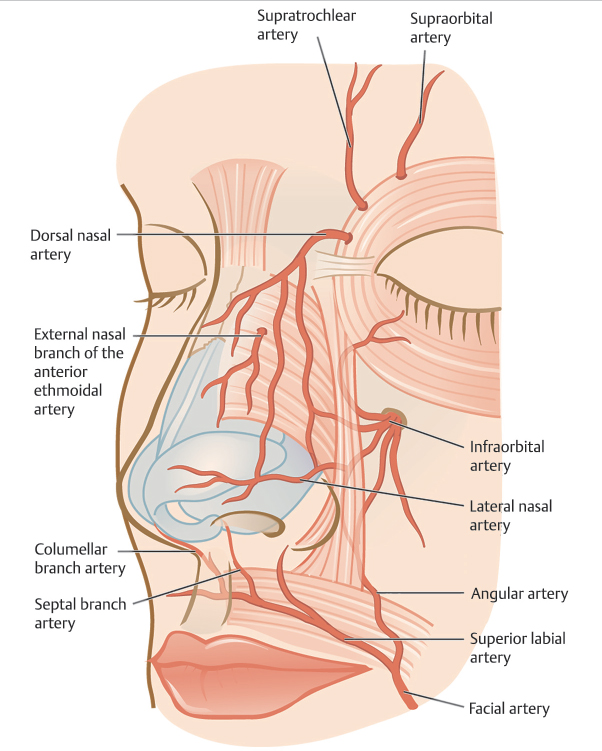
Fig. 3.3 Arterial supply of the nose.
A review of nasal anatomy would be incomplete without mention of the internal nasal valve. The valve is the narrowest part of the nasal airway and the area of greatest resistance. It is formed by the caudal border of the upper lateral cartilage, the nasal septum, the nasal sidewall, and the inferior turbinate. Because the nasal sidewall is the most mobile border, cancer extirpation or repairs involving the sidewall adjacent to the alar groove can risk collapse of the valve, resulting in impaired airflow during inspiration. Therefore, it is essential to assess patency of the valve prior to repair to determine whether correction is necessary. In the remainder of this chapter, we will review our approach to nasal reconstruction, describing various repair options for each nasal subunit.
3.3 Nasal Tip
Due to the immobility of the thick sebaceous nasal tip skin, even minimal tissue movement can lead to distortion. Therefore, a precise reconstructive plan is vital. Second intention healing, primary closure, flaps, and grafts are all reconstructive options for the nasal tip, depending on the nature of the defect.
3.3.1 Second Intention Healing
In patients with highly sebaceous skin, superficial defects anywhere on the nose are amenable to healing by second intention (Fig. 3.4).2 Aesthetic results when utilizing alternative reconstructive approaches can be unpredictable, as healed surgical incisions are particularly prone to postoperative scar depression on highly sebaceous skin.
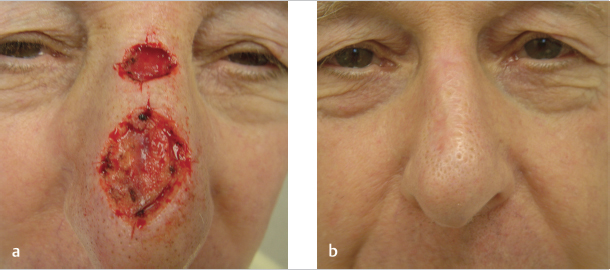
Fig. 3.4 (a) Superficial defects on the nose of a 68-year-old man with a sebaceous nose. (b) Results at 3 months when wounds were allowed to heal by second intention.
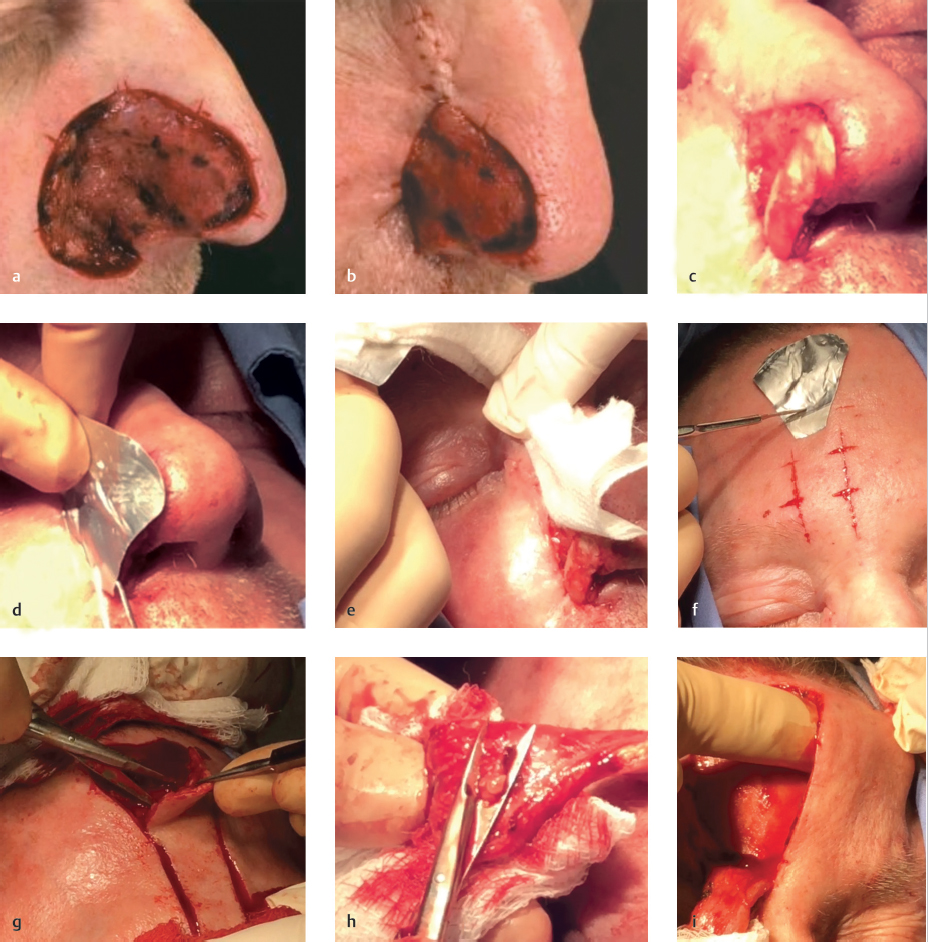
While many defects can heal by second intention with no additional intervention, a “shave and sand” technique can often be employed to enhance results (▶Video 3.1). This technique can be performed immediately postoperatively or delayed and is particularly useful for superficial defects with abrupt edges. Using a scalpel blade placed horizontally on the skin immediately adjacent to the defect, light pressure is applied removing thin shavings skin in order to blend the transition between the defect and its surrounding skin. To further camouflage the surgical site, coarse 80-grit sterile aluminum oxide sandpaper is then rubbed over the whole subunit until fine pinpoint bleeding is observed. We describe this technique to patients by comparing it to sanding a scratch on wood furniture. While this method typically yields excellent cosmetic results in those with highly sebaceous skin, very rarely patients may develop increased pore size and/or hypopigmentation. In the editors’ experience, a manual dermabrasion apparatus may also be used with a diamond fraise for younger or nonsebaceous skin and a wire brush for thick sebaceous and rhinophymatous skin. In patients with nonsebaceous skin, surgical repair consistently yields superior results and is our favored approach, unless a defect is exceptionally thin.
3.3.2 Primary Closure
Primary repair on the nasal tip should be reserved for small to medium-sized midline defects (Fig. 3.5).
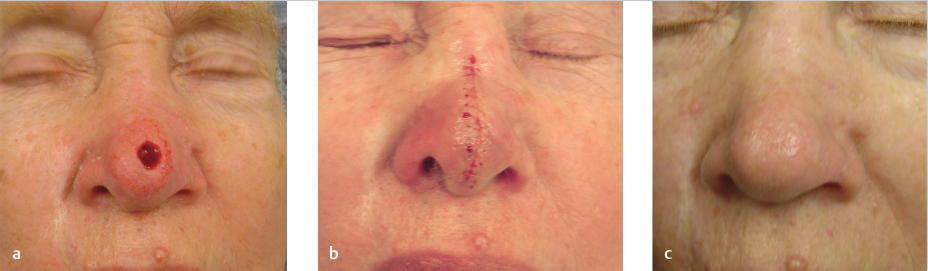
Fig. 3.5 (a) Defect on the midline nasal tip of a 74-year-old woman. (b) Fusiform repair utilizing a 5:1 length-to-width ratio. (c) Results at 3-month follow-up.
Design
There are several important points in designing and executing a successful fusiform closure on the nose.3 When designing the repair, at least a 5:1 length-to-width ratio is employed with the apices ending above the bony hump of the nasal dorsum (where the nasal bone connects to cartilage) and below the inferior margin of the nasal tip about the infratip or columella. Using standard 3:1 length-to-width ratio design may increase closure tensions and result in prominent standing cutaneous deformities, significantly distorting the nasal profile.
Execution
After widely anesthetizing the area, the ellipse including the defect is incised to the level of the perichondrium and periosteum. Undermining in a submuscular plane, often as wide as the nasofacial sulcus for larger defects, is necessary to recruit sufficient skin laxity for closure under minimal tension. Hemostasis is then performed. For a nose with prominent telangiectasia, there is often a desire to cauterize superficial vessels to allow for a bloodless field. However, doing so may result in epidermal necrosis with scarring. Rather, this bleeding should be anticipated by allowing ample time for the epinephrine in the anesthesia to work. The defect is then closed using 5–0 polyglactin 910 buried vertical mattress sutures.4 When suturing on the nose, entry points on the wound edge should be in the deep reticular dermis, as more superficial bites can leave persistent nodules. Also, underlying muscle should be included in each bite in order to prevent a depressed scar.
For defects that are slightly off-center, the inferior triangle can be displaced medially, creating a Burow’s advancement flap, sometimes called the “East-West” flap on the nose5 (Fig. 3.6). This variation should only be used on individuals with a wide infratip and columella; otherwise, closing the inferior triangle may distort the nares.
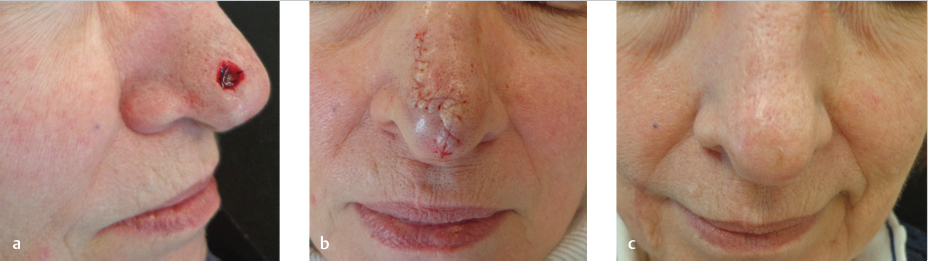
Fig. 3.6 (a) Defect on the lateral nasal tip in a 71-year-old woman. (b) Repair with a Burow’s advancement flap. (c) Results at 3-month follow-up.
If size of a nasal tip defect precludes complete fusiform closure, a superiorly based Burow’s graft can achieve an excellent aesthetic result (Fig. 3.7). Burow’s grafts have the advantage of providing adjacent skin for superb color and texture match.
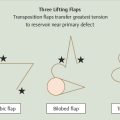
3.3.3 Bilobed Flap
Our workhorse repair option for defects under 1.5 cm on the nasal tip is the bilobed flap (▶Video 3.2).6 What makes the bilobed flap the ideal option for nasal tip repair is its ability to deftly recruit laxity from upper nose to close defects where the immediate adjacent skin lacks sufficient mobility to use single transposition or other local flaps. In addition, it has an inherent Z-plasty-like motion, which provides a lengthening effect that creates a downward force, preserving the position of the free alar margin.
Design
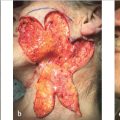
Proper design of the bilobed flap is crucial for its success (Fig. 3.8a). For tip defects, the flap is most commonly laterally based. The dog-ear is drawn to be approximately 1.5 times the diameter of the defect and its superior arm drawn horizontally, permitting the secondary lobe of the flap to be drawn vertically along the length of the nose. Designing the secondary lobe vertically effectively places closure tension perpendicular to the ala, preventing its displacement when suturing in the flap. Our endeavor is to match the size of the primary and secondary flap lobes to that of the defect. Designing flap lobes that are too small may cause secondary movement upon flap closure that could result in alar displacement, while lobes too large may result in pincushioning. For defects that are more distal on the nasal tip, the Burow’s triangle needs to be drawn with its apex oriented more vertically, avoiding its placement through the ala. When doing so, we will often add a third lobe, creating a trilobed flap (Fig. 3.9), in order to place the quaternary defect perpendicular to the alar free margin as discussed previously.
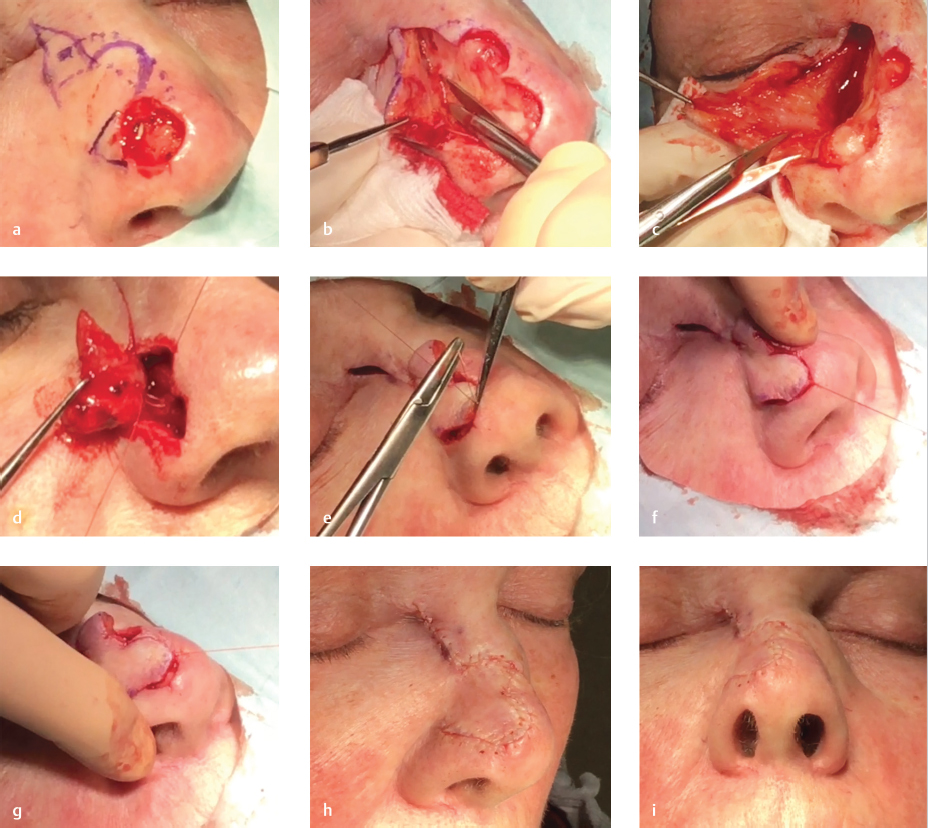
Fig. 3.8 (a) Proper design of the bilobed flap for defect on in a 58-year-old woman. (b) Severing unnamed ligament to allow for flap release. (c) Trimming tissue at pivot point of flap. (d) Nasal valve “stenting” suture to base of flap. (e) Correct placement of “key” suture. (f) Improper low placement of key suture causing “bulldozing” of ipsilateral ala and elevation of contralateral ala. (g) Improper high placement of key suture causing ipsilateral alar elevation. (h) Lateral view of completed flap. (i) Worm’s eye view of demonstrating no alar distortion.
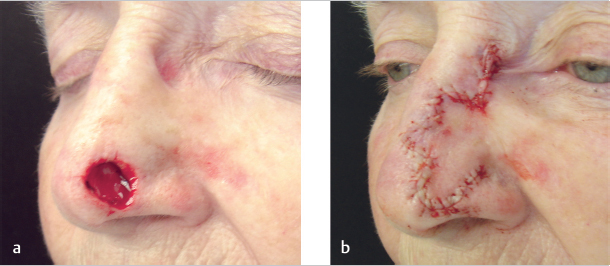
Fig. 3.9 Trilobed flap. If a bilobed flap were chosen in this case, the secondary lobe could not have designed vertically. Adding a tertiary lobe allows its orientation perpendicular to the ala. (a) Post-Mohs defect in an 84-year-old woman. (b) Completed flap.
Execution
The flap is first incised to the level of the perichondrium, and the defect is deepened to the level of the cartilage if necessary. Next, the flap is widely undermined, using skin hooks intermittently to assess if the flap will cover the defect without significant tension. Like primary closure described earlier, undermining is often carried out as wide as the nasofacial sulcus. We have found that severing an unnamed ligament, which exists at the lateral junction of the nasal bone and upper lateral cartilage, provides substantial flap movement allowing it to easily fall into place (Fig. 3.8b). The primary lobe, especially the leading edge of the flap, should then be thinned and defatted as necessary to match the level of the skeletonized defect. We have also found that trimming tissue at the point of rotation minimizes the chance of a persistent dog-ear (Fig. 3.8c). Hemostasis is then performed with care not to cauterize vessels of the superficial skin edge.
Like other transposition flaps, the distal defect is closed first, which is the tertiary defect in the case of the bilobed flap. Because the bilobed flap often traverses the alar crease, which overlies the internal valve, a tacking suture is often placed, allowing the nasal valve to remain patent (Fig. 3.8d). Next, we place what we believe is the “key” stitch. This stitch is the one that aligns the primary lobe of the flap into the defect. In addition to correct design, proper placement of this stitch is essential to preserve nasal symmetry and prevent distortion (Fig. 3.8e). If placed too low, a “bulldozing” effect of the ipsilateral ala can occur (Fig. 3.8f), while if placed too high, displacement of the contralateral side may occur (Fig. 3.8g). The remainder of the flap is then anchored into place, the secondary lobe is trimmed, and a fast gut suture is run along the scar to finely approximate the epidermis (Fig. 3.8h, i). Prior to starting the repair, we inform patients of the potential for visible incision lines, which may inevitably occur on a sebaceous nose despite immaculate suture technique, and routinely have them return to assess the need for dermabrasion in 3 months.
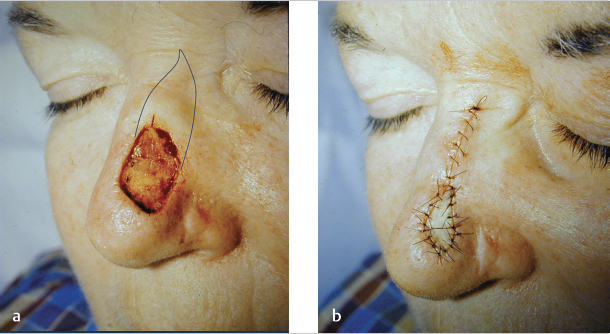
3.3.4 Dorsal Nasal (Rieger’s) Flap
The dorsal nasal flap is a rotation flap widely used for midline defects less than 2.5 cm on the nasal tip and supratip (Fig. 3.10).7 We use this flap infrequently due to some of its limitations; we use it only in circumstances where a defect may be too large for a bilobed flap and when the patient prefers a one-staged flap. The pivotal restraint encountered with this flap is amplified compared to that faced with other rotation flaps due to the thick sebaceous quality of the nasal skin. Therefore, increased closure tension is frequently encountered, which can often lead to conspicuous scarring and distortion. Another significant limitation is that the flap rotates thick glabellar skin into the medial canthus, often requiring subsequent revision.
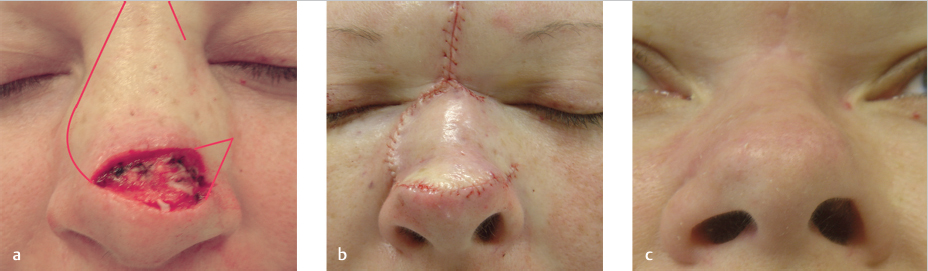
Fig. 3.10 (a) Design of dorsal nasal flap for defect in a 42-year-old woman. (b) Completed flap. (c) Results at 3 months showing depressed right ala. Picture included to demonstrate inconsistent results of the dorsal nasal flap despite proper design and technique.
Design and Execution
The flap is first designed with a Burow’s triangle angled superiorly in the direction of the base of the flap. Importantly, the leading edge is extended past the defect to overcome the inherent rotational shortening that accompanies this flap. The arc is drawn in the alar sulcus, upward along the nasofacial sulcus, continued onto the medial canthus, and then terminated on the glabella. The arc should be completed superiorly on the glabella in order to facilitate closure of the secondary defect, and a generous back cut is designed downward no more inferior than the contralateral medial canthal tendon to enable ample rotation.
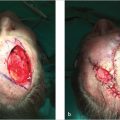
3.3.5 Forehead Flap
For large (typically >2 cm) or complex nasal tip or alar defects not amenable to repair with local flaps, we often employ a forehead flap (FHF) to restore the subunit with a staged approach (▶Video 3.3, Fig. 3.11).8,9 Its reliability, ease of transfer, capacity to provide bulk when lost, and excellent color and textural match make the FHF unsurpassed in its ability to repair such defects. Relative contraindications of the FHF include patients with poor mental status who may be at risk pulling the flap’s pedicle, patients who do not understand the multiple steps required of the procedure, and patients who are at risk for not returning for a second stage. Anatomic contraindications include patients with additional skin cancers or scarring on the forehead donor site or patients who do not possess adequate forehead height to generate sufficient flap length, although if other options are limited, the flap can be curved laterally, like a hockey stick, or hair-bearing scalp can be used with a plan to do hair removal.