Fractures of the metacarpals and phalanges are frequent injuries, representing 41% of all upper extremity fractures in the United States.1 Each patient and fracture is unique, but common principles apply. The goals of hand fracture treatment are restoration of articular congruity, reduction of malrotation and angulation, maintenance of reduction with minimal surgical intervention, and rapid mobilization. This chapter focuses on the most common types of hand fractures with an emphasis on the principles related to optimal fracture treatment.
FOCUSED EXAMINATION OF THE HAND
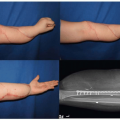
Physical examination of the patient with a hand fracture follows a thorough history. The type of trauma provides valuable information. When inspecting the injured hand, the contralateral hand serves as an excellent reference. Swelling, tenderness, or open wounds are assessed. Gentle palpation locates tender points. Circulation and sensation of the hand and the integrity of tendons and ligaments are assessed. The patient is asked to maximally extend and flex the fingers to detect malalignment or rotational changes of the digits (Figure 75.1). It may be useful to block the fracture site with local anesthesia to facilitate motion, which may otherwise be impossible due to pain.
In the presence of an open fracture, the wound is inspected after cleansing and disinfection of the hand. Deep probing of the fracture through the wound in an emergency setting is not recommended, as this may propagate bacterial contamination from the skin edges into the fracture site.
Plain radiographs in three planes—posteroanterior, lateral, and oblique—are obtained. It is of great importance that projections are accurately directed with the central beam aimed at the area of interest. Special views will be discussed as individual fractures are presented below.
PRINCIPLES OF FRACTURE TREATMENT
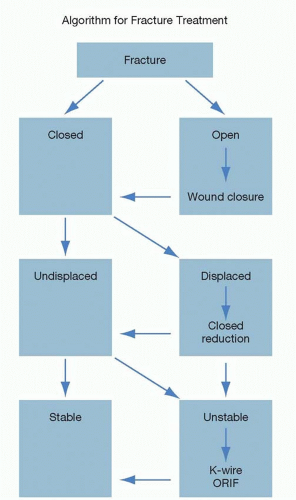
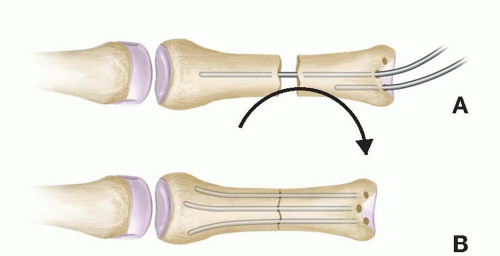
The majority of closed hand fractures can be effectively treated by closed reduction and splinting. Fractures can be identified as transverse, oblique, or spiral. Each fracture has its own “personality,” depending on the time from injury to presentation, the fracture pattern, the amount of cortical versus cancellous bone at the fracture site, and the muscle/tendon forces acting on the fractured parts. Stable, non-displaced fractures can usually be treated by splinting and/or buddy taping (taping to the adjacent digit) alone. Initially unstable fractures may be reduced, converting them to a stable position for splinting. If the reduction is not stable in post-reduction radiographs, then the position should be secured by percutaneous pinning or other means of fixation (Figure 75.2).
Once stabilized, the patient is encouraged to move all uninvolved digits and to elevate the hand to minimize edema. A follow-up radiograph is obtained after 7 to 10 days to check alignment and to rule out displacement. Metacarpal and phalangeal fractures usually require 3 to 4 weeks for clinical union. Clinical union, which is defined as a state of stability and painlessness, may precede radiographic evidence of bone healing.
Irreducible fractures are candidates for open reduction and internal fixation (ORIF). Even when performed with precise technique, a surgical procedure creates additional trauma to the damaged area; therefore, the surgeon must carefully ascertain if an indication for operative treatment exists: malrotation, instability, or multiple contiguous fractures. Furthermore, if ORIF will ultimately speed up motion and recovery, then an operative procedure may be preferable.2
For open fractures, the wound is irrigated and debrided urgently in the operating room. The fracture is treated by internal fixation or Kirschner wire (K-wire) fixation during the same session if the wounds are clean. Soft tissue defects are reconstructed prior to or at the time as definitive fracture treatment. Most skin defects can be closed with local tissue. The dorsum of the fingers requires special consideration. Due to its thin soft tissue cover, this area is vulnerable to full-thickness skin loss. Coverage with local flaps, however, is limited because of the shortage of adjacent tissue. In these cases, island flaps from the metacarpal skin that can reach the digital area such as reversed metacarpal artery flaps can be used.3 Distant or free flaps are rarely needed. Adequate soft tissue cover is essential for proper bone healing. Prophylactic intravenous antibiotics are administered.4 There is evidence that a single dose of intravenous antibiotic can reduce the incidence of infection in open fractures.5 Antibiotic administration is continued for up to 72 hours in type II injuries according to the modified Gustilo classification by Duncan et al.4
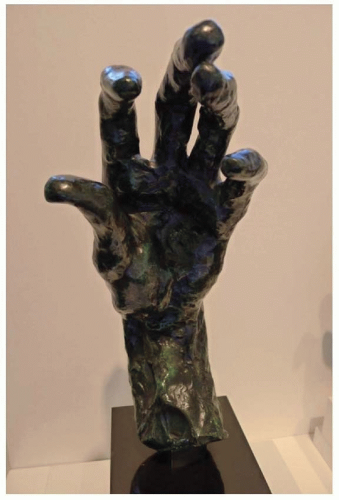
FIGURE 75.1. In this sculpture by Auguste Rodin, the long finger scissors over the ring finger while all the other fingers correctly point toward the scaphoid tubercle.
FIGURE 75.2. Algorithm for fracture treatment. K-wire, Kirschner wire; ORIF, open reduction and internal fixation.
TECHNIQUES OF BONE FIXATION
K-Wires (Kirschner Wires)
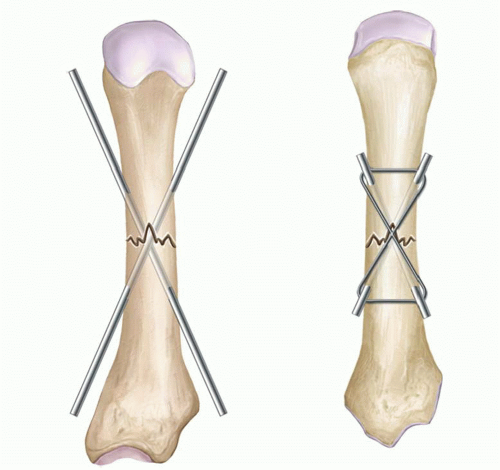
K-wires are the most versatile and the most frequently used fixation method. To minimize trauma, the wires can be introduced percutaneously under fluoroscopic guidance after closed reduction of the fracture. If closed reduction is not possible, the fracture can be reduced via an open approach and then stabilized with K-wires. One K-wire alone cannot provide rotational stability; therefore, at least two wires in different planes are necessary to prevent rotation. K-wires do not add a compressive component on the fracture. The disadvantages of this technique are lack of rigidity, possible pin loosening, pin tract infection, and the necessity for additional immobilization (Table 75.1).
Tension Band Wiring
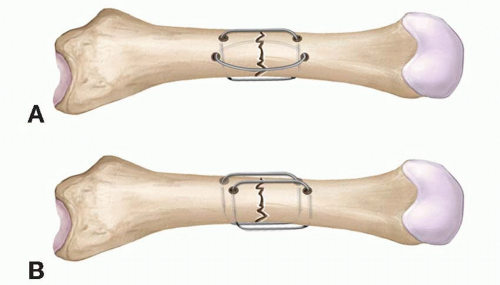
The principle of this technique is to maintain the alignment of the fracture fragments with K-wires and to apply interfragmentary compression with wire loops around the K-wire. The forces of the strong flexor tendons also contribute to the compressive force. K-wires of 0.035 or 0.045 inch diameter are driven across the fracture line. Care is taken not to position the wire ends directly underneath a tendon. A 24G or 26G monofilament steel wire is guided in a figure of eight fashion and tightened dorsally, counteracting the natural pull of the flexor tendons. This technique provides adequate fixation for early motion (Figure 75.3).
TABLE 75.1 PRACTICAL TIPS FOR OPTIMAL K-WIRE PLACEMENT
1.
Use fluoroscopy for proper placement.
2.
View the operative field without surgical loupes to assess proper anteroposterior and lateral orientation. (Surgical loupes are helpful for delicate dissection, but for K-wire application, the reduced field can lead to spatial disorientation.)
3.
Gain a “toehold” onto the bone before drilling. Even though the soft tissue envelope of the hand is thin, the tip of the K-wire can easily be displaced when drilling before it reaches its actual starting point on the bone. Therefore, it is important to first drill through the skin until the K-wire tip can be anchored at the desired site on the bone cortex.
4.
Direct passage of the pin precisely. Once the wire has made a track in the bone, the direction of the K-wire cannot be readjusted.
In order to measure the length of wire advancement or retrieval, place the driver head of the drill at the level of the skin to use the skin as a reference point.
Interosseous Wiring
The 90° to 90° interosseous wire fixation can also provide stability and compression with minimal soft tissue dissection. It is mainly used for transverse fractures of the phalanges, for joint fusion, and for osteosynthesis in replantation. The technique requires 0.045 inch K-wires, an 18G needle, and 24G or 26G dental wire. Drill holes are made using a 0.045 inch K-wire through both bone fragments, dorsal to palmar, and radial to ulnar. An 18G needle is inserted through the drill holes to serve as a temporary guide for the insertion of a 24G or 26G dental wire. After circumferential engagement of the wire, it is tightened carefully to avoid wire breakage (Figure 75.4). Alternatively, instead of using interosseous wires in anteroposterior and lateral planes, both loops can be positioned in a dorsal to volar direction.
FIGURE 75.3. Tension band wiring: K-wires provide stabilization and wire loops exert compression across the fracture line.
FIGURE 75.4. Interosseous wiring: A. Two-wire loops at 90° angles to each other (90° to 90°) or (B) parallel wires provide both stabilization and compression.
Intramedullary Fixation
The use of intramedullary fixation may be suitable for transverse fractures. Steinmann pins or multiple K-wires are used (Figure 75.5).6 The devices are completely intraosseous and their removal is not necessary. Potential disadvantages are rotational instability and pin migration. They are difficult to apply in spiral or long oblique fractures.
FIGURE 75.5. Intra medullary fixation of a metacarpal fracture with anterograde insertion of prebent K-wires. A. During placement. B. Wires are trimmed after placement.
FIGURE 75.6. Lag screw principle (compression screw): A. Drilling of hole across both fragments. B. Countersinking. C. Screw length determination. D. Drilling of glide hole with larger drill bit. E. Tightening the lag screw. F. Two or three lag screws assure stability.
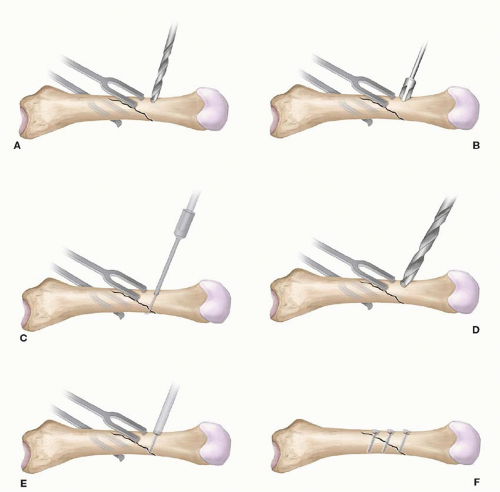
Compression Screws
Compression can be applied between the fracture fragments using the lag screw principle. This is done by using screws with a small length of thread at the tip and a smooth shank between the threaded portion and the tip. Fully threaded screws can also act as lag screws if the proximal cortex is over-drilled so that the proximal hole acts as a glide hole (Figure 75.6). Compression of two bone fragments with lag screws can be applied in long oblique and spiral fractures, where the fracture length is at least twice the bone width. Proper holding of the accurately reduced fragments with appropriate clamps is essential for successful lag screw osteosynthesis.
Plate Fixation
The main benefits of osteosynthesis with plates and screws are rigid fixation and maintenance of bone length. The technique is indicated in metacarpal fractures, especially with multiple fractures, and for the reconstruction of malunion and nonunion. Compression plates are designed to provide compression across the fracture line. Tightening the screw in an eccentrically placed drill hole creates a force vector in the longitudinal direction. The screw head progressively pulls the plate along with already fixed fracture portion toward the other fragment (Figure 75.7). Due to the need for extensive dissection, plate fixation is associated with a higher rate of extensor tendon adhesion formation, often necessitating tenolysis. Despite the development of thinner plates, some bulkiness remains and plates may require removal.
External Fixation
External fixation is used in complex fractures where anatomic reconstruction is not feasible. For example, highly comminuted fractures with bone loss, gunshot wounds, and fractures with severe soft tissue damage and/or contamination may be best treated by external fixation. The external fixator bridges across the fracture, thus stabilizing the bone fragments and maintaining length until soft tissue healing occurs. As the manipulation of the fracture site is minimal, preservation of the vascular supply is possible. The high stability of external fixator systems permits early mobilization.
Only gold members can continue reading. Log In or Register to continue