Introduction
Flexor tendon injuries are among commonly seen hand trauma, and outcomes of the treatment in the fingers and thumbs are traditionally unsatisfactory. In the hand and the forearm, flexor tendons are divided into five anatomical zones. Zone 2 is the most complex area, which has attracted most attention from surgeons and investigators alike. Over the past decades, zone 2 flexor tendon repairs have evolved greatly, and outcomes have changed dramatically. Several conceptual changes, as well as key surgical methods and postoperative hand therapy protocols, have led to the changes. The new principles and clinical practices include: (1) using strong core sutures, typically 4- or 6-strand repairs; (2) judicious venting of the critical annular pulley; (3) ensuring that a slight tension is created by the repair to prevent gapping at the repair site; (4) performing on-table digital extension–flexion tests to confirm the quality of the surgical repair; and (5) early partial-range active motion to ensure tendon gliding, without overloading the repair.
In addition, having the patient wide awake under local anesthesia with epinephrine without use of a tourniquet during surgery is an important advance. In such settings, the patient can actively move the tendon to ascertain that after end-to-end repair the repair site has no gapping or does not impinge against the pulleys. , Wide-awake surgery also enables better intraoperative judgment of tenolysis or proper tensioning of the tendon graft during secondary surgery.
Anatomical Features
There are 12 flexor tendons in the hand and forearm regions. These tendons include finger and thumb flexors and wrist flexors. Finger flexor tendons are the flexor digitorum superficialis (FDS) and the flexor digitorum profundus (FDP). In the thumb there is only one flexor tendon, i.e., the flexor pollicis longus (FPL). The tendons of the FDP come from a common muscle belly in the mid forearm. The tendons of the FDS originate from the separate muscle bellies, which allow more independent finger flexion. Within the carpal tunnel, nine tendons (four FDS, four FDP, and one FPL) exist.
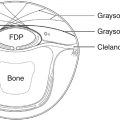
In the fingers and thumb, the digital flexor tendons glide within a closed fibro-osseous sheath with segmental, semi-rigid, constrictive bands present. Proximally, the synovial sheath ends proximal to the neck of the metacarpals, forming the proximal reflection of the digital flexor sheath. The FDS tendons lie superficial to the FDP tendons proximal to the bifurcation of the FDS tendon at the level of the metacarpophalangeal joint. Distal to the bifurcation, the FDS tendon becomes two slips coursing laterally and then deeper to the FDP tendons. This FDS bifurcation is in the middle part of the A2 pulley area. In this area, the FDS tendon also serves to constrain the FDP tendon, acting as the second sheath constricting the FDP tendon. Deep to the FDP tendon, the FDS slips rejoin to form Camper’s chiasm, and insert on the middle phalanx as two separate slips. The FDP tendon inserts into the distal phalanx. Inside the flexor sheath of the thumb, the FPL tendon is the only tendon and inserts at the distal phalanx.
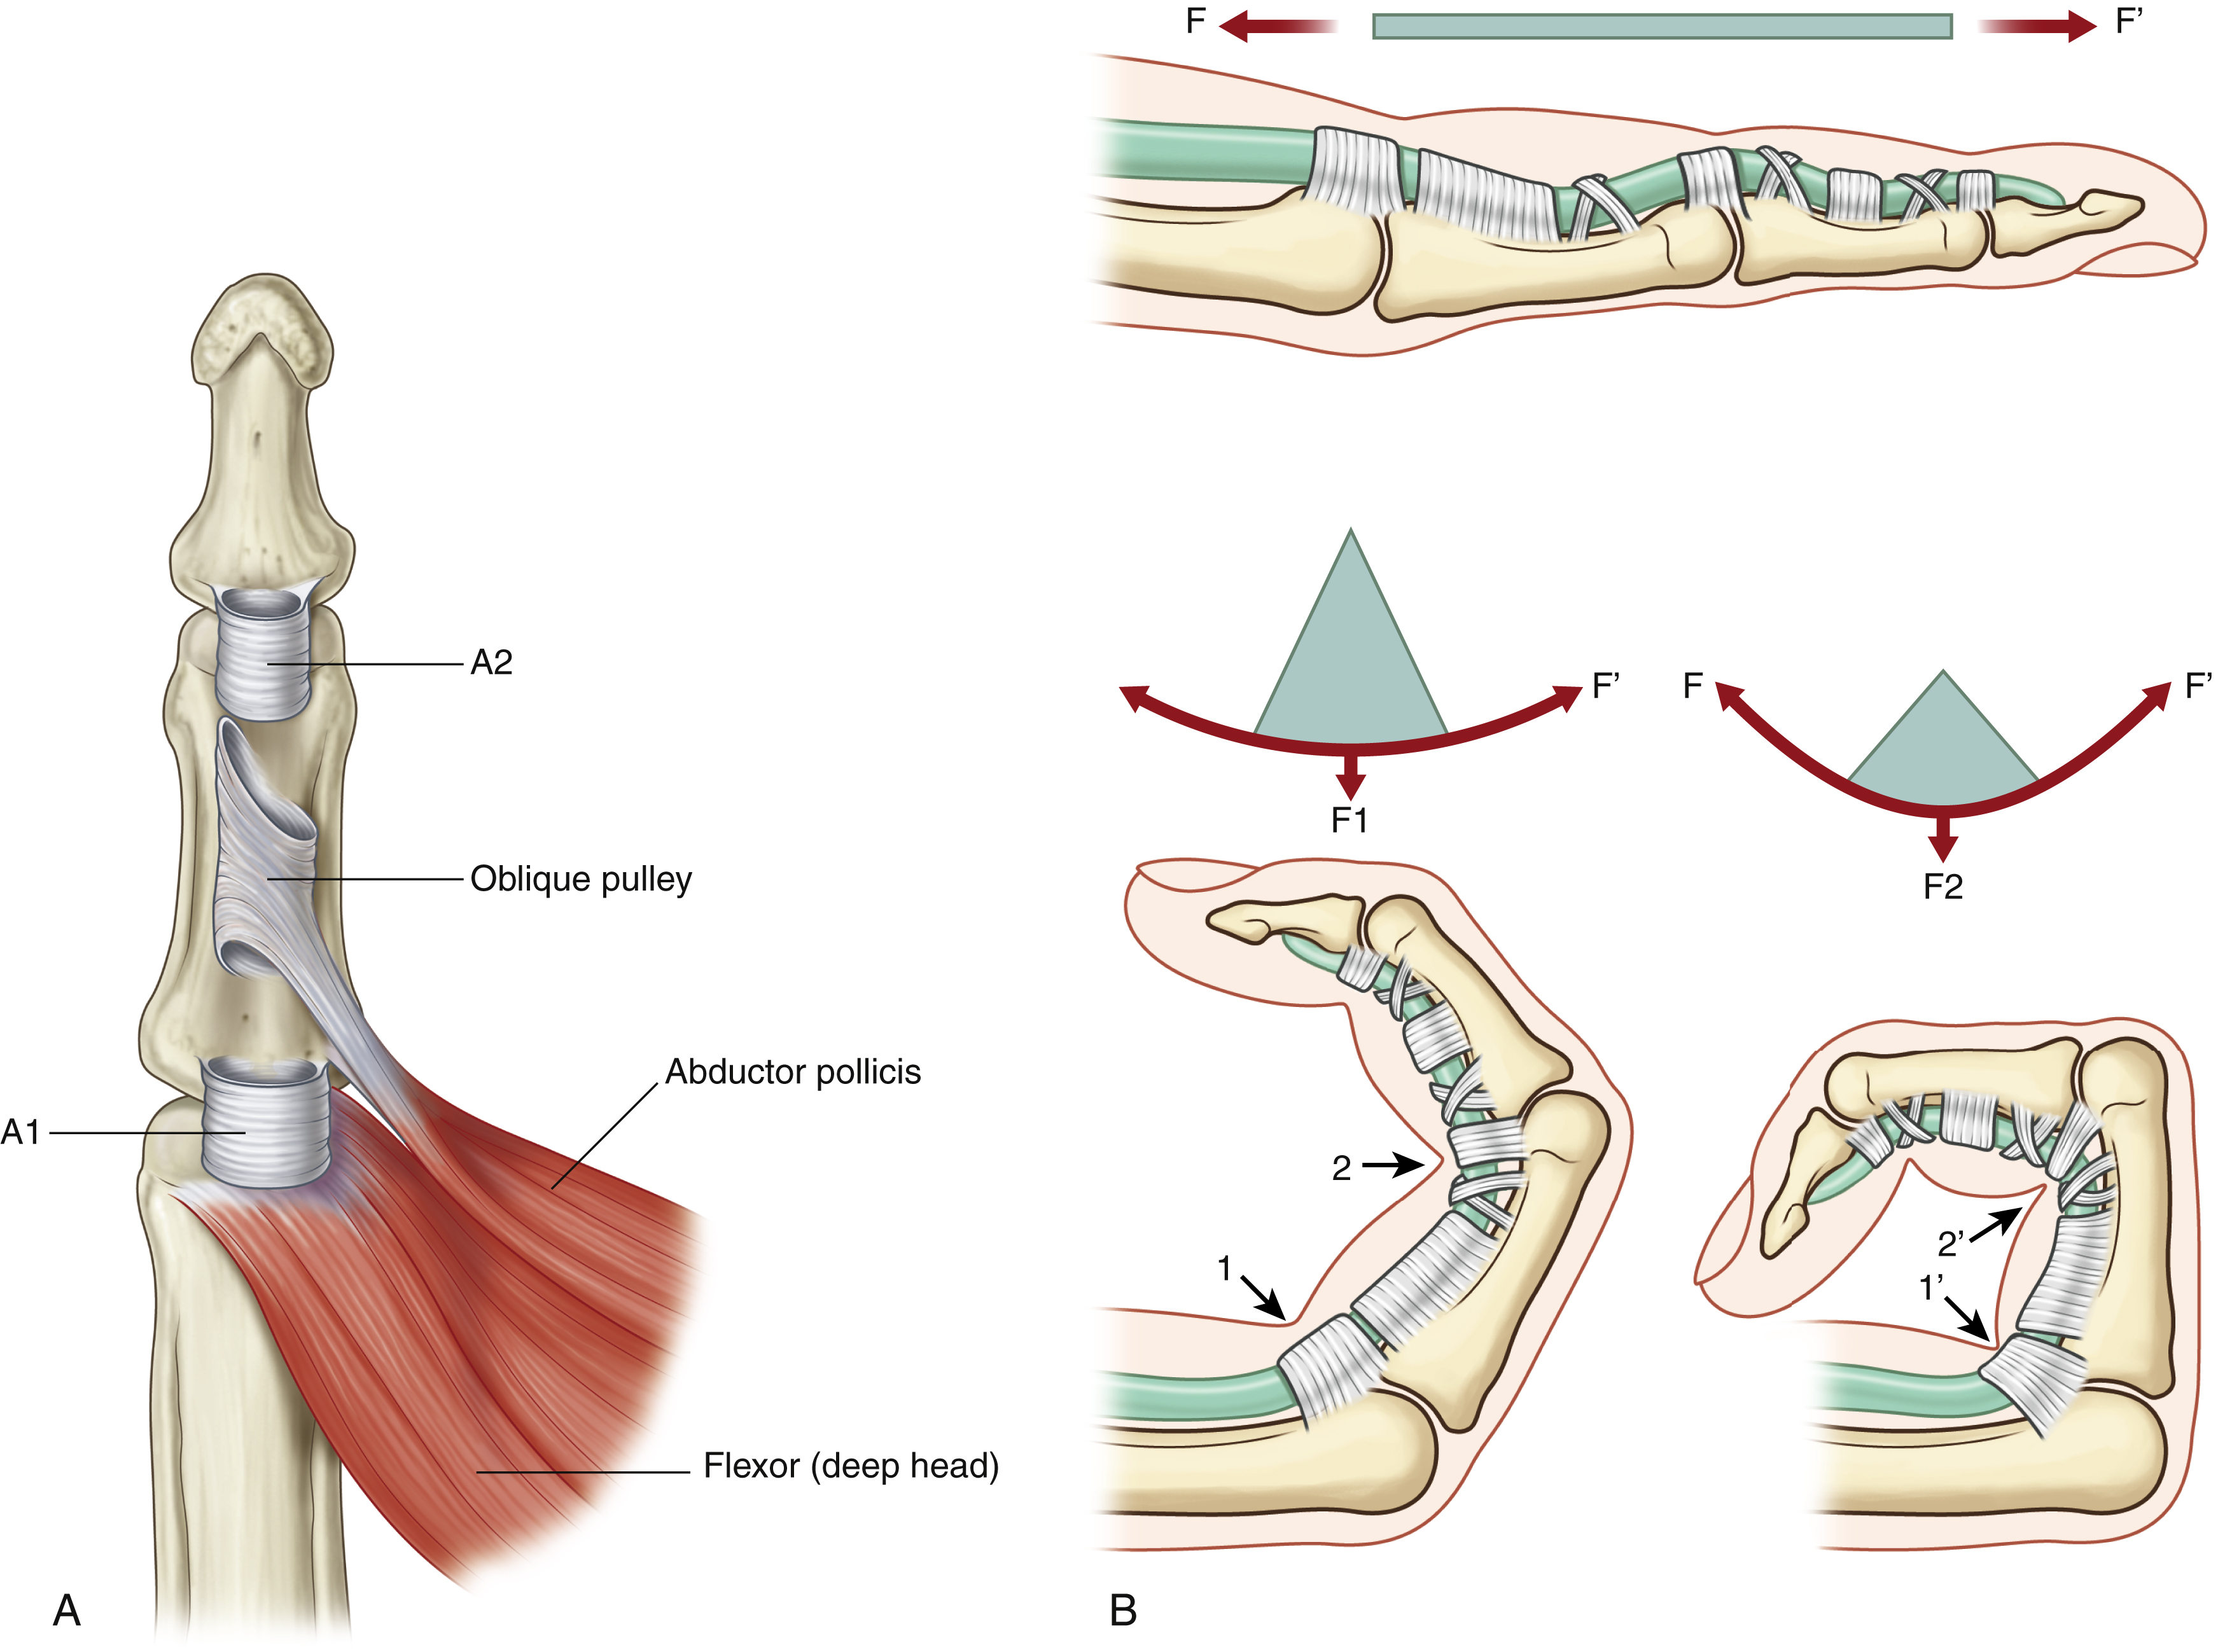
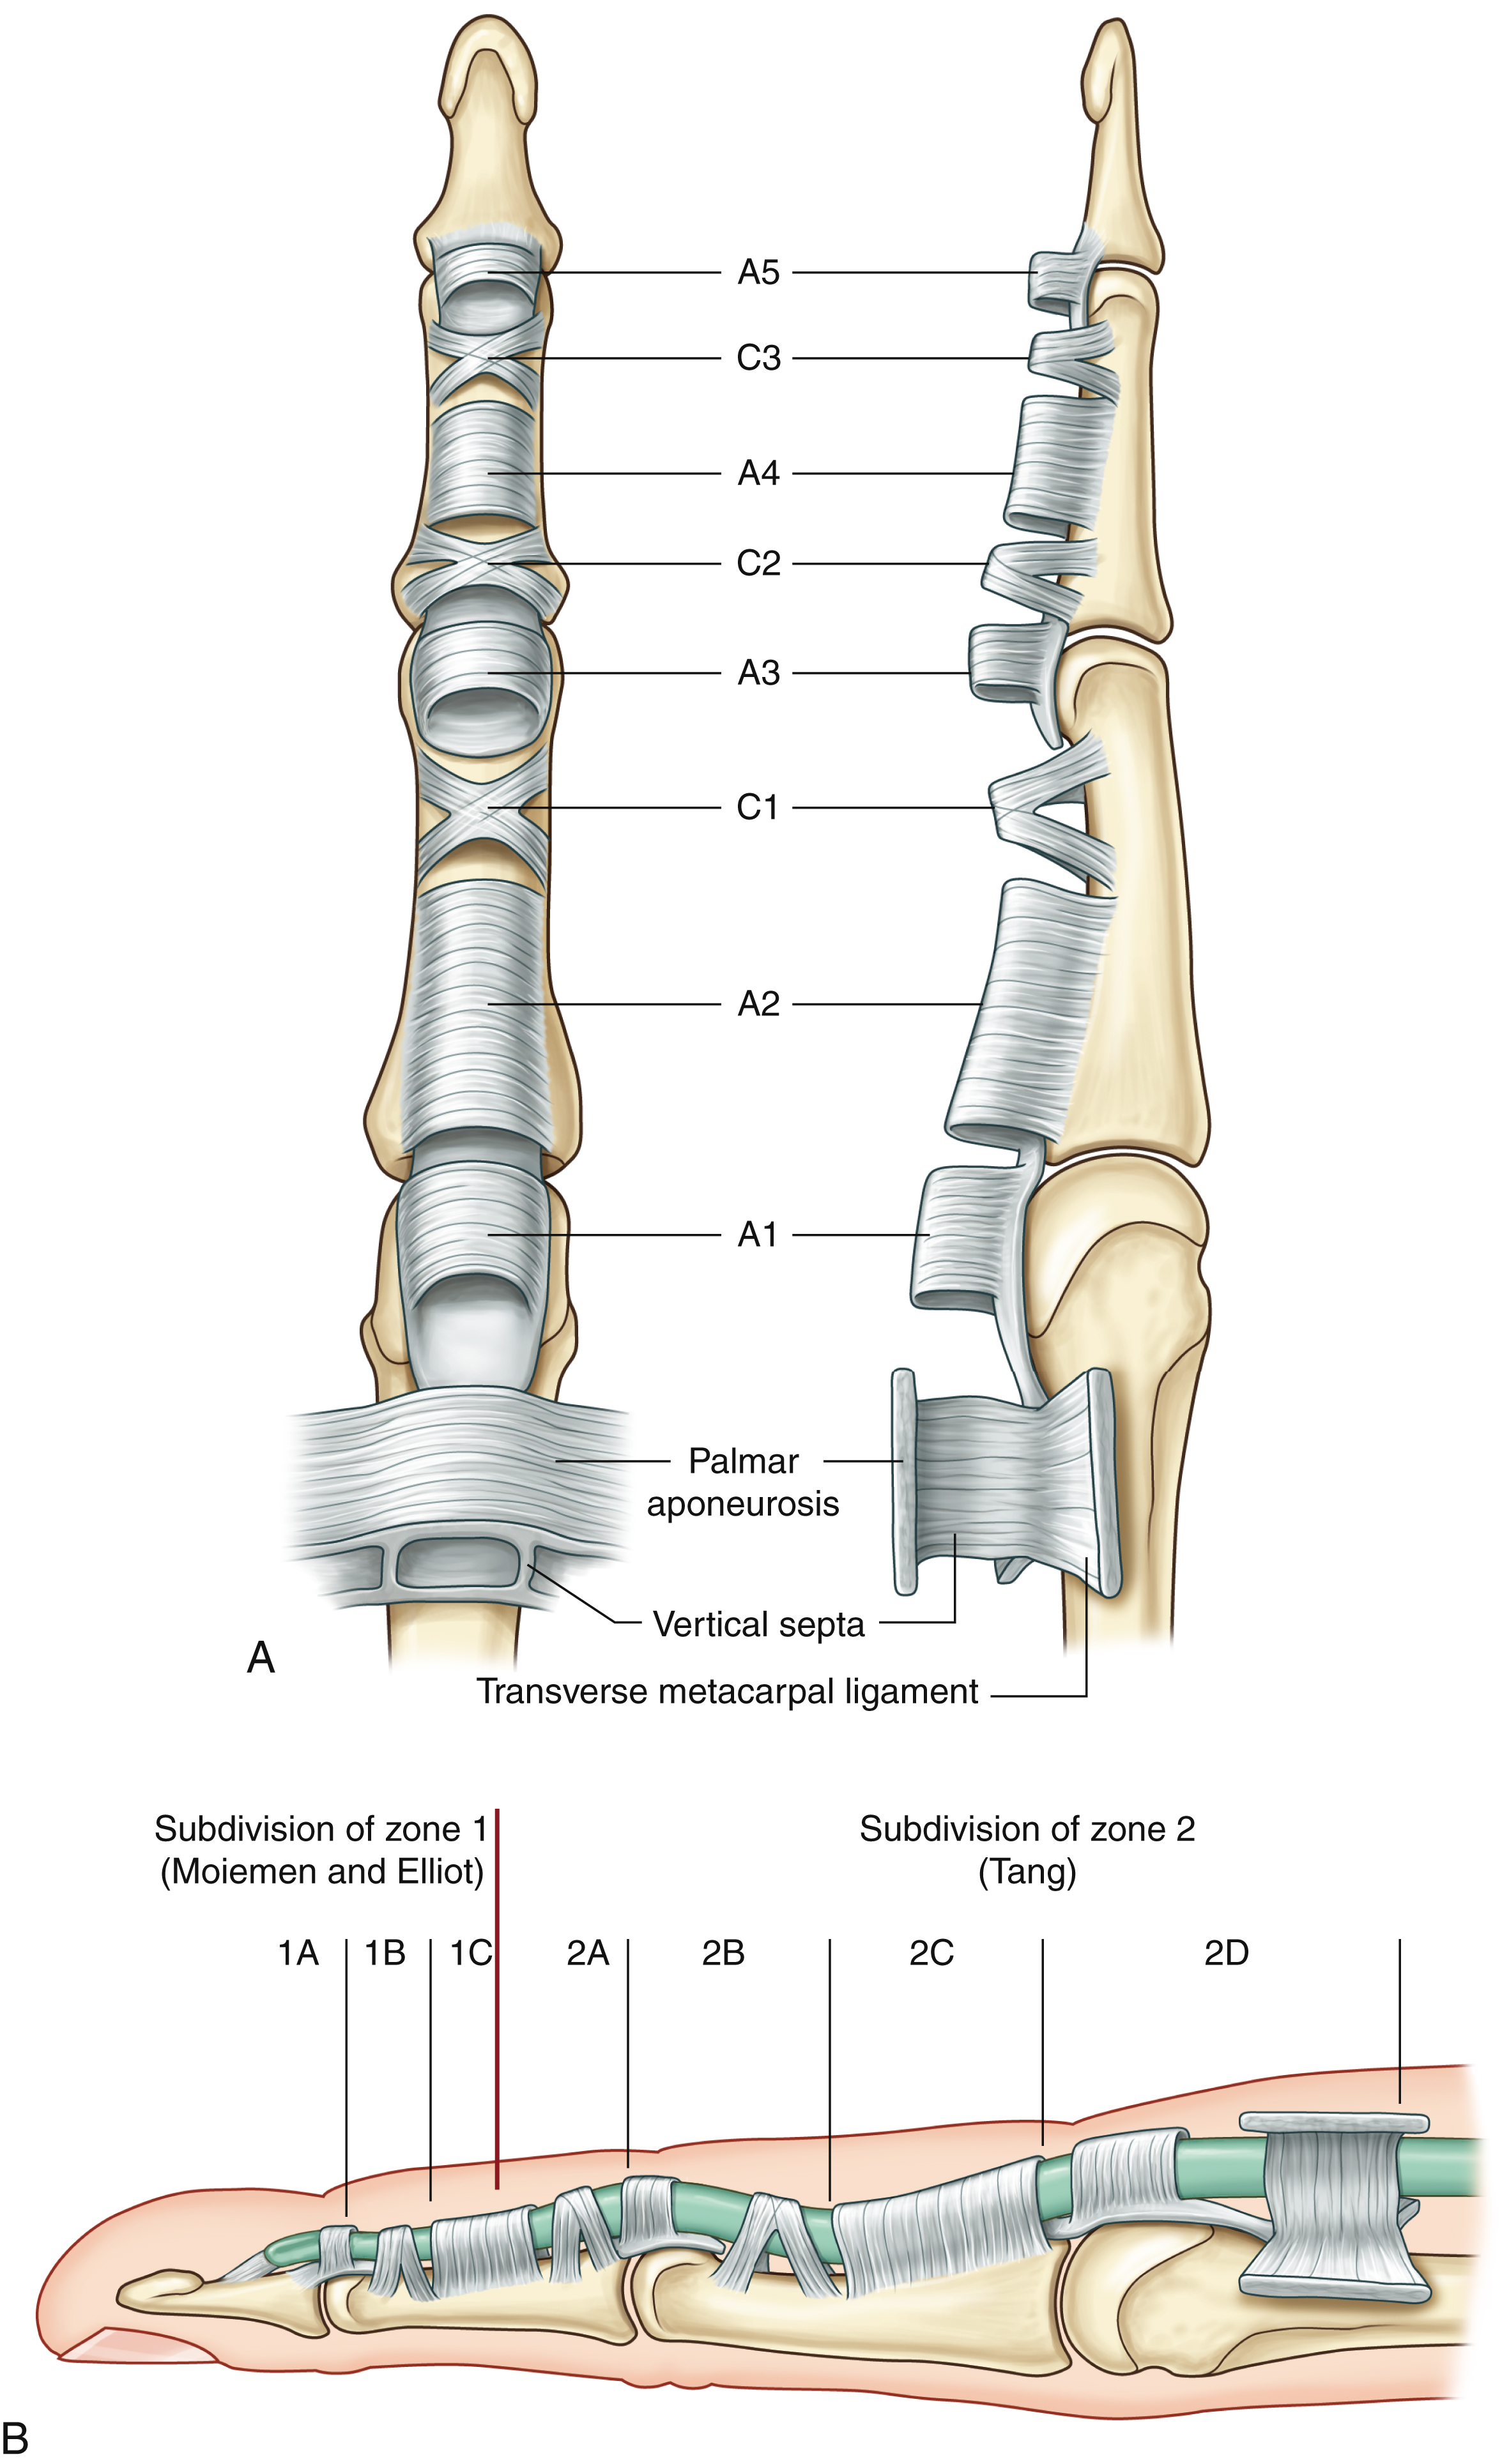
The digital flexor sheath consists of synovial sheath and segmental, condensed fibrous bands called pulleys . Synovial sheath, a thin layer of continuous paratenon covering the inner surface of the fibrous sheath, provides a smooth surface for tendon gliding and nutrition to the tendons. The pulley system of the fingers consists of annular pulleys (condensed, rigid, and heavier annular bands) and cruciate pulleys (filmy cruciform bands) ( Fig. 47.1 ). In the thumb, there are two annular pulleys (A1 and A2) palmar to the two thumb joints and one oblique pulley; there are no cruciate pulleys. In the fingers, there are five annular pulleys (A1, A2, A3, A4, and A5), three cruciate pulleys (C1, C2, and C3), and one palmar aponeurosis (PA) pulley (see Fig. 47.3A ). The A1, A3, and A5 pulleys attach to the palmar plates of the metacarpophalangeal (MCP), proximal interphalangeal (PIP), and distal interphalangeal (DIP) joints, and the A2 pulley attaches to the proximal two-thirds of the proximal phalange and A4 pulleys attach to the middle portion of the middle phalange.
The presence of annular pulleys is a unique anatomical feature. The A2 pulley is the largest and strongest, and the A4 pulley the second largest. The annular pulleys serve to prevent tendon bowstringing during digital flexion. The A3 and A1 pulleys also perform this function, but their role is less critical than the A2 and A4. Loss of integrity of any one of the pulleys alone has no marked functional consequence, though anatomically, minor tendon bowstringing occurs at the site of the loss.
The middle and distal part of the A2 pulley (1.5–1.7 cm long in adult middle finger) and the A4 pulley (about 0.5 cm long) are the narrowest and constricting. These sites become very compressive to the repaired tendons because of postoperative tendon swelling. These narrow pulley sites can be incised to allow the repaired tendons to glide more freely.
Zones and Subzones of Flexor Tendons
In the 1960s, the flexor tendons were divided into five zones by Verdan. In the 1990s, subdivisions of zone 1 by Moiemen and Elliot and zone 2 by Tang were added into the zoning system, in order to describe the location of injuries and repairs more specifically. These zoning and subzoning systems provide surgeons with the nomenclature to document the injuries and outcomes, and describe treatment methods.
The zoning of flexor tendons is described below and seen in Figs. 47.2 and 47.3 :
Zone 1: From the insertion of the FDS tendon to the terminal insertion of the FDP tendon
Zone 2: From the proximal reflection of the digital synovial sheath to the FDS insertion
Zone 3: From the distal margin of the transverse carpal ligament to the digital synovial sheath
Zone 4: Area covered by the transverse carpal ligament
Zone 5: Proximal to the transverse carpal ligament.
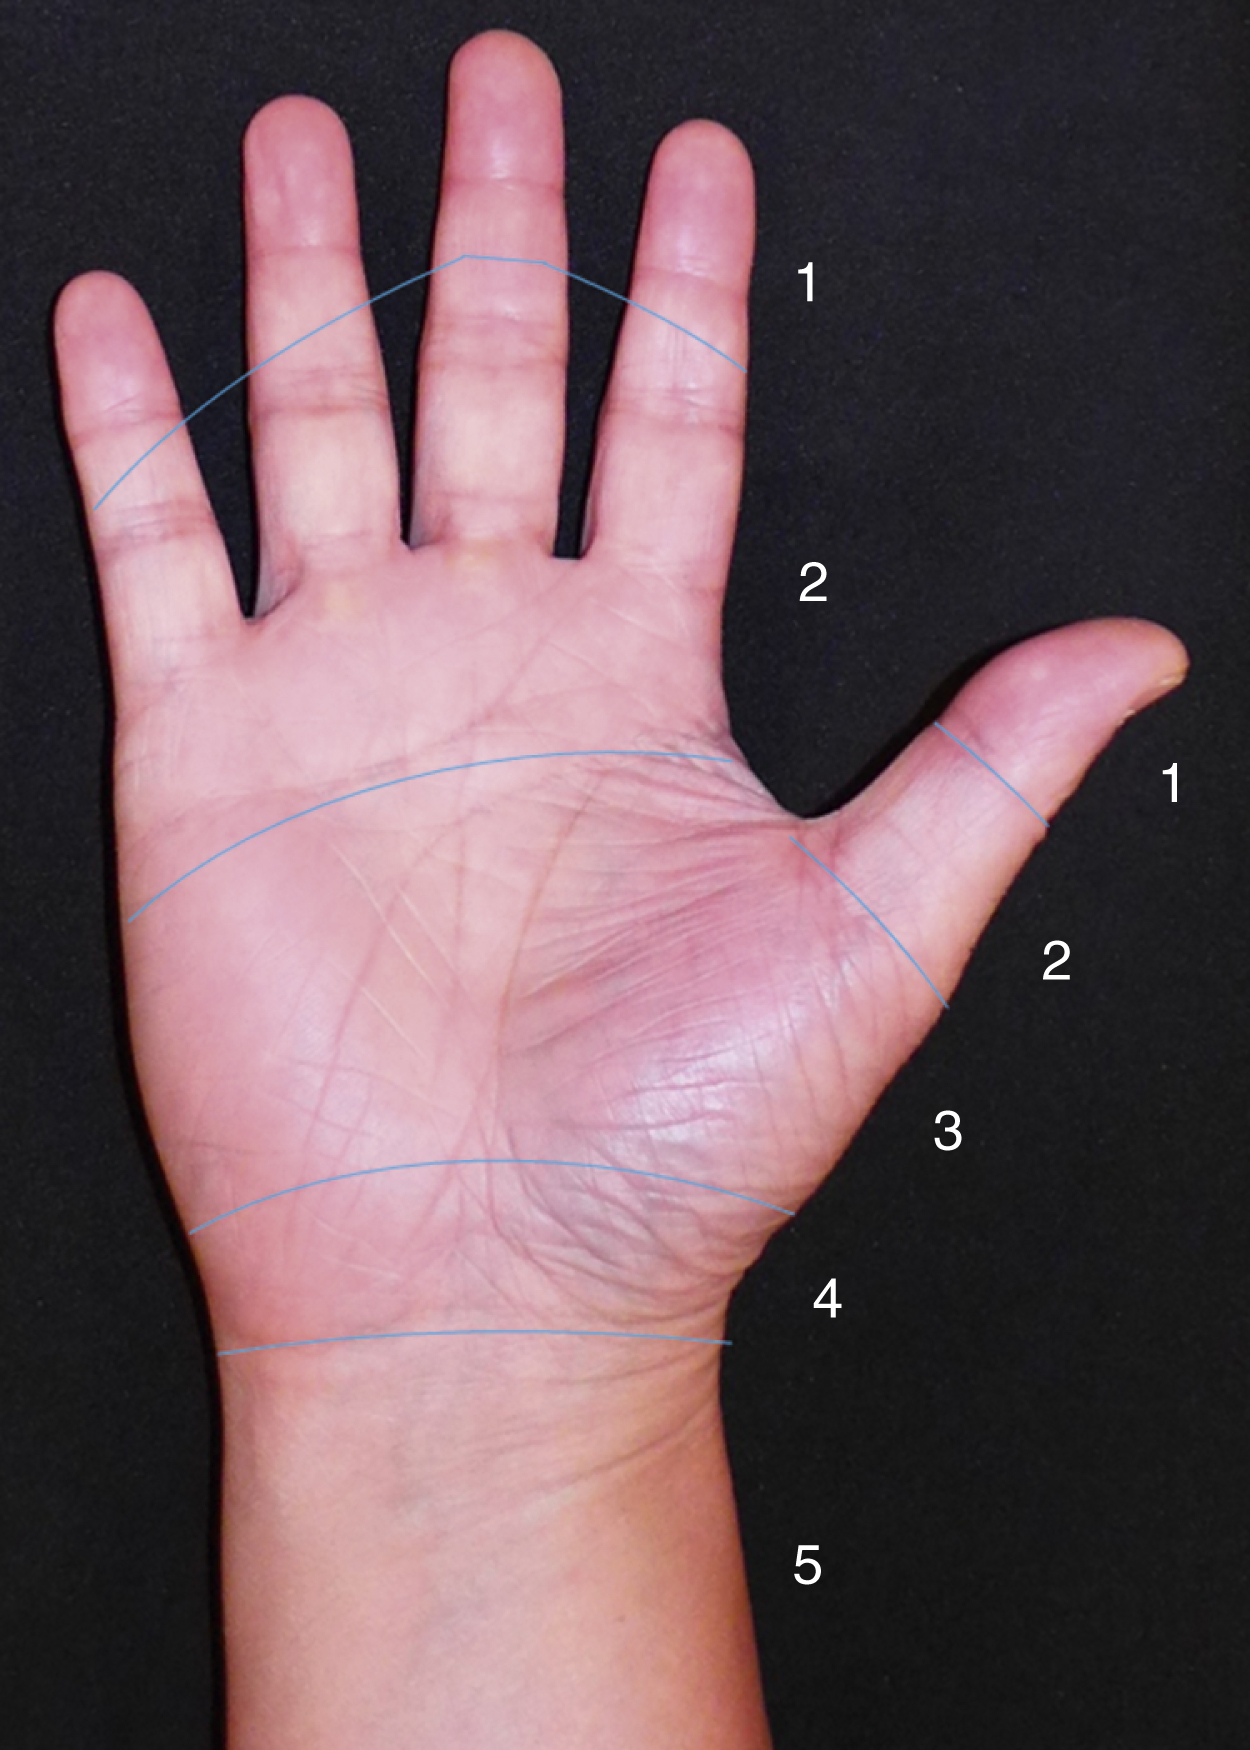
In the thumb, zone 1 is distal to the interphalangeal joint, zone 2 is from the interphalangeal joint to the A1 pulley, and zone 3 is the area of the thenar eminence.
The subdivisions of zone 1 by Moiemen and Elliot are:
1A: The very distal FDP tendon (usually <1 cm), not possible to insert a core suture
1B: From zone 1A to the distal margin of the A4 pulley
1C: The FDP tendon within the A4 pulley
The subdivisions of zone 2 by Tang are:
2A: The area of the FDS tendon insertion
2B: From the proximal margin of the FDS insertion to the distal margin of the A2 pulley
2C: The area covered by the A2 pulley
2D: From the proximal margin of the A2 pulley to the proximal reflection of the digital sheath.
Biomechanical Considerations
Two major considerations are factors affecting the strength of repaired tendons as well as contributing to the resistance to active digital flexion.
Factors Affecting the Strength of Repaired Tendons
The following factors affect the strength of repaired tendons: (1) the number of core suture strands across the repair sites – strength is roughly proportional to the number of core sutures; (2) the tension of repairs – most relevant to gap formation and stiffness of repairs; (3) the core suture purchase; (4) the types of tendon–suture junction – locking or grasping; (5) the diameter of suture locks in the tendons – a small diameter of locks diminishes anchor power; (6) the suture calibers (diameter); (7) the material properties of suture materials; (8) the curvature of tendon gliding paths – the repair strength decreases as tendon curvature increases; and (9) above all, the holding capacity of a tendon, affected by varying degrees of trauma and posttraumatic tissue softening, plays a vital role in repair strength.
It must be realized that tendon curvature during finger flexion greatly effects the repair strength. A tendon under curvilinear tension is subjected to both linear pulling and bending forces. Therefore, a repair in a tendon under a curvilinear load is weaker than that under a linear load. The repair strength decreases progressively as the curvature increases. , Therefore, the repair fails more easily in the flexed finger and when the finger moves to approach full flexion, a bent tendon is particularly prone to fail. This is the mechanical basis of current partial active finger flexion protocols and one reason why a full fist should be avoided in the initial few weeks post surgery ( Table 47.1 ).
| Active Flexion | Resistance to Tendon Gliding | Healing Tendons during Active Motion |
|---|---|---|
| None to mild | Low | Not easily disrupted |
| Mild to moderate | Low or moderately high | Not easily disrupted |
| Moderate to full | Very high | Easy to disrupt. Should avoid such motion |
Factors Affecting the Resistance to Tendon Gliding after Surgery
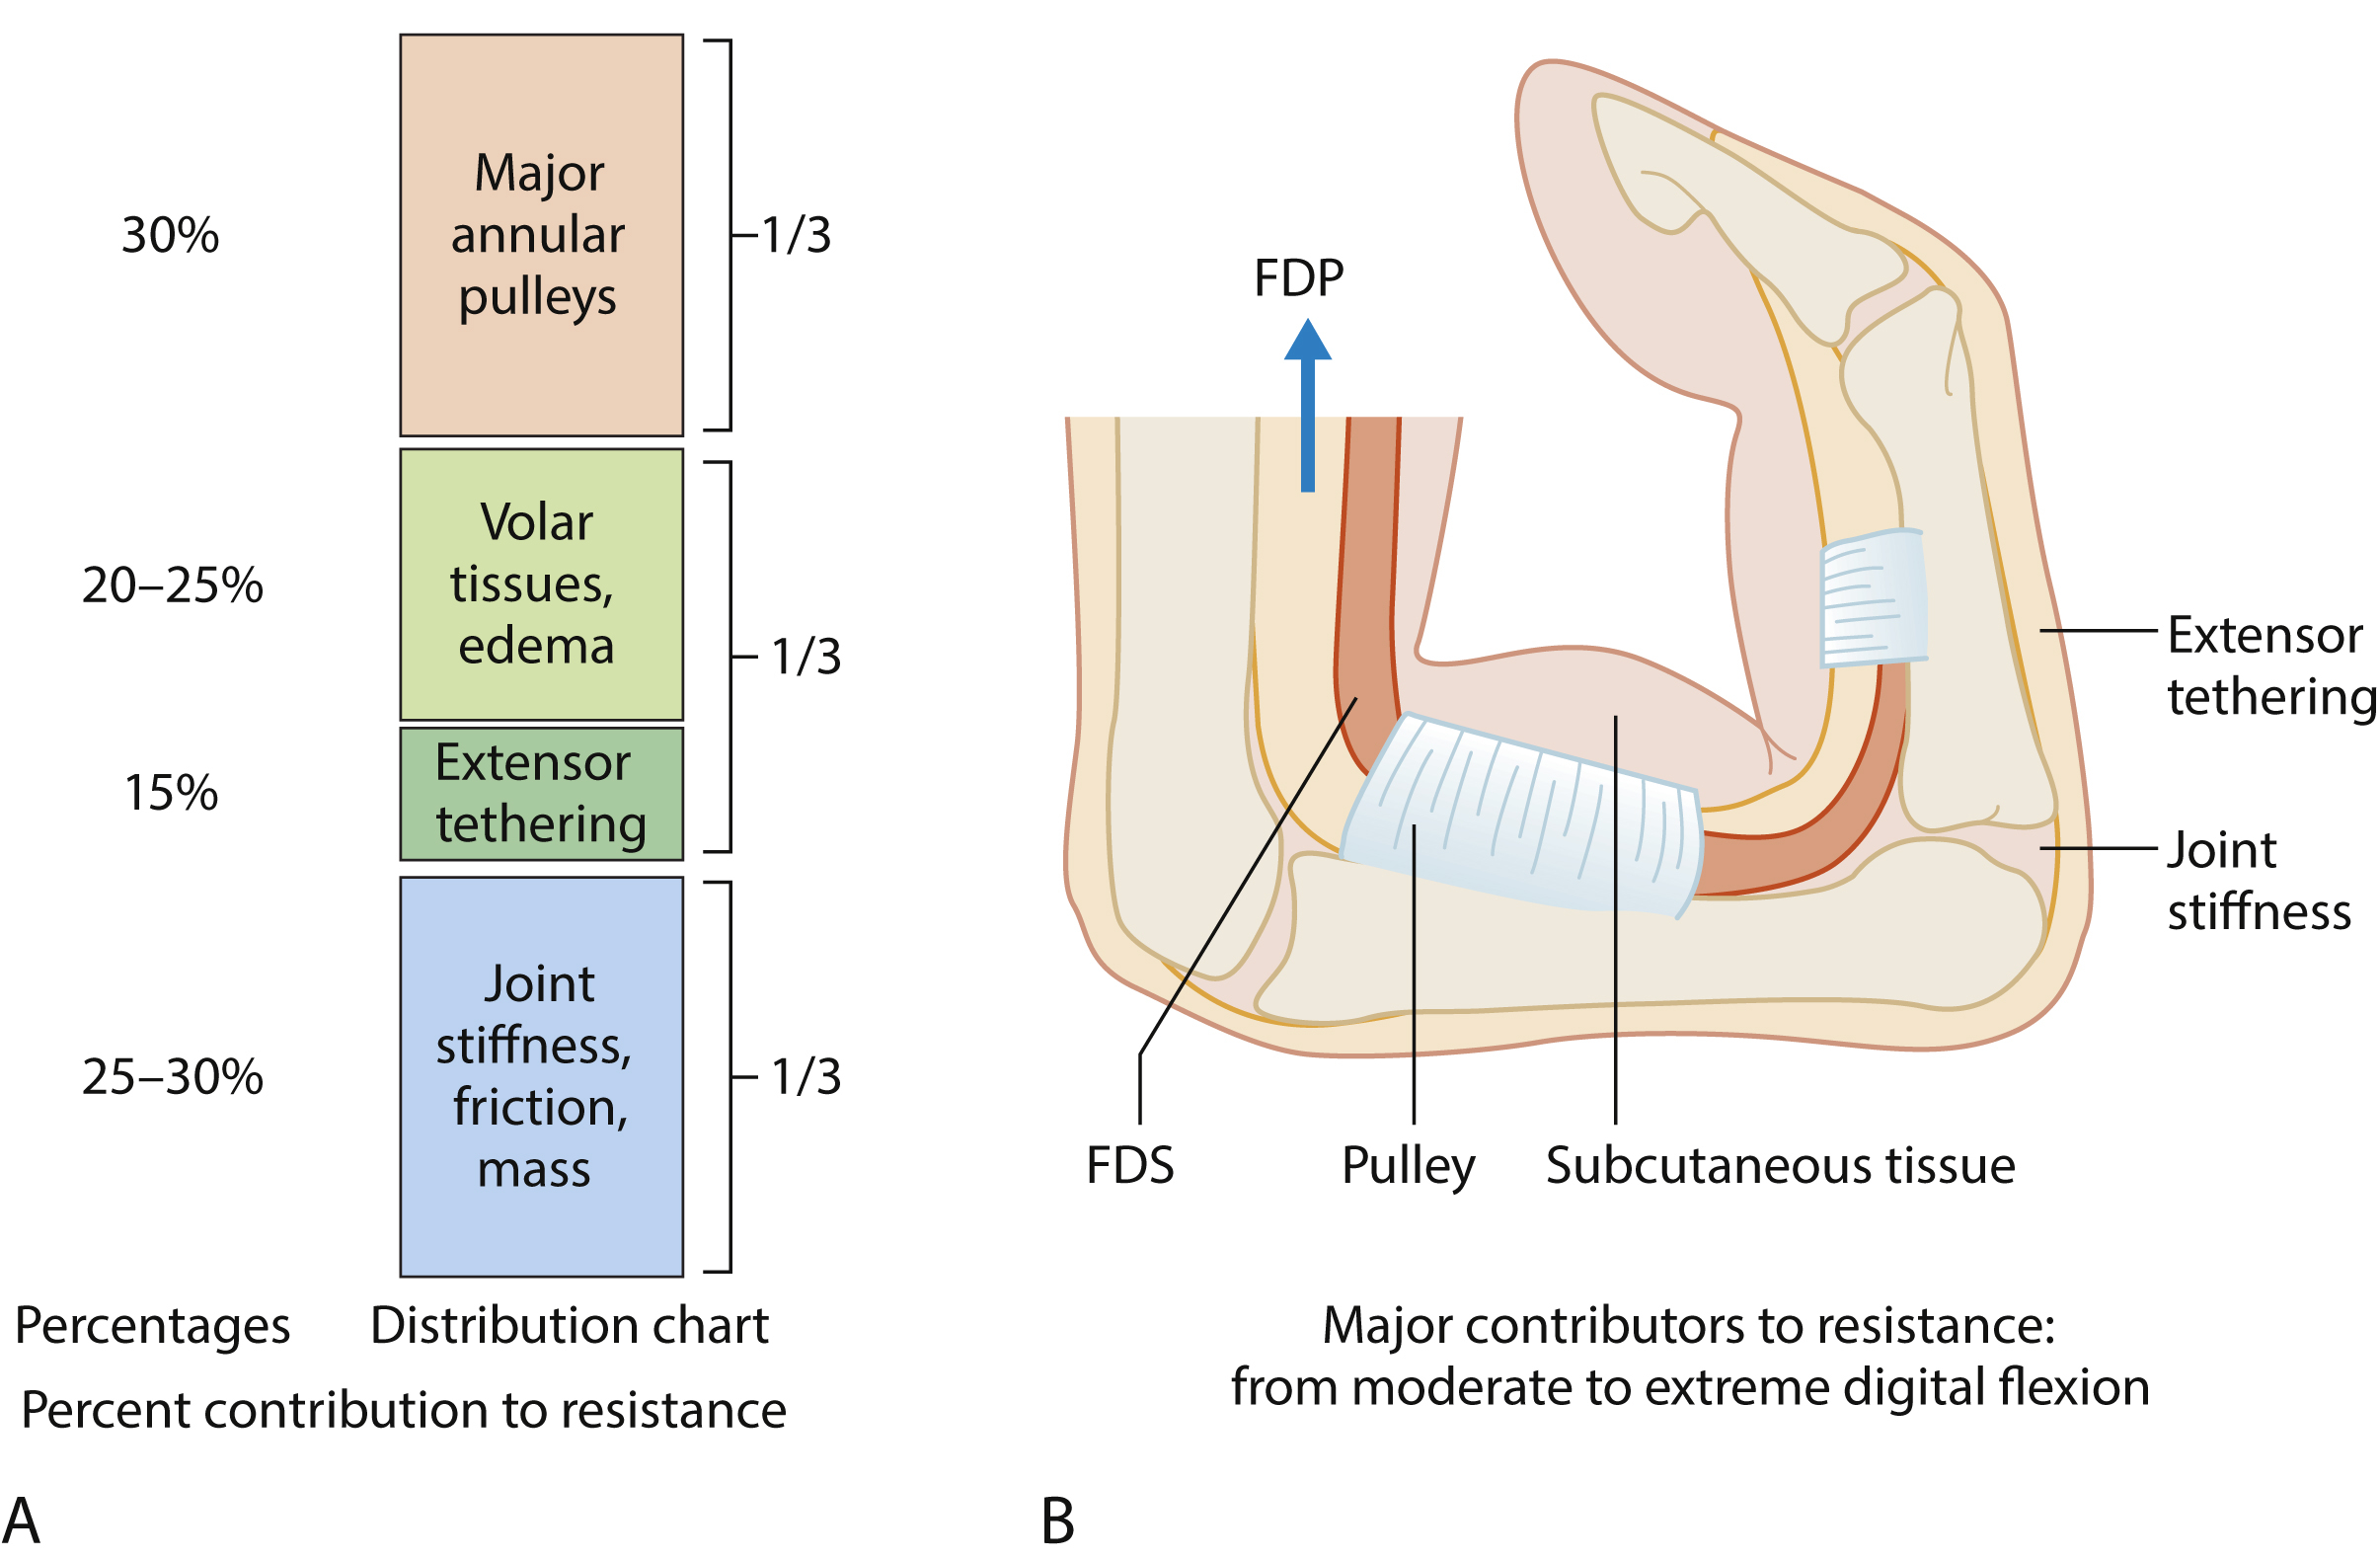
Fig. 47.4 summarizes the breakdown of contributors to postoperative resistance to tendon gliding, which should be considered in planning and adjusting the active motion protocols. The safety margin of early active digital flexion can be enhanced by a strong surgical tendon repair or appropriately decompressing the tendon during surgery through releasing restricting pulleys, limiting the lengths of skin incisions, and minimizing the trauma to the tendon and sheath. After surgery, delicate adjustments in early active flexion to fit individual patients by therapist or surgeon is also important.
Clinical Diagnosis
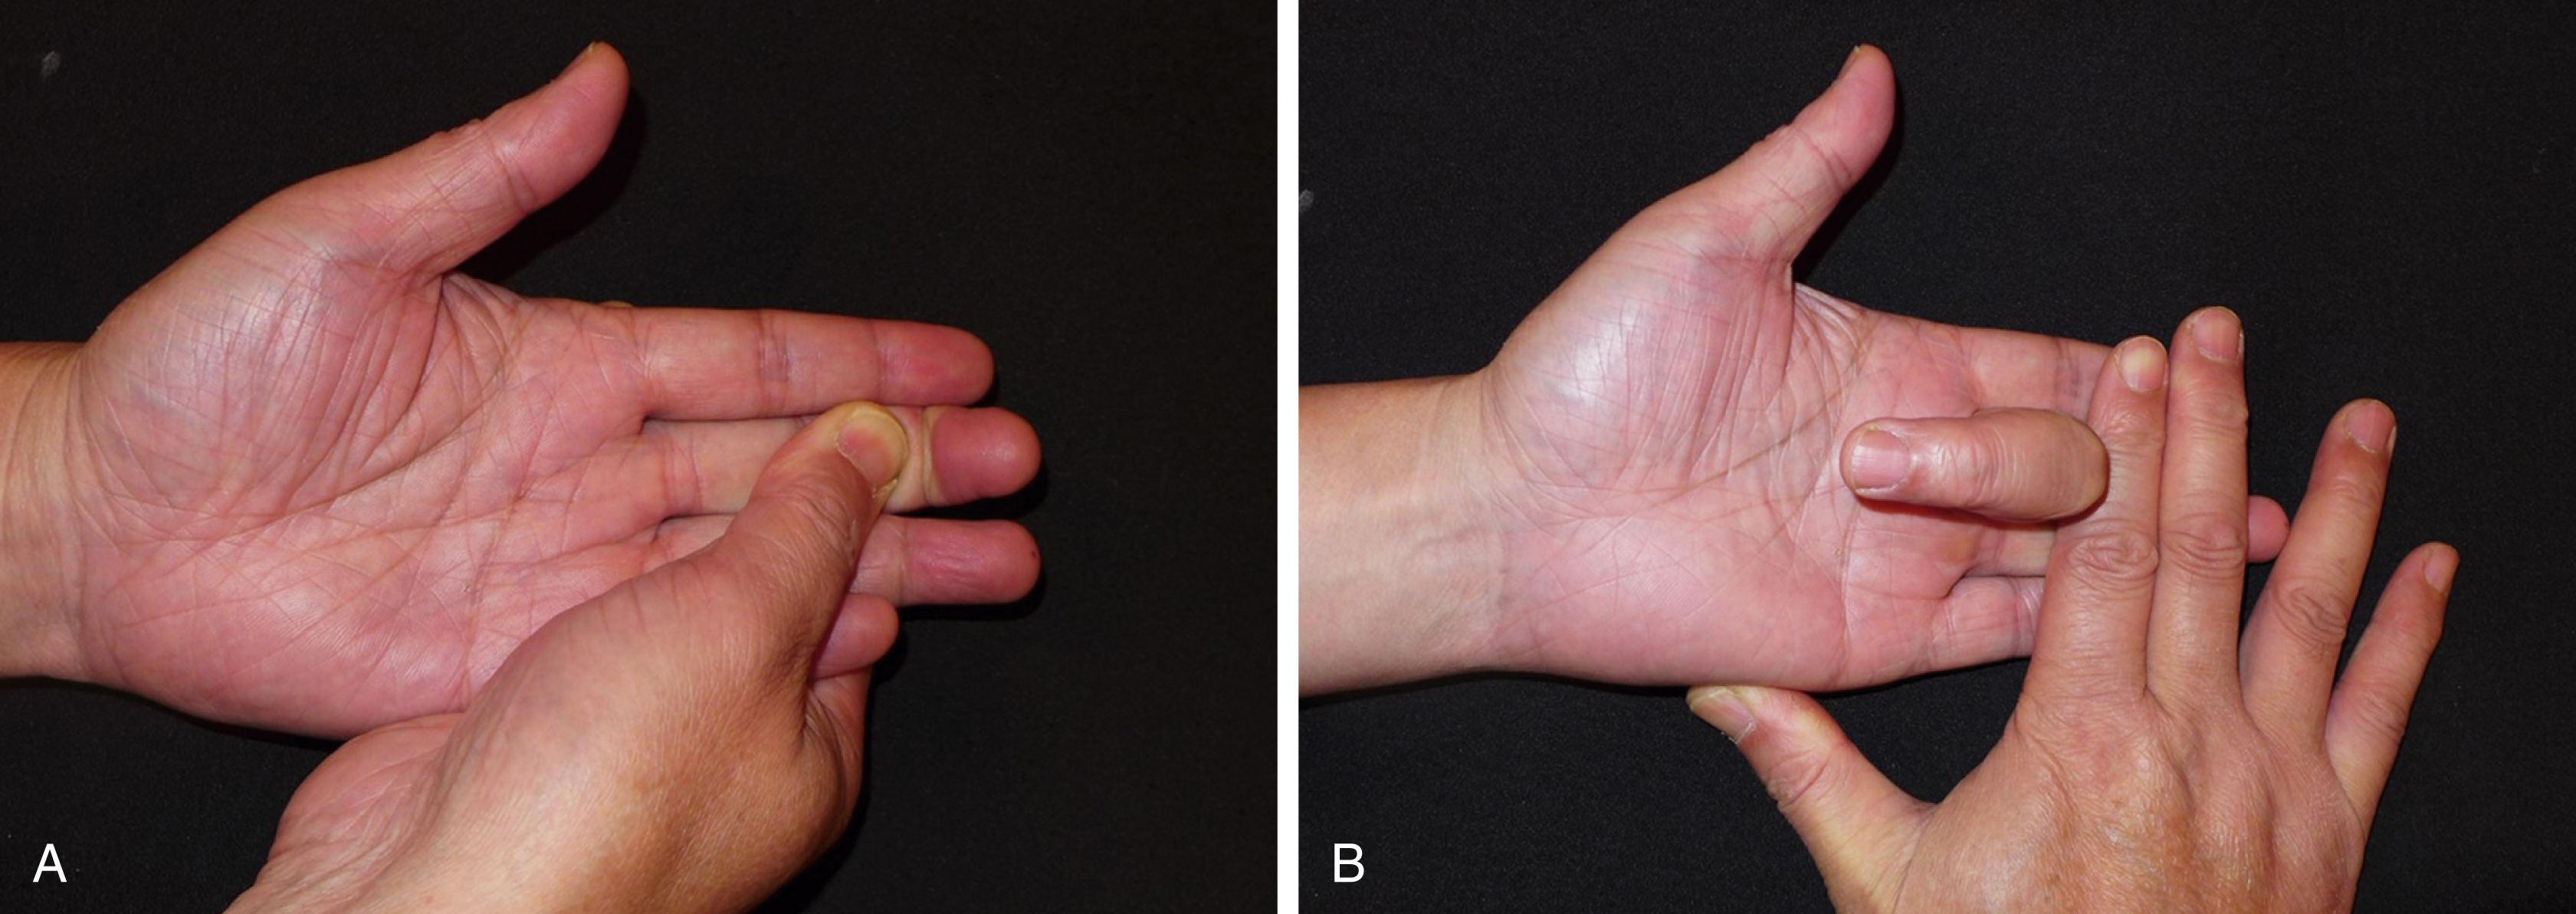
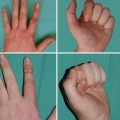
Open injuries are the most common cause of flexor tendon injuries in the hand and upper extremity. Less commonly the rupture of the tendons is found with a closed injury, such as forceful finger flexion. After injury, the natural resting posture of the wounded digits are usually changed, with the affected fingers seen in a relatively extended position and loss of active finger flexion at PIP and DIP joints. During clinical examination, if the patient can actively flex the DIP joint while the motion of the PIP joint is blocked, the FDP tendon has no injuries or has only a partial disruption ( Fig. 47.5 ). To assess the continuity of the FDS tendon, the adjacent fingers must be held in full extension by the examiner. The FDS tendon is severed completely if the patient cannot actively flex the PIP joint ( Fig. 47.6 ).
The FDS in 30%–35% of little fingers has connection with the FDS in the ring or middle fingers, and the FDS tendon is missing in 10%–20% of the little fingers. These patients have limited or no PIP flexion of the little finger during testing.
Weakness and pain during resisted finger flexion indicates a possible partial tendon cut. Loss of active flexion at the interphalangeal (IP) joint indicates complete severance of the FPL tendon.
Primary and Delayed Primary Repair
Nowadays the majority of lacerated flexor tendons in the hand and forearm are repaired at the same day of injury or a few days later. Primary repair indicates end-to-end repair performed within 24 hours after tendon injury. When an experienced surgeon is not available at the day of injury, the repair can be deliberately delayed and delayed primary repair is performed in a selective surgical setting. The delay usually has no adverse effects on outcomes, but in this period of delay antibiotic use reduces the risk of infection of the wound. Delayed primary repair is a repair performed within 3 or even 4 weeks after injury. The end-to-end repair is often still possible 5 weeks after injury. Because zone 2 is the most complex and demanding, the repair methods for zone 2 injuries are given in detail below.
Repair in Zone 2
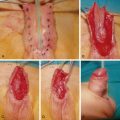
Exposure and Finding Tendon Ends in Zone 2
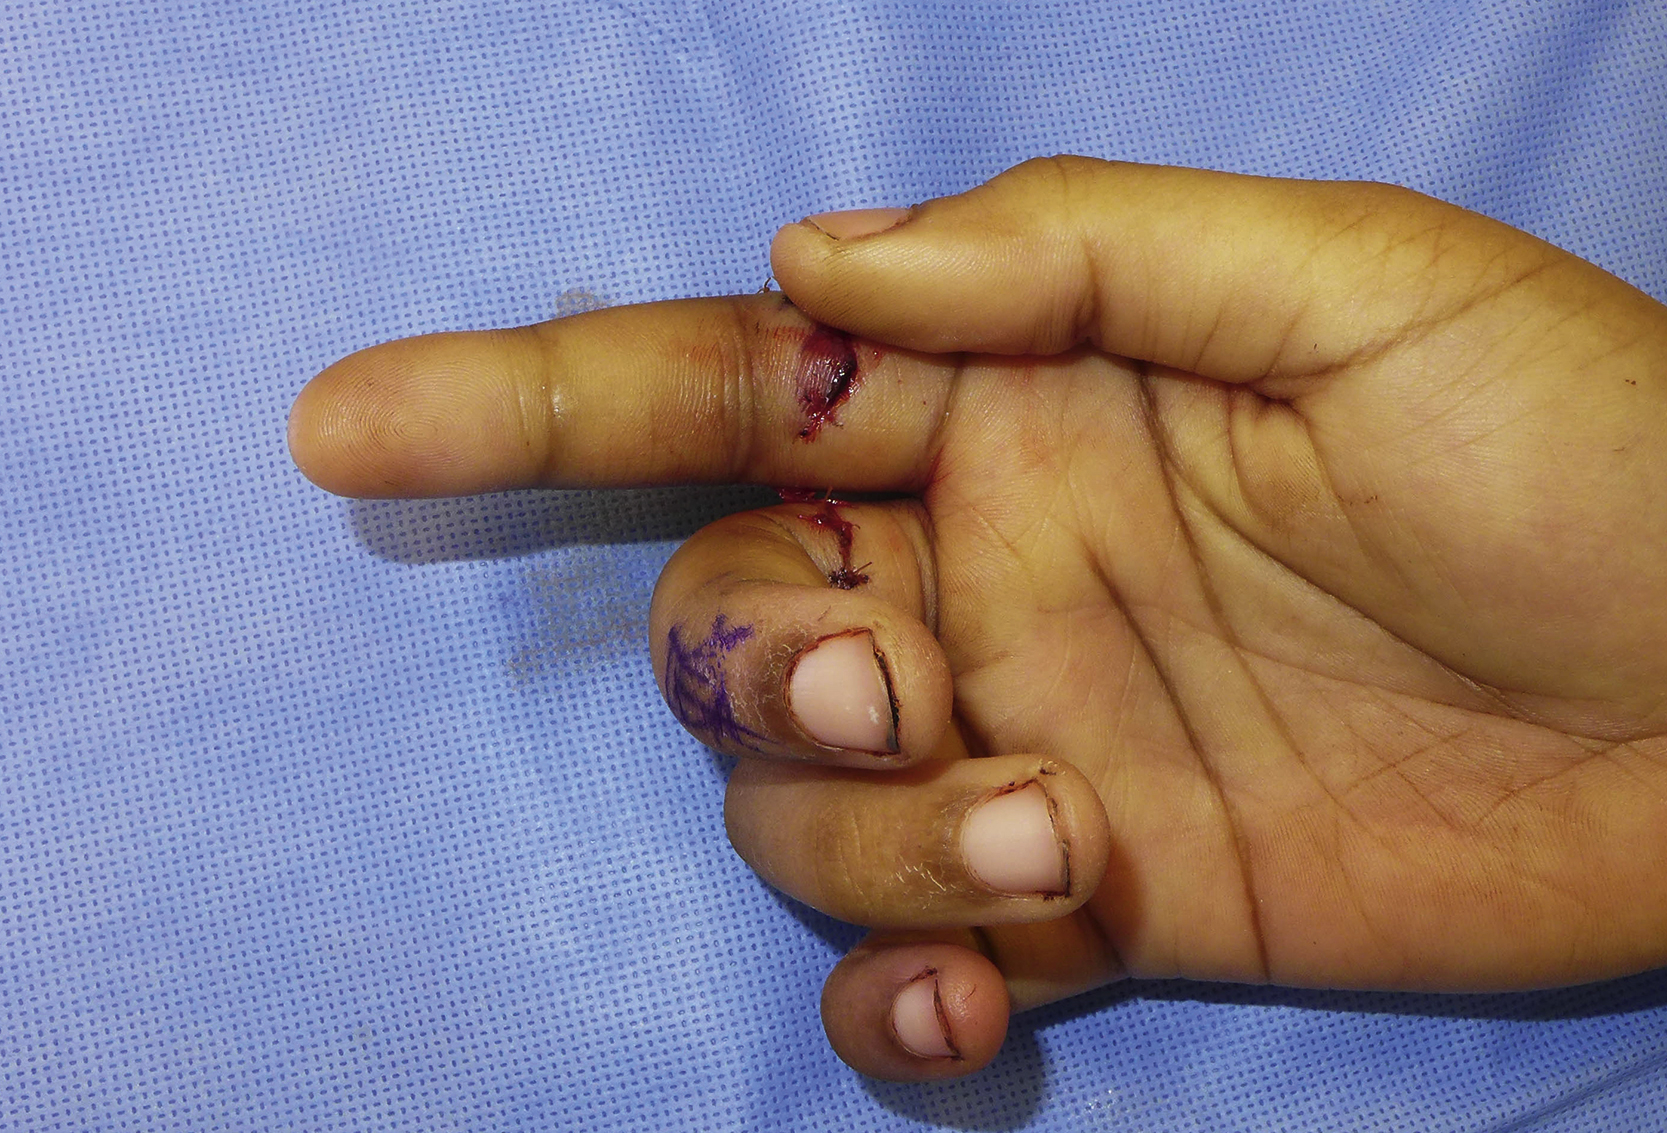
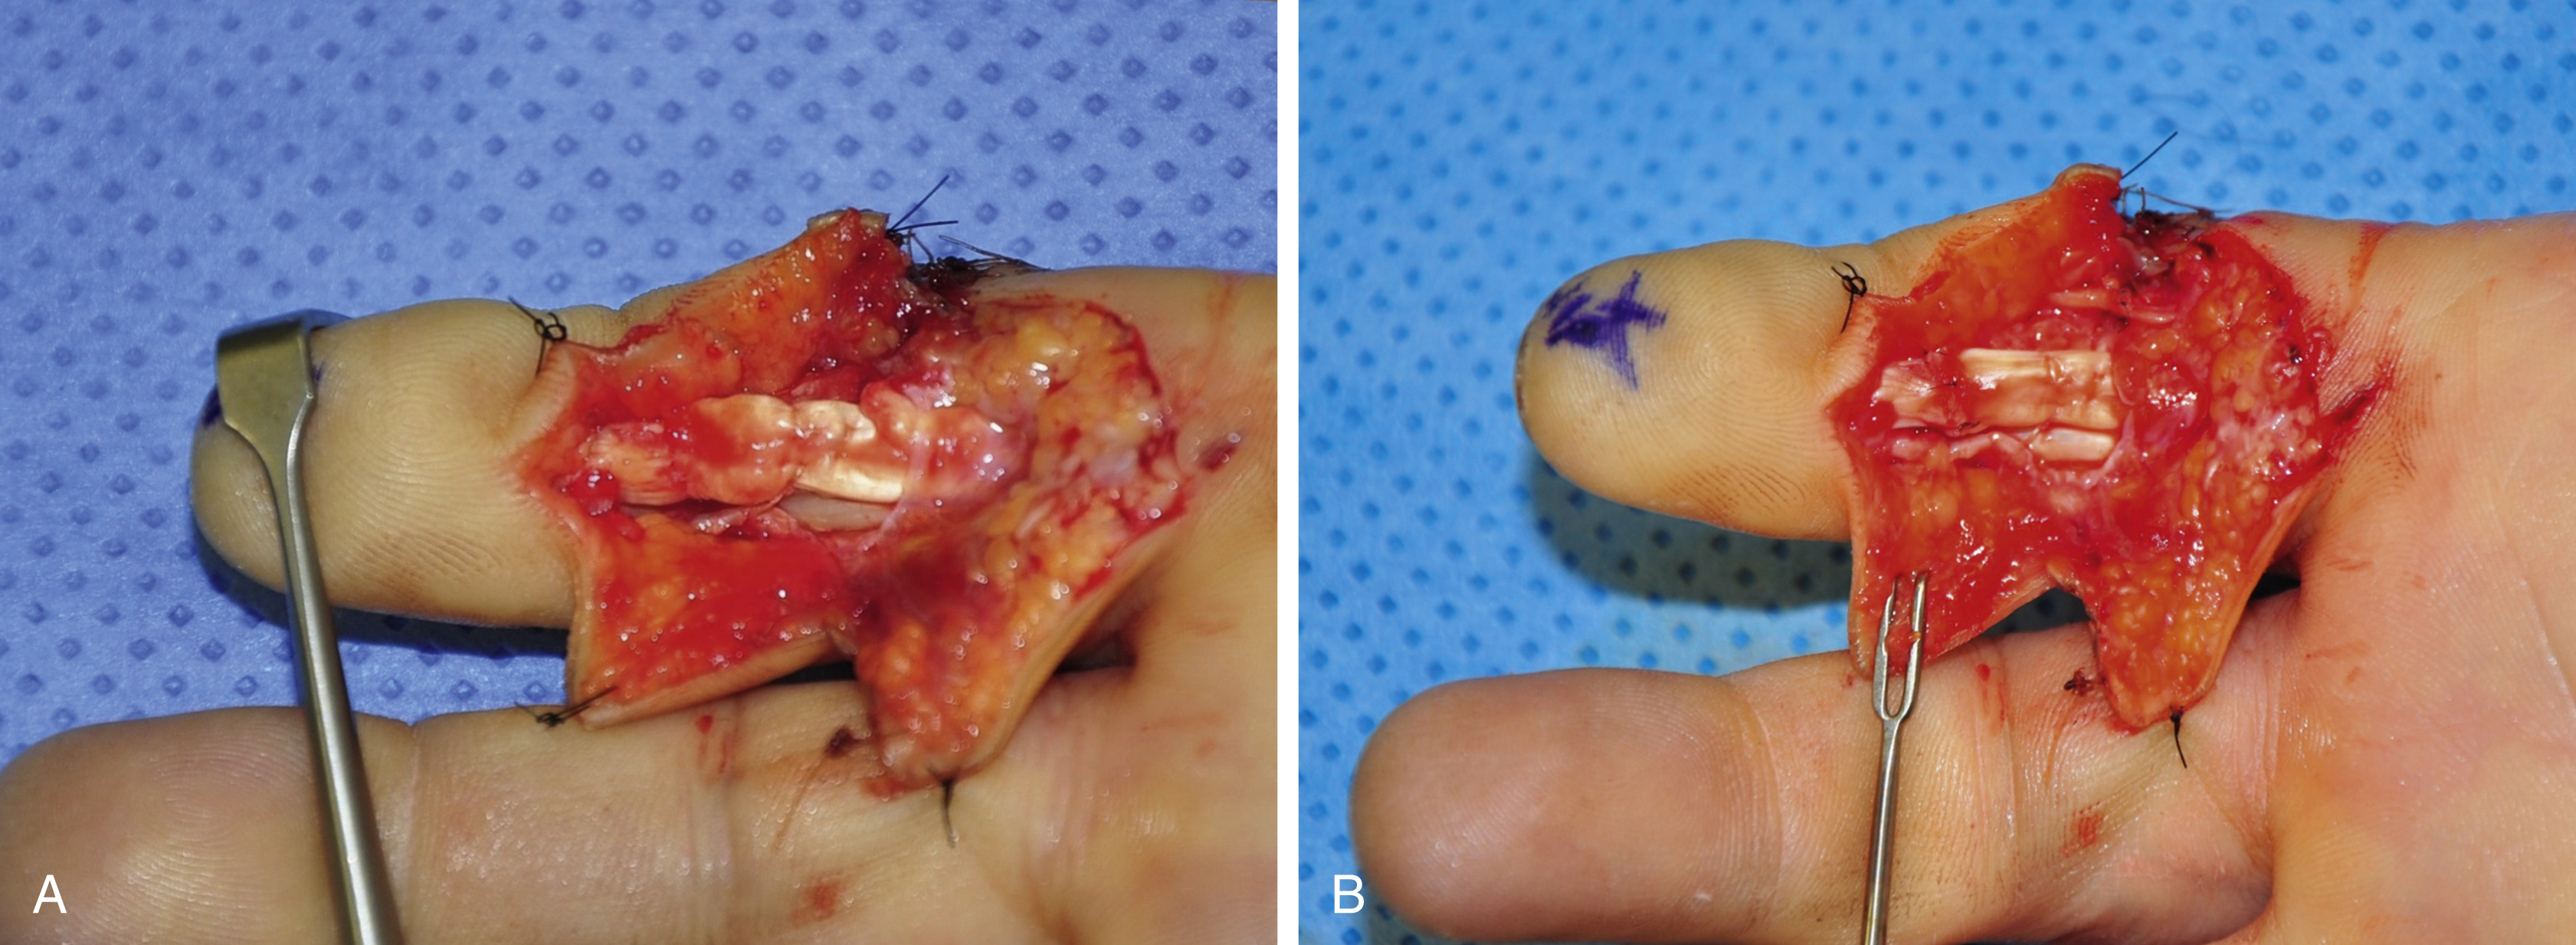
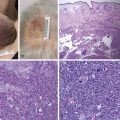
The surgical incision to access the tendons is usually a Bruner’s skin incision of 1.5–2 cm ( Fig. 47.7 ). We keep the skin incision as limited as possible to decrease edema of the digit and resistance to tendon gliding after surgery. Retraction of the proximal tendon stump is very common, especially in delayed primary repair. If the FDP tendon end has not retracted far proximally, flexion of the MCP or PIP joints can deliver the proximal end into the incision site.
If the proximal FDP tendon end retracts into the palm, it is preferable not to extend the incision to the palm, but instead to make an additional incision in the distal palm. In the author’s experience, the retracted tendon end can always be found in the distal palm. From this small incision, the proximal tendon end is pushed distally within the synovial sheath bit by bit using two forceps, like pushing a rope until the distal end is seen out of the distal opening in the sheath.
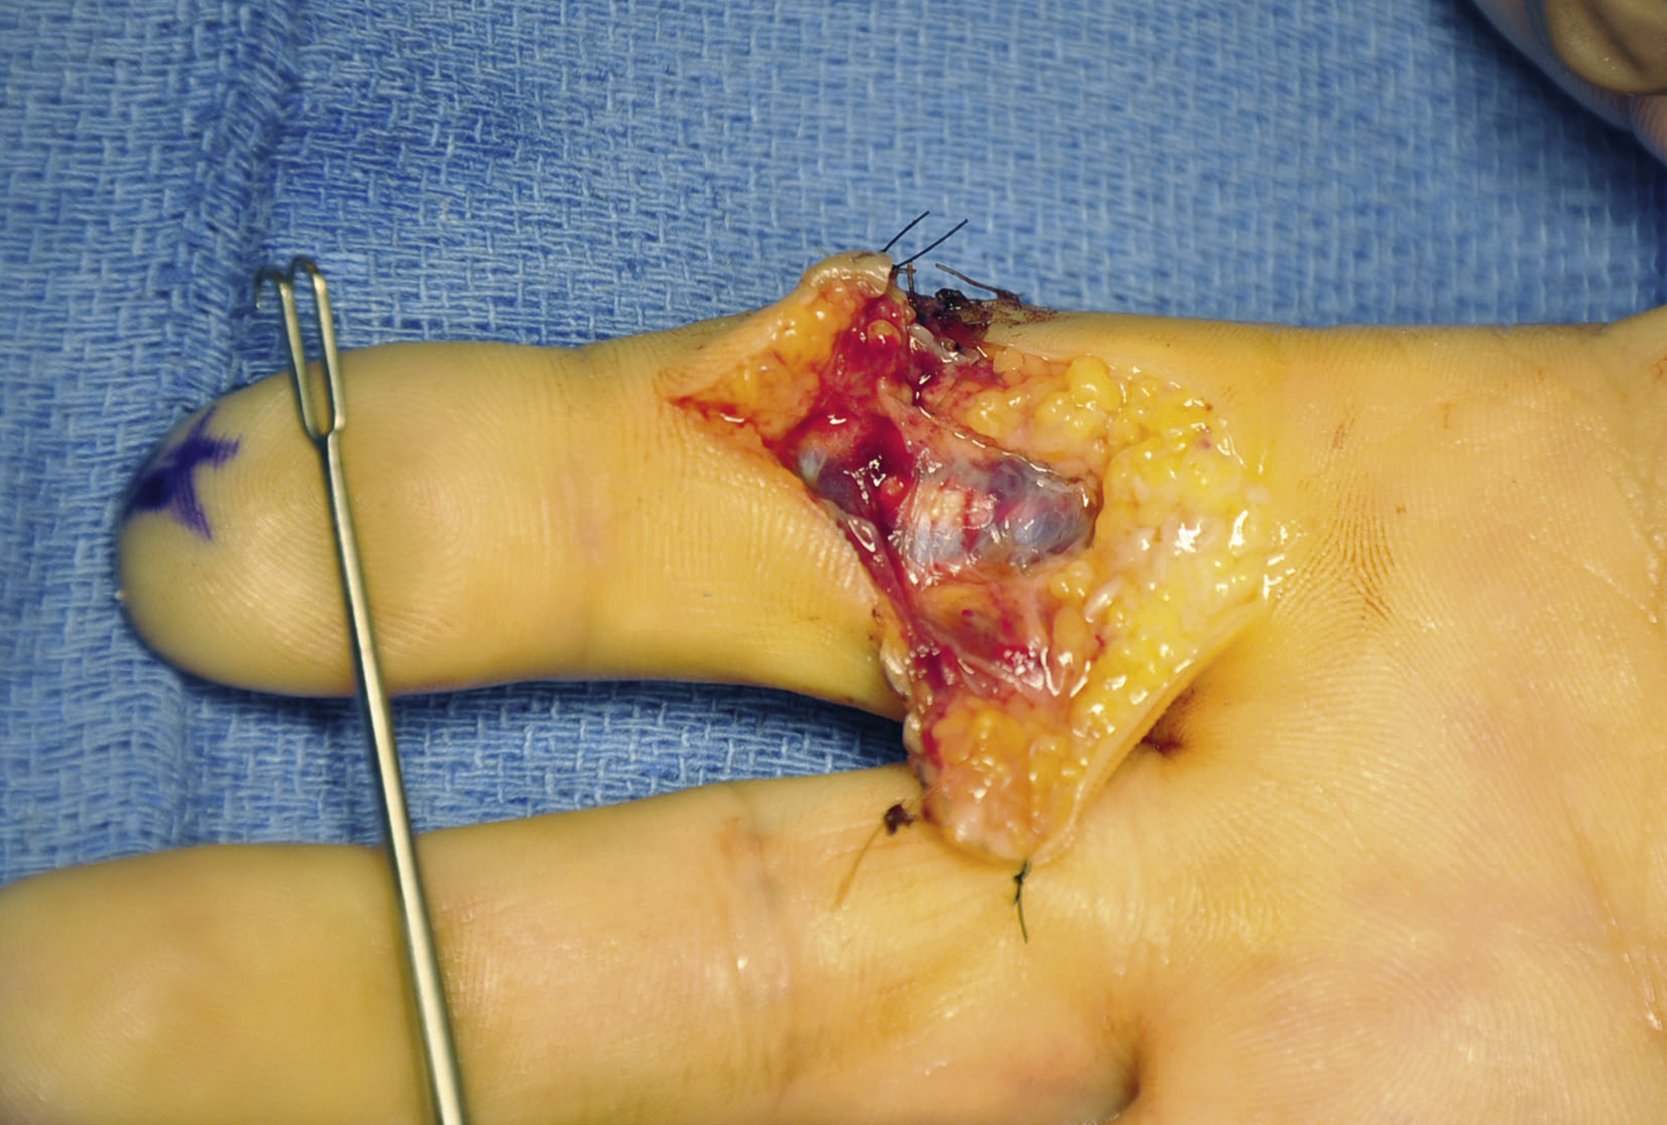
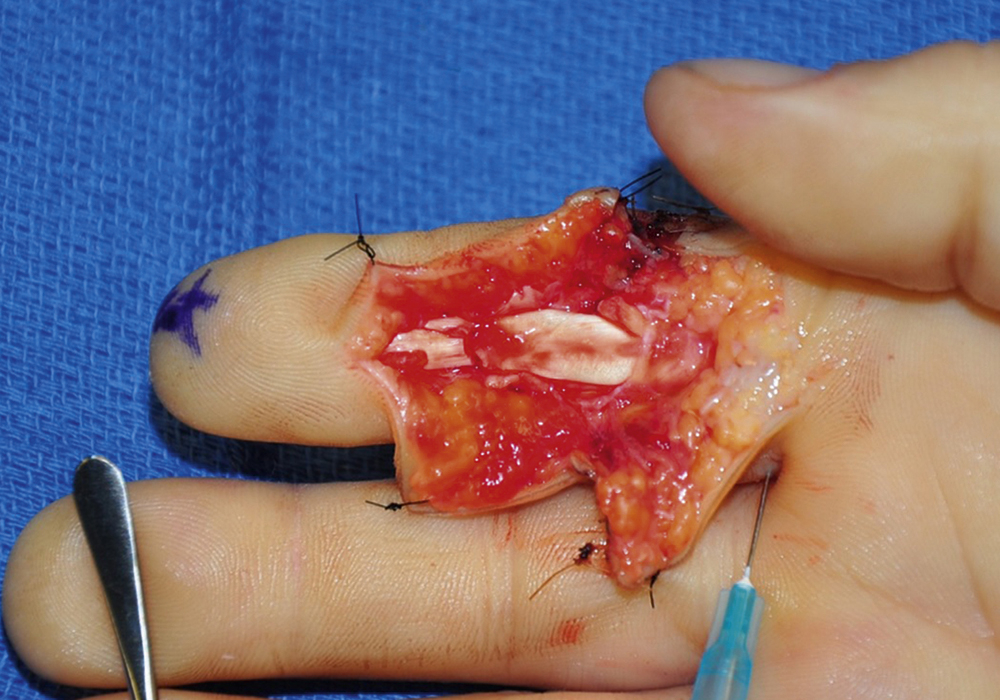
The forceps instrument is used to pull the exposed proximal stump distally out of the preserved sheath for about 1 cm. Then the finger is held in slight flexion, a 25G needle is inserted at the base of the finger through the proximal tendon stump to hold it during repair ( Fig. 47.8 ).
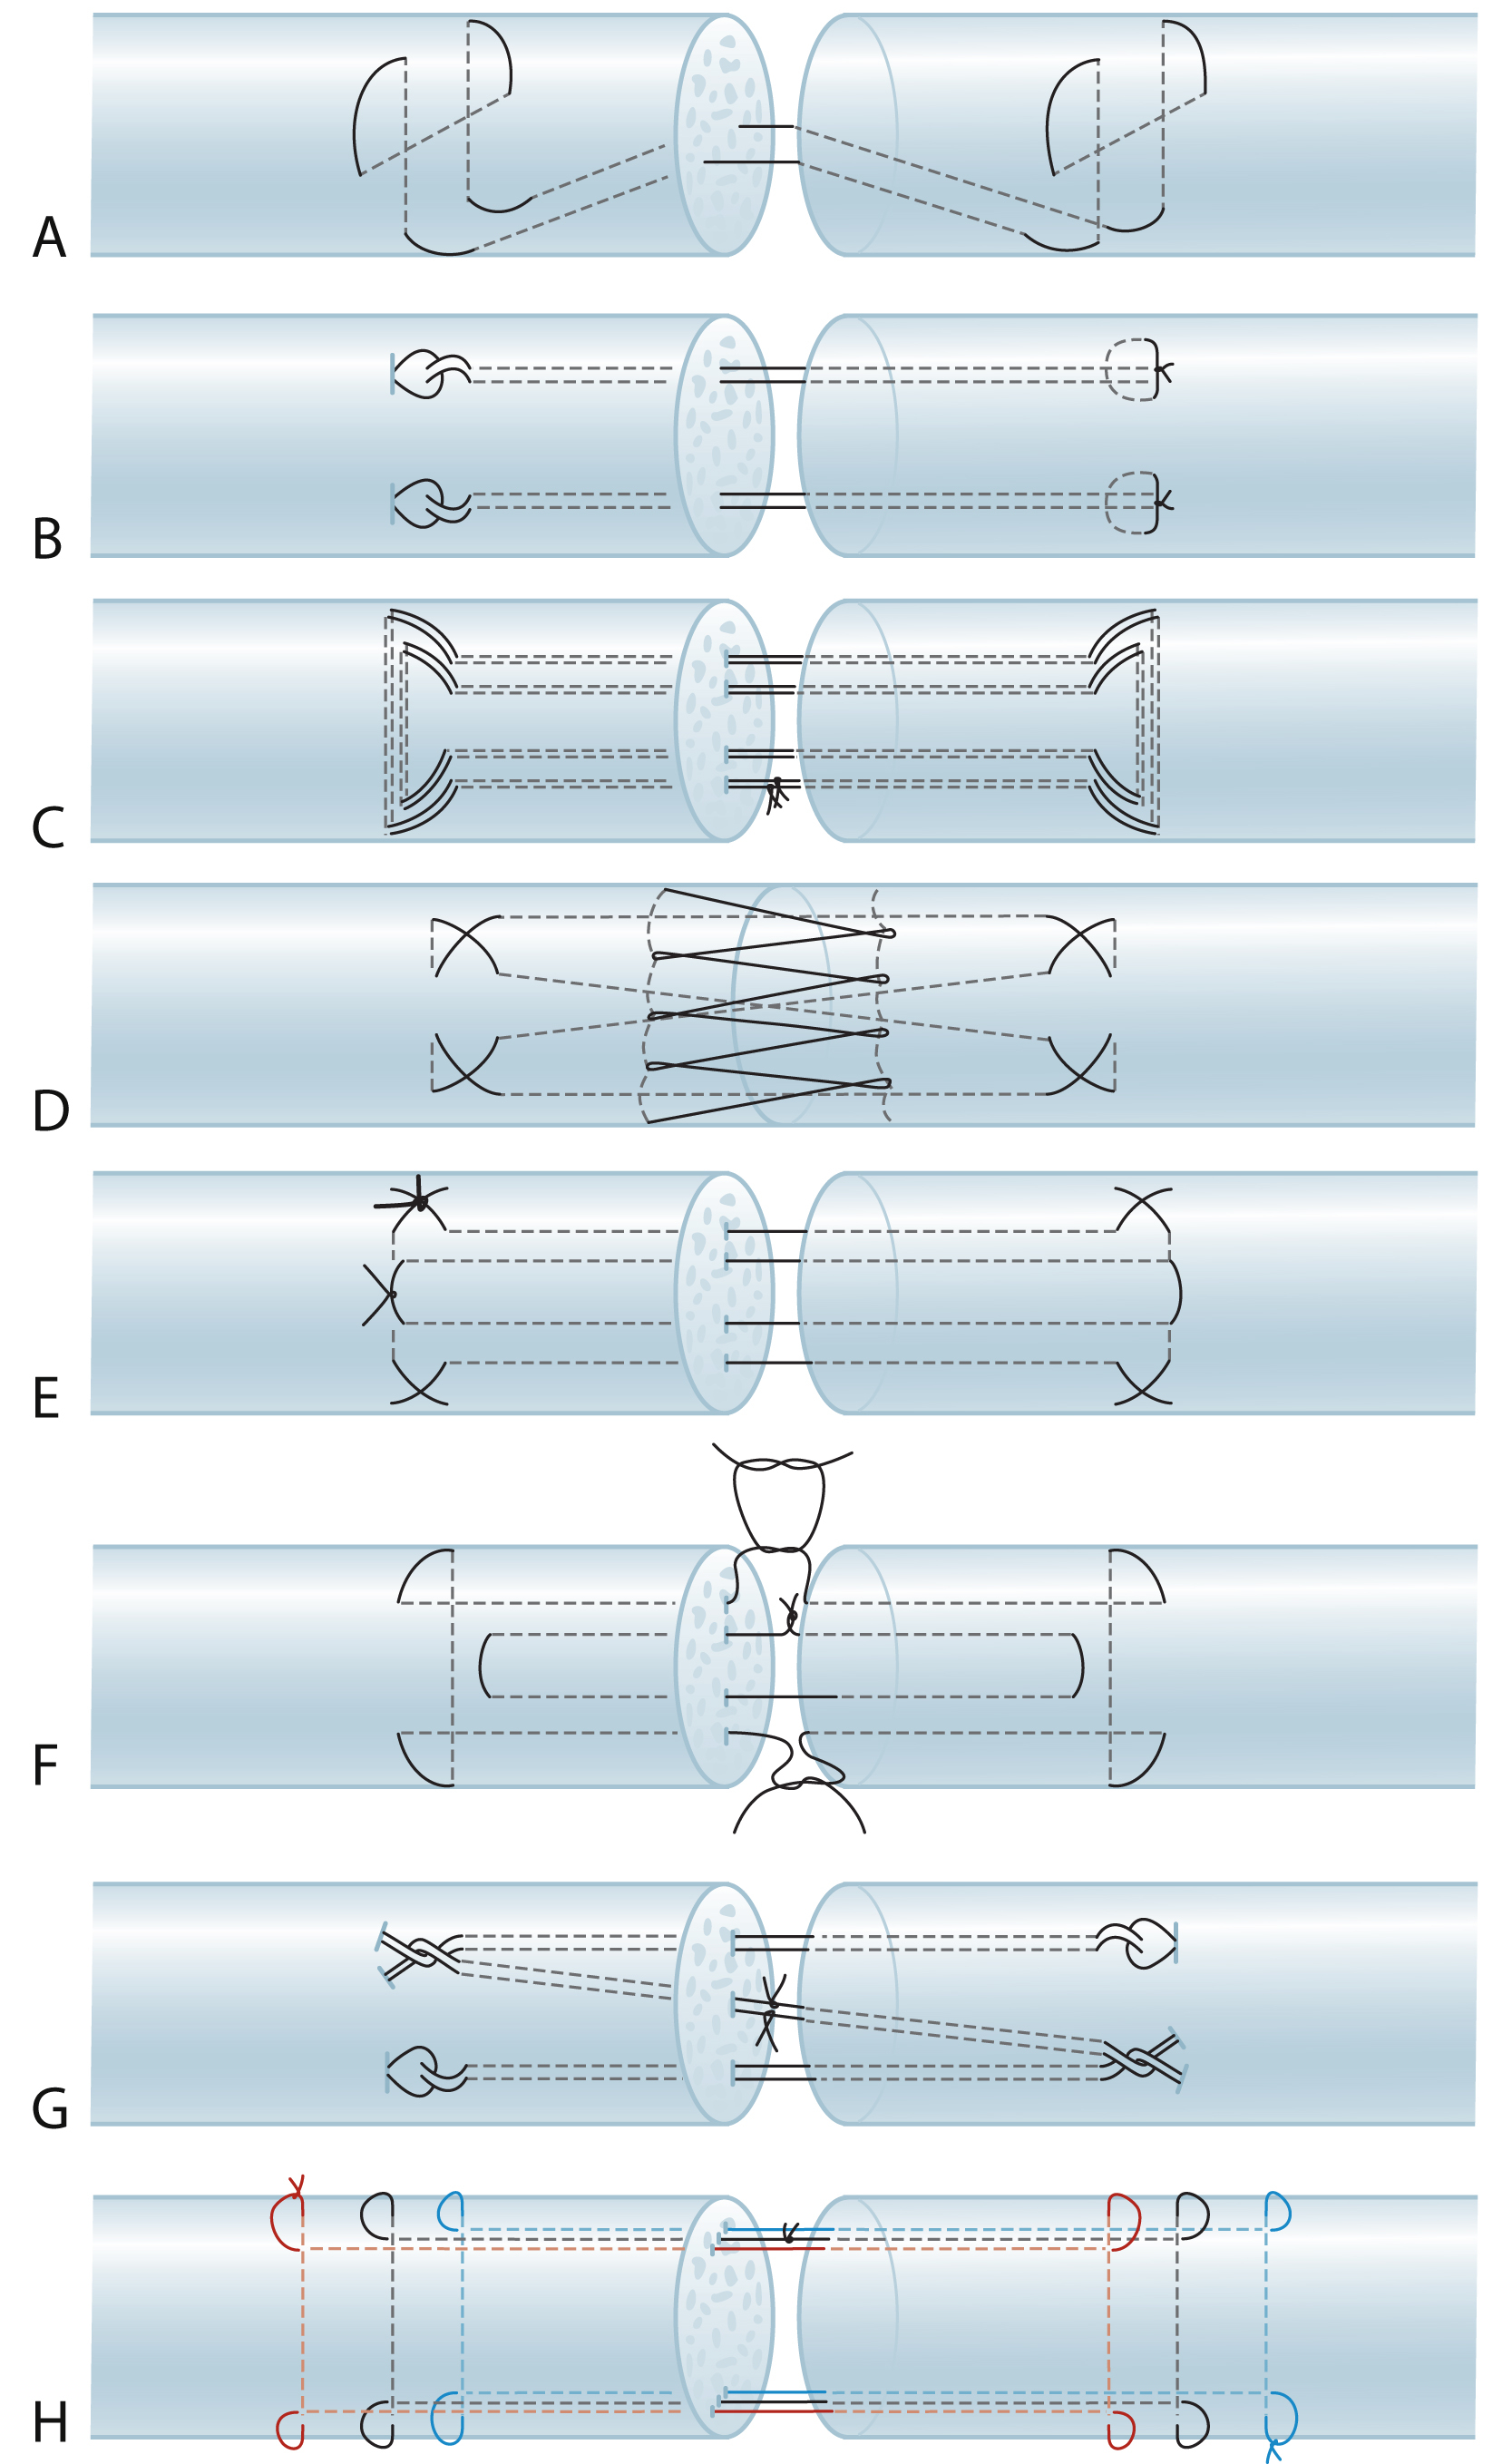
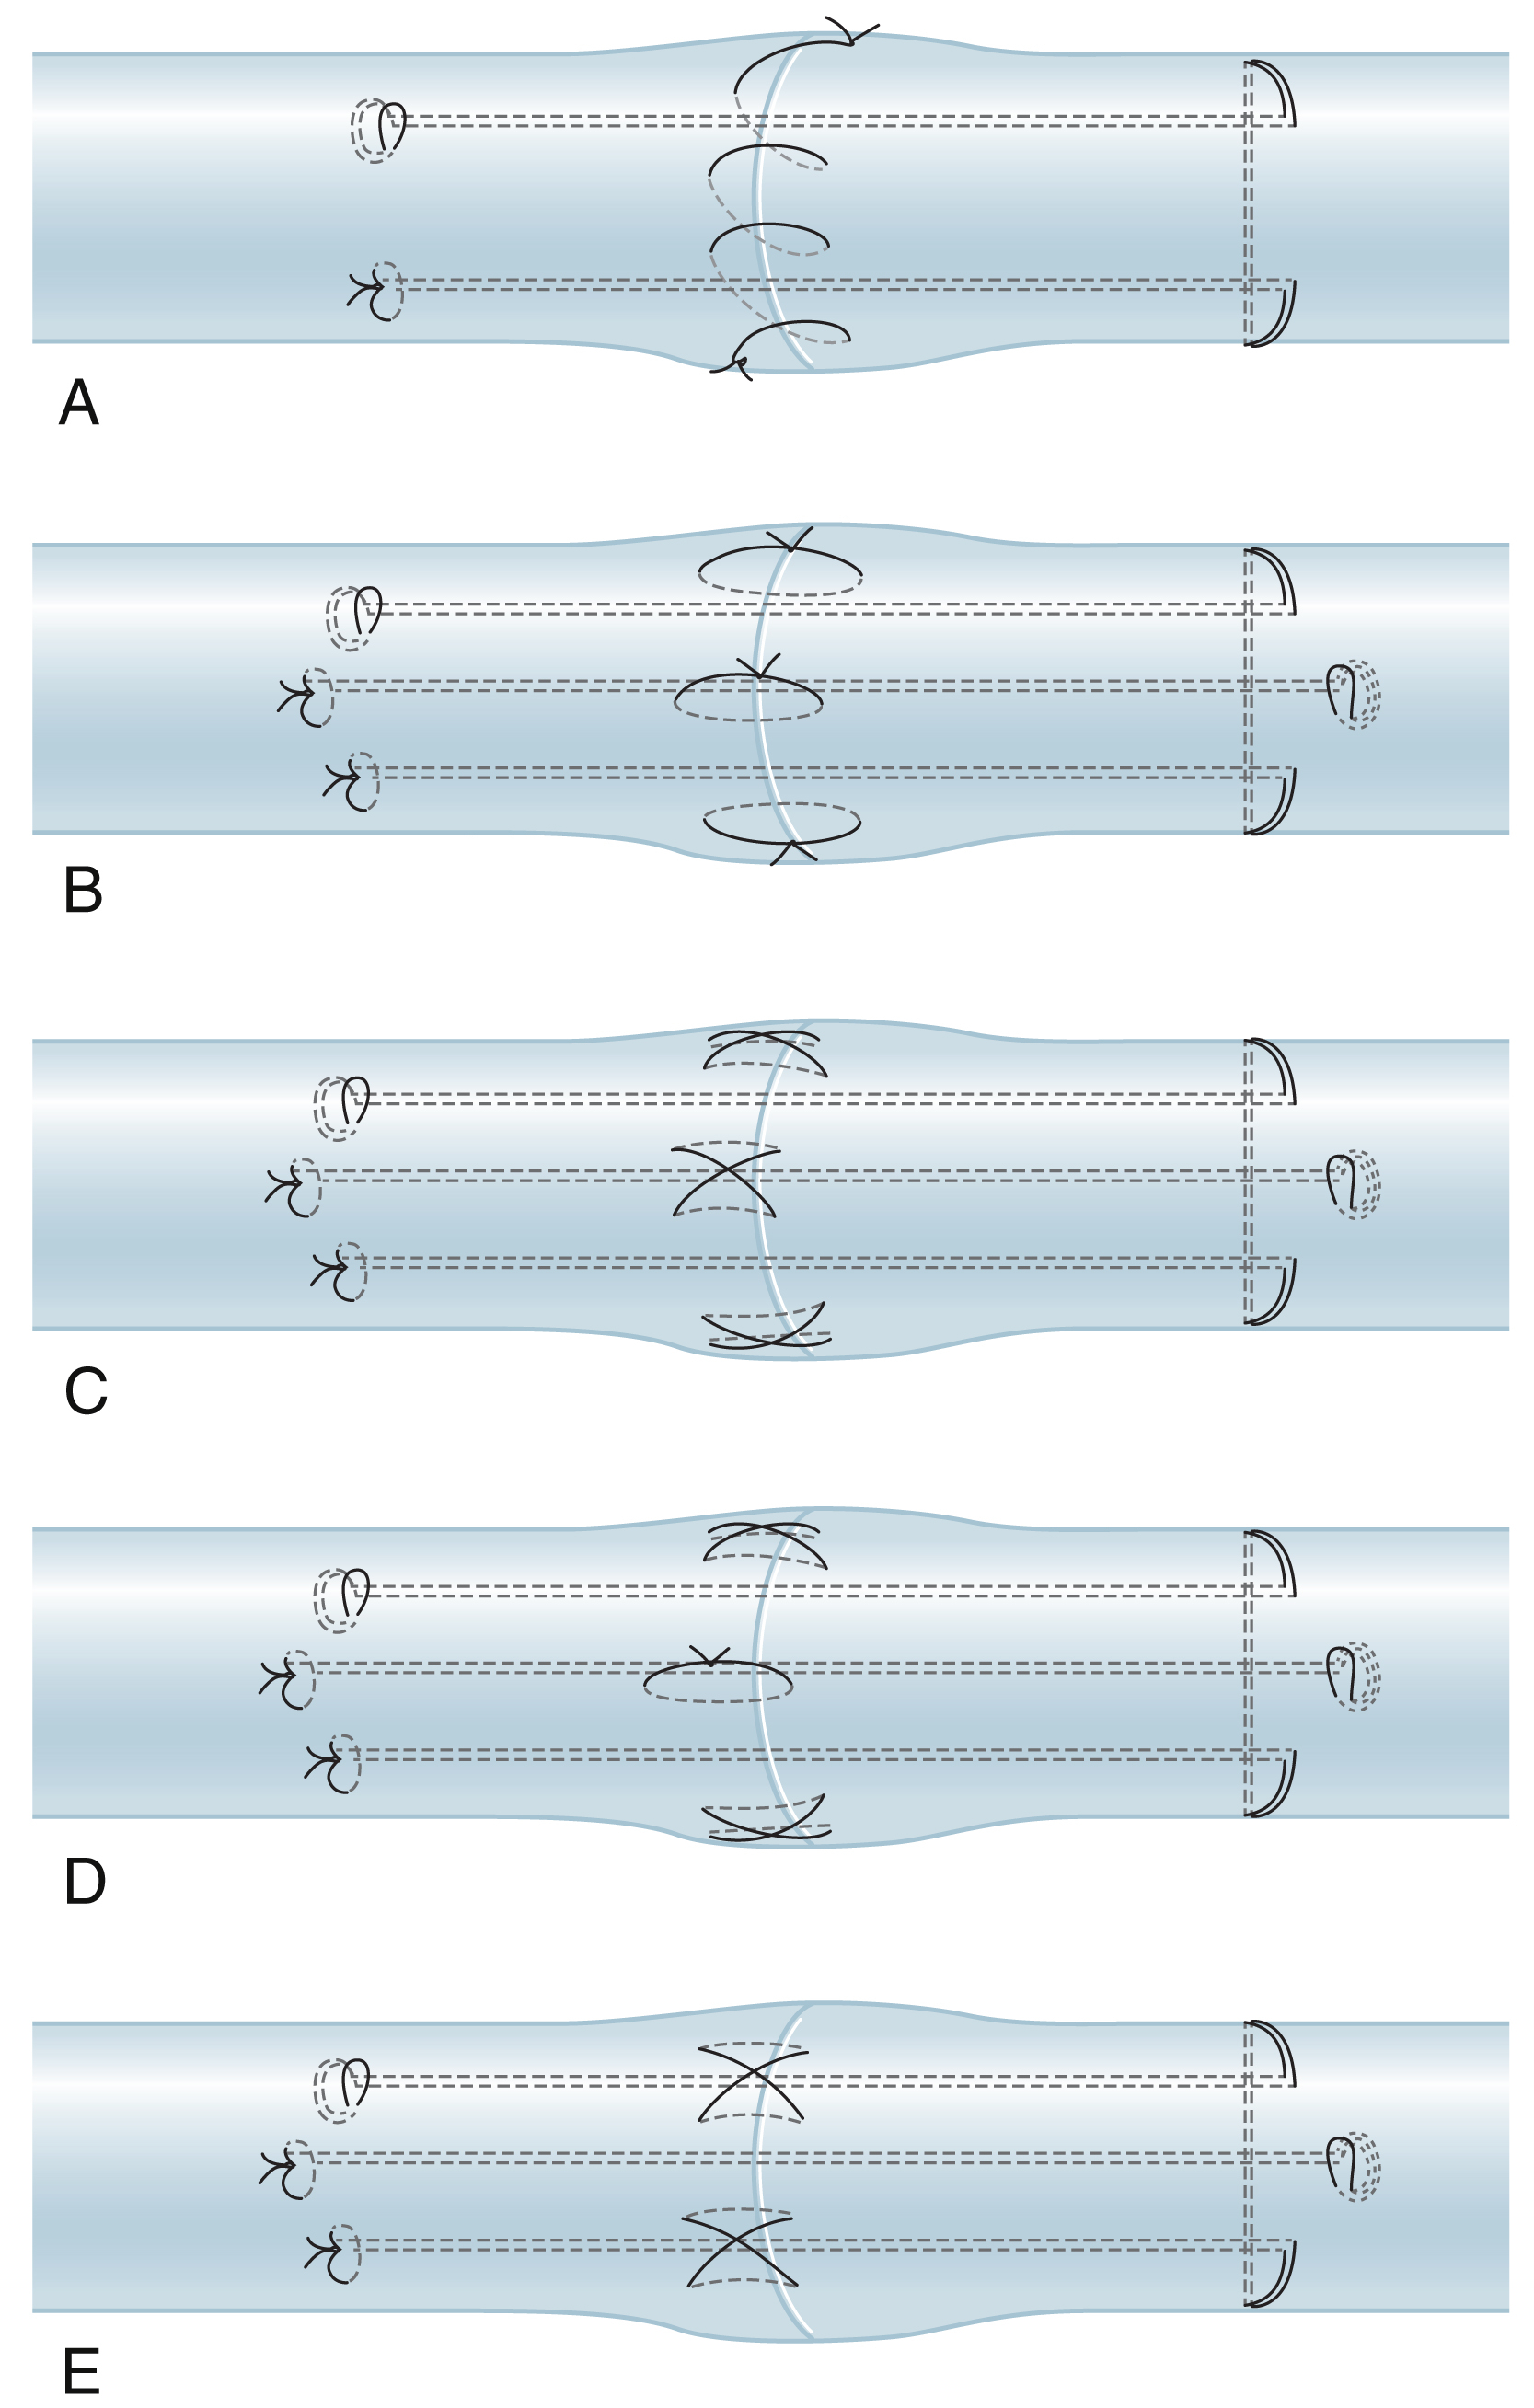
Surgical Repair Techniques
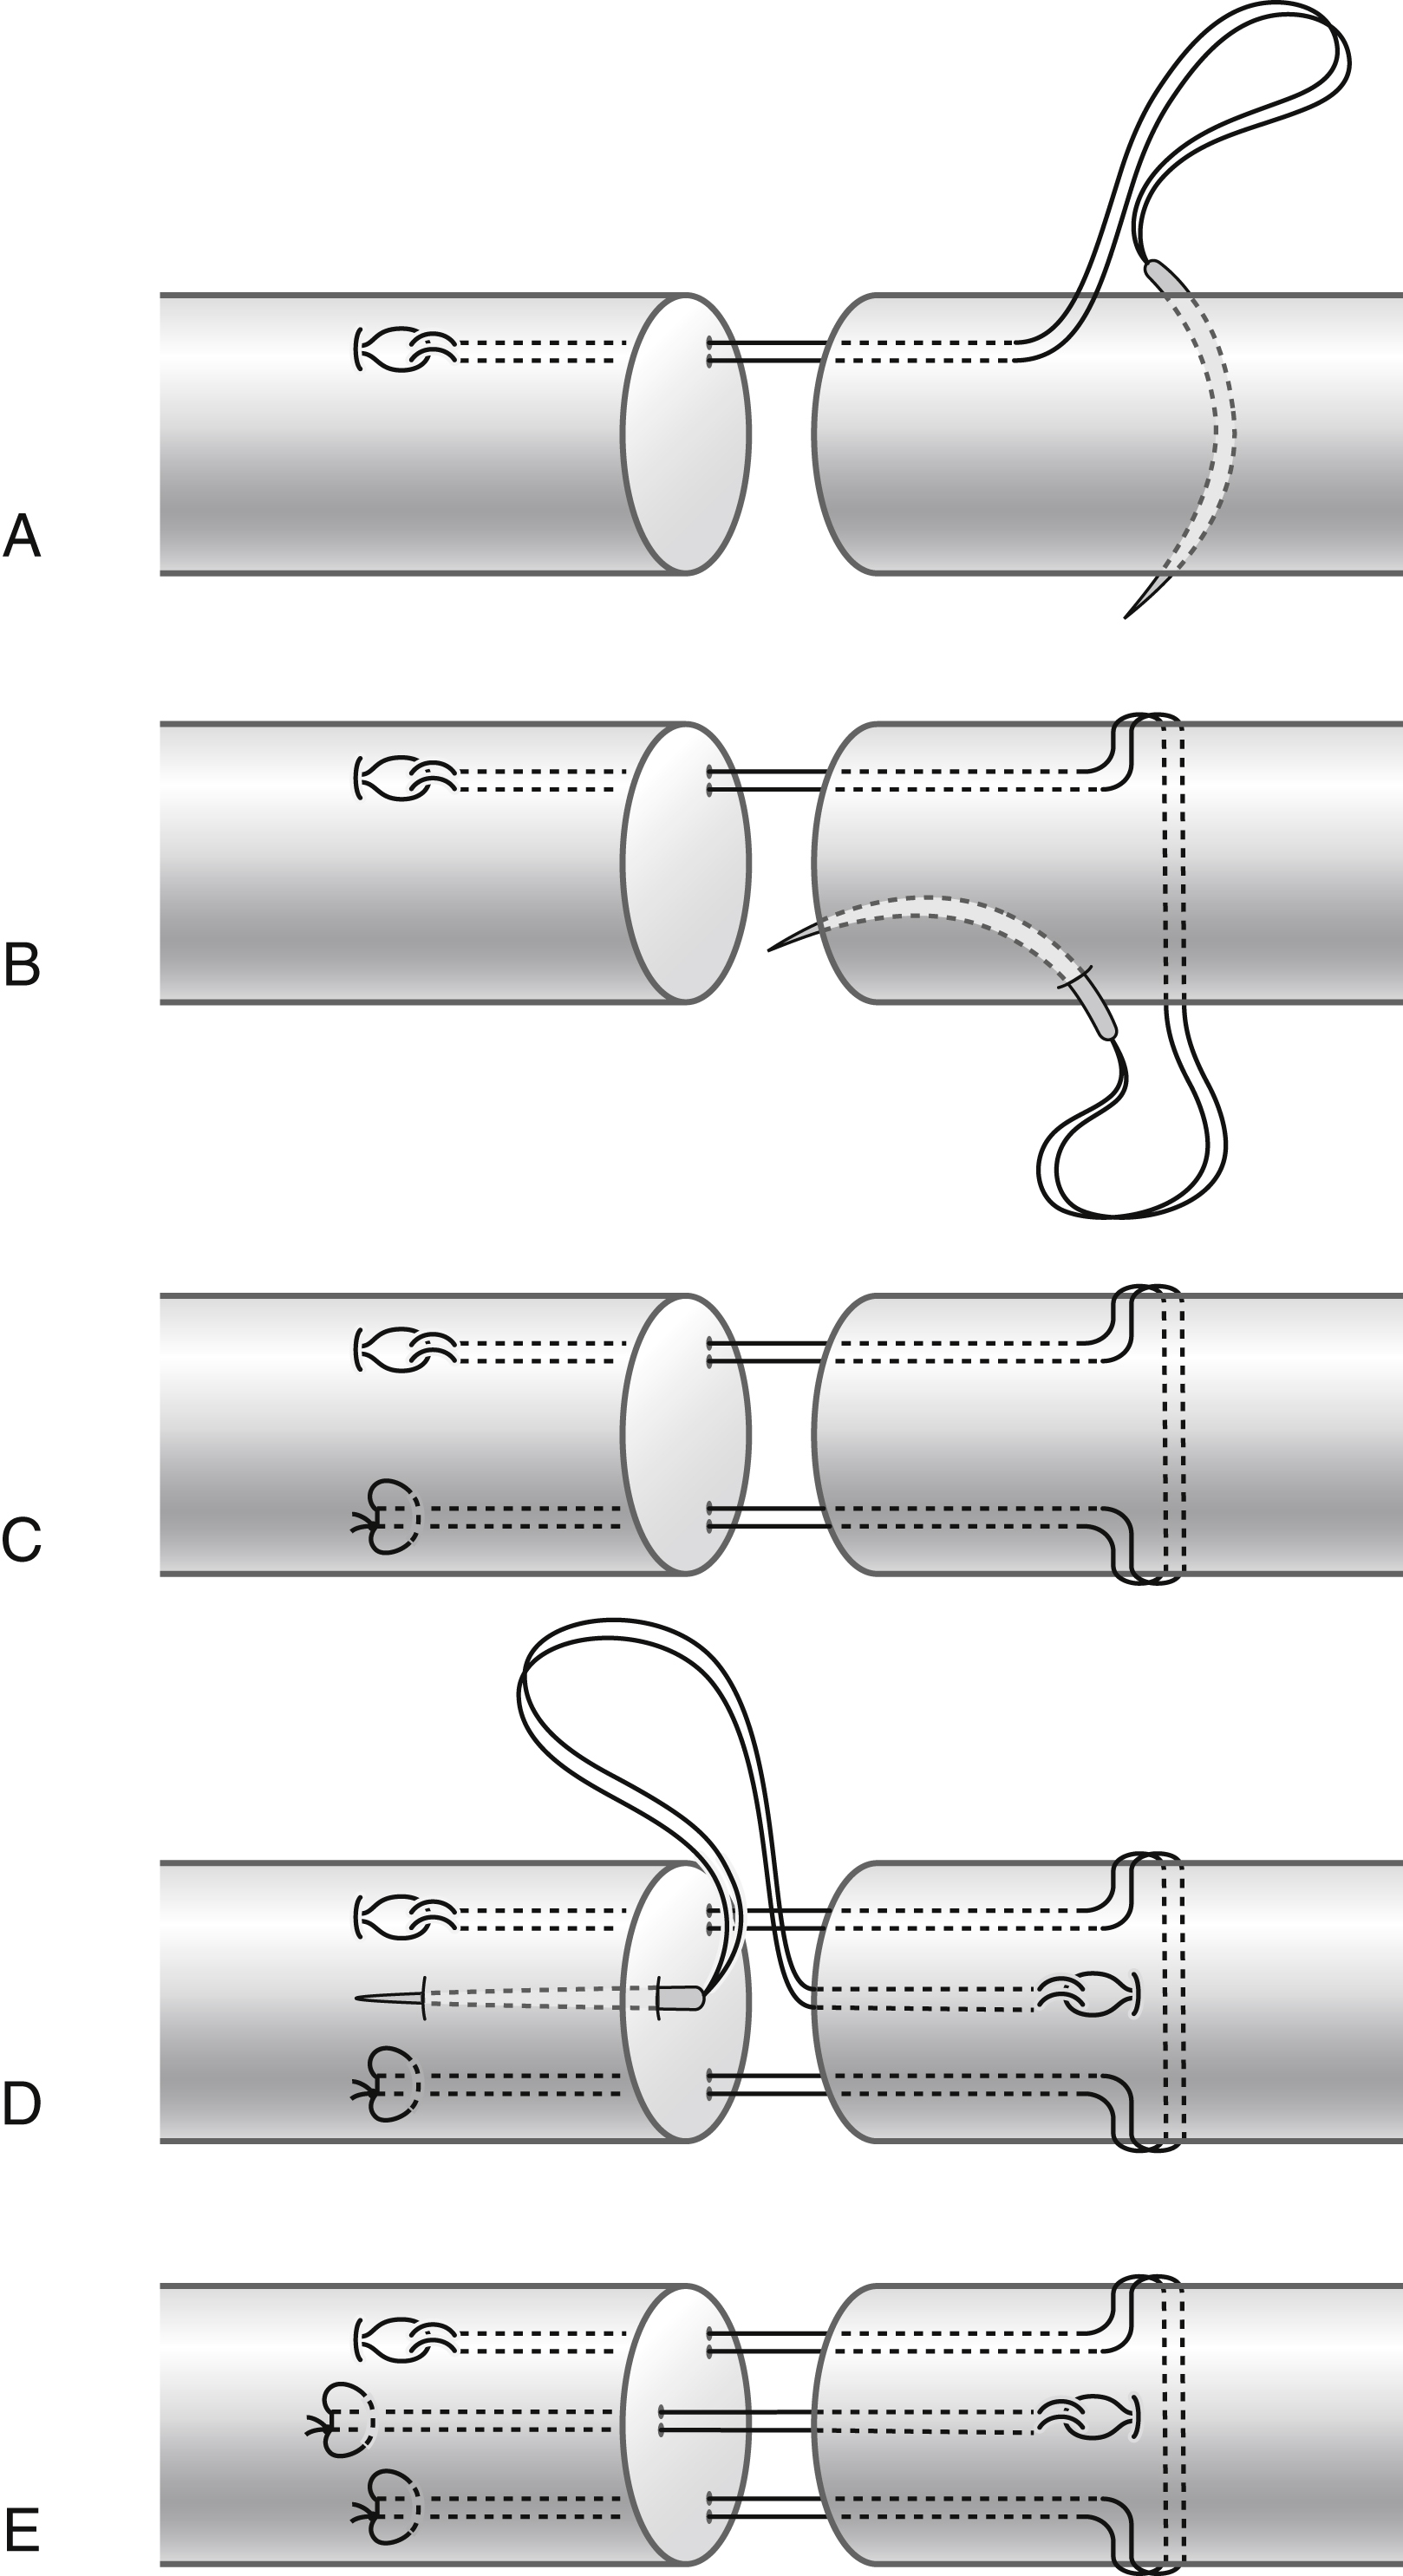
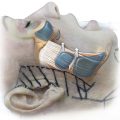
At the cut ends the tendon tissue is often ragged, which should be conservatively shaved with a scalpel or sharp scissors. Basic requirements of direct end-to-end repair are: (1) sufficient strength of the repair methods; (2) smooth tendon gliding surface, with fewer suture exposures; (3) prevent gapping of the repair site under tension; and (4) easy to perform. Different configurations of the suture strands in the tendon may produce good outcomes given all the requirements are met. Surgeons in different centers use different multistrand repairs ( Fig. 47.9 ). In the author’s patients, a 6-strand M-Tang method is used as the core suture ( Figs. 47.10 and 47.11 ). Then a simple running epitendon suture or 3 or 4 stitches of separated peripheral stitches are added sparsely over the palmar repair site with 6-0 nylon, to smoothen the junction of the two tendon ends ( Fig. 47.12 ).
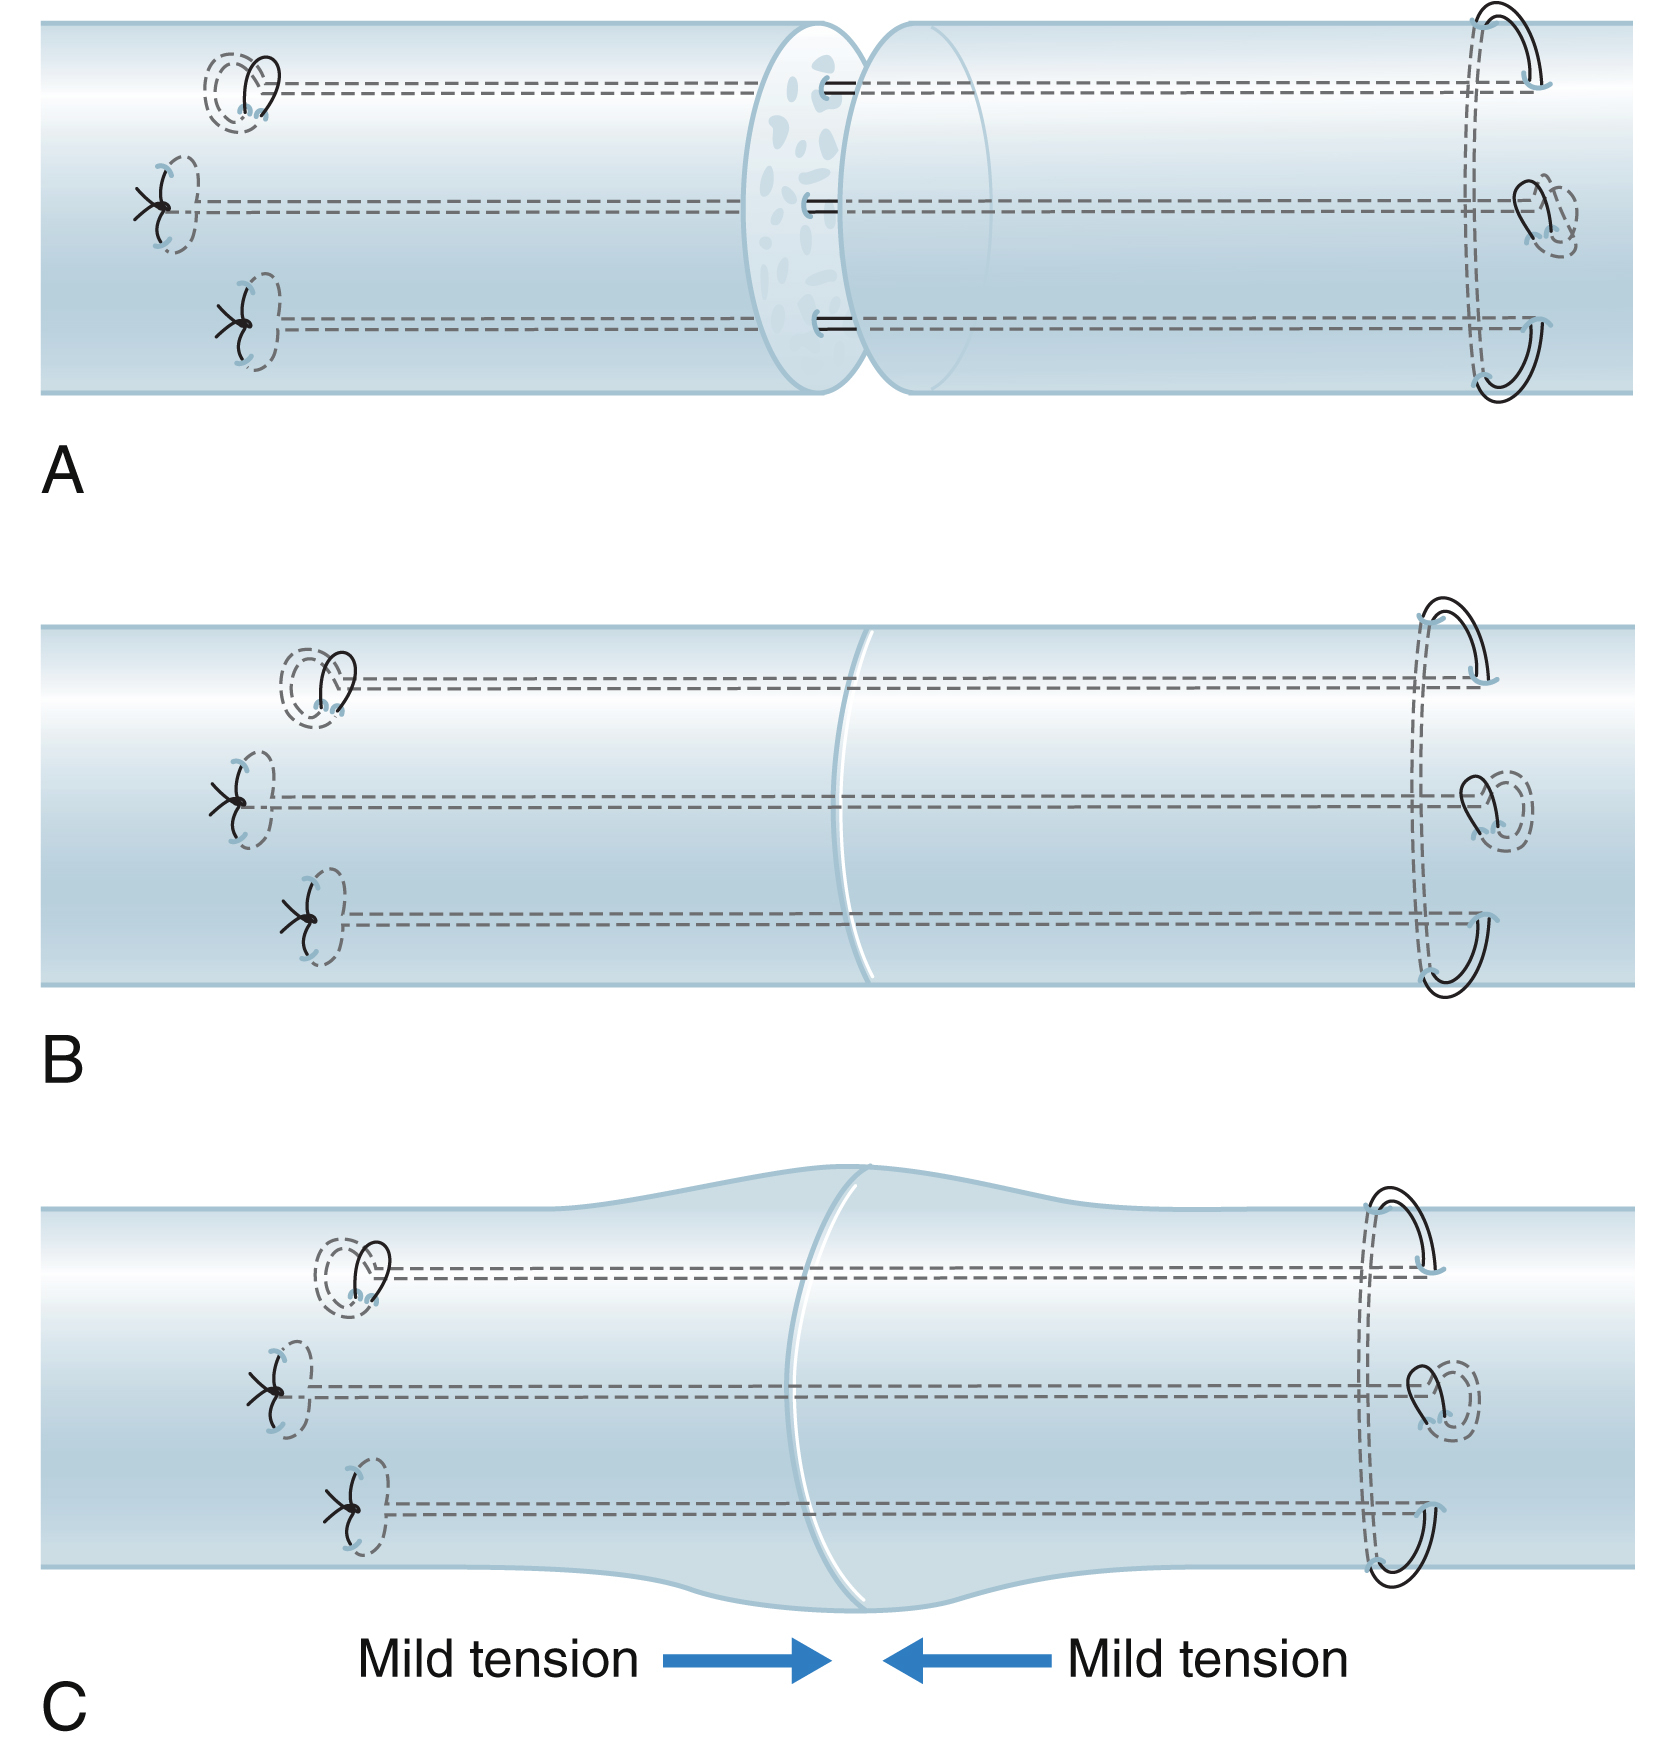
Surgical essentials for making a strong tendon repair are, firstly, we must ensure core suture purchase of at least 0.7–1.0 cm to generate maximal holding power and a sufficiently large size (2 mm in diameter) of locks if a locking suture is used. Surgical repair strength decreases as the length of the purchase decreases. Tendon cut surfaces tend to soften after trauma. The repair is at great risk of rupture if the suture purchase is short. The second key to successful repair is that a certain amount of tension across the repair site should be maintained. To prevent gapping, it is very important to ensure the repair has tension or bulkiness that results in 10%–20% shortening of the tendon parts encompassed by core sutures, or a 20%–30% increase in the diameter of the junction site of the two tendon ends ( Fig. 47.13 ). A small amount of baseline tension would counteract the tension of the flexor muscles during resting or active motion. The repair site becomes more flattened once it is under the load of active digital flexion. Such degrees of bulkiness do not hamper tendon gliding with proper pulley venting. Thirdly, at least a 4-strand core suture is required; a 6-strand core suture is ideal. The caliber of suture used in adults is either 4-0 or 3-0. Key clinical technical points for achieving repair are summarized in Box 47.1 .
Zone 2 flexor tendon repair has evolved greatly over the past three decades. Some key clinical techniques for ideal outcomes are:
- 1.
Using strong core sutures, typically 4- or 6-strand repairs
- 2.
Judicious venting of the critical annular pulley
- 3.
Ensuring that a slight tension is created by the repair to prevent gapping
- 4.
Performing digital extension–flexion tests to confirm the quality of the surgical repair
- 5.
Early partial-range active motion to ensure tendon gliding without overloading the repair
Locking suture-junction in the tendon is not a must, though locking anchors are slightly more secure. If the locks are incorporated, the locking circles of the suture in the tendon should be of a sufficient size (approximately 2 mm in diameter).
Epitendon sutures mainly serve to tidy up the repaired tendon stumps. Most surgeons now choose to insert only simple or sparse peripheral stitches. Some surgeons even do not supplement epitendinous sutures when multistrand core sutures have been used. , In the presence of a strong core repair that has been tensioned over the repair sites, peripheral sutures are less important ( Box 47.2 ).
- 1.
Direct strong repair of the terminal FDP tendon to any tissues available distally to repair tendon cut close to the distal insertion. Similar methods can be used in making the distal junction of the grafted tendon.
- 2.
Using strong core-suture-only repair or a strong core suture plus separate simple peripheral stitches.
- 3.
Venting the A3 together with A4 pulleys if greater range of motion of the finger is needed.
- 4.
Using a wide-awake setting for tendon repair, including grafting.
Related posts:
Stay updated, free articles. Join our Telegram channel

Full access? Get Clinical Tree


