Excisional Surgery and Repair, Flaps, and Grafts: Introduction
|
The goal of any excisional surgery is to remove the lesion with appropriate margins and leave the least noticeable scar possible. In order to consistently attain aesthetically pleasing results, time must be taken long before the first incision to appropriately plan the procedure. While excisional surgery is as much an art form as it is a science, there are many principles to keep in mind when planning the surgical excision and closure. Wounds should be closed under minimal tension, with scars placed along cosmetic unit junctions or skin tension lines, without distorting critical anatomic structures and landmarks (eyelid, eyebrow, nose, lip, hairline, etc.). Biologically, the closure must be such that the mobilized skin and associated adenexal structures are viable, and there is maximal preservation of sensory and motor nerve function.
Knowledge of underlying anatomy is critical in both the design and execution of the excision (see Chapter 242).
The planning and execution of dermatologic surgery procedures varies from case to case. A skilled surgeon evaluates the risks and benefits of various options in each patient and anticipates potential complications. Key elements of dermatologic surgery procedures include proper patient selection and preparation; comprehension of risks and necessary precautions; obtaining effective local anesthesia; use of sterile or clean technique; informed procedure design and meticulous technique in performing the incision and repair; diligent postoperative wound care and patient education.
Risks and Precautions
It is important that both the patient and practitioner be aware of the risks of dermatologic surgery. In fact, professional standards dictate that these risks be documented for proper patient consent.1 The main risks of excisional surgery include pain and discomfort; bleeding, bruising, and hematoma formation; nerve damage; wound infection; wound dehiscence; and undesirable scar or contracture.
- While the injection of local anesthesia is not without pain, there are several ways to minimize the discomfort. Some of the most effective ways to diminish pain on injection is the addition of sodium bicabonate to the anesthetic agent, using small-gauge needles, inserting the needle into the skin through a pore, and injecting very slowly and into the subcutaneous tissue. In addition, starting at the proximal aspect of the neural innervation and working distally will help minimize discomfort. Postoperative pain is typically minimal and controlled with over-the-counter analgesics such as acetaminophen. Meticulous operative technique will also help minimize postoperative pain. More severe pain may require the prescription of narcotics.
- Excessive bleeding, subsequent bruising, and possible hematoma formation are also risks. Most dermatologic surgeons now recommend that medically necessary anticoagulation, including aspirin, clopidogrel, heparin, and warfarin, be continued perioperatively.2 Herbal supplements such as ginseng or garlic, vitamin E, aspirin, and nonsteroidal anti-inflammatory agents that are not prescribed by a physician should be discontinued 2 weeks prior to surgery if possible.2 The consumption of alcohol should also be restricted immediately before and after the procedure. Meticulous hemostasis with electrocautery or coagulation, ligation of larger arteries, and the application of a compression bandage minimize the risk of bleeding.
- Risk of infection exists whenever the skin barrier is breached. Wound infection is relatively uncommon3 and occurs more frequently in particular patient populations, such as those who are diabetic, smokers, or immunosuppressed, and at certain surgical sites, such as the ear or lower leg.4 Sterile technique and atraumatic tissue handling minimizes this risk. Prophylactic antibiotics may be administered for high-risk patients, or if the wound base or suture perforates into nonsterile areas, such as the nasal or oral cavities. Guidelines for antibiotic usage are outlined in Table 243-1).
- Wound dehiscence occurs in wounds under high tension, or in cases of poor wound healing or infection. This risk is reduced by proper planning of the closure, the use of buried subcutaneous sutures, fascial plication to relieve tension on wound edges where indicated, and minimizing activity and immobilization of the wound edges for 1 to 2 weeks after surgery.
- Undesirable scars are always a possibility. While many steps can be taken to minimize the appearance of the final scar, it is important for the patient to understand that all excisional surgery will result in the formation of some form of a scar. Many factors must be considered with respect to formation. Free margins must be respected and never distorted. Closures are best hidden when they are placed on along cosmetic unit junctions and contained in as few cosmetic units as possible. The long axis of the excision and/or design of a repair should be placed in the direction of rhytides or relaxed skin tension lines. It is best to plan an excision with the patient in an upright position, and animation using the underlying muscles of facial expression may also be helpful. On the trunk or extremities, the direction of skin tension may be tested by moving/pinching the area. The incision should be made perpendicular to the skin surface, and an even depth of resection and undermining across the base of the wound should be maintained. Remove standing cones of redundant tissue. Buried vertical mattress sutures should be placed to attain good wound eversion and minimize the tension on the wound edges as it heals. Wounds heal under the optimal conditions of a clean, occluded environment.
Risk Stratification for Endocarditis and Prosthesis Infection | ||||
|---|---|---|---|---|
High-Risk Patient | Low-Risk Patient | |||
History of bacterial endocarditis | History of CABG surgery | |||
Prosthetic valve | Pacemaker, defibrillator | |||
Any cardiac valvular dysfunction Hypertrophic cardiomyopathy | No valvular dysfunction (including history of rheumatic fever or Kawasaki disease) | |||
Mitral valve prolapse with regurgitation, all mitral valve prolapse in men >45 years | Mitral valve prolapse without regurgitation Physiologic heart murmur | |||
Cardiac malformation | Atrial septal defect or ostium secundum | |||
CNS shunts | >6 mon since repair of ASD, VSD, PDA | |||
Shunt/fistula near inflamed/infected tissue | Arterial grafts/stents | |||
Orthopedic prosthesis | Nonorthopedic prosthesis (i.e., penile prosthesis, breast implants) | |||
Antibiotic Prophylaxis for the Prevention of Endocarditis and Prosthesis Infection | ||||
Risk | Procedure | Skin Condition | Location | Prophylaxis |
High | Mohs | Any | Any | Yes |
High | Excision, biopsy, ED&C, ablative laser, cryotherapy | Intact or erodeda Infected/Inflamed | Skin Mucosa Any | No Yes Yes |
Low | Any | Any | Any | No |
Potential Antibiotic Prophylaxis for the Prevention Surgical Site Infection Inflamed or infected skin close to surgical site Flap or graft reconstruction on nose and ear High-tension closures Below-the-knee procedures Hand surgery Multiple simultaneous procedures Mucosal/anogenital sites in immunocompromised patients | ||||
Equipment
- Basic: mechanical table, overhead procedure lights, electrocautery, vital signs monitor, Mayo stand (1 or 2), receptacle for contaminated waste.
- Optional: depending on the location and scope of the procedure, suction may be needed.
The specific instruments selected depend on the scope of the procedure and personal preference of the surgeon. It is helpful to set up the basic elements on the tray in the same layout each time. Consistency in placement of sharps prevents inadvertent injury with contaminated instruments to the surgeon or the assistant.
A basic excisional surgery tray (eFig. 243-0.1) contains:
eFigure 243-0.1
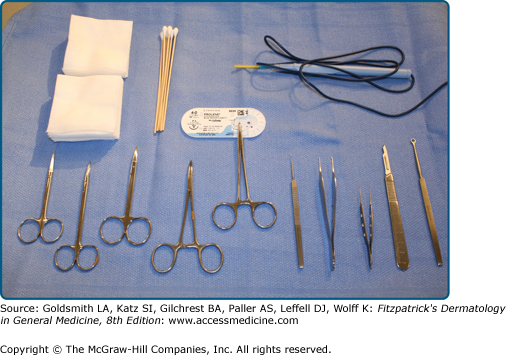
Surgical tray: a surgical tray should be equipped with high quality delicate instruments. This tray has a scalpel, small skin hook, Bishop Harmon forceps, larger Adson forceps, 5-mm curette, curved iris scissors, blunt curved Metzenbaum scissors, delicate needle holder, suture scissors, gauze, and cotton tipped applicators.
- Instruments: curette, No. 3 or No. 7 Bard-Parker scalpel handle with a No. 15 or No. 10 blade (or a Beaver blade in some cases), small forceps (e.g., Bishop-Harmon) and/or smooth-toothed Adson forceps, delicate standard skin hook or double-prong skin hook, curved iris scissors, blunt-tipped undermining scissors, hemostat, towel clamps, needle holder, suture scissors. For larger procedures, such as flaps, additional hemostats or hooks may be needed. Special procedures will need other instruments added to this tray (e.g., split-thickness skin grafts require a dermatome).
- Disposable material: marking pen, gauze sponges, cotton tip applicator sticks, scratch pad for electrocautery tip, electrocautery handpiece and tip, surgical drapes, foam or magnetic pad for discarded needles
- Suture
Preparation
Before starting a surgical procedure, it is important to review the patient’s medical history, drug allergies, and current medications, including over-the-counter medications. The entire procedure should be explained in detail, and the patient must sign an informed consent. Vital signs should be taken and recorded.
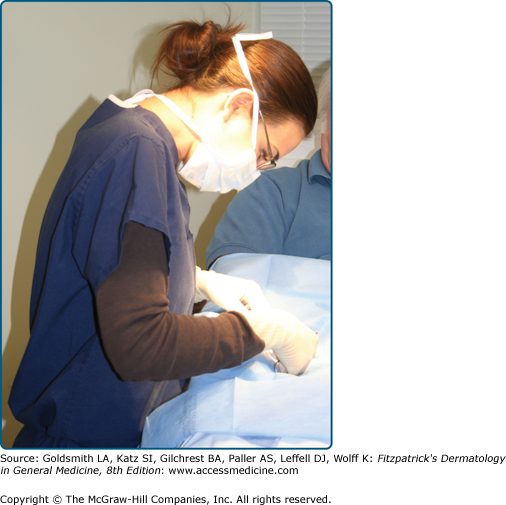
The patient should be positioned in a manner that allows maximum exposure of the surgical site and is comfortable enough that the patient can remain still for the procedure. It is also important to be sure the patient is positioned in an optimally ergonomic way for the surgeon. Patients should be positioned so that the surgeon and assistance are comfortable and not leaning excessively over the table. A back flexion angle of greater than 15° increases the risk of significant back injury. Likewise, the patient should be elevated to a height that is comfortable for the surgeon. While many occupational therapists suggest working at a height that is in line with the elbow, most find bringing the working surface up higher to reduce the angle of the surgeon’s neck to be significantly more comfortable. Operating with a cervical neck angle greater than 15° can lead to serious neck injuries and disabilities (eFig. 243-0.2).
If hair removal is deemed necessary, it may be trimmed. The operative field is cleansed in a sterile fashion with one of several scrubs, including chlorhexidine (with or without isopropyl alcohol), iodophors, or triclosan.5 The boundaries of the skin prep should be much wider than the planned incision and take into account the path of suture material in the surgical field. For procedures on the face, the patient should be advised to keep the eyes closed and caution should be used not to get any of the prep into the eyes. Sterile towels or a sterile drape should be placed around the edges of the field. In addition, draping the eyes may add additional comfort to the patient by helping avoid the glare of the operative lights.
Anesthesia
Most excisions are performed with local anesthesia only.6 The most common agent utilized is 1% or 2% lidocaine, injected in a ring around the involved area. Other anesthetics used include bupivicaine, mepivicaine, or articaine. The addition of epinephrine 1:100,000 causes local vasoconstriction and helps increase the amount of total anesthesia that may be safely administered, increases the duration of anesthetic activity,7 and decreases intraoperative bleeding. Plain lidocaine should be used when the administration of epinephrine is contraindicated, such as in patients with known cardiac arrhythmias, unstable angina, and narrow-angle glaucoma. It should be used with care in patients who are hypertensive, pregnant, or with known anxiety disorders.
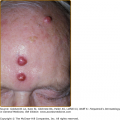
The administration of local anesthetic is painful, particularly on sensitive sites such as the perioral and perinasal areas. There are several ways to decrease this discomfort.8 Lidocaine is slightly acidic, and the addition of sodium bicarbonate 1:10 raises the pH of the solution closer to physiologic levels. Liquid injected at room temperature or warmer is less uncomfortable than that delivered at cooler temperatures. At the injection site, the application of ice or vibration may also decrease the sensation of pain. Placement of the needle through an enlarged pore, especially on the nose, may also limit discomfort. Superficial dermal injection induces anesthesia more quickly than that injected into the deep dermal-subcutaneous tissue region, yet since the tissue is less distensible, it is uniformly more painful. Therefore, lidocaine should first be delivered to the deep dermal-subcutaneous tissue and then more superficially as the needle is withdrawn. Anesthesia should be delivered slowly through a small caliber needle. A 30-gauge needle typically is used in these circumstances. The surgical site should also be anesthetized from the proximal to the distal aspect of the local sensory nerve if possible. For example, when injecting around a lesion on the forehead, start the injections at the inferior aspect and move more superiorly with subsequent injections. In this manner, by the time the superior injections are performed, the area may already be numb since the supraorbital nerve had been anesthetized from the inferior injections.
Excisional Surgery
Excisional surgery is one of the most frequently performed dermatologic surgery procedures. Specifically, the elliptical or fusiform excision allows for a linear, side-to-side closure. Mastery of elliptical excision and closure is fundamental to more advanced procedures, including variations on the ellipse itself and planning and executing more complex flaps. An elliptical excision is indicated for the removal of small- to moderate-sized benign or malignant neoplasms as well as for excisional biopsy and scar revision.
In planning the excision, the lesion to be excised should first be identified and confirmed by the patient. Using an appropriate marker a circle is drawn around the lesion with the appropriate margins. The size of the surgical margin is dependent on the nature of the lesion.9,10
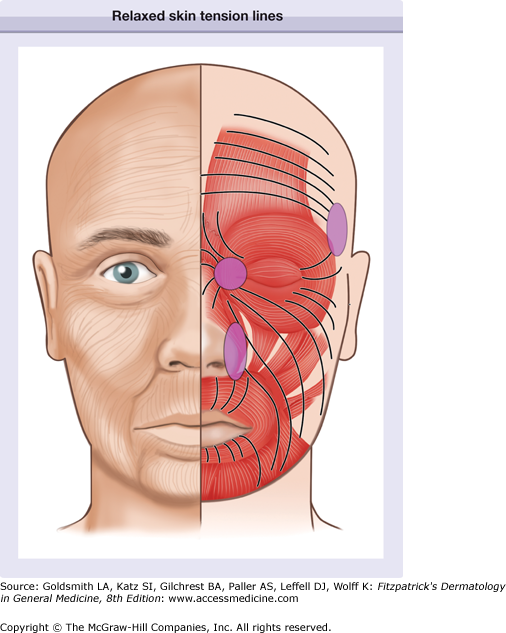
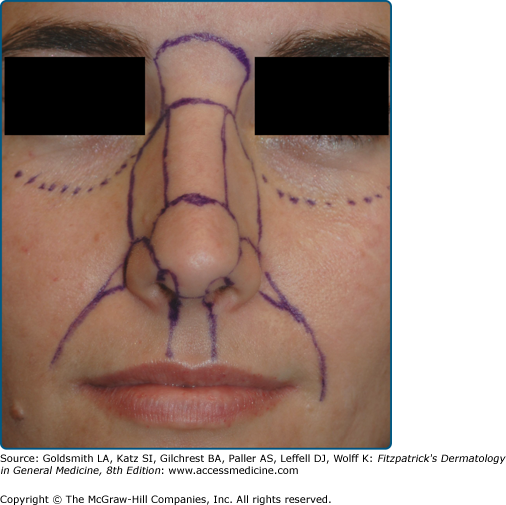
Once the margins of the lesion have been marked, the ellipse is planned. When planning a fusiform excision with linear closure, one must consider several factors, including the impact of the procedure on form and function. Free margins are of primary concern. Any distortion of a free margin will be aesthetically unacceptable. Closures should be planned such that tension vectors are perpendicular to free margins so no distortion occurs. For optimal cosmetic results, the long axis of the fusiform excision should be oriented along the relaxed skin tension lines, which are generally perpendicular to the direction of the pull of the underlying muscle (Fig. 243-1). These lines should be identified while the patient is sitting upright, and may be highlighted by asking the patient to make certain facial expressions. If the relaxed skin tension lines are not obvious, the direction of laxity may be identified by manipulating tissue manually. Relaxed skin tension lines rarely follow published diagrams, and closures should mimic the subtle arcs in the facial lines of expression. When possible, excisions should be restricted to one of the major cosmetic units (e.g., forehead, nose, periorbital area, lips and perioral area, chin, and cheeks) (Fig. 243-2). Placing the incision line at the junction of the cosmetic units may also minimize the appearance of the resultant scar. An adequate reservoir of surrounding tissue or skin laxity must be present. When the elliptical excision and closure that has been designed cannot include these conditions consideration must be given to other forms of repair such as flaps, grafts, partial purse sting closures, or healing by second intention.
The simple ellipse is based on an optimal length to width ratio of 3.5:1 to minimize the formation of redundant tissue at the apices, otherwise known as “dog-ears,” “puckers,” or “standing cones skin.” The ratio may be increased to 4:1 or greater in locations with less tissue distensibility or decreased to 3:1 in areas where the tissue is more lax. The apical angle between the two arciform incisions ranges from of 37°–74°, depending on the length to width ratio.11 As the ratio becomes larger, the apical angle decreases; thus, for a ratio of 5:1, which may be needed for scalp surgery, the apical angle approaches 30° (Fig. 243-3).
It is important to note that as a wound is closed in a linear fashion, the length of the resultant scar will be longer than the distance between the two distal points drawn out in the preoperative design of the ellipse. The arc of the two sides of the closure that are brought together is necessarily longer than a straight line drawn between the distal points of the ellipse. Mathematically, with the angles used in excisional surgery, the arcs are roughly 20% longer than the straight line drawn down the middle of the ellipse. In most cases this becomes irrelevant as there is contraction along the long axis of a scar and the tissue around the closure distends and absorbs this small difference without any noticeable distortion. In areas such as the upper lip, however, this small difference may be enough to distort the lip margin and be disfiguring. Lengthening the elliptical closure and bringing it around the lip to the wet mucosal margin will often help hide this potential distortion.
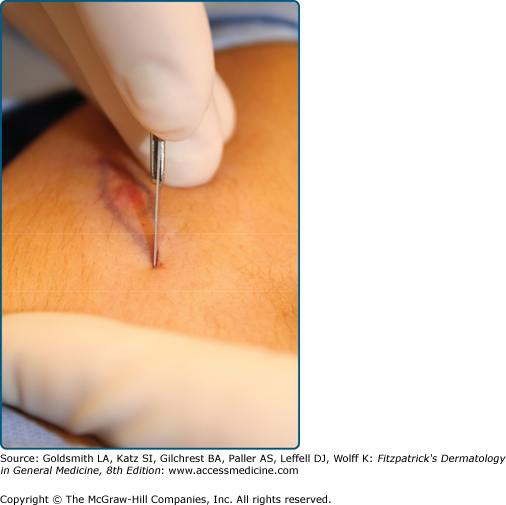
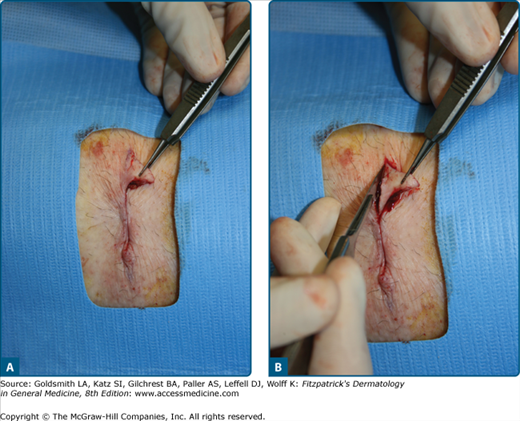
After the ellipse is planned and drawn, the field is anesthetized, prepped, draped, and the first incision is made using a scalpel (Fig. 243-4). In most instances, a number 15 blade is used to score the epidermis or to cut through to the fat on the first pass; however, thick back skin may require the use of a No. 10 blade. The surgery begins with the point of the blade at the apex distal from the surgeon’s position. As the incision progresses toward the arc of the ellipse, the belly of the blade is held perpendicular to the skin surface, preventing a beveled incision. As the opposite apex of the incision is approached, the blade rocks back up onto its tip, which allows the surgeon to clearly see the apex of the incision under the advancing hand. This prevents extending the incision beyond the planned apex. To prevent bunching of the tissue ahead of the pressure exerted by the blade, traction on the surrounding skin is held with the nondominant hand; in addition, an assistant may aid with traction. The depth of the excision is, again, dependent on the nature of the neoplasm being excised. When a side-to-side closure is planned, the depth of the incision must be full thickness, or into the superficial subcutaneous fat. The proximal apex of the ellipse is grasped gently with a toothed forceps to elevate the tissue. The base of the specimen is dissected in an even plane with a scalpel or scissors. The depth at the apices should be the same as the depth at the center; there is a tendency to remove the specimen with the depth at the apices more superficially. When the depth of the excision is not uniform, a more noticeable standing cone of tissue may surround the tips as the wound is closed.
Undermining is performed to increase mobility of the surrounding tissue, aid in wound eversion, decrease tension on the wound edges, and diffuse scar contraction.12 The subcutaneous tissue is undermined at the same level around all edges of the wound, including the apices, utilizing iris or blunt-tipped scissors. The tissue may be snipped or bluntly dissected by inserting the tip of the scissors and spreading. The plane of undermining will vary depending on body site but should be uniform in depth at all edges. Knowledge of anatomy is extremely important and careful attention must be given to surrounding vital structures. Patients receiving anticoagulants or with reduced platelet number or function may benefit by limiting the extent of undermining as the risk of bleeding and hematoma formation is decreased.
Electrocoagulation or electrocautery is employed to attain meticulous hemostasis of the bed of the wound. A skin hook is used to elevate the wound edges to expose vessels that were injured during the excision or undermining. Blood that accumulates in the wound must be cleared with gauze or cotton swabs to allow for visualization of pinpoint bleeding and to allow for a relatively dry field. The cautery tip may be applied directly to the vessel until bleeding ceases. Alternatively, indirect coagulation is achieved by using small forceps to grasp the vessel and applying the cautery tip to the forceps. Indirect cautery limits the residual thermal damage surrounding the cauterization and may speed wound healing. Theoretically it could reduce the risk of infection but in facial skin, where much dermatologic surgery is performed, the excellent blood supply often minimizes the risk of infection. No matter which method is used, care should be taken to stop all significant bleeding while minimizing cautery char. Larger, more high-pressured arteries may require ligation with absorbable suture.
Suturing technique (see Chapter 242) reduces and redistributes wound tension, everts the skin edge, eliminates dead space, and maintains or restores natural anatomic contours, while minimizing the formation of permanent suture marks on the skin surface. Most wounds are closed in two layers: (1) absorbable deep sutures and (2) nonabsorbable superficial sutures. Deeper wounds or those with significant dead space may benefit from a third, deep layer in the subcutaneous fat or fascia.
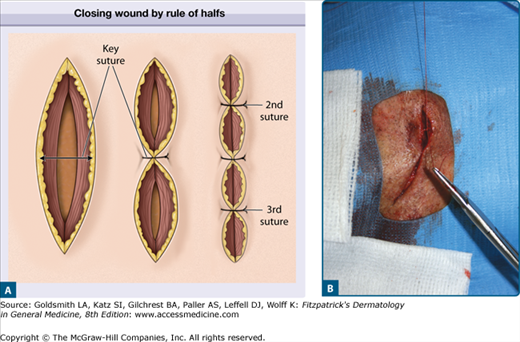
Ideally, the wound is closed by first placing the deep sutures using the rule of halves to minimize the formation of dog-ears (Fig. 243-5). The first suture is placed in the center of the wound. Each half of the remaining defect is closed in a similar manner, which is repeated until a suitable numbers of sutures have been placed. A wound gains only 7% of its final strength after 2 weeks.13 As most skin sutures are removed within 1 to 2 weeks of placement, absorbable buried sutures are an important part of a layered wound closure.14 Buried sutures typically dissolve over the course of months and provide support for the wound until epidermal tensile strength has increased sufficiently to prevent wound dehiscence.
Buried vertical-mattress sutures aid significantly in wound eversion by reducing or eliminating tension on the wound edge and producing thinner less noticeable scars (Fig. 243-6). This type of buried suture should be used in nearly all closures. Subcutaneous sutures help minimize or eliminate dead space and align deep structures such as skeletal muscle or fascia. They can also be used to anchor overlying tissue to underlying fixed structures, such as periosteum, to prevent distortion of free margins or maintain proper facial contour and function. This is exemplified by anchoring a melolabial flap to the maxillary periosteum. When tying a buried suture, it is important not only to keep both free ends of the suture on the same side of the loop created, but also to tie the suture in such a manner that draws the knot down on the same side so it will tuck up under the loop and not get hung up on it (Fig. 243-7). Buried sutures should align the wound edges such that they are perfectly approximated with good wound eversion before the placement of epidermal sutures.
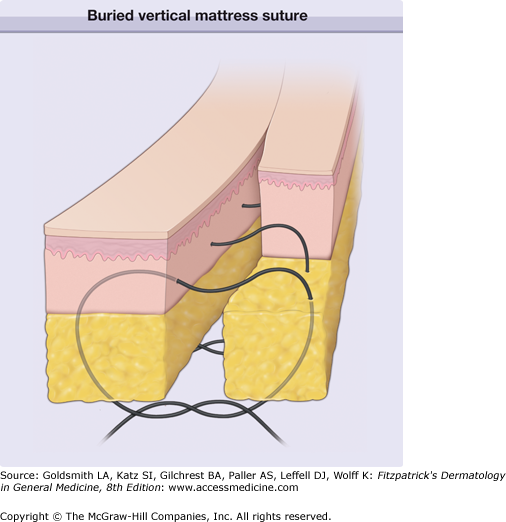
Figure 243-7
A and B. Tying deep sutures. It is important to keep the knot forming from the two free ends on the same side of the loop in the middle so they do not get hung up on the loop. This will allow the knot to cinch up under the loop and draw the wound edges together. The wound should be together with skin edges nicely opposed and everted.
Epidermal sutures are placed to approximate the margins of the skin edge. They should be evenly spaced and placed at roughly the same distance from the wound as the combined dermal epidermal depth. Therefore, sutures placed on the eyelid will be much closer together than those placed on the thick skin of the back. Most practitioners use a running nonabsorbable minimally-reactive monofilament suture, such as polypropylene, that requires subsequent removal.15 Alternatives include running absorbable fast-acting gut16, absorbable or nonabsorbable running subcuticular sutures17, simple interrupted nonabsorbable sutures, and polymethylmethacrylate tissue glue. Simple interrupted sutures are more time-consuming to place and remove than a running suture. In settings, where wound healing may be impaired due to the patient’s advanced age or underlying disease, interrupted sutures compared with running sutures may be preferred, as interrupted sutures may have, with all other factors being equal, greater tensile strength and less potential to cause edema, induration, and impaired microcirculation.18
The risk of crosshatch marks across the suture line can be minimized by removing the sutures within a week of placement, before the formation of epithelial suture tracks develop. On the face and ears, most skin sutures are removed within 5 to 7 days. Neck sutures should be removed in 7 days and scalp sutures in 7 to 10 days. On the trunk and extremities, risk of wound dehiscence mandates that epidermal sutures may be left in place longer, typically 10–14 days, to provide additional support. In repairs under high tension or when dehiscence is likely, sutures may be left in place for 3–4 additional days. However, if sufficient buried sutures have been placed and the wound as well approximated at 7–10 days, epidermal sutures can be removed. The use of a running subcuticular suture for well-approximated wounds will prevent the formation of suture tracks and should be used in most cases that require sutures be left for more than 7 days.
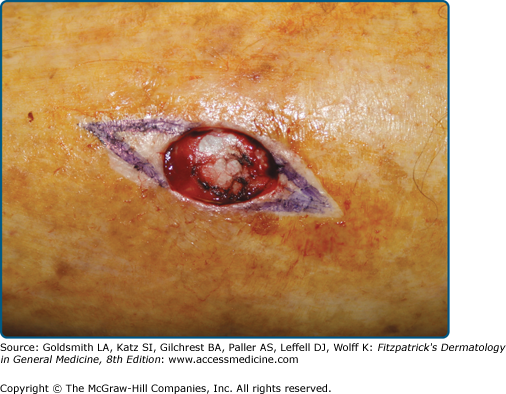
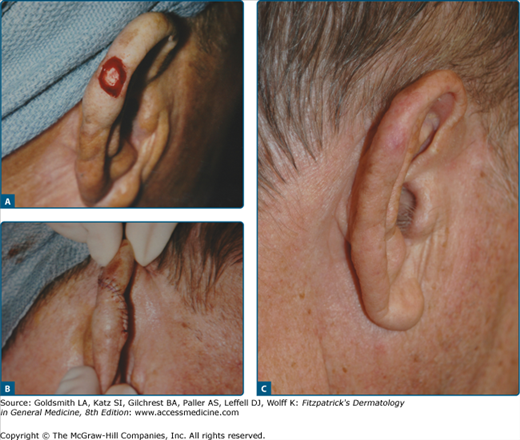
There are certain locations and situations where allowing a wound to heal by second intention is the preferred method of closure. Wounds in patients who are poor surgical risks for reconstructive surgery, where there is relatively minimal tissue mobility (scalp, distal lower extremities), and where there is a high risk of infection healing by second intention may be indicated. (eFig. 243-7.1).
Wounds located in concave areas such as the medial canthus, ear concha, alar crease (if small), temple region, and postauricular sulcus lend themselves well to healing by second intention.19 Wounds allowed to heal by second intention contract significantly and may decrease in size as much as 50% or more.20 Superficial wounds heal with less wound contraction, because there is less deposition of collagen. Therefore, a very superficial wound, even on a convex surface such as the forehead or the nose, can potentially heal well. Because all wounds contract to some degree, it is important that there be no free margin along one side of the wound that can be elevated during wound contracture and cause distortion at the site. This may be encountered along the eyelid margins, ear margins, eyebrow, nasal ala, and lip vermillion border. These areas are almost always better managed with appropriate reconstructive surgery.
When a lesion is excised with the intention of allowing the wound to heal by second intention, appropriate margins should be included and the resulting defect will typically be circular in nature. The incision through the skin is beveled inward to provide exposure of the base of the wound. The depth need not reach the subcutaneous fat if the lesion can be removed satisfactorily by transecting the dermis.
Wounds that are allowed to granulate are more resistant to infection and do not form a hematoma. In addition, the size of the final scar is kept to a minimum by negating the need to remove standing cones. These wounds, however, require more time to heal than those that are closed primarily and exhibit increased contracture. In some cases there is an unpredictable cosmetic result.20 Employing a purse string suture can significantly decrease the size of the wound and abbreviate the healing time considerably.
Under certain circumstances, a circular excision may be performed when the orientation of the ellipse is difficult to anticipate. This may occur when the precise direction of relaxed skin tension lines and least tension is difficult to determine, when the length of the ellipse for an optimal outcome is unclear, or when alternative repairs may be considered, such as a local flap. Nonelliptical defects require revision of the cones or dog-ears. First, the wound is closed with a few centrally placed sutures; bilateral standing cones of excess tissue form on either side of the central closure. In addition, tissue redundancies may persist at one or both ends of a planned fusiform excision if the apical angle is too wide, if the sides are of unequal lengths, or on convex surfaces and the techniques for addressing these redundancies are similar under both clinical circumstances 21 Skillful repair of the redundant standing cones extend the incision line by removing an additional triangle of tissue at the tip (Fig. 243-8). The apex of the standing cone is lifted with forceps or a skin hook and manipulated to determine where to place the incision that releases the redundant tissue. The incision is made with a scalpel and the dog-ear is undermined. The free end of the cone is pulled over the incision and the remaining incision is made such that the resultant wound edges lie flat.22 The freed cone is termed a Burow’s triangle. This technique results in a linear extension of the scar. Variations on the revision of tissue cones include a curved extension, an angled extension, and an M-plasty.
The classic fusiform excision creates a linear scar. At times, it is aesthetically preferable to create a curvilinear scar. The curvilinear repair is useful on the cheek and around the chin. The curved ellipse is created by intentionally designing it with one side longer than the other. The wound is closed by the rule of halves.
An S-shaped repair is useful on convex surfaces such as the extremities where a linear repair may result in persistent standing cones or indentations. The tension vectors of a standard elliptical incision are perpendicular to the long axis of the ellipse. Since wounds contract along their long axis, designing the closure with an S-plasty, displaces the tension over a greater length and a variety of angles (Fig. 243-9) and does not create a contracting in one direction with resulting indentation over a convex surface such as an extremity.
Figure 243-9
A–C. S-plasty closures are often used to give a wound a curvilinear line and to alter the tension vectors so they do not all pull along the long axis of the wound and cause noticeable contraction. The S-plasty is especially useful on convex surfaces where wound contraction may cause the scar to sink down and appear depressed.
An M-plasty allows the length of a scar to be shortened. Rather than extending the end of an ellipse or removing a Burow’s triangle, the redundant tissue may be excised inward, forming a M-shaped scar. The long axis of the incision is reduced by the length equivalent to the inverted triangle which makes the center of the M. This technique is useful for confining a scar to a single cosmetic unit, that is, the chin, or when an incision approaches a free margin. The scar may be camouflaged in locations where rhytides bifurcate, such as the crow’s feet in the periorbital area or around the lips. It is important to advance the inverted triangle up into the rest of the ellipse to take full advantage of the scar-shortening effect.
Partial closure is used when more extensive repairs are limited by lack of local tissue reservoirs or the patient’s health or coagulation status. The wound is closed from the ends toward the center. When wound tension prevents further closure, the area remains open to heal by second intention. The final scar is usually linear and may resemble a spread scar in the middle. Alternatively, a purse-sting suture is placed around the wound and tissue is drawn together circumferentially. The purse-string suture is closed just to the point of minimal tissue buckling. Additional guiding sutures may then be placed across the partially closed wound to attain better alignment and even further closure.
In some cases, the length of an ellipse required to excise a lesion with a 3 or 4:1 ratio is too long for an acceptable cosmetic or functional outcome. In such instances, the lesion may be removed with a series of staged excisions. A partial excision is performed, ideally an ellipse that accommodates the full length of the lesion, with primary linear closure. During the following months, the surrounding tissue stretches and the tension in the area decreases. Additional excisions are performed in a similar manner, removing the remaining lesion as well as the scar or scars created from the first steps of the procedure. This is typically used to minimize the length of the final scar in large circumference neoplasms that are benign or low risk.
Flaps
When simple primary closure cannot be done because a wound is too large, there is excessive tension, or an unacceptable functional or cosmetic result would ensue from a linear scar, a tissue-movement procedure, such as a flap or a graft, should be considered. A local skin flap is a portion of full-thickness skin and subcutaneous tissue transferred from an adjacent donor site into the surgical defect. The flap maintains its blood supply via a vascular pedicle that remains connected to the donor site.
Random pattern flaps, the most widely used in dermatologic surgery, are supported by the small arterioles and capillaries of the subdermal vascular plexus found in the mid-to-superficial fat. Therefore, undermining and flap mobilization must be done at or below this level to ensure adequate blood supply. If undermining occurs too superficially, the intradermal vaculature alone will often not be able to support a flap. In certain areas other than the face, the perfusion pressure of even the subdermal vascular plexus is often not sufficient to support a random pattern flap. Fortunately, the blood supply of the face is rich, estimated to be ten times greater than necessary to support the skin’s basic metabolic needs so it can support a wide variety of random pattern flaps.