Key Words
forehead flap, cervicofacial flap, temporalis flap, pectoralis major flap, rectus abdominus flap, trapezius flap, latissimus dorsi flap, radial forearm flap, posterior interosseous flap, gracilis flap, gastrocnemius flap, sartorius flap, reverse sural flap, pedicled anterolateral thigh flap, soleus flap, biceps femoris flap, tensor fascia lata flap
Synopsis
There are many regional flaps that have been described, and there is a subset that is very reliable and versatile. This chapter will outline the anatomy, indications, operative technique, post-operative care, and pearls and pitfalls of these workhorse flaps. By learning these 16 regional flaps, the authors propose, almost any defect in the body can be reconstructed.
Common Regional Flaps
- I.
HEAD AND NECK
- a.
Forehead flap
- i.
Anatomy:
- •
The forehead flap can be raised from either side of the brow, and involves the upper facial muscles of expression (the frontalis muscle and the corrugator supercilii muscle). It is usually raised as a fasciocutaneous flap. Its dominant pedicle is the supratrochlear artery and venae comitantes, and the minor pedicle is the supraorbital artery and venae comitantes.
- •
- ii.
Indications:
- •
Coverage: This versatile flap is useful for a multitude of facial defects, ranging from medium-sized nasal defects to large ones requiring reconstruction of the entire nose.
- •
- iii.
Technique:
- •
Construct a template of the defect, usually best done with a glove wrapper or suture wrapper. Design the flap with the template, being sure to center over the supratrochlear vessel ( Fig. 2.6.1 ). If a Doppler is available, use it to identify the pedicle. Check that the arc of rotation adequately reaches the defect.
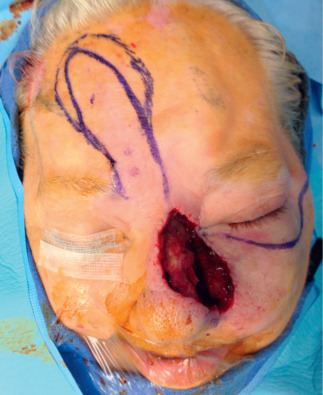
FIG. 2.6.1
Forehead flap designed to match defect. A cervicofacial flap can be utilized concomitantly.
- •
Raising the flap is done in a three-tier stepwise fashion, proceeding distal to proximal, with the distal third in the subcutaneous plane, the second third subgaleal, and the proximal third in the sub-periosteal plane. The distal end of the flap should be thinned to get better contour.
- •
Inset the flap in the defect, being mindful of not kinking the pedicle. The donor site may be closed primarily with adjacent undermining. If this is not possible, the defect can be allowed to heal secondarily or skin grafted ( Fig. 2.6.2 ). The exposed portion of the pedicle is covered with bacitracin and Xeroform gauze.
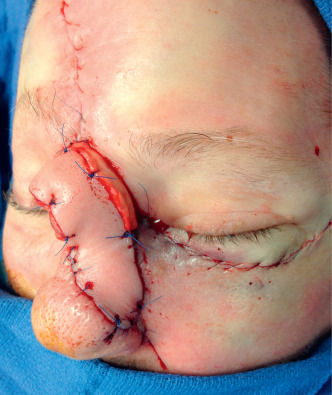
FIG. 2.6.2
Inset of flap and closure of donor site.
- •
- iv.
Post-Operative Care:
- •
Post-operative care is primarily focused on flap monitoring. Congestion can sometimes be improved with release of some sutures. Daily dressing changes to the exposed pedicle is performed with bacitracin and Xeroform. The donor site sutures are usually left in place for at least 10 to 14 days. The pedicle can be divided after 2 weeks ( Fig. 2.6.3 ). The flap can be thinned before pedicle division.
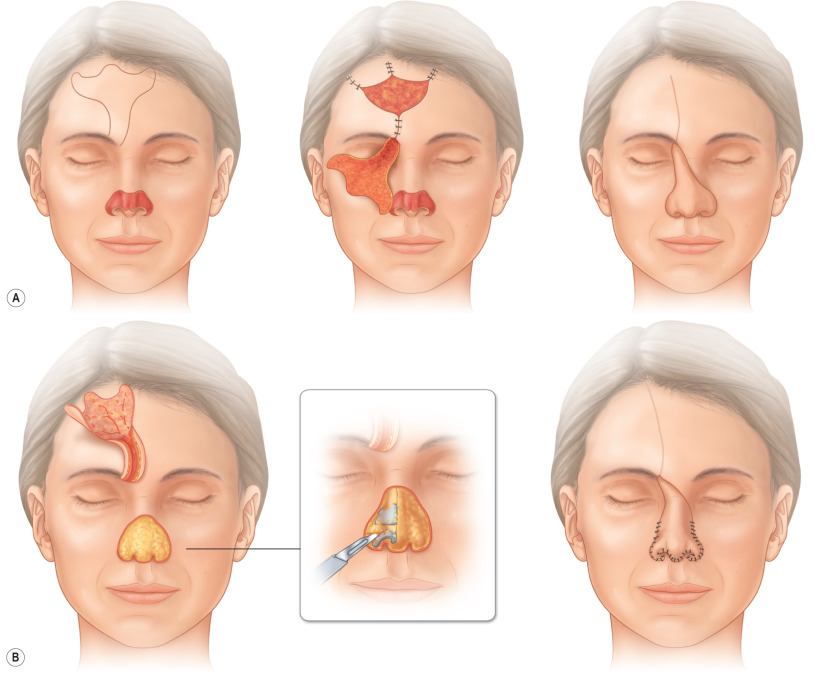
FIG. 2.6.3
Illustration of operative sequence with (A) initial elevation and inset of paramedian forehead flap. (B) An intermediate stage to improve contouring by excising excess muscle and subcutaneous tissue, and placement of cartilage grafts. The pedicle is then divided at a final stage.
- •
- v.
Pearls and Pitfalls:
- •
The forehead can be pre-expanded to increase flap dimension and reach.
- •
The angle of rotation can be increased with relaxing incisions in the epidermis.
- •
A periosteal extension can be included if cartilage grafts are used in the same stage to provide a vascularized base.
- •
Open raw areas can be skin grafted if dressing changes are difficult.
- •
- i.
- b.
Cervicofacial flap
- i.
Anatomy:
- •
The cheek has a rich blood supply with contributions from the superficial temporal artery, infraorbital artery, and facial artery. This flap is usually raised as a subcutaneous flap with a wide pedicle based on the subdermal plexus.
- •
- ii.
Indications:
- •
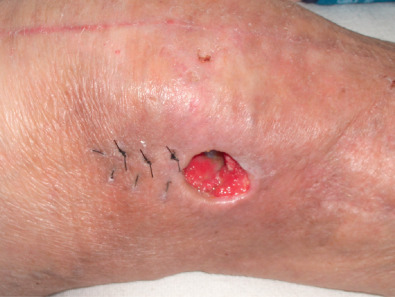
The cervicofacial flap is a workhorse flap for large medial cheek defects ( Fig. 2.6.4 ).
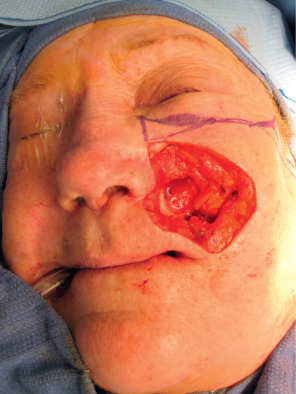
FIG. 2.6.4
Large cheek defect after melanoma excision.
- •
- iii.
Technique:
- •
The key to this flap is planning the incisions within relaxed skin tension lines or natural creases such as the nasofacial sulcus. Depending on the defect, the incision is usually started at the inferior bony orbital rim, curving upward laterally beyond the canthus. The incision then extends to the preauricular crease, down the outline of the ear, and marches down to the upper neck, where laxity can be recruited and advanced into the defect.
- •
Elevate and undermine the flap in the subcutaneous plane and preserve the subdermal plexus ( Fig. 2.6.5 ). Note the cobblestone appearance of the fat to ensure that you are in the right plane. Use skin hooks to maintain tension and prevent buttonholing. If available, a nerve stimulator may be useful to help monitor the facial nerve branches.
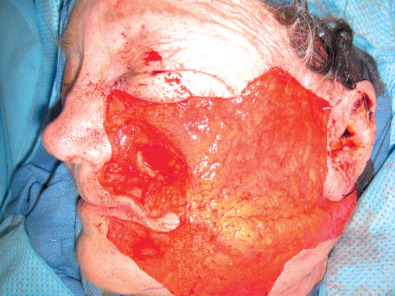
FIG. 2.6.5
Cervicofacial flap raised and reflected inferiorly to demonstrate extent of flap.
- •
When insetting the flap, consider anchoring to the periosteum of the inferior orbital rim and the nasofacial sulcus to mitigate long-term facial distortion.
- •
- iv.
Post-Operative Care:
- •
Bruising and swelling is expected, and the patient should keep the head of the bed elevated. In the acute post-operative period, it is important to be wary of hematomas, which can compromise the viability of the flap. Dog ears and redundant tissue may need to be excised at a later date in patients with tenuous flaps or with a history of radiation or smoking ( Fig. 2.6.6 ).
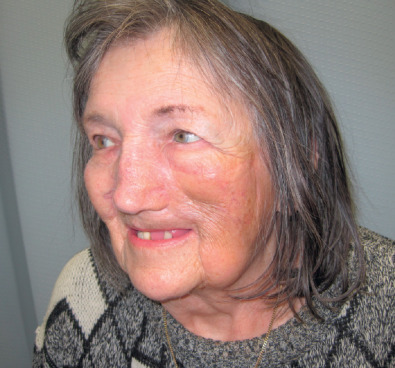
FIG. 2.6.6
Post-operative follow-up demonstrates good healing, well-hidden scars, and acceptable esthetic results.
- •
- v.
Pearls and Pitfalls:
- •
Design the flap with incisions placed at relaxed skin tension lines or natural creases at the borders of facial esthetic regions.
- •
The incision can be extended down to the neck, which is a useful reservoir of skin laxity that can be recruited.
- •
Anchor the flap to the periosteum to help support the flap and prevent malposition of the eyelid.
- •
- i.
- c.
Temporalis flap
- i.
Anatomy:
- •
The temporalis is a fan-shaped muscle that originates from the temporal fossa and fascia and inserts onto the coronoid process and anterior ramus of the mandible ( Fig. 2.6.7 ). It functions in elevating and retracting the mandible during mastication. It can be raised as a muscle, muscle and fascia, or a musculocutaneous flap. The dominant pedicles arise from the anterior and posterior deep temporal arteries, and the flap can be raised on either. It also has minor contributions from branches of the middle temporal artery.
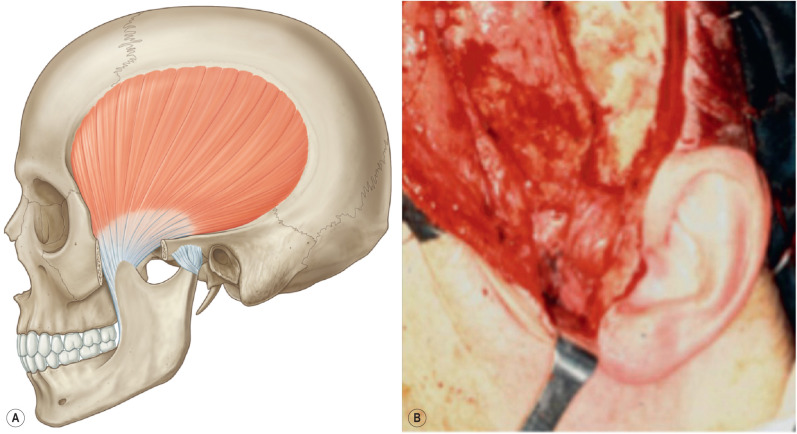
FIG. 2.6.7
(A) The temporalis is a fan-shaped muscle that originates from the temporal fossa and fascia and inserts onto the coronoid process and anterior ramus of the mandible. (B) The coronoid insertion can be released to allow supraorbital rim coverage.
- •
- ii.
Indications:
- •
Useful for coverage of upper facial defects such as at the orbit and ear, and the flap can also reach the palate and mandible. It can be used for facial reanimation.
- •
- iii.
Technique:
- •
Make a semicoronal incision that extends superiorly into the hairline. Incise through the temporal scalp and the superficial temporoparietal fascia (STF) down to the temporalis. Elevate the muscle anteriorly and posteriorly with a periosteal elevator, hugging the temporal fossa, and inferiorly to the level of the zygomatic arch. Care must be taken when dissection reaches the zygoma because the nerve and pedicle emerge on the deep surface of the muscle; avoid injury by maintaining close contact with the bone. If the pedicle length needs to be extended to reach the palate or mandible, the zygoma can be temporarily removed to increase the inferior arc of rotation. The arch can then be wired back in place after transposition. Transpose the flap anteromedially for orbit coverage or turned over on itself for palate and mandible coverage. Inset the flap and skin graft; then close the donor site primarily.
- •
If the flap is to be used for facial reanimation, include extension strips of the temporoparietal fascia and galea beyond the temporalis. Anchor these strips to the muscles of facial expression.
- •
The temporalis can also be raised in a reverse flow fashion based on the STF and superficial temporal vessels. This significantly extends the arc of rotation and can be utilized to obliterate frontal sinus defects and other anterior cranial defects. Using the aforementioned semicoronal incision, elevate the scalp flap. In the temporal area, take care to preserve the STF by dissecting in the subfollicular plane. Incise the pericranium 2 cm above the superior temporal line and elevate the temporalis muscle with the pericranium. Once at the zygoma, undermine the STF from the deep temporal fascia (DTF). Next, sever the temporalis and its DTF transversely along with the deep temporal branches. Separate and reflect the temporalis muscle with its DTF from STF to 1 cm short of the superior temporal line. Maintain the fascial connection between the temporalis and the STF along the broad origin of the muscle to preserve the flap vascularity. The pedicle can be skeletonized to further increase excursion. Inset the flap and remove the outer bone cortex along the pedicle to create a groove for the flap.
- •
- iv.
Post-Operative Care:
- •
Post-operative care is mainly avoiding pressure at the pedicle origin. The skin graft bolster can be removed in 5 to 7 days.
- •
- v.
Pearls and Pitfalls:
- •
The temporalis flap can be segmentalized based on the anterior or posterior blood supply.
- •
Preserve the temporal branch of facial nerve that runs close to the dissection at the zygomatic arch.
- •
A reverse flow temporalis flap can be utilized to cover cranial defects past the midline.
- •
- i.
- a.
- II.
CHEST
- a.
Pectoralis major
- i.
Anatomy:
- •
The pectoralis major is a fan-shaped muscle that originates from the medial clavicle, the sternum, the superior costal cartilages, and the external oblique aponeurosis. It inserts onto the bicipital groove of the humerus. It functions to adduct and medially rotate the arm. It can be raised as a muscle, musculocutaneous, or osseo-musculocutaneous flap. Its main blood supply comes from the thoracoacromial artery and the perforating branches of the internal mammary artery and intercostal arteries. It has a minor contribution from the lateral thoracic artery.
- •
- ii.
Indications:
- •
This versatile flap can be used for coverage of a multitude of defects, including in the head and neck, chest, sternum, mediastinum, axilla, and upper extremity. It is useful for reconstruction of the mandible, esophagus, and breast.
- •
- iii.
Technique:
- •
Position the patient supine with shoulders abducted 90 degrees and arms extended out. Mark out a line from the middle of the outer third of the clavicle to the xiphoid. The thoracoacromial pedicle runs along this line.
- •
For chest wall reconstruction, use the margin of the existing defect to raise the flap, typically a median sternotomy incision or wound ( Fig. 2.6.8 ). Coverage can be achieved either by a standard flap based off the thoracoacromial artery or a turnover (reverse) flap based off the segmental blood supply.
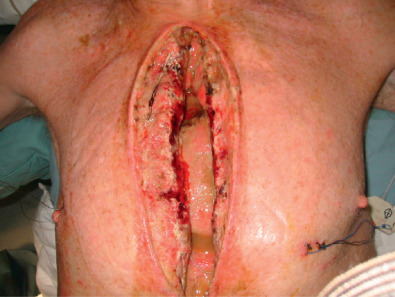
FIG. 2.6.8
Sternal wound defect.
- •
In the standard flap, elevate the overlying skin off the muscle to facilitate dissection, or raise en bloc with muscle to preserve perforators to the skin. Divide the attachments to the clavicle and sternum and mobilize the muscle off of the pectoralis minor from medial to lateral, taking advantage of the avascular plane between the muscles. The pedicle can be visualized on the undersurface of the muscle as you approach the lateral extent of the pectoralis minor. Divide the pectoralis major lateral to the pedicle. This release can also be done via a counter-incision at the anterior axillary fold. The flap is then rotated and advanced medially to cover the defect ( Fig. 2.6.9 ).
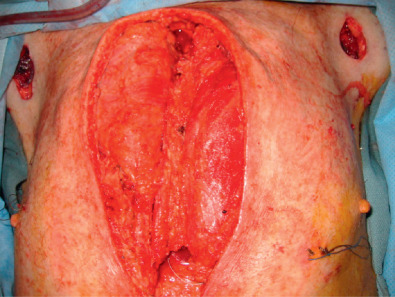
FIG. 2.6.9
After debridement and washout, bilateral pectoralis flaps have been raised to cover the defect. Note the counter-incision at the axillary fold for release of lateral attachments.
- •
For the turnover flap, make a separate incision at the lateral border of the muscle. The muscle needs to be dissected free of overlying skin and subcutaneous tissue. Elevate the flap off the clavicle and the underlying pectoralis minor from lateral to medial, stopping about 3 cm short of the sternal border where the segmental perforators lie. Divide the muscle at the junction of the medial two-thirds with the lateral one-third at the lateral border of the pectoralis minor, medial to the thoracoacromial vessels, which are ligated. Suture the remaining lateral third of the muscle to the pectoralis minor to preserve the anterior axillary fold. Preserve the segmental vessels as the pivot point and free the muscle from any remaining chest wall attachments. The flap is then folded medially into the defect. The muscle can be split in segments to provide more flexibility with flap inset. Inset the flap and close in layers over suction drains. If it is available, place an incisional wound VAC. If necessary, as in the case of a turnover flap, perform a skin graft on top of the muscle and secure with a bolster.
- •
For head and neck reconstruction, design a wide skin paddle in line with the thoracoacromial pedicle or just above the inframammary fold. The most reliable myocutaneous perforators lie within 3 to 4 cm of the midline. Incise and isolate the skin paddle by elevating skin flaps to expose the underlying muscle. Bevel out while incising down to muscle to include as many perforators as possible. Suture the paddle to the underlying muscle to prevent shearing of the perforators. Free the muscle from its attachments at the sternum, clavicle, ribs, and humerus and bluntly dissect free of the pectoralis minor and intercostal muscles. Visualize the pedicle on the deep surface of the muscle. Inset the flap into the defect. Close the donor site either primarily or with a skin graft ( Fig. 2.6.10 ).

FIG. 2.6.10
Post-operative follow-up.
- •
- iv.
Post-Operative Care:
- •
Avoid pressure to the flap pedicle and directly over the clavicle if the flap is tunneled for head and neck coverage. Be aware of any venous congestion or flap compromise due to kinking of the pedicle.
- •
- v.
Pearls and Pitfalls:
- •
The turnover flap cannot be used if the left internal mammary artery has been previously harvested for bypass.
- •
Bevel out the skin paddle for head and neck coverage to include as many myocutaneous perforators as possible.
- •
Be careful in elderly women with ptotic breasts. The skin paddle must be planned carefully because perforators may not lie directly below skin.
- •
Suture the skin paddle to the pectoralis muscle to prevent shearing.
- •
One can take a wide central strip of muscle instead of elevating the entire pectoralis muscle.
- •
- i.
- a.
- III.
ABDOMEN
- a.
Rectus abdominis
- i.
Anatomy:
- •
The rectus abdominis is a long, flat, vertically oriented muscle that originates from the pubic crest and pubic symphysis and inserts onto the costal cartilages of the fifth, sixth, and seventh ribs. It functions to flex the torso the first 30 degrees and tenses the abdominal wall. It can be raised as a muscle or musculocutaneous flap, superiorly or inferiorly based, with either a transverse or vertical skin paddle. The arterial blood supply to the rectus abdominis is co-dominantly supplied by the superior and inferior epigastric arteries. Venous outflow is achieved by means of the deep inferior and deep superior epigastric veins.
- •
- ii.
Indications:
- •
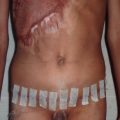
The rectus abdominis flap can be raised as a pedicled flap. It can be based off the superior epigastrics to cover the anterior and lateral thorax, abdomen, breast, and posterior trunk, or it can be based off the inferior epigastrics to cover and reconstruct the perineum, vagina, groin, and lower extremity.
- •
- iii.
Technique:
- •
Mark the appropriate skin paddle, oriented either vertically or transversely, to appropriately match the targeted defect ( Figs. 2.6.11 and 2.6.12 ). Position the patient supine on the operating table in a position that will accommodate flexing at the waist.
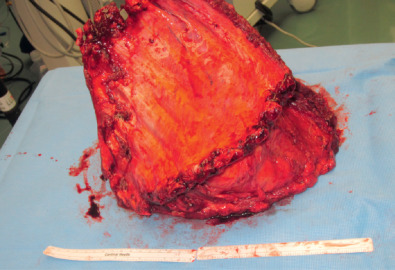
FIG. 2.6.11
Large chest wall specimen after oncological resection.

FIG. 2.6.12
Remaining chest wall defect.
- •
Make the superior incision of the skin paddle through skin and subcutaneous tissue down to rectus fascia. Extend the dissection superiorly, raising an adipocutaneous flap free from the rectus fascia, taking care not to extend undermining lateral to the rectus border. Make the inferior incision of the skin paddle down to rectus fascia and continue dissection from lateral to medial, taking care to identify perforating vessels extending through the rectus fascia.
- •
Undermine the rectus muscle from the posterior sheath and isolate it circumferentially. Ligate the deep inferior epigastric artery and vein. Continue to isolate the muscle from the fascial sheath, moving superiorly. The umbilicus is incised circumferentially and isolated on its stalk ( Fig. 2.6.13 ).

FIG. 2.6.13
Raising pedicled transverse rectus abdominis muscle flap.
- •
The flap is passed to its target and inset ( Fig. 2.6.14 ). The donor site is closed primarily, with drains placed subcutaneously ( Fig. 2.6.15 ). The umbilicus is reset by exteriorizing it through the superior abdominal skin flap.
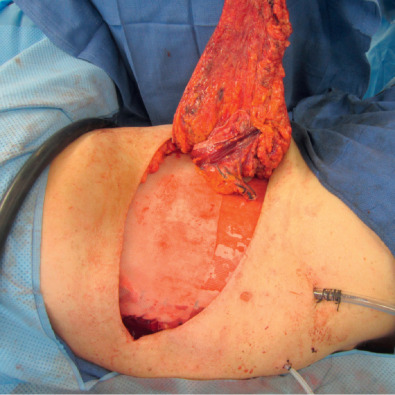
FIG. 2.6.14
Tunneling and insetting this myocutaneous flap into the chest wall deficit with mesh placed underneath.
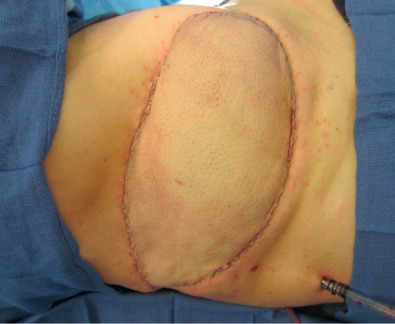
FIG. 2.6.15
Demonstration of good coverage of the defect with the flap.
- •
- iv.
Post-Operative Care:
- •
When the flap is raised as a myocutaneous flap, the patient should be kept in a semi-Fowler’s position to reduce tension on the donor incision. The patient should be advised to limit activity that places strain across the abdominal wall. Conservative restrictions are to limit lifting anything heavier than 5 pounds for a period of 1 month.
- •
- v.
Pearls and Pitfalls:
- •
Quilting sutures between the dermis and the rectus aponeurosis may reduce the incidence of seroma.
- •
Body contour is improved with plication of the rectus fascia.
- •
Take care to close both layers of the anterior rectus sheath below the arcuate line to reduce the incidence of post-operative hernia.
- •
- i.
- a.
- IV.
BACK
- a.
Trapezius
- i.
Anatomy:
- •
The trapezius is the most superficial muscle on the posterior neck and thorax. It is a large, flat, triangular-shaped muscle that attaches to the base of the skull, shoulder, and the spinous processes. It can be raised as a muscle or musculocutaneous flap. The trapezius is divided into three parts: the inferior, middle, and superior parts. The inferior part is attached to the spinous processes of the 6th to 12th thoracic vertebrae and inserts into the spine of the scapula. The middle part originates at the spinous processes of the 1st to 5th thoracic vertebrae and inserts into the acromion. These are the two parts of the trapezius commonly used for reconstruction. They are used to depress and retract the scapula. Preservation of the superior fibers will preserve the muscle’s important function of elevating the shoulder.
- •
The dominant pedicle, particularly for the middle part of the muscle, is the superficial branch of the transverse cervical artery (TCA), which is found at the anterior margin of the muscle in the posterior inferior neck. Minor pedicles supply the inferior part, which includes the dorsal scapular artery.
- •
- ii.
Indications:
- •
This versatile flap is used for coverage of the skull, head and neck, oral cavity, mandible, axilla, posterior trunk, and shoulder ( Fig. 2.6.16 ).

FIG. 2.6.16
Posterior scalp malignancy requiring extensive margins.
- •
- iii.
Technique:
- •
The skin island overlying the superior half of the back, ipsilateral neck, and lateral upper arm may be used with this flap. However, in many cases, only the muscle is raised and skin grafted.
- •
First, the patient is marked to outline the posterior midline and vertebral border of the scapula, which denote the medial and lateral borders, respectively. The TCA is located next to the brachial plexus in the inferior posterior neck.
- •
The following instructions are for the vertical flap ( Fig. 2.6.17 ). Incisions are made medially around the skin island between the posterior neck to the cephalad border of the skin island. The muscle is identified laterally, and the deep surface is separated from the chest wall and rhomboid muscle. The medial aspect is incised, and fibers of origin from the vertebral column to the level of the superior scapula are incised. Above the scapula, the muscle is divided from its origin on the vertebral column and laterally toward the acromioclavicular joint. If attachments are severed from the thoracic vertebrae to the C7–T1 process, the flap should have an adequate arc of rotation to the posterior skull, neck, and lateral lower third of the face ( Fig. 2.6.18 ). If superior fibers are released from the lateral clavicle, the flap may reach the upper, middle, and lower thirds of the face and temporal fossa. Direct donor site closure should leave minimal deformity.

FIG. 2.6.17
Raising the trapezius muscle flap.
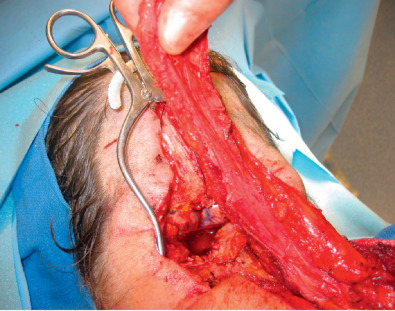
FIG. 2.6.18
Demonstrating arc of rotation of flap and its adequate reach for coverage.
- •
Inset of the flap may use the skin island externally for cutaneous defects or internally for mucosal coverage.
- •
- iv.
Post-Operative Care:
- •
Patients should be maintained in the prone position when the flap is used for posterior skull coverage. After flap inset to the anterior face, the head position should be monitored carefully to avoid kinking of the flap as it passes in the tunnel from the posterior trunk to the head and neck. Additionally, shoulder immobilization will help reduce tension on the donor site closure.
- •
- v.
Pearls and Pitfalls:
- •
Functional loss after flap harvest may include absence of tonic elevation of the shoulder girdle, superior adduction of the scapula, and initial upward rotation of the scapula in raising the arm if the superior trapezius muscle fibers in the lateral flap are completely lost, thereby disrupting innervation of the inferior muscle. Shoulder function is still adequate, however.
- •
History of a radical neck dissection should alert surgeons about possible loss of the TCA pedicle.
- •
Include the thoracolumbar fascia as an extension to facilitate anchoring and insetting.
- •
- i.
- b.
Latissimus dorsi
- i.
Anatomy:
- •
The latissimus is a large, broad V-shaped muscle of the posterior trunk. Superiorly, it is deep to the trapezius muscle, and the remainder is superficial to the muscles of the posterior trunk. Its origin is a broad aponeurosis medially that attaches to the lower six thoracic vertebrae, sacral vertebrae, supraspinal ligament, and posterior iliac crest. Its insertion converges to form the posterior fold of the axilla and inserts to the intertubercular groove of the humerus. The latissimus dorsi functions to adduct, extend, and rotate the humerus medially.
- •
This flap has one dominant pedicle from the thoracodorsal artery, which enters the deep surface of the muscle in the posterior axilla 10 cm inferior to the humeral insertion. Its segmental pedicles come from perforators that originate at the posterior intercostal artery laterally and lumbar artery medially.
- •
- ii.
Indications:
- •
This versatile flap can cover the head/neck area, thorax, upper extremity, spine, and abdomen. It is also used for reconstruction of the breast and abdominal wall.
- •
- iii.
Technique:
- •
Contraction of the latissimus allows marking at the posterior axillary line. The tip of the scapula is marked as well to form the superior edge, and the spinal column is used as the medial edge. In the operating room, the patient is placed in the lateral decubitus or prone position, usually with a beanbag or axillary roll ( Fig. 2.6.19 ). Incision is made from the posterior axilla extending inferiorly 5 to 10 cm postero-inferiorly toward the iliac crest. This will allow one to visualize the anterior surface of the muscle. The vascular pedicle is found in the fibrofatty tissue of the axilla. The flap is elevated to the medial aspect. In standard transposition, the flap extends to its origin on the vertebral column. After identification of the pedicle near the origin in the posterior axilla, the insertion is divided at the superior medial fibers off the trapezius muscle and the vertebral column. This is not routinely required for transposition to the head, neck, or anterior trunk. The muscle is elevated toward the axilla, and minor pedicles are identified and ligated. Commonly the muscle will need to be dissected off the teres major, which is deep to the latissimus in the posterior axilla as well. It is then transposed anteriorly to the chest wall for breast reconstruction and reconstruction of the middle and lower thirds of the face.
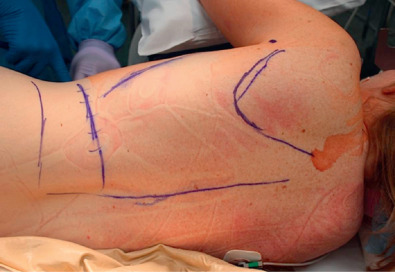
FIG. 2.6.19
Borders of latissimus muscle marked out and patient positioned lateral decubitus with beanbag.
- •
A segmental flap may be raised as well, in which case the lateral branch of the thoracodorsal artery is visualized after dividing muscle fibers in the inferior portion of the flap. Be careful to divide the muscle medial to this branch.
- •
A reverse flap may be used for defects of the posterior trunk. In this case the insertion is divided in the axilla immediately. After elevation, the thoracodorsal artery is found and divided. Segmental pedicles are located 4 to 6 cm from the midline after dissection toward the spinal column. Superior and inferior fibers of origin are divided, preserving perforators identified previously, usually 1 to 2 large vessels from the lower five intercostal arteries. The flap is transposed medially to cover posterior trunk defects.
- •
Skin islands can be made supero-posteriorly so that the muscle is above the skin island after transposition to the chest wall for breast reconstruction ( Fig. 2.6.20 ). Donor sites are closed primarily.
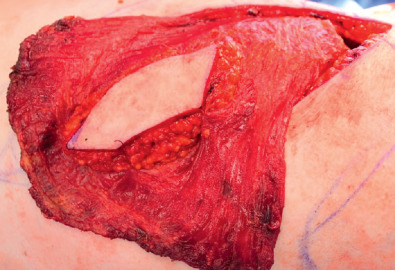
FIG. 2.6.20
Latissimus muscle flap raised with a skin paddle.
- •
- iv.
Post-Operative Care:
- •
Post-operative care is primarily flap monitoring, especially for venous congestion. Drains are left in the donor site; they can be removed 3 to 5 days post-operatively or when they have less than 50 mL of fluid in 24 hours. If skin grafts are used, they are dressed until post-operative day 5. After 10 days, the wound can usually be left without a dressing.
- •
- v.
Pearls and Pitfalls:
- •
The serratus branch to the latissimus should not be divided until the proximal thoracodorsal pedicle is identified, in case this main pedicle has been previously damaged.
- •
Take care to dissect from the superficial surface of the scapula and serratus; otherwise, the dissection may elevate the serratus as well. Dissect both superiorly and inferiorly to ensure the right plane.
- •
Be careful of putting too much tension on the dominant pedicle.
- •
Be wary of an irradiated axilla.
- •
Quilting sutures can reduce the incidence of seroma.
- •
- i.
- a.
- V.
UPPER EXTREMITY
- a.
Radial forearm
- i.
Anatomy:
- •
The radial forearm flap is a septocutaneous flap based on the radial artery and its venae comitantes. Septocutaneous perforators supply flow to the radial artery angiosome along an axis from the elbow flexion crease to the scaphoid tubercle. The radial forearm flap can be raised as a sensate flap when the lateral antebrachial cutaneous nerve and medial antebrachial cutaneous nerve are included.
- •
- ii.
Indications:
- •
The radial forearm flap is a widely applicable flap that is useful as both a pedicled and free flap. As a pedicled flap, it is typically designed as a proximally based thin flap for elbow or distal upper arm defects. The flap can also be designed as a distally based reverse flow flap for coverage of hand defects ( Fig. 2.6.21 ).

FIG. 2.6.21
(A) Degloving injury of the hand (B) outline of radial forearm flap (C) Elevation of flap, including palmaris longus tendon for extensor reconstruction (D) Tunneling of flap and inset onto dorsum of hand.
- •
- iii.
Technique:
- •
Mark the course of the radial artery by first identifying it by palpation distally and tracing proximally using Doppler ultrasound. Position the patient supine with the arm abducted to 90 degrees and supinated on a hand table with a tourniquet on the upper arm.
- •
Design a skin paddle along the radial artery axis slightly larger than the defect to be reconstructed. Incise the skin and subcutaneous tissue and continue dissection to the antebrachial fascia. Incise the fascia circumferentially with a 1.0- to 2.0-cm rim extending beyond the flap. It is prudent to now suture the dermis of the flap to the fascial rim to prevent shearing of the septocutaneous perforating vessels.
- •
Identify the radial artery between the brachioradialis and flexor carpi radialis muscle bellies. Continue the incision along the radial axis and isolate the vascular pedicle proximally to the length necessary to reach the defect. Ligate and divide the distal vessels distally and pass the flap through a subcutaneous tunnel for inset.
- •
- iv.
Post-Operative Care:
- •
Splint the hand in position of function, but make a window to allow exposure in the post-operative period to assess perfusion to the hand. Because the donor site is in a region of high mobility and often requires skin graft coverage, keep the area immobilized with a bolster dressing in place for 1 to 2 weeks.
- •
- v.
Pearls and Pitfalls:
- •
Perform an Allen test pre-operatively to ensure sufficient perfusion to the hand after radial artery ligation.
- •
Be aware that the ulnar artery may course more superficially than expected; proceed cautiously when ligating vessels.
- •
If concern for hand perfusion is warranted, reconstruct the radial artery with a vein graft.
- •
Keep the surgical site moist to prevent desiccation, especially in the donor site, where skin graft take can be compromised.
- •
Maintain upward traction of the flap during dissection to facilitate elevation of the pedicle from the underlying periosteum.
- •
- i.
- b.
Posterior interosseous
- i.
Anatomy:
- •
The posterior interosseous artery (PIA) flap is an adipocutaneous flap based on the PIA. It can be dissected in both anterograde and retrograde fashion. It is most frequently raised in the retrograde or “reverse” fashion, and is based on a distal communication between the PIA and the anterior interosseous artery (AIA). The PIA courses along a septum between the extensor digitorum quinti (EDQ) and the extensor carpi ulnaris (ECU). The pedicle length is approximately 15 cm, pivoting from a point approximately 2 cm proximal to the distal radioulnar joint (DRUJ). The venous drainage is facilitated by the venae comitantes.
- •
- ii.
Indications:
- •
The primary indication for the PIA flap is for coverage of dorsal hand defects. This flap has particular utility in the release of first web space contracture. When based in an anterograde fashion, the flap is useful for thin soft tissue coverage of elbow defects.
- •
- iii.
Technique:
- •
Mark the long axis of the flap from the lateral epicondyle to the DRUJ. Design a skin paddle along this axis to correlate with the wound dimensions, centered on a point approximately 6 cm distal to the lateral epicondyle. Mark a point approximately 2 cm proximal to the DRUJ that represents the pivoting point of the flap.
- •
Position the patient supine and with a tourniquet on the upper arm. Prep the arm circumferentially from the elbow distally. Rest the prepped arm in a pronated fashion on the patient’s draped chest to facilitate ulnar-sided dissection. Make an incision on the ulnar border and extend along the previously marked long axis to the pivoting point proximal to the DRUJ. Continue the dissection down to the ECU and incise the fascia to retract the muscle belly to the ulnar side. Next, identify the PIA along the septum between the ECU and the EDQ. Ligate muscle perforators running along the length of the PIA. Continue with dissection along the radial border of the flap down to the EDQ muscle and retract the muscle belly to the radial side.
- •
During dissection of the PIA, take care to preserve motor branches of the posterior interosseous nerve as they are visualized. Ligate the proximal origin of the PIA, and raise the PIA from the septum between the EDQ and ECU until the pivoting point is approximately 2 cm proximal to the DRUJ.
- •
Pass the flap through a subcutaneous tunnel to the defect, taking care to avoid tension on the pedicle. Inset the flap as desired for coverage of the defect. Close the long axis in layers and the donor site as able. Donor site defects greater than 4 cm often require split-thickness skin grafting for coverage.
- •
- iv.
Post-Operative Care:
- •
It is critical to avoid pressure and tension to the pedicle of the flap. The wrist should be held in extension with a splint for 3 weeks, at which point rehabilitation can proceed.
- •
- v.
Pearls and Pitfalls:
- •
Dissect from distal to proximal after identifying the PIA pedicle between the EDM and ECU.
- •
The flap may be delayed to enhance vascularity.
- •
- i.
- a.
- VI.
LOWER EXTREMITY
- a.
Gracilis
- i.
Anatomy:
- •
The gracilis muscle is superficial to the medial thigh between the adductor longus and sartorius anteriorly and semimembranosus posteriorly. It is broad at its origin at the pubic symphysis and narrows at its insertion at the medial tibial condyle. It functions as an expendable accessory thigh adductor.
- •
The main pedicle for this flap is the ascending branch of the medial circumflex artery located beneath the adductor longus. The superficial femoral artery gives off one or two minor pedicles.
- •
- ii.
Indications:
- •
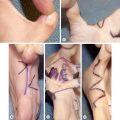
This flap is used for the reconstruction of male and female genitalia as well as anal musculature after, for example, an abdominal peroneal resection. It can also be used for coverage in the pubic area, groin, abdominal wall, and ischium ( Fig. 2.6.22 ). The posterior arc of the flap will cover the groin, genitalia, and lower abdomen, whereas the posterior will cover the thigh, perineum, lower abdomen, and buttocks.
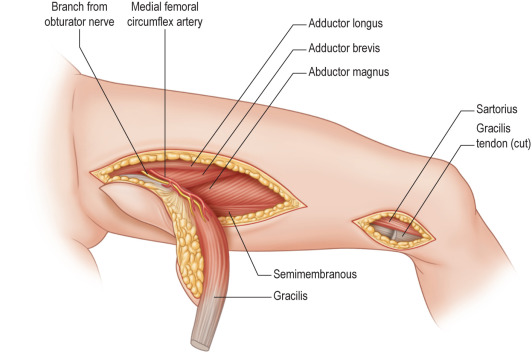
FIG. 2.6.22
Gracilis muscle flap elevation. Note dis-insertion of tendon at knee through a separate small incision.
- •
- iii.
Technique:
- •
Planning for the procedure involves drawing a line posteriorly connecting the pubic tubercle with the medial tibial condyle. Incise over the distal portion of the line and locate the gracilis between the longitudinal fibers of the sartorius anteriorly and the fascia of the semimembranosus posteriorly. The cutaneous territory may be vertical or horizontal and is based over the proximal 2/3 of muscle. Design the skin island 1/3 above the aforementioned line and 2/3 posterior to it. Typically the insertion of the muscle is divided with the attached skin island. The relationship of the skin island to the muscle is confirmed and altered if not correctly centered over the muscle. During mobilization, one or two minor pedicles may need to be divided and ligated. The main pedicle can be identified by retracting the adductor longus medially.
- •
Paired gracilis flaps may be used for reconstruction of the perineum or vagina, for example. In vaginal reconstruction, the musculocutaneous flaps form a vaginal vault, and the flaps are placed into the pelvic defect.
- •
- iv.
Post-Operative Care:
- •
There is no need for restriction of lower limb movement. Pressure is limited on the area of reconstruction (i.e., perineum, vagina).
- •
- v.
Pearls and Pitfalls:
- •
The key to successful elevation is accurate identification of the gracilis muscle near its insertion.
- •
Beware not to mistake distal sartorius muscle medially or semimembranous muscle laterally for the gracilis muscle.
- •
Avoid excessive traction on the dominant pedicle during transposition.
- •
- i.
- b.
Gastrocnemius
- i.
Anatomy:
- •
The gastrocnemius is the most superficial muscle located in the posterior compartment. It consists of two separate heads and extends between the knee and the heel. The distal soleus tendon unites with the gastrocnemius to form a common tendon of insertion to the Achilles. The muscle functions to plantar flex the foot. Of the two heads, the medial is larger. The absence of one head with an intact soleus does not change overall function. Perfusion is supplied by the medial and lateral sural branches of the popliteal artery. The main pedicle enters on the deep surface.
- •
- ii.
Indications:
- •
This flap may be used as a muscle or musculocutaneous flap that covers open wounds in the proximal or, in some cases, middle 1/3 of the tibia, the knee ( Fig. 2.6.23 ), and the distal thigh. Coverage of the middle 1/3 of the tibia (medial head) and distal thigh (lateral head) is contingent upon perforators between the heads that cross the midline raphe.
- •
- i.
- a.