Key points
- •
Clinical photography provides a useful adjunct to laser and light therapies; establishing pre-treatment baselines and documenting progress over time.
- •
Photography enhances patient communications, and can aid in the development of realistic, mutually agreed upon expectations.
- •
Consistency in the imaging process is critical to ensure meaningful serial photographs.
- •
Lighting is the single most important factor in producing medically significant surface images.
- •
Medical photography can also have important business, educational and legal applications.
Clinical photography overview
How your patients see themselves is an important consideration in why they came to you, and how they will evaluate the quality of your care. Unless you provide a better alternative, they can trust only a mirror and their memory to judge the success or failure of your treatments. This is where clinical photography becomes an indispensable adjunct to laser or light-based therapies.
Why do we need a chapter on photography in a book on laser treatments? Because photography is so common and accessible, it’s easy to believe that all we need is a reasonable quality digital camera to produce acceptable clinical results. And while that is sometimes the case, it would be a mistake to assume that a medical photograph is just another kind of snapshot. In this chapter, we will examine the unique requirements, and define the key success factors, of high quality clinical photography. All of these derive directly from the intended purpose of the picture. Regardless of the treatment type, there are always three fundamental purposes for clinical photography:
- •
Establishing the pre-treatment baseline. If you are looking at the patient, and the patient is looking at you (or perhaps, at a mirror), it can be difficult to share a common visualization of the patient’s condition. This can make clear communication, and consultation, difficult. It would be better if a carefully posed and skillfully lit picture could be brought up on a computer monitor or video display. Now you have the opportunity to point out specific details and features, understand the patient’s concerns, and help establish realistic expectations for the procedure.
- •
Documenting treatment progress and results. Both the patient and the practitioner ought to be interested in an objective evaluation of results. For the patient, it’s important to see that their time and money are producing real results, and this can be elusive when they need to evaluate their appearance at different points in time. Practitioners have an even more daunting task: to compare the results of different treatment techniques, on different patient types, over an even wider span of time. Without good quality photography, these objectives could be difficult or impossible to achieve.
- •
Building and protecting your business. A solid portfolio of photography demonstrating your abilities will find numerous uses. If you choose to publish, or deliver professional presentations, photography is indispensible. In a more pragmatic sense, convincing clinical photography can be used to develop marketing and promotional materials, or simply arranged in a binder to show prospective patients. And do not rule out the possibility that one day you may need to defend yourself from a patient’s accusations. Whether they will not pay their bill, or want to see you in court, a photographic record could be your best protection.
Installing a photographic system
When you plan on adding photographic capability to your practice, there are a number of factors you should consider. This will help you select the equipment and facilities needed and develop an understanding of the scale of the project. If you already have photographic capability, the same factors apply to expanding or upgrading your installation.
Location
An important first decision is the physical location where your photography will take place. Try to find a location away from outside windows so that outside lighting will not influence the color or brightness of your subject. Likewise, you should have complete control over the ambient lighting inside the room. In some cases, you may want to turn off the normal room lights during photography: particularly overhead fluorescents which can cause unnatural color rendition in the photograph.
While space is always a factor, try to avoid the situation where your photography setup needs to be dismantled when not in use. A key element of quality clinical photography is consistency, and this will be difficult to maintain if the physical configuration of your equipment keeps changing. For most uses, a modest amount of space is adequate. Even a full body photography studio can be installed in about 40 square feet of floor space. If available, an 8 × 10 room makes an ideal studio for almost any purpose.
Lighting systems
Convenient as it is, the camera’s built in flash is seldom a good light source for clinical photography. The importance of correct lighting cannot be over stressed; it can make the difference between an excellent photograph, and one that is worthless. In the following sections, various types of lighting are discussed, the choice of which will be determined by the anatomical area, and feature type, that you need to photograph.
- •
Camera mounted flash systems. Particularly useful for close-up photography, a variety of twin-light and ring-light flash units are available from the major camera manufacturers and third party suppliers. The ring-light configuration is most suitable for intra-oral applications, while the point flashes provide better illumination for skin surfaces and texture. The Canfield TwinFlash ™ (Canfield Imaging Systems, Fairfield, NJ) integrates with the through the lens (ttl) metering system of suitable cameras.
- •
Studio lighting systems. Whenever space permits, external studio lighting offers the best solution. These lights can be positioned exactly as needed, and offer variable power settings for complete control over the lighting situation. For a simpler, yet effective solution consider an integrated studio lighting system, such as the Canfield IntelliStudio ™ combining lighting and camera positioning in a single movable device. Systems such as this produce excellent clinical photographs, and when used with indexed distance mats, or ranging lights, and patient posing mats, allow highly repeatable serial imaging ( Figure 14.1 ).
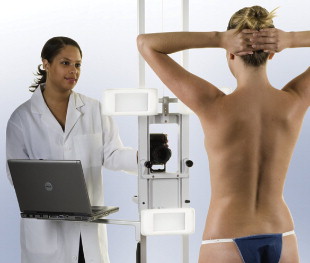
Figure 14.1
An integrated studio combining camera and lighting in a single mobile system.
- •
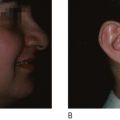
Special purpose systems. For certain skin features, special purpose lighting systems are available. Ultraviolet (UV) systems are useful for imaging subsurface pigmentation (melanin) or features such as porphyrins which fluoresce under this type of illumination. Digital cameras are largely insensitive to the UV illumination itself, but the visible fluorescence of collagen and the UV absorption of melanin enable the camera to image pigment clusters, lesions and the like. Another type of special purpose system works by positioning cross-polarized filters over the light source and camera lens respectively. This virtually eliminates surface reflections, and therefore texture, from the skin, allowing a clearer rendering of subsurface detail ( Figure 14.2 ).
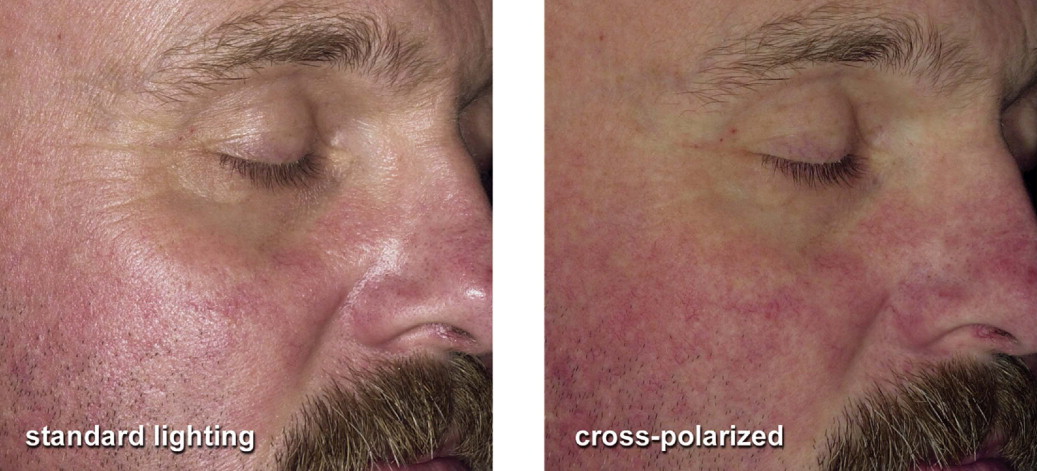
Figure 14.2
Cross polarized lighting, right, eliminates surface reflections and reveals subsurface detail.
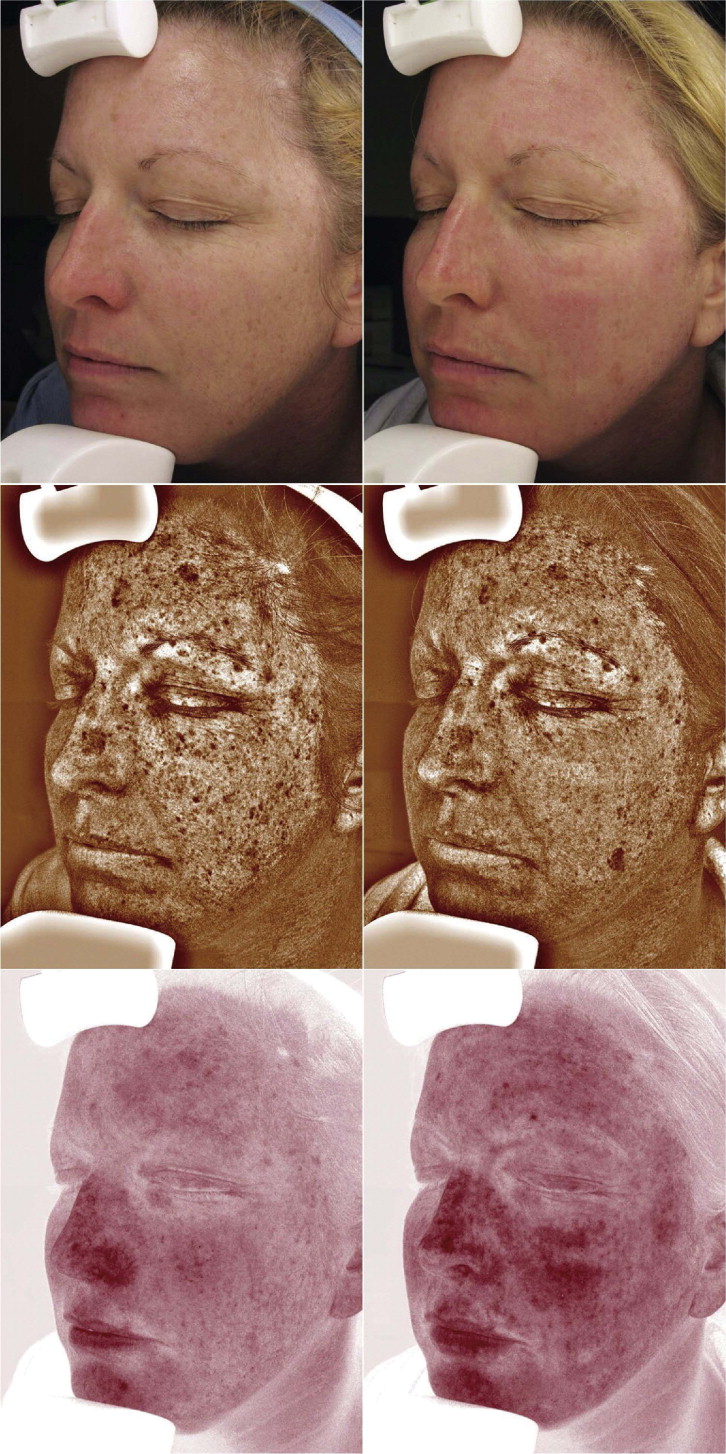
The choice of lighting systems may be dictated by the intended purpose of the photography. For example, certain types of image analysis applications, such as Canfield’s RBX™ technology, start with a cross-polarized image. Software post processing is then used to identify the color signatures which correlate with specific chromophores, such as melanin and hemoglobin, and then generate a visual representation of the associated features, i.e., pigmentation and vascularity. This is particularly useful in guiding and monitoring laser or light based treatment of these features ( Figure 14.3 ).
Posing systems
Together with lighting; patient posing, or positioning, is one of the key elements of success in clinical photography. There is some danger though, because it seems so intuitive. While, we are all accustomed to framing the subject in the camera’s viewfinder, and pressing the shutter, there are two pitfalls in this approach when applied to clinical photography. The first is that the pose itself influences the appearance of the feature being photographed. An obvious example would be facial wrinkles or skin laxity. The severity of these features can change dramatically with the position of the patient’s head and neck, as well as the facial expression. Similar effects can be seen in most parts of the anatomy. There may be situations where you choose to induce a ‘stressed’ position, to accentuate a feature, but that should be a clinical decision based on the results you expect from your procedures. For the most part, a more natural position would be desirable, as that more closely represents the typical appearance of your patient.
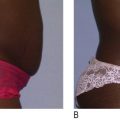
Second, you may need to critically align pre- and post-treatment photographs. For many procedures the visual improvement can be lost (or worse) if there is a mis-match in positioning of the before and after pictures. This is particularly important for those treatments in which the change to physical appearance is subtle. Positioning tools and other techniques for ensuring repeatability are discussed further on. While not strictly a positioning issue, you also need to be mindful of the background that will appear in your photographs. The short answer is that it must be plain and simple. Distracting backgrounds not only look bad; they can have a negative effect on the clarity of your clinical image. In procedures such as body contouring, it is particularly imperative that the boundary between the patient and the background be as distinct as possible. The background of choice is a medium blue felt material, as this provides a pleasing contrast with skin tones and resists wrinkling. Another excellent choice is to cover a back wall with flat, medium blue paint.
Camera selection
The most basic decision in selecting a camera is whether to go with a single lens reflex (SLR) or a point and shoot (PAS). The fundamental difference between these two types is in how they view the subject ( Table 14.1 ). With an SLR, you peer into a viewfinder, and a system of prisms and mirrors enables you to see the subject directly through the camera’s lens. When you press the shutter, a mirror inside the camera flips up and out of the way, allowing the digital sensor to record the scene through the same lens. This system enables a key advantage of SLRs: interchangeable lenses. You can choose from fixed focal length or zoom lenses, and if close-ups are required, a lens with macro photography capabilities.
Related posts:
 CO 2laser applications: new fractional and traditional CO 2laser resurfacing and CO 2laser blepharoplasty
 Aging skin: intrinsic aging and chronic photoaging
 Laser hair removal
 Advances in light-emitting diodes (LED) technology and therapy
 Low level laser therapy in hair loss
 Non-invasive body contouring
Stay updated, free articles. Join our Telegram channel

Full access? Get Clinical Tree


