CHAPTER 2 Clinical Anatomy
The preaponeurotic fat and the orbital septum
Anatomy of the paranasal sinuses
Innervation to the periocular area
The arterial supply to the orbit and periocular tissues
The venous drainage of the orbit and periocular tissues
Introduction
Expertise in oculoplastic and orbital surgery starts with anatomy. Learning anatomy can be very difficult. Remembering it is even harder. It’s easy to get bogged down in the details without knowing why a particular anatomic feature is important in order to take care of your patients. One way to help learn anatomy is to always understand how the anatomy makes the normal tissues function (e.g., a certain amount of horizontal tension or “tightness” is required to hold the normal lower eyelid up against the eyeball). Then make the step to understand how an anatomic and functional abnormality may be related to a clinical problem (with age, the canthal tendons lengthen, which causes the normal lower eyelid tension to be lost, allowing eversion, or ectropion, of the lower eyelid). It is not difficult to move to the final step—understanding how to repair the anatomic abnormality and restore the function (tightening the lower eyelid, by removing some of the redundant tendon, shortens the lax lower eyelid to correct the ectropion). These clinical anatomic correlations are not just useful teaching tools—they are the basis for most reconstructive procedures. Your real understanding of anatomy comes when you start to apply what you have read to the case that you are doing next. This is one of the thrilling parts of operating (Box 2-1).
Box 2-1 Steps to Learning Clinical Anatomy
• Understand how the anatomy makes the normal tissues function
• Understand how an anatomic and functional abnormality is related to a clinical problem
• Understand how to repair the anatomic abnormality and restore the function
• Your real understanding comes when you apply what you have learned in books to the operation you are doing
Throughout this chapter and in the remainder of the book, we will apply the anatomy to the clinical problem and vice versa. Periocular and orbital anatomy is very complex. Understanding of anatomy comes at many levels, some of which cannot be achieved without seeing the anatomy in the “living flesh” and actually performing the surgery. In this chapter, get the big picture. Understand the principles. There is a tremendous amount of information in this chapter. If you are a beginner and unfamiliar with periocular anatomy and clinical oculoplastic surgery, you may be overwhelmed. If you have a working knowledge in this area, you may think this chapter is basic. In subsequent chapters, the anatomy pertinent to the clinical problem or procedure being discussed will be presented again, so don’t worry about learning it all the first time through. This repetition may be unnecessary for some of you, but most of us can use it when it comes to remembering anatomy. I expect that, by the time you finish this book, this material will seem very easy to you. Remember, it is the application of the anatomy to the clinical problem that will make you a successful reconstructive surgeon. A photographic memory would be of help in learning anatomy, but that alone is not enough to get the job done for your patients.
Periocular anatomy
Skin creases and folds
Several lines on the skin serve to anatomically define the periocular and facial anatomy. The upper eyelid skin crease separates the upper eyelid skin fold from the flat pretarsal component of the upper eyelid (Figure 2-1). In your study of oculoplastic surgery, you will see that the upper eyelid crease is an anatomic landmark that is commonly referred to in oculoplastic surgery. Incisions hidden in this crease for upper eyelid ptosis repair or blepharoplasty and other procedures are among the most common incisions that you will use in oculoplastic surgery.
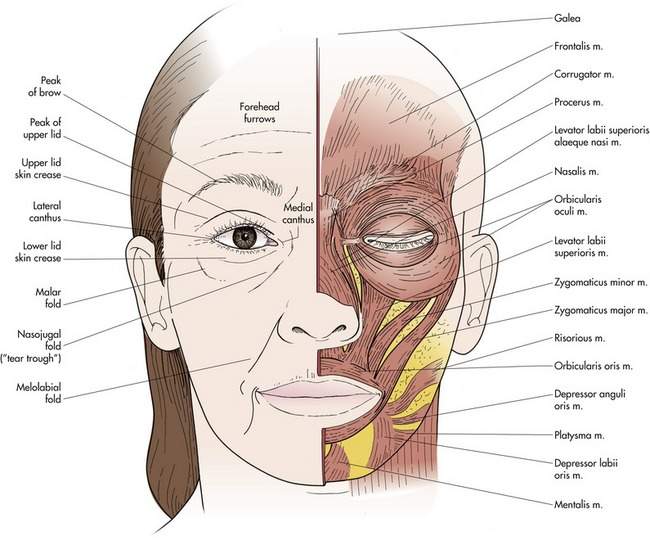
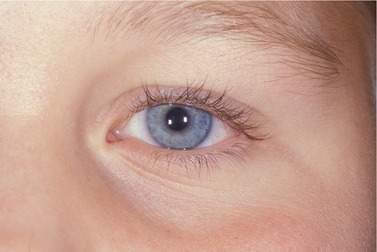
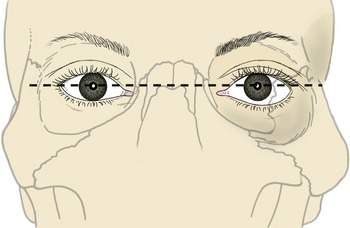
The eyelid skin above and below the crease is the thinnest in the body. The skin must be thin to allow for the spontaneous quick blinking movements of the eyelids. A lower eyelid crease is common in children (Figure 2-2), but is usually not visible in adults. The eyelid skin becomes thicker as you move further away from the eyelid margins toward the brow and cheek. The nasojugal and malar folds separate the thin lower eyelid skin from the thicker skin of the cheek. In younger patients, the inferior orbital rim contour is not visible or easily palpable. With age, the malar fat pad (sometimes called the suborbicularis oculi fat or SOOF) descends, and the rim becomes more noticeable, both visually and by palpation (compare some of your 20-year-old patients with your 50-year-old patients in this regard). The melolabial fold extends inferolaterally from the ala of the nose to the corner of the mouth. Subtle facial asymmetry resulting from paralysis of the facial nerve is often evident in the melolabial fold where the fold is softer or absent.
Skin creases (rhytids or wrinkles) form as a result of the movement of the underlying muscles of facial expression. The most familiar of these creases are the “crow’s feet” arising at the lateral canthus caused by contraction of the orbicularis muscle. The direction of these wrinkles can be predicted by recognizing that they always form perpendicular to the underlying muscle fibers (Figures 2-3 and 2-16). This explains the radial orientation of the crow’s feet lines to the circular orientation of the orbicularis muscle. Other prominent creases caused by underlying muscle contraction that you will see include the horizontal forehead furrows and the vertical and horizontal lines of the glabella. These lines suggest redundancy in the tissue perpendicular to the lines. That redundancy represents lax tissue that is “tightened” to reverse aging changes. The same redundancy is what you are looking for when you are trying to close a tissue defect after excision of a facial skin cancer. You will also learn to hide incisions in these creases so that the resulting scar is not easily seen.

The eyebrows
The brows, technically a part of the scalp, are divided into three anatomic parts:
The orientation of the brow hairs varies in each part of the brow. The brow hairs in the head of the brow tend to be vertical. As you move toward the tail of the brow, you will notice that the hairs tend to lie flatter or slightly downward. It has been suggested that incisions made within the brow hairs should be oriented parallel to the shafts of the hairs to minimize the number of follicles damaged. This seems reasonable, but makes closure of the wound more difficult.
The eyebrows are an important feature of an individual’s facial appearance and are primary indicators of facial expression and mood. Look at Figure 2-3. Many texts include variations of this “happy face” eyebrow model. Look at your friends’ brows carefully and you will be impressed by how the slope, shape, and position of the eyebrows give you an immediate impression of mood. You will be impressed to see that lifting a drooping tail of the brow will make a melancholic-appearing patient look happier. We will see this later in Chapter 6.
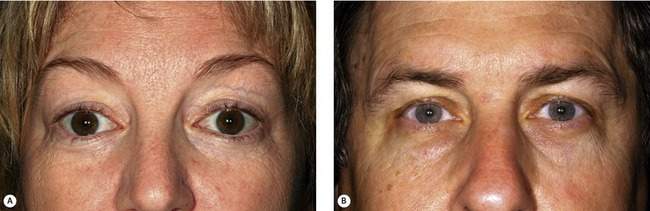
The male and female brows differ in shape and position (Figure 2-4). The normal male brow is flat and full in contrast to the thinner and more arched female brow. The superior margin of brow hairs is “feathered” in men and smooth in women. The male brow sits squarely at the superior orbital rim. The female brow is typically arched, with the highest point being above the lateral canthus or slightly more medial. The position of the female brow is well above the rim, especially temporally, where the superior lateral part of the bony rim contour is visible and easily palpable. The male rim is generally more prominent than the female rim because of a larger frontal sinus. The male brow tends to encroach upon the otherwise hairless glabella between the brows.
The eyelids
The lateral canthus is usually slightly higher than the medial canthus, although the slope of the eyelid fissures can vary widely among individuals (see Figure 2-1). The upper lid contour is more arched than that of the lower lid. The peak of the upper lid is just nasal to the pupil. The lowest point of the lower eyelid is below the lateral limbus. The normal contour of the eyelid must be recreated in a variety of procedures, including ptosis repair and reconstruction of the lateral canthal angle.
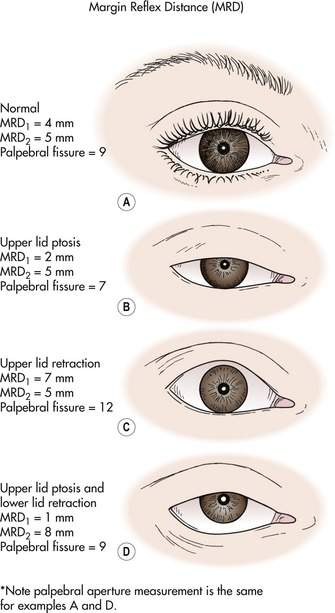
The horizontal length of the eyelids is 30 mm. The distance between the upper and lower eyelids, the palpebral aperture or fissure, is about 10 mm. A useful way to measure the position of the upper and lower eyelids is the margin reflex distance. This distance is the number of millimeters from the corneal light reflex to the lid margin. The upper lid margin reflex distance (MRD1) usually measures 4–5 mm. That means that the upper lid margin rests slightly below the limbus. The lower lid rests at the lower limbus, making the lower lid margin reflex distance (MRD2) 5 mm (Figure 2-5). These distances can be measured with a ruler or estimated. When you estimate the distance, keep in mind that midway between the corneal light reflex and the limbus is 2.5 mm. The eyelid aperture measurements, especially the MRD, are an essential part of the eyelid examination, one of the eyelid vital signs. A drooping upper eyelid is known as ptosis or blepharoptosis. An upper eyelid resting above the upper limbus or a lower eyelid resting below the lower limbus is said to have lid retraction. The white between the limbus and the lid is known as scleral show.
The orbital bones
The orbital rim
The bones of the orbital rim
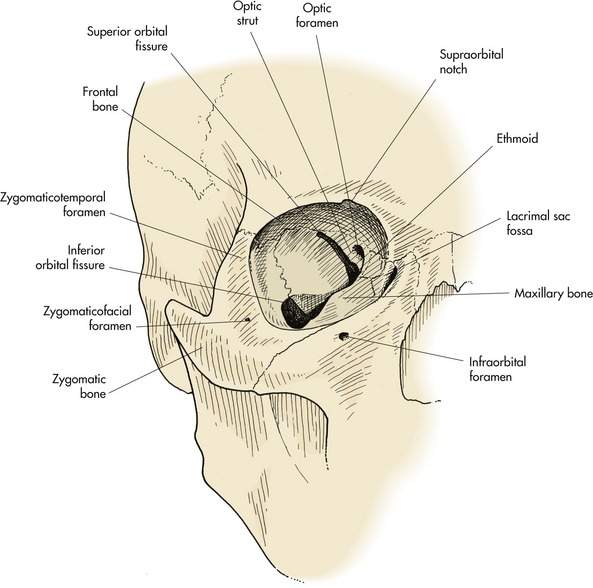
The orbital rim provides protection for the eye without compromising visual field. The rim is made of thick strong bones, especially the superior and lateral rims where protection from injury is needed most. The superior orbital rim protects the eye from blows from above as well as sunlight (you will rarely see skin cancers on the upper eyelid). The lateral orbital rim curves posteriorly so that there is good peripheral vision at the sides. The inferior rim is posterior enough so that the inferior visual field is not blocked for close work and reading. The orbital rim is made of three bones, the frontal, the zygomatic, and the maxillary (Figure 2-6).
Tripod fracture
Rarely do the bones of the superior and lateral rims themselves break. More commonly, the suture lines between the bones separate. The most common facial fracture is a zygomaticomalar complex fracture (ZMC fracture) (Figure 2-7). In this fracture, the zygoma is separated from the other orbital bones at the sutures connecting the zygoma to the rim. Fracture or separation occurs superiorly at the frontozygomatic suture and inferiorly at the zygomaticomaxillary suture. A fracture also occurs along the zygomatic arch posteriorly at the suture line between the temporal bone and zygoma. Because three suture lines are fractured, this type of fracture is also known as a tripod fracture. The bones of the medial and inferior rims are not as strong as the superior and lateral rims. Injury to the medial and inferior rims may cause the bones to fracture in many pieces, a comminuted fracture.
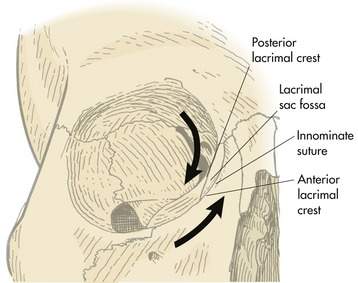
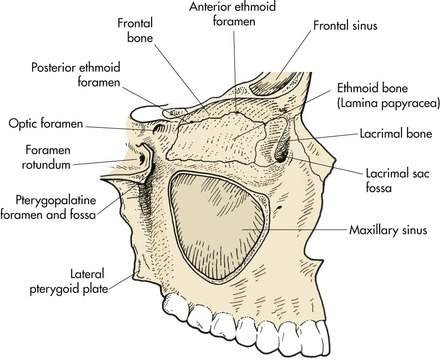
The orbital rims provide the sites for attachment of the medial and lateral canthal tendons. Look at a skull or Figure 2-8. Follow the inferior and superior rims as they form the medial orbital rim. You will notice that the paths of the rims diverge. The superior rim moves posteriorly to form the posterior lacrimal crest. The inferior rim moves anteriorly to form the anterior lacrimal crest. The fossa between the two crests is the lacrimal sac fossa where the lacrimal sac sits. The medial canthal tendon splits into two limbs, the anterior and posterior limbs, which attach to the lacrimal crests, respectively, surrounding the lacrimal sac (Box 2-2).
The orbital walls
Boundaries of the walls
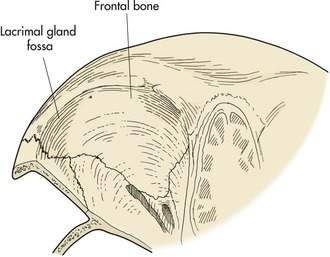
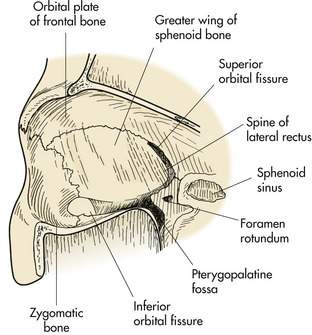
There are four orbital walls. The walls angle posteriorly to form a conical or pyramidal orbit. The orbital roof is concave in contour and forms the floor of the anterior cranial fossa. The concavity of the orbital roof is particularly steep laterally and anteriorly where the lacrimal gland sits in the lacrimal gland fossa. The orbital roof is separated from the lateral orbital wall by the superior orbital fissure (Figure 2-9; see also Figure 2-7). The lateral orbital wall (Figure 2-10; see also Figure 2-6) is relatively flat on the orbital side, but curved on its exterior surface to accommodate the temporalis muscle. The inferior orbital fissure separates the lateral wall from the orbital floor (Figure 2-11). The orbital floor is the roof of the maxillary sinus. The orbital floor slopes upward posteriorly to the apex and medially toward the medial orbital wall. The medial orbital wall is the lateral wall of the ethmoid sinus. Notice that both the medial wall and the floor are normally convex. The anatomic separation of the medial wall and orbital roof is the suture line separating the ethmoid bone and the frontal bone (the frontoethmoid suture) (Figure 2-12). This suture line is easy to see because the anterior and posterior ethmoid arteries and nerves travel through the foramina in the suture line.
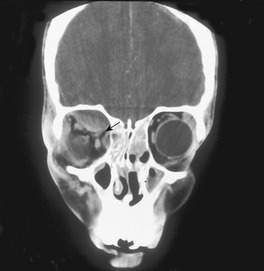
Blowout fracture
In contrast to the thick orbital rims, the orbital floor and medial wall are extremely thin. The medial wall of the orbit is made of mainly the lamina papyracea, or paper plate of the ethmoid bone, so called for the distinctively thin wall. The infraorbital nerve separates the orbital floor into a thin medial portion and a thicker lateral portion. The thin bone of the orbital floor and the medial wall is commonly fractured in trauma. The most common type of orbital fracture seen in ophthalmology is a blowout fracture. This fracture, by definition, does not involve the orbital rim. The classic blowout fracture is caused by a blow to the orbit with an object larger than the orbital diameter such as a ball or fist. The rims are not fractured, but pressure placed on the orbital contents causes the thin floor or medial wall to “blow out.” Orbital tissue may become incarcerated into the fracture site, causing diplopia as a result of tethering (restriction) of the eye. Fracturing the walls into the adjacent sinus causes the size of the bony orbit to expand, which may lead to enophthalmos (remember the floor and medial wall are normally convex, bowing into the orbit). Injury to the infraorbital nerve usually accompanies a blowout fracture, causing characteristic numbness of the cheek and upper teeth. We will discuss blowout fractures in more detail in Chapter 13.
The bones of the orbital walls
| Roof | Frontal bone |
| Lateral wall | Zygoma anteriorly |
| Sphenoid wing posteriorly (the greater wing) | |
| Floor | Maxilla |
| Medial wall | Ethmoid bone |
| Lacrimal bone (in the lacrimal fossa) | |
| Palatine bone (deep in the apex) |
Fissures, foramina, grooves, and canals
There are several openings into and out of the orbit (Table 2-1). I like to think about what these openings are for. What spaces do the openings connect? Once you know what spaces are connected, it’s easier to remember what goes through the openings. The most obvious of these are the superior and inferior orbital fissures. These fissures form a V on the lateral side of each orbit. As we said, the superior orbital fissure separates the roof from the lateral wall, and the inferior orbital fissure separates the floor from the lateral orbital wall. See if you can visualize this (if you can’t, look at Figure 2-6). Because the superior orbital fissure connects the orbit to the brain, it must carry cranial nerves to the orbit (cranial nerves III, IV, and VI). The inferior orbital fissure connects the orbit to the infratemporal fossa and the pterygopalatine fossa (“behind and around the maxillary sinus”—posterior and lateral to the maxillary sinus).
Table 2-1 Fissures, foramina, grooves, and canals
| Opening | From orbit to | Contains |
|---|---|---|
| Superior orbital fissure | Cavernous sinus | Cranial nerves III, IV, and VI Superior ophthalmic vein |
| Inferior orbital fissure | Pterygopalatine fossa | Inferior ophthalmic vein |
| Foramen rotundum | Brain | Maxillary nerve (V2) |
| Optic canal | Chiasm | Optic nerve (cranial nerve II) |
| Anterior ethmoidal foramen | Sinus mucosa | Anterior ethmoidal artery, vein, and nerve |
| Posterior ethmoidal foramen | Sinus mucosa | Posterior ethmoidal artery, vein, and nerve |
| Zygomaticotemporal foramen | Superior lateral orbital rim tissues | Nerve, artery, and vein |
| Zygomaticofacial foramen | Inferior lateral orbital rim tissues | Nerve, artery, and vein |
| Bony nasolacrimal duct | Inferior meatus of nose | Membranous nasolacrimal duct |
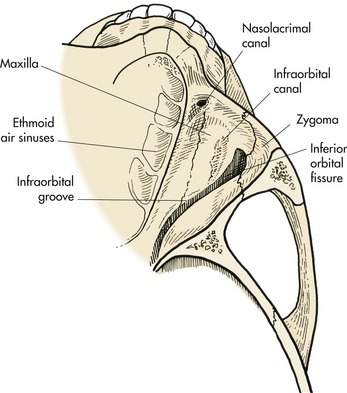
At the apex of the V formed by the superior and inferior orbital fissures is the infraorbital groove (Figure 2-11). As the groove extends anteriorly along the orbital floor, it gets a bony covering and is known as the infraorbital canal. The canal leaves the orbit at the infraorbital foramen. As you would assume, the infraorbital nerve travels in the infraorbital groove and through the infraorbital canal. The infraorbital nerve is the major sensory nerve of the second division of the trigeminal nerve. Go back to the apex of the V. Follow the infraorbital groove posteriorly and you will be in the pterygopalatine fossa. This fossa, as mentioned earlier, is the space posterior to the maxillary sinus and anterior to the skull base (the bottom of the cranial vault). The trigeminal nerve leaves the cranium through the foramen rotundum, entering the pterygopalatine fossa. The trigeminal nerve then crosses the fossa and enters the orbit via the posterior portion of the inferior orbital fissure, the infraorbital groove.
Let’s talk about the other important opening out of the orbit into the cranium, the optic canal. The optic nerve leaves the orbit via the optic canal to enter the cranial vault. Look at Figure 2-6 or at a skull. The optic canal is the most posterior landmark in orbit. The length of the optic canal is 10 mm. Medially, the posterior ethmoid foramen is 4–7 mm anterior to the optic canal, an important surgical landmark when operating deeply along the posterior orbital wall (see Figure 2-12). Laterally, the optic canal is separated from the superior orbital fissure by a small piece of bone, the optic strut. If you follow the optic strut posteriorly and superiorly, it becomes the anterior clinoid process. Although not important for you now, if you approach the optic canal from an intracranial exposure with your neurosurgical colleagues, knowledge of this relationship may help you. (Next time you pick up a skull, look at how the optic strut extends to form the anterior clinoid process. It will help you learn some of this complicated anatomy.) When you look at a computed tomography (CT) scan, the thin piece of bone separating the optic canal from the superior orbital fissure is the optic strut. Earlier, we said that the posterior portion of the lateral orbital wall was made up of the greater wing of the sphenoid bone (Figure 2-13). The optic strut and the optic canal are a part of the lesser wing of the sphenoid bone. The sphenoid bone forms a large part of the skull base and posterior orbit. Its shape is complicated. For now, just remember that the greater wing lies lateral to the superior orbital fissure and the lesser wing lies medial to the superior orbital fissure.
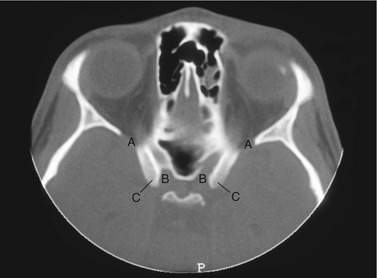
Look at the CT scans shown in Figure 2-13. It is easy to recognize the superior orbital fissure because it opens into the intracranial space. Similarly, it is easy to recognize the inferior orbital fissure because it opens into the space posterior to the maxillary sinus (the pterygopalatine fossa) and into the infratemporal fossa laterally. The inferior orbital fissure does not open into the brain. The optic canal is adjacent to the anterior clinoid processes (seen on the same CT cut). The optic canal also opens into the intracranial space.
The zygomaticotemporal and zygomaticofacial foramina transmit the arteries, veins, and nerves of the same name. The nerves are sensory branches of the trigeminal nerve (V2). The arteries are small branches that originate off the lacrimal artery (a main branch of the ophthalmic artery, which arises directly off the internal carotid artery). You will see these foramina when you lift the periorbita off the lateral wall. Cauterization is appropriate before you cut the arteries. If the artery retracts into the foramen, bleeding can be stopped by packing the foramen with a bit of bone wax. Cutting these nerves during a lateral orbitotomy results in some hypesthesia of the surrounding area that is minimal because of collateral innervation. Note that the overlap of these vessels and nerves with adjacent vessels and nerves of differing origin is typical of the collateral innervation and vascularization of the facial area. Infraorbital arterial branches (from the internal maxillary artery) medially and inferiorly overlap with the branches of the ophthalmic artery above. Anastomoses of the zygomaticotemporal nerve (from V2) with the lacrimal nerve (from V1) provide sensory overlap. This overlap of blood and nerve supply helps to preserve function after accidental trauma. Incisions can be made and flaps formed with relatively low risk of ischemia or sensory loss.
The periorbita
The bones of the orbit are covered with periosteum like all the other bones of body. The periosteum covering the inside of the orbit is known as the periorbita. The periorbita is tightly adherent to the bone at the orbital suture lines and along the orbital rims. Over the orbital walls, the periorbita is loosely adherent. You will see these differing degrees of adhesion when pus or blood accumulates under the periorbita as a result of infection or trauma. The periorbita is elevated off the orbital walls in a characteristic dome-shaped elevation ending at suture lines where the periorbita is adherent (Figure 2-14). The orbital septum is an extension of fibrous tissue continuous with the periosteum, extending from the orbital rim to lids. Where the orbital septum attaches to the rim is known as the arcus marginalis. Three structures meet at the arcus marginalis, the orbital septum, the periorbita, and the periosteum. We will discuss the orbital septum in more detail later.
Checkpoint
• Name the bones of the orbital rims. Which bone rarely breaks? Point to the fracture lines of a ZMC fracture?
• Describe the boundaries of the orbital walls. Name the bones of the walls. Where does a blowout fracture occur? Why is hypesthesia of the infraorbital nerve and subcutaneous emphysema common? What are other signs of a blowout fracture?
• Name three openings in the orbital walls and describe what spaces they connect. Try to identify these on each orbital axial CT scan:
• What two openings in the orbit form a V?
• What structure separates the superior orbital fissure from the optic canal?
Muscles that close the eyes
The orbicularis muscle
For the eyelids to function, there must be muscles that close the eye and muscles that open the eye. The orbicularis muscle (Figure 2-15) is the muscle primarily responsible for closing the eyelids. The orbicularis muscle is anatomically divided into the pretarsal portion, the preseptal portion, and the orbital portion. The pretarsal and preseptal portions overlay the tarsus and the septum, respectively. These muscles are responsible for involuntary spontaneous blinking. The orbital portion covers the orbital rims and is responsible for forced eyelid closure. All parts of the orbicularis muscle are innervated by the facial nerve with innervation entering from the underside of the muscle like all muscles of facial expression.
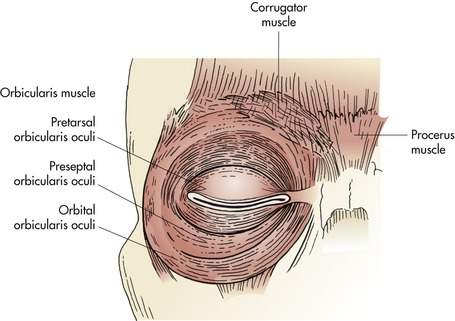
The corrugator and procerus muscles
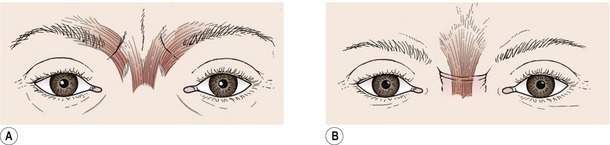
Other protractors of the eyelids (protractors being the opposite of retractors, which open the eyes) include the corrugator muscle and the procerus muscle (Figure 2-15). The corrugator muscle originates on the bone of the superonasal rim and inserts into the skin of the head of the eyebrow. Firing of the corrugator muscle pulls the heads of the eyebrows together and makes the vertical furrows of the glabella (Figure 2-16). The procerus muscle originates on the frontal bone above the glabella and inserts into the skin of the glabella. The action of these vertically oriented muscle fibers pulls the heads of the brows inferiorly and causes the horizontal furrows of the glabella.
Overactive muscles: orbicularis myokymia, facial tics, essential blepharospasm, and hemifacial spasm
The disorders resulting from overactivity of the orbicularis muscles are orbicularis myokymia, facial tics, essential blepharospasm, and hemifacial spasm. Probably you have suffered from orbicularis myokymia at one time or another. Hyperexcitability of the muscle, caused by stress or lack of sleep, causes a quick twitch of a few muscle fibers. Orbicularis myokymia is self-limited and usually lasts a few days or less. The other conditions involve different patterns of overactivity of the facial muscles, including the orbicularis muscle. These will be discussed in detail later in Chapter 9.
Checkpoint
The last section is straightforward. You should know:
• The muscles that close the eyes
• The muscles responsible for the horizontal and vertical glabellar furrows
• The problems associated with underactive and overactive facial muscles
You will see these conditions commonly in practice. You will learn the diagnosis and treatment of these problems in detail in Chapter 8.
The canthal tendons
The lateral canthal tendon
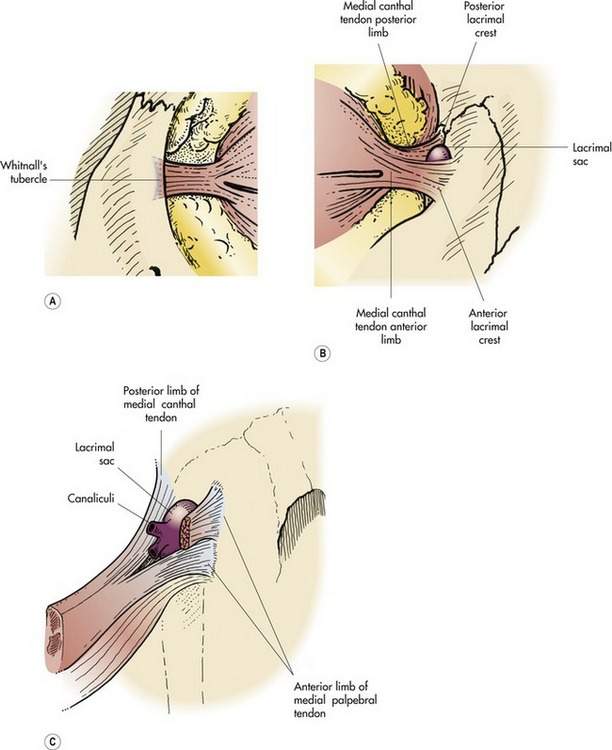
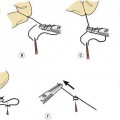
Before we leave the topic of the orbicularis muscle, we should discuss the canthal tendons. As we have already noted, the canthal tendons attach the eyelids to the lateral and medial orbital rims (Figure 2-17). The tendons are extensions of the orbicularis muscle that attach to the periorbita overlying the bone. The anatomy of the lateral canthal tendon is easy to understand (Figure 2-18, A). The pretarsal and preseptal portions of the orbicularis muscle of each eyelid taper to form the superior and inferior limb of the lateral canthal tendon. The upper and lower limbs unite to form the lateral canthal tendon, which attaches to the inner aspect of the lateral orbital rim on Whitnall’s tubercle. Imagine the lateral canthal tendon complex as a Y lying on its side with contributions from both the upper and the lower eyelids.
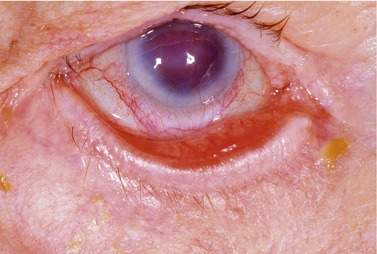
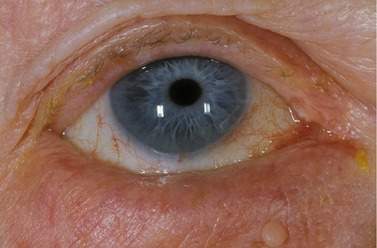
Lower eyelid laxity: the cause of ectropion
In the following chapters, you will learn that proper horizontal tension on the lower eyelid is necessary for the eyelid to maintain its position. Laxity of the lower eyelid is the major cause of lower eyelid eversion or ectropion (Figure 2-19). This laxity does not occur from stretching of the tarsal plate; rather, it is attributable to lengthening of the lateral canthal tendon with age. You may have heard of older patients stating that their eyes look smaller than they did in their youth. You have probably already noticed that, with age, the upper eyelid droops (ptosis) and the lower eyelid actually rises up a bit (stretching of the lower eyelid retractors). Less apparent, but equally common, is a horizontal narrowing of the eyelid as a result of stretching of the canthal tendons. Thus, the “small eyes” that your older patients may notice are caused by both horizontal and vertical narrowing of the palpebral fissure.
The medial canthal tendon
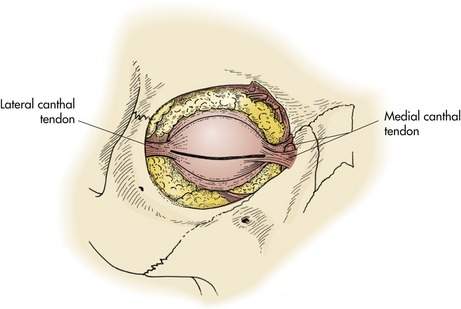
The medial canthal tendon is much more complex than the lateral canthal tendon because of the relationship of the medial canthal tendon to the lacrimal drainage system. The pretarsal and preseptal portions of the orbicularis muscle extend medially to form the two limbs of the medial canthal tendon (Figure 2-18, B). You will recall from the discussion of the anatomy of the medial orbital rim that the anterior limb attaches to the frontal process of the maxilla along the anterior lacrimal crest. The posterior limb attaches at the posterior lacrimal crest. Remember that the two limbs of the tendon surround the lacrimal sac (Figure 2-18, C).
Medial canthal tendon laxity
Laxity of the lower eyelid is usually not caused by medial canthal tendon stretching. Occasionally, laxity of the medial canthal tendon is seen. As the lower eyelid is pulled laterally, the lower eyelid punctum is seen to extend to or beyond the limbus. Although procedures to tighten the medial canthal tendon have been devised, they are seldom used because of the difficulty in working on the medial canthal tendon without damaging the canaliculi or the lacrimal sac.
Telecanthus
Checkpoint
You will treat many problems related to the canthal tendons. Some points to remember are:
• The lateral canthal tendon is much simpler than the medial canthal tendon. You should have an anatomic concept of what this tendon looks like to help you understand the procedures that you will be doing at the lateral canthus.
• Ectropion of the lower eyelid is one of the most common problems that you will see. Use your anatomic concept of the lateral canthal tendon to visualize canthotomy, cantholysis, and other steps in the lateral tarsal strip operation.
• Again visualize your conceptual anatomy of the medial canthal tendon surrounding the lacrimal sac. Do you remember where the anterior and posterior limbs of the medial canthal tendon insert?
• Which is more common—medial canthal tendon laxity or lateral canthal tendon laxity?
Muscles that open the eyes
The levator muscle
One of the most common operations in oculoplastic surgery is the correction of drooping upper eyelids, so your knowledge of the anatomy and function of the levator muscle is critical to your success in oculoplastic surgery. The levator muscle originates at the orbital apex and extends forward inferior to the bone of the orbital roof (Figure 2-20). At the orbital aperture, the levator is supported by Whitnall’s ligament. As the levator muscle travels anteriorly, it becomes a fibrous aponeurosis that extends inferiorly into the eyelid to insert on the anterior aspect of the tarsal plate. Fibrous extensions of the aponeurosis pass through the orbicularis muscle to create the upper eyelid skin crease (Figure 2-21).
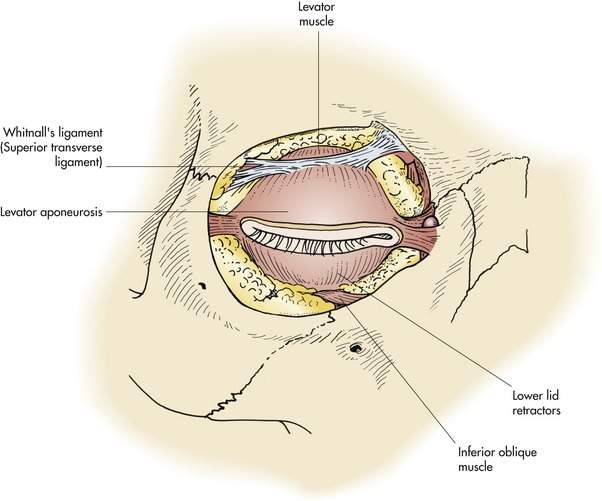
Whitnall’s ligament
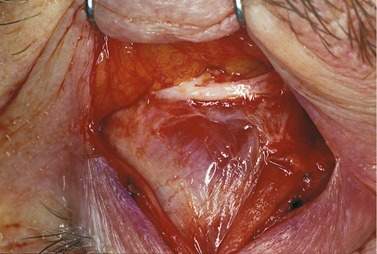
Whitnall’s ligament is an important anatomic landmark. The ligament extends from the fascia surrounding the lacrimal gland temporally to the trochlea medially. Whitnall’s ligament is usually easy to see intraoperatively as a strong white band of fibrous tissue (Figure 2-22). Generally, the tissue superior to the ligament is muscle while the tissue inferior to the ligament is aponeurosis, although variation among individuals exists. It has been suggested that Whitnall’s ligament serves as a “pulley” for the levator muscle. Although the levator muscle complex does not slide through the ligament, the concept of the ligament allowing the muscle to change direction is a helpful one.
Müller’s muscle
Müller’s muscle is responsible for the involuntary upper eyelid elevation seen in the sympathetically innervated “fight or flight” phenomenon. Müller’s muscle is “sandwiched” between the conjunctiva posteriorly and the levator aponeurosis anteriorly. Müller’s muscle extends from the superior margin of the upper tarsal plate to the level of Whitnall’s ligament (see Figure 2-21). A prominent surgical landmark on the surface of Müller’s muscle is the peripheral arcade, a vascular arcade extending across the muscle a few millimeters above the tarsal plate (Figure 2-23). The term peripheral arcade is easily confused with the marginal arcade, a vessel that travels on the anterior surface of the tarsus along the lid margin.
Ptosis of the upper eyelid
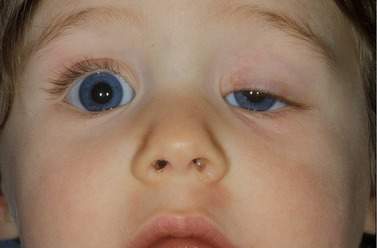
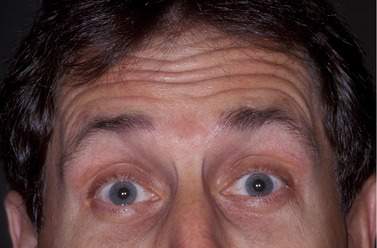
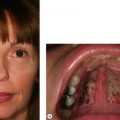
Ptosis of the upper eyelid is one of the most commonly encountered clinical problems in oculoplastic surgery. Many causes of ptosis exist. Most cases of upper eyelid ptosis are caused by abnormalities of the levator muscle or aponeurosis. Congenital ptosis (Figure 2-24) results from abnormal development of the levator muscle itself. Intraoperatively, this dystrophy presents as fatty infiltration of an otherwise normal muscle. The most common type of acquired ptosis, involutional ptosis, is generally thought to occur as a result of stretching or thinning of the aponeurosis, rather than of the muscle itself (we will talk more about the etiology of involutional ptosis later; an entire chapter is dedicated to the evaluation and treatment of ptosis). Advancement or tightening of the aponeurosis will elevate the ptotic eyelid in most patients. Loss of sympathetic innervation to Müller’s muscle will cause a mild ptosis of the upper eyelid. This problem is known as Horner’s syndrome.
The frontalis muscle
No doubt you have already seen patients with drooping upper lids who lift their eyebrows to provide a tiny bit more upper eyelid elevation. The frontalis muscle lifts the brows and is a weak retractor of the upper eyelids. The frontalis muscle is a part of the occipitofrontalis musculofascial complex (frontalis muscle, galea aponeurotica, and occipitalis muscle) of the scalp. This broad band of tissue extends across the top of the skull from the occiput to the eyebrows (Figure 2-25). The A in the mnemonic for remembering the layers of the “SCALP” is this aponeurosis (S, scalp, C, subcutaneous tissue, A, aponeurosis, L, loose areolar tissue, P, periosteum.)
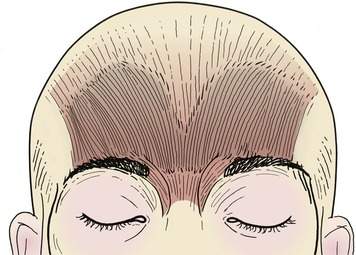
The fibrous aponeurosis becomes the frontalis muscle inferior to the hairline. Contraction of the frontalis muscle causes the horizontal furrows in the forehead (Figure 2-26). You may notice that the forehead furrows do not extend to the temporal hairline. The frontalis muscle thins laterally and does not extend to the tail of the brow. The lack of frontalis pull over the tail of the brow explains the temporal brow ptosis seen so commonly in older adults.
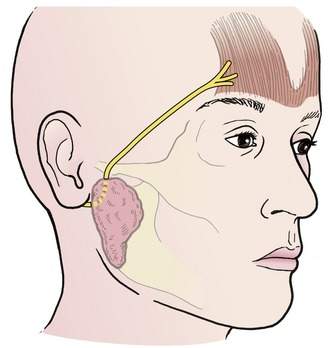
Like the other muscles of facial expression, the frontalis muscle is innervated by a branch of the facial nerve. Unlike with other branches of the facial nerve, there is no redundancy in the innervation of the frontalis muscle. A single branch, the frontal nerve (Figure 2-27), innervates the frontalis muscle. The path of the frontal nerve can be estimated by drawing a line from the tragus of the ear to the point 1 cm above the tail of the eyebrow. You will learn to take special care to avoid damage to the frontal nerve during any surgery near the path of the frontal branch. Damage to the nerve may leave the patient with a permanent paresis or paralysis of the frontalis muscle, resulting in a brow ptosis.
The lower eyelid retractors
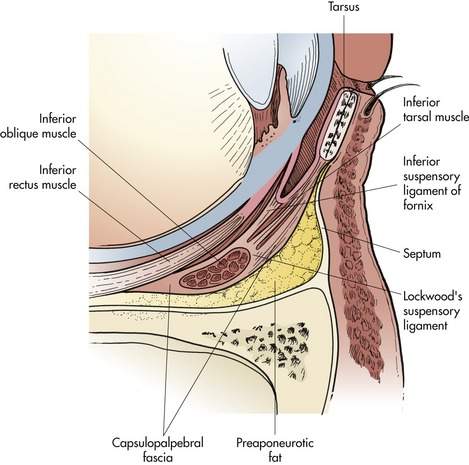
Although we don’t think about the lower eyelid moving much, there are retractors in the lower eyelid as well. The retractors of the lower eyelid are analogous to those of the upper eyelid, but are less well developed. The lower eyelid equivalent to the levator muscle is the capsulopalpebral fascia, which is a band of fibrous tissue that extends from the inferior rectus muscle to the inferior margin of the lower eyelid tarsus (Figure 2-28). As the capsulopalpebral fascia travels anteriorly from the inferior rectus muscle, the fascia splits to surround the inferior oblique muscle. Anterior to the inferior oblique muscle, the fascia reunites as a condensation of fibrous tissue known as Lockwood’s suspensory ligament. This ligament is the equivalent of Whitnall’s ligament in the upper eyelid.
Involutional entropion
Two clinical examples of problems with the lower eyelid retractors are worth considering. Involutional entropion (turning in of the lower eyelid attributable to aging) is caused by laxity of the lower eyelid retractors. The posterior and inferior pull of the normal retractors into the orbit stabilizes the inferior margin of the tarsus. In combination with other factors, loss of the tension on the tarsus as a result of stretching or “laxity” of the retractors allows the inferior margin of the retractors to rotate upward. The eyelid margin turns inward against the eyeball (Figure 2-29). An operation to tighten the lower eyelid retractors (analogous to correction of upper eyelid ptosis) corrects the entropion.
Horner’s syndrome
Checkpoint
• What muscles are the upper lid retractors?
• Did you remember to include the frontalis? (It is not a very efficient retractor of the eyelids, however.)
• What is Whitnall’s ligament? What is its purpose? How is it different from Whitnall’s tubercle?
• Sketch a picture of the parts of the levator muscle (both frontal and cross-section views). Check this against the diagrams in the text.
• Now sketch the lower lid retractors. How are they different from the levator and Müller’s muscles? Draw the relationship of the inferior oblique and inferior fornix ligament to the lower lid retractors.
• After you master levator advancement for repair of acquired ptosis, you can learn to recess the levator aponeurosis and extirpate Müller’s muscle for the correction of upper lid retraction caused by thyroid disease (a much more difficult procedure). Similarly, you can remove the lower lid retractors to correct lower eyelid retraction.
• Remember to learn about Horner’s syndrome. Keep your effort in perspective. In your office, you will see several hundred patients with routine ptosis for every one patient with Horner’s syndrome. On tests, you may see more questions about Horner’s syndrome than about routine ptosis. (It seems strange that we have to spend so much time preparing for the uncommon problems, rather than learning the common problems well.)
The preaponeurotic fat and the orbital septum
The preaponeurotic fat
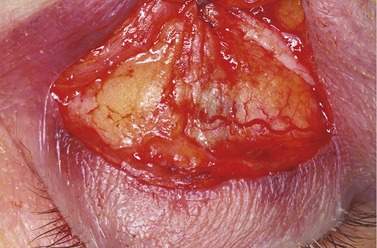
Before we leave this topic, we should cover two other important surgical structures, the preaponeurotic fat and the orbital septum. The preaponeurotic orbital fat (Figure 2-30) is the surgical landmark identifying the levator aponeurosis. Every time you perform ptosis surgery from the skin approach, you will see the orbital fat. In your early experience, you will intentionally identify the fat to help you find the underlying aponeurosis. There are two fat pads that compose the upper eyelid preaponeurotic fat, the central and the medial fat pads. Later, you will learn the terms, intraconal space and extraconal space, regarding compartments in the orbit. For now, keep in mind that the preaponeurotic fat is extraconal fat, or fatty tissue lying outside the muscle cone of the orbit. The central and medial fat pads are enclosed in a thin fibrous capsule with small vessels. The medial fat pad is smaller than the central fat pad and whiter in color. No one knows why this fat is whiter. There is no lateral fat pad in the upper eyelid. The lacrimal gland is in the preaponeurotic space laterally. You will be able to differentiate the lacrimal gland from the fat because the gland is more irregular in texture and is whitish-gray in appearance rather than yellow. The fat itself is relatively avascular, whereas the lacrimal gland is well vascularized.
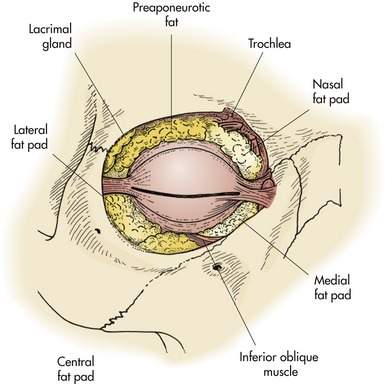
As in the upper eyelid, identification of the fat pads is the key to identifying the lower eyelid retractors. In the lower eyelids, there are three fat pads: the medial, central, and lateral fat pads (see Figure 2-30). As you would expect, these fat pads are found posterior to the orbital septum and anterior to the lower eyelid retractors. Prolapse, or bulging of the lower eyelid fat pads, is a common cosmetic concern. The main goal of the lower eyelid blepharoplasty operation is to eliminate this prolapse.
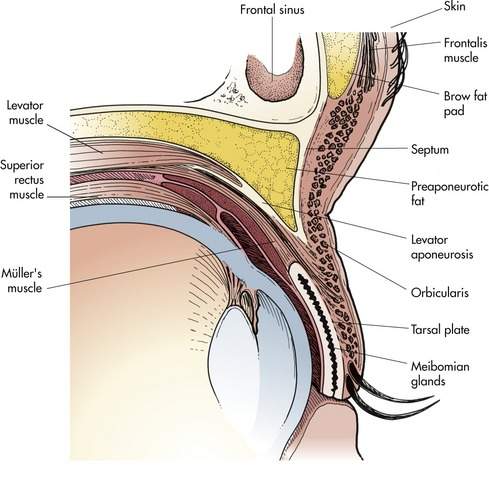
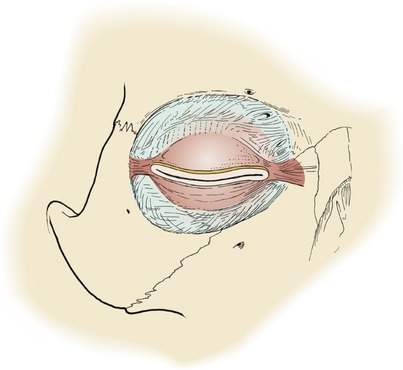
The orbital septum
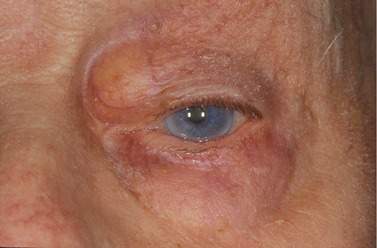
Anterior to the preaponeurotic fat is a tough fibrous layer that extends from the orbital rims to the tarsal plates known as the orbital septum (Figure 2-31). The septum is the anatomic boundary between the eyelids and the orbit, lying between the orbicularis muscle and the orbital fat. Fat seen in an eyelid laceration means that the septum has been cut and that deeper tissues, including the eye or even the brain, may be injured. An intact septum means that there has been no penetration into the orbit from the anterior aspect. Infections of the eyelid are prevented from extending posteriorly by the orbital septum. As well as preventing infection from spreading posteriorly, the septum prevents the orbital contents from bulging anteriorly. As we discussed earlier, with age, the septum thins and the orbital fat prolapses forward, accounting for some of the fullness seen in the upper and lower eyelids of adults (Figure 2-32). You will notice this difference in the thickness of the septum in pediatric and adult eyelid operations.


Stay updated, free articles. Join our Telegram channel

Full access? Get Clinical Tree


