Aesthetic Surgery of the Face

CHAPTER 7 Aesthetic Surgery of the Face


Introduction


This chapter has lots of new material not contained in my original book, Oculoplastic Surgery—the Requisites. Aesthetic surgery is a booming area that used to be on the periphery of “traditional” oculoplastic surgery. All across surgical specialties, interest in facial rejuvenation has increased dramatically in the last 10 years. Based on the material in the last chapter, you should be able to treat the majority of your patients with “functional” or “restorative” periocular problems. Facial rejuvenation is another area where your expertise as a reconstructive surgeon can be put to good use. All reconstructive procedures have an aesthetic element in addition to the primary goal of restoring function. And vice versa, all aesthetic procedures depend on reconstructive concepts that form the basis of a successful rejuvenation procedure. In this chapter, we will emphasize those concepts.


In Chapter 6, we looked at aging changes around the eyes from the point of view of restoring the function of the eyes lost with the common aging changes. We have looked primarily at the upper face, the forehead, and upper eyelids and some procedures to improve eyebrow position and remove the extra skin on the eyelid. In this chapter, we will reinforce the concepts that you have already learned with regard to the upper face. We’ll look at the mid and lower face. At the same time, we’ll put the sags, bags and wrinkles that we see in the framework of the “descent and deflation” process that begins and continues through adulthood.


You may already be familiar with many of the procedures discussed here. For the advanced surgeon already incorporating these techniques in his or her practice, this will serve as a review. For the resident or surgeon interested in learning these procedures, my hope is to provide a general scheme of options for rejuvenation. We will start with the anatomic and pathologic basis of skin changes, followed by their prevention and the medical and surgical options for treatment. The “nonsurgical” treatments include exfoliants, Botox® and filler injections, laser resurfacing, and chemical peeling. The surgical options include forehead lift, midface lift and lower face and neck lift.


As always keep the big picture in mind. Skim over the material initially and go back over it in a more detailed fashion. Pick out areas that you and your patients are interested in. Start with easy skin care options and proceed to the next level when your skills permit it. For more advanced operations, you will need extra reading, observation, and mentoring before you take them on. At the end of this chapter, no matter what your personal goals are in the area of facial rejuvenation, you should have a good base to build on.


Evaluation and treatment of aging


What happens in aging? The conceptual approach of “descent and deflation” is a good way to organize your thoughts. As we age, supporting tissues stretch causing the familiar “sags and bags” of aging. Accompanying this laxity is a general loss of soft tissue thickness. In the current jargon, this is referred to as a loss of facial “volume.” A combination of thinning of the subcutaneous layer and facial fat pads combines with generalized tissue laxity to give a characteristic aged facial profile. Temporal brow drooping and the formation of the melolabial fold are familiar examples. Thinning of the skin, primarily the dermis, causes the skin to “wrinkle” and develop other surface changes (Figure 7-1).


There is a complex interplay of internal and external causes of aging. Forgive this simplification, but I think you will find that this scheme will provide a basis for evaluating your patient’s aging changes. You will also see that these concepts will help you organize and present a treatment plan to your patient (Boxes 7-1, 7-2 and 7-3).


Anatomic considerations


The skin


In Chapter 2, we discussed the facial anatomy in some detail. Here, we will review features that you can easily apply to the sags, bags and wrinkles approach to the evaluation and treatment of your patients. We will start at the surface and work our way inward.


The skin has two layers, the epidermis and the dermis. You will recall that the epidermis is rapidly turning over with young cells originating at the deep basal layer and maturing as the cells migrate toward the surface. As the cells move upward, they lose their nuclei, flatten, and eventually become keratinized. Pigment cells are scattered in the deep layers of the epidermis. With aging, the epidermis thins. A generalized loss of pigment occurs but, at the same time, focal areas of pigmentation, dyschromias, occur. Premalignant and malignant changes include actinic keratosis, basal cell carcinoma, and squamous cell carcinoma. Laser resurfacing (the ablative type) and chemical peeling remove the epidermis, which removes abnormal surface cells and improves color changes. The real improvement that results from these procedures comes in improvements in the underlying dermis, however.


The dermis is a connective tissue layer made of collagen and elastin fibers surrounded by a watery mixture known as the ground substance. The dermis also contains fibrous cells and the skin adnexae—the hair follicles, oil and sweat glands. We will discuss a variety of lesions related to the adnexae in Chapter 11. Blood vessels, lymphatics, and nerves also travel within the dermis.


There are two layers of the dermis: the more superficial papillary and the deeper reticular dermis. Aging changes damage the collagen and elastin fibers of the dermis, resulting in a loss of dermal thickness and elasticity. Loss of the dermal thickness allows normal and telangiectactic vessels to become apparent.


The loss of skin elasticity causes wrinkles or rhytids to form. Wrinkles that form while the underlying muscle contracts are called dynamic wrinkles. Over time, as the skin loses its elasticity, the repeated folding of the skin creates lines that remain without any underlying muscle contraction known as adynamic wrinkles. Resurfacing and peeling procedures remove the epidermis and cause thermal damage to the dermis. Repair of the damage results in thickening of the dermis and the return of some elastin fibers resulting in a more elastic skin—and fewer wrinkles. A new layer of epidermis grows back from regenerative cells derived from the underlying adnexae. The new epidermis is lighter in color with fewer patchy dyschromias and premalignant changes. Botulinum injections relax the underlying muscles resulting in improvement of dynamic wrinkling. When adynamic wrinkles remain, injectable filler agents “plump up” the dermis and “fill in” the creases.


A part of facial “deflation” is a loss of subcutaneous fat in aging. The cherubic look of the youthful face is lost, especially in patients who are normal weight or tending to be slim. In heavier patients, some of the typical deflation features may not be obvious and the patient may have a more youthful facial appearance. Injection of filler materials or autologous harvested fat can mask the loss of facial fat giving a more rounded youthful look.


Superficial musculoaponeurotic system (SMAS)


In Chapter 2, we spent a great deal of energy talking about the muscles of facial expression and the investing fibrous layer known as the SMAS (superficial musculoaponeurotic system). If this is sounding pretty hazy to you, it might be worth going back and rereading the last sections in Chapter 2 before you move on. Hopefully, you will recall that the SMAS layer coordinates facial movements by physically linking the mimetic muscles together. Strong fibers attach the SMAS to the underlying bone and in turn attach to the skin itself (osseo-cutaneous retaining ligaments). These ligaments are strongest along the inferior and lateral orbital rim extending onto the zygoma, as well as along the mandible. Lax tissues “hang” over the sturdy attachment points. Combined with the loss of associated fatty tissues, this process is responsible for the characteristic “sags and bags” of the face—deepening of the melolabial fold, jowling, and marionette lines. The anatomic extensions of the SMAS—the temporoparietal fascia (TPF), the galea, and platysma—develop laxity as well. Temporal brow drooping and platysmal banding are the manifestations of this process.


Tightening of the SMAS layer and its counterparts is the basis of modern face, neck, brow, and temple lifting procedures.


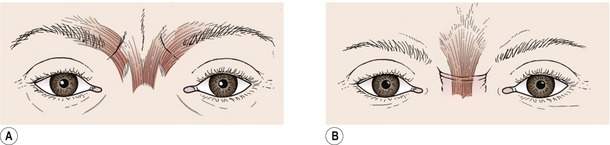
As the SMAS stretches, its associated fat pads fall, contributing to the sags and bags we have just discussed. A deep plane of fat exists behind the orbicularis muscle overlying the inferior rim (the suborbicularis oculi fat pad; SOOF) and extends superiorly over the lateral rim to overlie the superior orbital rim (the retroorbicularis fat pad; ROOF). The fullness of the lateral portion of the eyebrow and the tissues over the superior orbital rim seen in youth are due to a full and well-supported ROOF. Drooping of the ROOF is a cause of temporal eyebrow ptosis and is corrected with the browplasty or forehead lift operations. The malar fat pad is a collection of fat on and within the anterior surface of the SMAS over the malar eminence (Figure 7-2). A full normally positioned malar fat pad contributes to the high full cheek in children and young adults. We will see below that the descent of the SOOF and the malar fat pad is a characteristic feature of facial aging, the formation of the so-called double convexity deformity.


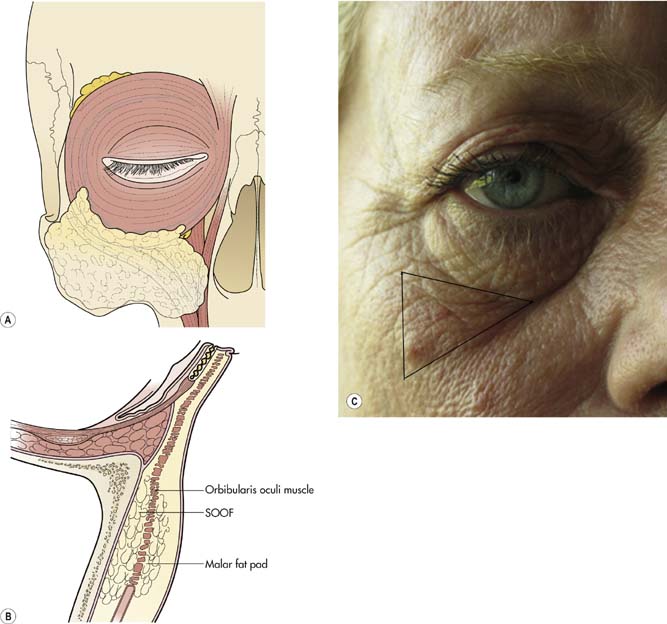
In the child, the facial profile from the lower eyelid to the cheek extends inferiorly in a smooth convexity (Figure 7-2). Over time, this single curve changes into a double curve. Here is what happens. Let’s look at the development of the cheek convexity first. As the SMAS stretches in the lateral midface, the malar and the suborbicularis fat pads fall (“descend”) in a characteristic manner creating the “malar mound” laterally. Medially, the cheek descent causes the inferior orbital rim to lose its soft tissue padding (part of the “deflation” look). This used to be referred to as a “long lower eyelid.” Now the term “skeletonization” of the lower orbital rim is in vogue, emphasizing the loss of tissue over the inferior orbital rim. The feature most commonly emphasized is deepening of the nasojugal fold (so-called “tear trough” deformity). As the cheek tissues descend inferiorly and medially, the melolabial fold deepens. The eyelid convexity develops as the orbital septum thins and fat prolapses forward. The aging adult develops a bulge of fat prolapse in the lower eyelid, a hollow at the rim, and a bulge of drooping cheek, the double convexity.


What can be done to improve this—essentially “rejuvenate” the midface? There are some options for restoring the smooth single curve of youth. Lifting the cheek (midface lift) improves the melolabial fold and lifts some tissue over the rim. Trimming some fat from the lower eyelid with a blepharoplasty reduces the lower eyelid convexity. Maybe even repositioning the eyelid fat over the inferior rim—“flipping the fat”—will help to fill in the hollow at the rim. A less invasive way to camouflage the double convexity is to fill in the “tear trough” with an injectable filler or autogenous fat transfer. You can see this can be a complicated issue.


My hope is that by now you are starting to understand the normal anatomy and what happens to that anatomy with aging. The options for rejuvenation are numerous and complex. So how do you decide what can or should be done? Let’s look at the options from simplest to more complicated. As you might imagine, this algorithm follows a chronological progression of patient age (Table 7-1).


Table 7-1 Options for rejuvenation


  Prevention  
Wrinkles Sunscreen and stop smoking All ages
Dynamic wrinkles Botulinum injection 30–40+ years
Adynamic wrinkles Fillers 40+ years
Surface texture and color changes Laser resurfacing or chemical peels 40+ years
Sags and bags    
Dermatochalasis Blepharoplasty 35+ years
Lower eyelid fat prolapse Blepharoplasty 35+ years
Brow ptosis Browplasty or forehead lift 40–50+ years
Deepening of melolabial fold Midface lift 40–50+ years
Jowling and marionette lines Facelift 50+ years
Platysmal banding Liposuction and platysmaplasty 50+ years

Look this over a few times. It is important because it summarizes the facial aging scheme and gives you some direction in what procedures that you might consider offering your patient interested in facial rejuvenation.


Making a decision: the “cost”–benefit ratio


The menu


There are many reasons for the increasing interest in cosmetic surgery. Youth remains a priority in our society. We are all “hard wired” to be attracted to youthful features. Patients are living longer. The “baby boomer” population is aging and remaining active. Most patients who look younger feel younger. The introduction of less invasive procedures, especially Botox injections, has made the opportunities for rejuvenation more available to patients, often serving as an introduction to other aesthetic procedures. Society is accepting these procedures more readily. More men are having procedures done. And no doubt a constant barrage of marketing makes the option of rejuvenation procedures appear attractive to the general public.


In the next sections, we will deal with the “menu” of aesthetic procedures available that your patients might choose from. Your job is to offer them procedures that suit their needs and are safe. I like the scheme of evaluating your patient in terms of:


This system lends itself well to selecting the right menu choices, depending on your patient’s desire for a “snack” or a full “seven course meal.”


All patients over 40 years have some degree of all these aging changes. So how do you and your patient make a decision about which of many choices for rejuvenation is appropriate? It all comes down to the perceived cost–benefit ratio. You are going to offer only procedures within your skill set that you think will address the patient concern and offer a benefit to the patient with a minimal risk. As we said, your job is to educate the patient with regard to the benefit and risk of a particular procedure. As cosmetic procedures are completely elective, the decision to proceed really comes down to the patient’s perception of the cost–benefit ratio. If the patient perceives no benefit, even “no risk” does not make the patient want to have the procedure (mind set 1). If the patient perceives a benefit and the risks appear minimal, he or she will elect to proceed with surgery.


The medical risks of all these procedures are very low, but you must factor in cost and “down time” (swelling, bruising, pain, and time out of the public eye) on the risk side of the ratio. Patients prefer low-cost procedures with little down time. You will find that many patients are interested in trying that “appetizer” from the long “menu of rejuvenation” options. This is where Botox and fillers have received widespread acceptance. Later, the patient may come back for a second or third course. A few patients are “hungry” and will order “full meal” on the first visit. You might want to remind your patients that more “involved” treatments with longer recovery almost always have more effect and longevity than procedures with less down time. Ultimately, it is the patient’s choice with your wise counsel.


Where do you start?


With regard to your level of expertise, Botox and filler injection technique skills are acquired easily with some practice, so that is a good place to start. You may already know how to do a functional upper blepharoplasty and direct browplasty. An aesthetic blepharoplasty in a younger patient is not any more difficult. In some ways, it is easier because there is usually much less redundant tissue. It goes without saying that your technique must be meticulous and your bedside manner very accommodating. Next, you might want to offer laser resurfacing or chemical peels. Then think about lower blepharoplasty, generally considered more difficult and risky than upper blepharoplasty. As your skills increase, you can learn pretrichial or coronal forehead lifting. With the brow and temple anatomy well understood and perhaps your familiarity with the endoscope for retrieving stents and doing endoscopic dacryocystorhinostomy (DCR), you might want to do endoscopic forehead lifting with your upper blepharoplasty (the technique that I have outlined below is not a big jump). Taking courses, viewing DVDs, mentoring with an experienced colleague, and trips to the anatomy lab will help you tremendously.


At this point, you are well on your way to a full “aesthetic menu” for your patients. Each of us has different interests and practice situations. Very few surgeons do only “cosmetic” surgery. The market is very competitive for these higher reimbursement cases. You can choose to limit your expertise to periocular procedures, or move further into midface, face, and neck lifting.


In the next sections, we will consider the first of these procedures in some detail. I would like you to have an understanding of midface, lower face, and neck lifting procedures, but have not given you details. There are many other procedures that you should at least be aware of, such as cheek and chin implants, rhinoplasty, and hair replacement, that are not covered in this text. There are many texts available that you can use when you want more specifics. Some of these are listed in the Suggested Reading. Before we head toward the procedures, we should talk about prevention of facial aging, an important topic for all our patients for both functional and aesthetic reasons (Box 7-4).


Prevention and medical treatment of the skin


We talked about intrinsic and extrinsic factors that play a role in aging. We cannot change our genetic predisposition to specific intrinsic aging changes. No better example of the aging patient is the person who sees his or her genetic future and presents with the complaint, “I am starting to look like my mother.” In other cases, an inherited less desirable feature may have been present for years: “I have been self conscious of these bags under my eyes since high school.” As the saying goes, we cannot pick our parents, but we can maintain a healthy diet and keep active. Both are important factors in preventing vascular disease and diabetes. Extrinsic causes of aging can be modified. Smoking accelerates aging significantly. As you will see in your practice, there is an obvious difference in the appearance of the 45-year-old patient who has been a long-standing smoker compared with a patient of similar age who has never been a smoker. You are familiar with the term smoker’s lips, the fine vertical creases at the vermillion border of the lips. Sun exposure is the other major cause of facial aging. I have to credit a dermatology lecturer, whose name I have long since forgotten, with this example: “If you want to know the effects of sun on your own skin, compare your cheeks. That is, the cheeks on your face compared with the ‘cheeks’ on your bottom. They both have the same number of birthdays and the same parents.” Most of us no longer have that “baby bottom skin” on our faces largely due to actinic damage. Lightly pigmented skin ages more easily than darker skin. Skin that tans, rather than burns, is less easily damaged by the sun. You will find it more difficult to judge the age of a darkly pigmented patient compared with a lightly pigmented patient. So the message to our patients is to apply a sunscreen every morning as part of a daily hygiene regimen. Some actinic damage can be reversed by a daily application of tretinoin crème (0.25–0.50% bid or qhs, Retin-A, Renova, Avita). These keratolytic agents remove a thin layer of the epidermis and promote remodeling of the dermis to a small degree. Some patients will have trouble with skin irritation and erythema and will require holidays from treatment.


Keep in mind our scheme for evaluation and treatment. Is your patient concerned about wrinkles or sags and bags? We will talk about how to improve the wrinkles with Botox injection, injectable fillers, and skin resurfacing in the next sections. Later in the chapter, we will discuss some of the surgical procedures for rejuvenating your patient who complains of sags and bags (Box 7-5).


Botulinum (Botox®) injection


Principles


Botulinum toxin was introduced to the medical community in the late 1970s by Alan Scott as an investigative treatment for strabismus. The pharmaceutical industry picked up Botox as an “orphan drug” for treatment of facial dystonias, primarily essential blepharospasm, in the mid-1980s. Since that time, the indications for this powerful neurotoxin have exploded. The Federal Drug Administration (FDA) approval for Botox as a treatment for glabellar wrinkling was granted in 2002. The muscle weakening effect of Botox is due to inhibition of the release of acetylcholine from the presynaptic neuron at the neuromuscular junction, causing a chemodenervation lasting 3–6 months.


Wrinkles in the skin are caused by contraction of the underlying muscles. As we have shown earlier, the wrinkling is directed 90 degrees from the pull of the underlying muscles. Think of the horizontal forehead rhytids resulting from the contraction of the underlying vertically oriented frontalis muscle or the radially oriented crow’s feet at the lateral canthus resulting from circular orientation of the underlying orbicularis muscle. In Chapter 2, we talked about the glabellar wrinkling causing contraction of the underlying procerus and corrugator muscles (Figure 7-3). In youth, the plump skin barely shows a wrinkle with facial movement. As the skin thins, facial movements are accompanied by “dynamic wrinkles.” With further aging and loss of the elastic nature of the skin, wrinkles present without muscle contraction develop, known as “adynamic wrinkles.” As Botox blocks the underlying muscle contraction, it is most useful for the treatment of dynamic wrinkles. The primary regions where Botox is used are in the forehead, glabella, and crow’s feet.


Technique


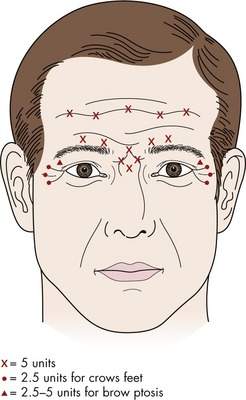
Botox is available in a powder form with 100 u of Botox in each bottle. The powder is typically dissolved with 2 cc of sterile saline (resulting in a dilution of 5 u/0.1 cc of fluid). You should avoid vigorous shaking of the bottle as the Botox is easily degraded. Typically 2.5–5.0 units are injected in each site. (0.05–0.10 cc of solution). Some surgeons change the concentration depending on the site. Typical injection sites and dosage are chosen as shown in Figure 7-4. You might want to review the sites for Botox injection in cases of essential blepharospasm and hemifacial spasm shown in Chapter 9 (Figures 9-8 and 9-9).


The glabella or midway up the forehead are good places to start treatment with Botox. Use lower doses and fewer sites until you have experience. Injection technique is straightforward. Use a short 30-gauge needle and inject just under the skin. You should not be intradermal. Injection into the muscle can cause hemorrhage. Around the eyes, stay peripheral to the orbital rim to avoid an upper eyelid ptosis. It’s a good idea to always point the needle away from the eye.


Undertreatment is more desirable than the total paralysis of overtreatment. Even worse is the occasional upper eyelid ptosis that will persist for several weeks once it occurs. Iopidine™ (apraclonidine 0.5%) eye drops have been recommended to treat Botox-induced ptosis. This α2-adrenergic agonist causes Müller’s muscle to contract, elevating the upper eyelid 1–3 mm. I have no experience with this, however. Few patients will experience dry eye symptoms after treatment, but a lubrication regiment of artificial tears three or four times a day is reasonable. You should avoid treatment of the lower face, at least until you get experience. Unsightly abnormalities in movements of the mouth are tell-tale signs of overtreatment with Botox.


A good rule of thumb is—Botox is best for the upper face. Fillers are best for the lower face.


With some experience, you can use Botox in conjunction with fillers. Botox eliminates the tissue elevation (smooth the “hills”) caused by the underlying muscle contraction. Fillers eliminate any remaining depression (fill the “valleys”). Botox has been advocated prior to a surgical forehead lift, hoping to facilitate the release and maintain forehead elevation while postoperative adhesions form. Botox injection in the neck can be used to improve platysmal banding in the neck. Injection of 5 units per site in several sites along the bands can give temporary improvement. A good time to “practice” is on your functional patients with facial dystonias or facial nerve synkinesis.


Remember, the best aesthetic result occurs when a new “refreshed look” is not attributed to any treatment at all. You want your aesthetic outcomes to look natural. Consider the example of hairpieces—have you ever seen a good toupee? No, you only see the bad ones. Similarly, it does not matter if you are doing Botox injections or a facelift, your patient should not have an unnatural “operated on look.”


Injectable fillers


Principles


Botox works well for dynamic wrinkles but does not completely eliminate adynamic wrinkles. These “wrinkles at rest,” like a depressed scar, are most visible with a light directed from the side casting a shadow over the valley, making the depression visible. When you eliminate or “fill” the depression with injection of a filler product, the shadowing is gone. Typically, this is most useful in the area of the adynamic wrinkles at the lateral canthus, on the sides of the mouth (vertical jowl lines and the marionette lines), at the margins of the lips, and in the glabella (with caution because necrosis has been seen).


Fillers can also be used as a “volumizing agent” to replace facial deflation. You can restore the fullness of the youthful face with injection of filler products into the melolabial fold, the nasojugal fold, the ROOF, and in the lip itself. The most common use is to fill in the valley (the crease) of the melolabial fold. In many cases, more advanced uses of fillers, often in significant amounts, can be used to reshape or volumize the face. These techniques include filling the fat pads in the malar region and jowls and depression overlying the temporalis muscle.


Fillers can be divided into products that have a temporary or a permanent effect. The safest and simplest fillers to use are the temporary products, all of which contain a variation of hyaluronic acid (HA). As you recall, HA is a main component of the ground substance of skin and is very hydrophilic, pulling water into the dermis. HA products have replaced the collagen-based products popular in the past. They last twice as long and have no tendency to create allergic reaction, so no skin testing is required. These products vary in terms of thickness. Thinner HA materials can be used to improve fine wrinkles, whereas thicker materials are used for more prominent lines and for providing volume. In practice, it is easiest to stock and use one type of HA filler that will work in all regions of the face for most patients. I would suggest that you use only HA products until both you and your patients get experience with the effect of the filler. Some patients will want more volume than others (related to personal preference or expense), so don’t overtreat initially. You can add more filler later if needed.


HA products are injected in the mid-dermis. With experience, you may vary the depth depending on the area and the filler, but you should not inject very superficially or into the underlying fat. Your careful injection technique and massage will give a uniform distribution of the material. The result is immediate. Swelling and bruising are minimized by ice application after injection. The effect lasts from 6 to 12 months. If any filler material is left over after the initial injection, you should keep it on hand in case your patient requests a bit more volume in the subsequent week after treatment. Although rarely, if ever, necessary, the injection can be reversed by injection of hyaluronidase (Wydase).


Injection into the crow’s feet or the melolabial folds is the easiest. When you get more experience, you can inject the nasojugal fold and the lips. Small depressed scars can be improved somewhat. If adynamic wrinkles remain after Botox injection into the forehead and glabella, you can add a small amount of filler (especially in men with deep wrinkles). Check out the tips for injection of HA fillers in Box 7-6.


Most “permanent filler” products contain particulate matter and derive their long-lasting effect by stimulating new collagen production in the dermis. The effect is delayed and cumulative over many injections. These fillers should be delivered deeper in the dermis. There is no current consensus on the safest and most effective type of long duration filler product at this time. None are FDA approved for cosmetic use except for human immunodeficiency virus (HIV) lipodystrophy patients. The benefit of a “permanent” effect is attractive to patients, but there is no good way to reverse an unwanted outcome. Rare, but reported, side-effects, such as granuloma formation, are difficult to deal with. I would suggest that you do not use these materials until you are very comfortable with your techniques using HA products.


A final option for “reinflating the deflated face” is using autogenous fat injections. Using liposuction technique, you can harvest fat either from the neck during a facelift procedure or from another site on the body. Prior to injection, the fat cells are separated out via a centrifugation technique. Small or, in some cases, large amounts of fat can be injected into the face to re-establish the smooth contours of youth. The results and longevity are variable but, in some cases, the improvement is spectacular. For most surgeons, this is a technique that is added to a “mature” aesthetic practice.


My goal in this section is to have you remember the principles of Botox and injectable filler use. Botox and fillers are a good place to start your aesthetic practice. Patients with less aged skin may have only dynamic wrinkles and respond well to Botox alone. Patients with more aged skin will have both dynamic and adynamic wrinkles. If Botox alone does not do enough, you can add an HA-based filler. The currently available products are listed in Box 7-7. Start with one or two HA products and get confident using them. As you get more experience, you might want to learn to use longer lasting fillers. Keep in mind that this field is changing rapidly, so check the literature and talk with your colleagues to find out the latest information on the effectiveness, duration, and safety of new products as they become available (http://www.juvedermusa.com, http://www.restylaneusa.com).


Skin resurfacing and chemical peeling


Fitzpatrick classification system of skin type


The Fitzpatrick Classification (Table 7-2) is useful for selecting which of your patients are good candidates for treatment. This classification is based on a patient’s tendency to tan rather than burn when exposed to sunlight. Your patients with lighter skin color will respond best to resurfacing and peeling procedures with less risk of post-treatment hyperpigmentation, the most common side-effect. When you are learning these treatments, pick patients with mild to moderate aging changes with skin types I–III. You will get a reasonable effect and will avoid unwelcome post-treatment pigmentary changes.


Table 7-2 Fitzpatrick Classification System


Skin type Skin color Characteristic
I Very white or freckled Always burns, never tans
II White Usually burns, tans less than average
III White to olive Sometimes mild burn, tans about average
IV Brown Rarely burns, tans more than average
V Dark brown Rarely burns, tans profusely
VI Black Never burns, deeply pigmented


Laser resurfacing


Laser energy can be used to improve skin texture, pigmentation, and wrinkling. Many types of lasers and techniques have been described in recent years to improve facial skin health. In my opinion, the gold standard remains the CO2 laser ablative resurfacing technique*. The chromophore for the CO2 laser is water (10,600 nm wavelength). As human tissues contain a large amount of water, high laser energy levels will instantly vaporize the tissue. When lower energy is absorbed, the tissues will absorb heat. Ablative resurfacing techniques (either CO2 or Erbium YAG) vaporize the epithelium and deliver heat into the dermis. As the new epithelium regenerates, the result is a smooth healthy layer of cells without blotchy pigmentation. During the recovery process, the underlying dermis goes through a remodeling process that promotes collagen production resulting in a more plump skin with fewer wrinkles. Recently, nonablative lasers have been developed that deliver energy to the deeper layers without removing the surface epithelium. The intended result is improvement of wrinkles without the crusty healing phase of epithelialization. As you might expect, the result is faster healing, but a less dramatic reduction in wrinkling. More recently, laser techniques have developed known as fractional resurfacing. Using this technology, microscopic “holes” are burned through the epithelium with most of the energy delivered deeply. The consensus opinion regarding the results of this technique is not in yet. No doubt there will be continued efforts to achieve the most improvement with the least “down time” and possible side-effects. There is no “right” technique or laser.


As you will see with peeling, in your early treatment experience, it is best to pick one laser technique and get familiar with delivering a fixed amount, or a narrow range, of energy to mild to moderately damaged skin. As we said already, it is best to pick lighter skinned patients with skin types I–III. Once you are confident with your technique and happy with your results, you can treat patients with deeper damage using higher energies. Treating darker skinned patients is more unpredictable so be wary of moving to darker skin types. Always keep in mind that higher energy means more improvement, but will prolong recovery and increase the risks of postoperative problems such as scarring, prolonged erythema, hyperpigmentation, hypopigmentation, and infection.


As we discussed above, pretreatment with tretinoin (Retin-A, Avita, Renova) and sunscreen is mandatory. Some physicians will pretreat with bleaches, but this is not usually necessary. Cells for re-epithelialization migrate to the surface from the underlying dermal glands so patients should have not used Accutane (isotretinoin) for 6–12 months prior to resurfacing (remember this medication reduces sebaceous gland function). There is a paucity of these glandular structures in the neck so you should not resurface below the mandibular line.


Periocular treatment is a very effective adjunct to upper and lower blepharoplasty. As you know, upper blepharoplasty is primarily a skin- and muscle-removing operation. Lower blepharoplasty is primarily a fat-removing operation. Neither should be used for removing fine wrinkles in the eyelid skin. Resurfacing works well in this regard and can be performed at the same time. As the healing process is accompanied by a period of erythema often lasting weeks, you should warn your patients about demarcation lines separating treated and untreated areas. Similarly, occasionally, noticeable alterations in skin pigmentation (hypo- or hyper-) can result. You can minimize these problems by “feathering” the treatment edges so that more heavily treated areas blend with normal skin using intermediate treatment intensity. After epithelialization, 7–10 days, your patients can wear make up to hide any color changes.


Treatment may be directed at the periocular area alone or the full face. Full face resurfacing will avoid the “transition” zones around the eyes and can greatly improve the superficial and deep wrinkles around the mouth and in the vertical pleated folds that occur at the sides of the mouth and jowls. Similarly, “smoker’s” lips respond well. As you will not be resurfacing the neck skin, you must stop at the mandibular margin and do some feathering to minimize the transition from treated to untreated areas.


Infiltrative local anesthesia with mild sedation works well for eyelid resurfacing. For full face treatment, infiltrative and regional blocks (infraorbital, mental, and supraorbital nerve blocks) are necessary. Most of your face patients will do best with monitored anesthesia care (MAC) sedation or general anesthesia. Safety precautions should be followed to avoid accidental laser injury. Staff should all wear goggles and the patient should wear metal corneal shields. The surgical field should be surrounded with wet drapes and a smoke evacuator is necessary. Supplemental oxygen should be turned off during treatment.


You can change the depth of treatment by adjusting the laser power or density of the laser energy delivery. You can also change the depth of treatment with an additional one or two more passes of the laser. Remember that matching the depth of the burn to the depth of the damage is the key to “art” of resurfacing. Initially pick patients with mild to moderate damage and use the suggested settings below. Watch how the color changes on the treated skin—pink is light treatment, yellow is heavy treatment. The ideal treatment color is described as “chamois” color.


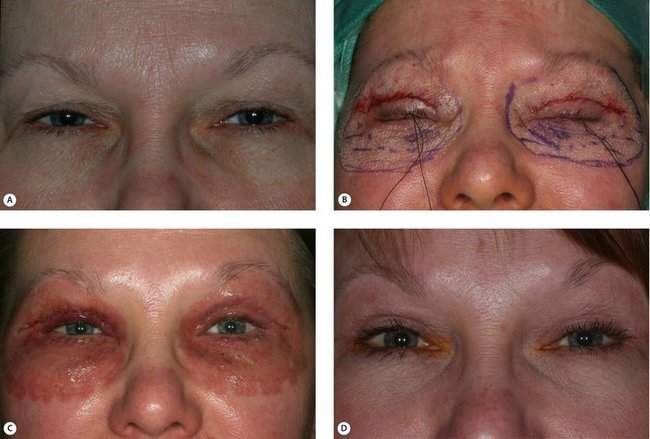
With experience, you will learn how to modify the settings or add treatment passes. When preparing to treat your patient, select the appropriate settings, get a comfortable grip on the hand piece, and fire a test against a tongue blade to see that the laser is working correctly. Depress the foot pedal for each laser burst. As you get experience, you can use repeated timed firings by holding the pedal down. Position the hand piece with the laser aimed perpendicular to the skin surface. Most lasers have a collimated hand piece that does not require an exact focal distance, making your hand positioning more flexible. Put the laser pattern bursts next to each other on the skin, with about a 10% overlap. When you complete one pass of the entire treatment area, you should remove the charred epithelium with a soaking wet gauze pad. Dry the skin to remove all water before another pass (Figure 7-5).


Do your second pass with the laser moving in a slightly different direction to insure even coverage. In general, the cheeks and forehead tolerate two or three passes. The eyelid skin and lips are thinner and tolerate only one or two passes. Use only one pass when feathering into the neck at the mandibular line and on the pretarsal skin. If a patient has especially deep vertical pleated wrinkles or smoker’s wrinkles of the lips (or elsewhere), mark these areas before you start. You can laser along your marks before swelling occurs, then add the two passes you planned for an additional effect.


A general protocol is presented in Box 7-8.


Mar 14, 2016 | Posted by in General Surgery | Comments Off on Aesthetic Surgery of the Face

Full access? Get Clinical Tree

Get Clinical Tree app for offline access