Chapter 1 THE COLEMAN TECHNIQUE
The basic principles of the Coleman technique of structural fat grafting have remained unchanged for more than three decades:
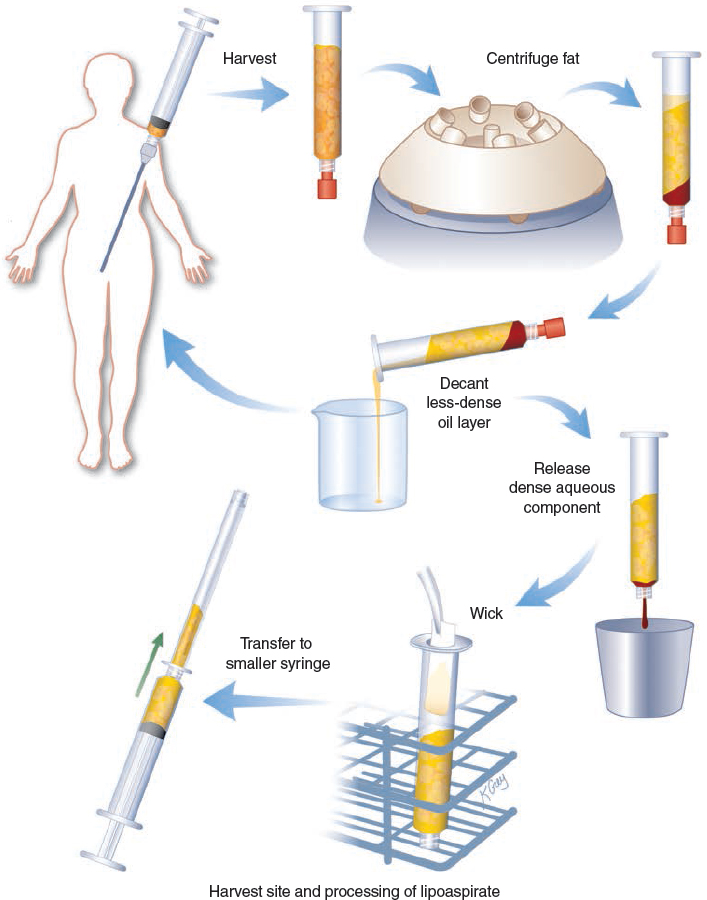
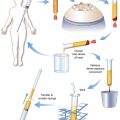
Harvesting parcels of fat with a blunt cannula and syringe using low suction
Refinement with centrifugation to facilitate removal of nonliving components
Purposeful placement of multiple small aliquots of fat into recipient tissues, separating parcels one from the other
Adherence to these fat grafting principles encourages longevity, promotes stability, and effectively integrates the fatty tissue into the host tissues. Fat grafted in this fashion creates a definitive structural change that is integrated and that can positively affect the tissues into which it is placed. The philosophy of the Coleman fat grafting technique remains fundamentally unchanged since its original publication in 1994. The Coleman technique continues to be the world’s gold standard of fat grafting after three decades of clinical application. The following is an overview of the basic principles of the Coleman technique, from harvesting through placement.
Fatty tissue, especially the adult adipocyte component, is more fragile than most other human tissues and is easily damaged outside the body by mechanical, barometric, and chemical insults. To survive harvesting, transport, and implantation with cannulas and syringes, fat must be harvested in intact parcels small enough to be inserted through a small cannula but large enough so that the tissue architecture is maintained. With the recent trend among many surgeons to smaller harvesting ports and even smaller infiltration cannulas, we need to be cautious and to carefully evaluate the longevity of fat transplanted through increasingly smaller portals. Furthermore, there are many other types of cells in fatty tissue that are important for fatty tissue to survive and function. And even if the tissue appears to be intact by histologic and enzymatic analysis, even a slight mechanical, barometric, chemical, or temperature insult can result in the tissues and cells dying weeks or even months later through apoptosis.
Harvesting
CHOICE OF HARVESTING SITE
No clear correlation between donor site location and longevity of the implanted tissues has been reported. A study comparing concentrations of stem cells from common donor sites found that the highest concentrations of stem cells were located in the fatty tissue harvested from the lower abdomen and inner thighs. 1 I select harvesting sites that enhance body contour and are easily accessible with the patient in the supine position. Because of the evidence of increased stem cell activity in the abdomen and medial thighs, I use these areas preferentially when possible, especially if I am trying to obtain a functional change, such as thickening or repair of the skin.
PLACEMENT OF INCISIONS
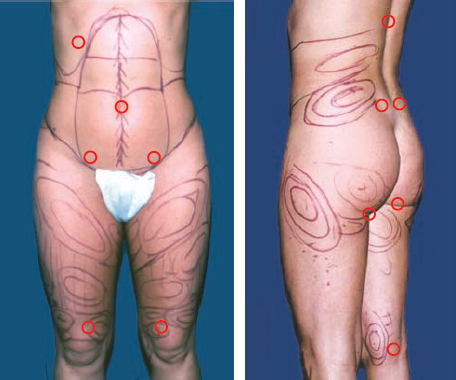
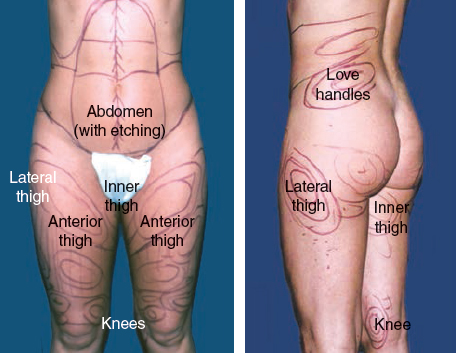
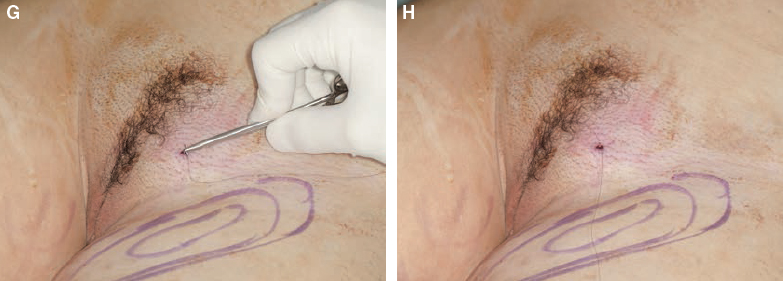
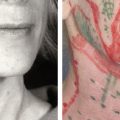
Harvesting sites are accessed through incisions placed in creases, previous scars, stretch marks, or hirsute areas (circled in red) whenever possible. The pubic region is the most useful site, because the abdomen, medial thigh, and anterior thigh can be reached with ease. To harvest fat from the upper abdomen and flanks, additional incisions can be made in the umbilicus and upper abdomen. Occasionally, an incision in the lateral hip can be used for access to the thigh as well as to the lower love handle. Incisions in the midback and lateral sacrum provide access to the love handles and the flank.
STERILE TECHNIQUE
Meticulous sterile technique is always observed, with careful attention to preoperative patient preparation with antiseptic soaps and an antiseptic agent such as povidone-iodine. Bacterial contamination of the fatty tissue can result in infection.
The choice of an anesthetic agent for harvesting depends on the donor areas and the projected volume of fat to be removed. For harvesting smaller volumes, local anesthesia using 0.5% lidocaine with 1:200,000 epinephrine is adequate.
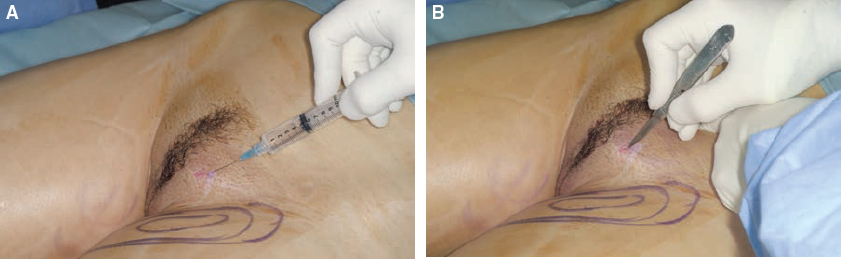
The lidocaine solution is first placed into the incision site through a sharp 25-gauge needle; incisions are then made with a No. 11 blade. The incisions for infiltration of anesthetic solutions are usually the same ones used for harvesting fatty tissue. These incisions are just large enough (usually 2 mm) to permit insertion of the tip of the harvesting cannula.
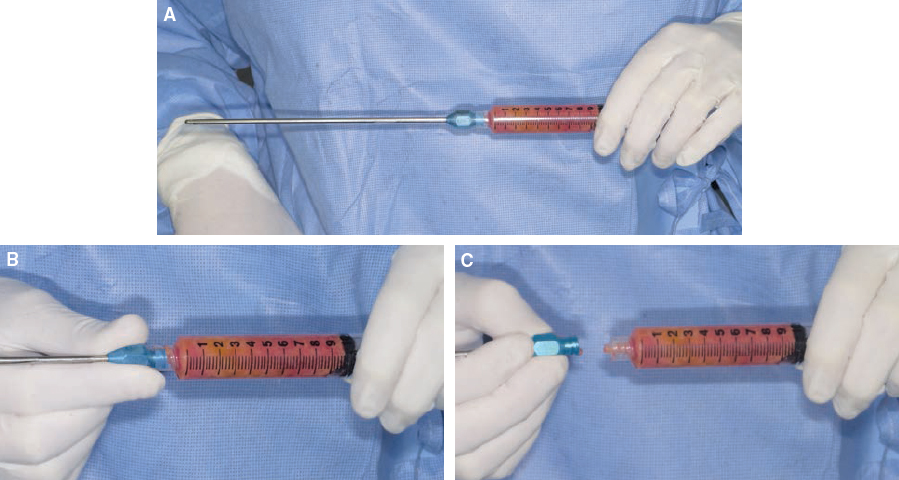
A nine-hole Coleman harvesting cannula attached to a 10 cc syringe is used to infiltrate the lidocaine solution into the projected sites of fatty tissue removal. This is the same cannula that I usually use now for harvesting of the fat. This eliminates the need for a Lamis infiltrator that I previously used for infiltration of the lidocaine solution.
The inserted cannula is attached to a 10 cc Luer-Lok syringe by the Luer-Lok connection. The 10 cc syringes are preferred for harvesting; these are small enough to be manipulated manually without locking devices. During harvesting, care is taken to minimize mechanical trauma to the fragile parcels of fat. Usually 1 ml of lidocaine is infiltrated for every cubic centimeter of fat harvested.
Propofol or general anesthesia is preferred for removal of larger volumes or when multiple sites are used. For hemostasis, Ringer’s lactate solution in a concentration of 1:400,000 epinephrine is also infiltrated in a ratio of 1 ml of solution for each cubic centimeter of fat harvested using a harvesting cannula.
Tumescent techniques are avoided during the harvesting phase. I believe that the motion of the harvested fat through large amounts of liquid in tumescent techniques may disrupt the architecture and release growth factors (see Chapter 9). This disruption of the intrinsic tissue architecture and release of growth factors may decrease the potential survival of the subcutaneous tissues. If less than 1 or 2 cc of the harvested material in each syringe is fat, then as many as fifty 10 cc syringes may be necessary to obtain 60 cc of fat; this can prolong the procedure by hours.
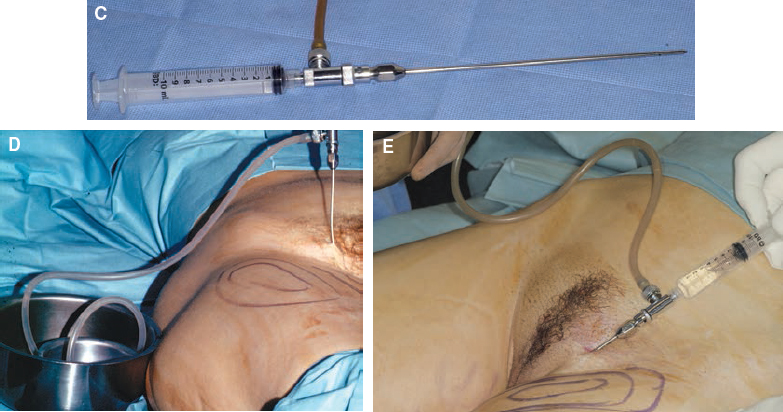
HARVESTING TECHNIQUE

Harvesting instruments for Coleman fat grafting should be efficient and minimally traumatic to the grafted tissue during both the harvesting and placement phases. Previously I used a two-hole cannula with a blunt tip and dull distal openings placed extremely close to the end for all harvesting. However, the nature of the opening of the “bucket handle” two-hole Coleman harvesting cannula was such that fat did not flow as easily through the cannula tip and/or Luer-Lok aperture. This resulted in the surgeon’s having to stop the procedure occasionally to remove the blockage.
I tried using various cannulas with a variety of configurations of number of holes and sizes of holes and tried them out in the lab on pigs then during a variety of procedures. I feel that the nine-hole configurations, as pictured above, appeared to be the most efficient combination for harvesting, and they provide a result that appears to me to give a similar or even improved result. For larger volume harvesting, I have been using a 12-gauge nine-hole cannula in two lengths, 15 cm and 26 cm. To reduce the difficulty with passage of the condensed fat through the 6, 5, and 3 cm Coleman placement cannulas, I started using a smaller 14-gauge nine-hole cannula for harvesting fat for placement into the face.
The length of the harvesting (aspirating) cannula is most often 15 cm. Although the commonly used 26 cm cannula has a greater reach, it can place greater torque on the Luer-Lok aperture and break the syringe tip during extraction. The surgeon has greater control of the tip of the cannula with the 15 cm cannula to avoid untoward incidences (see Chapter 52). It is thus advisable to use the shorter cannulas initially and to advance to longer ones after becoming more familiar with the instruments. These are also used for infiltration of the harvesting fluids.
Fatty tissue is harvested through the incisions made for infiltration of anesthetic solution. These incisions are just large enough (usually 2 mm) to permit insertion of the tip of the harvesting cannula.
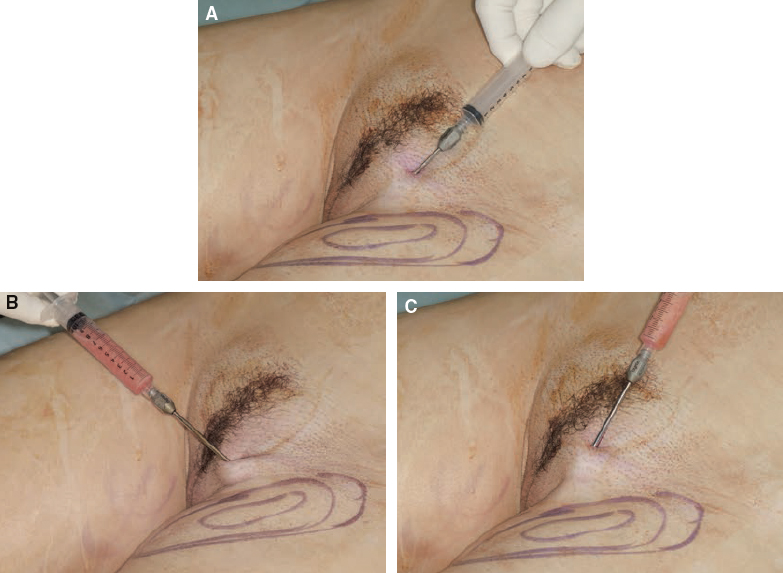
The inserted cannula is attached to a 10 cc Luer-Lok syringe by the Luer-Lok connection. The plunger is pulled back gently to minimize negative pressure. Only 10 cc syringes are used for harvesting; these are small enough to be manipulated manually without locking devices. Larger syringes are more cumbersome, and pulling back even slightly on the plunger in larger syringes might create damaging negative pressures.
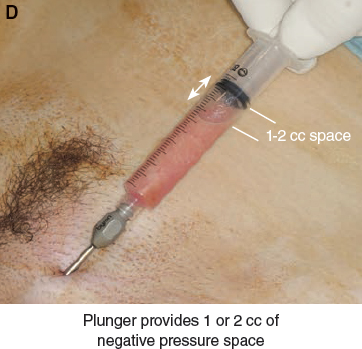
The plunger of the syringe is gently manipulated to provide 1 or 2 cc of negative pressure space in the barrel of the syringe while the cannula is pushed through the harvest site. All incision sites are closed with nylon interrupted sutures after harvesting is completed.
This manipulation can only be done manually; devices that distract then lock the plunger in a static position should never be used during harvesting for transplantation. The high vacuums created by these devices or by pulling back too far on the plunger (more than 2 cc) can increase the negative pressure dangerously, potentially to the point of vaporization (the pressure at which water boils at room temperature), which may damage the fatty parcels of tissue.
Several extensive studies support the superiority of keeping the pressure for harvesting to a minimum by using gentle, progressive syringe liposuction during the process. Pu et al 2 examined adipose aspirates collected from traditional liposuction and concluded that after traditional liposuction, the tissues “have a less-than-optimal level of cellular function and may not survive well after they are transplanted.”
Another study reinforced that syringe liposuction with a gentle progressive distraction of the plunger yielded a much higher level of cellular function than machine liposuction set to a lower level (20 cm H2O). 3
Although some studies have demonstrated that larger-bore cannulas are better for harvesting, 4 morecomprehensive studies have shown that smaller-bore cannulas connected to 10 cc syringes yield greater fat viability. 5
Superficial burns at the incision sites can occur from the repetitive friction of the cannulas against the skin margins of the incision during both harvesting and placement. As soon as fatty tissue or oil is available after the centrifugation of harvested fat, it can be used to lubricate the incision site, thereby minimizing friction burns on the edges of the incision.
I close all incision sites with nylon interrupted sutures after harvesting.
Refinement and Transfer
After the fat has been harvested, the cannula is removed from the syringe and replaced with a plug.
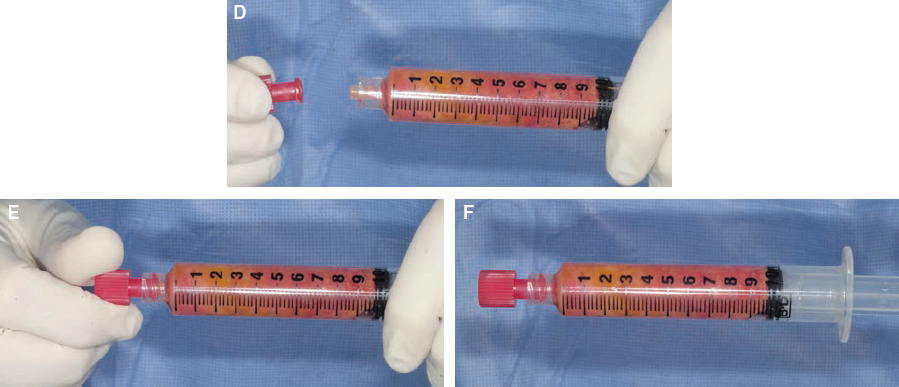
The preferred plug is a dual-function Luer-Lok plug for capping that is available in most hospitals. This plug is twisted on to create a seal that will prevent spillage during the centrifuging process.
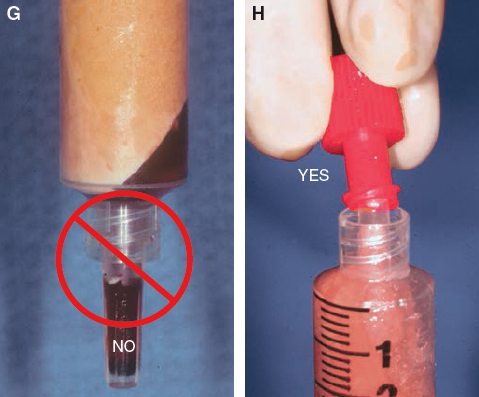
The plugs that accompany the syringe should not be used, because they frequently allow the aqueous portion of the contents to leak.
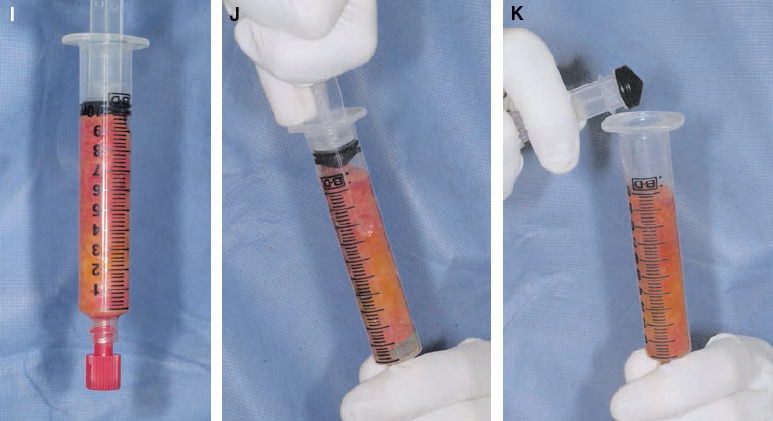
After the Luer-Lok syringe is sealed, the plunger is removed from the proximal end of the syringe.
CENTRIFUGATION
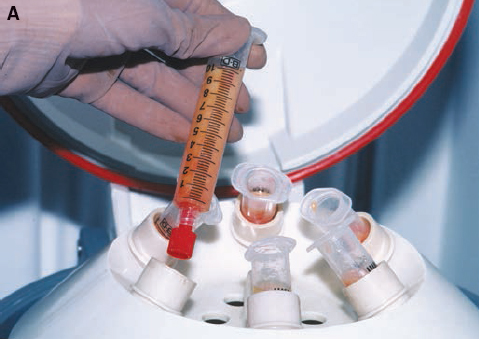
The syringe without the plunger is then placed into a centrifuge to separate the viable from the nonviable components. The recommended centrifugation creates a gravitational force of 1300 g for 3 minutes. On the pictured centrifuge, that needed force is generated at 3000 rpm by that particular diameter of rotor.
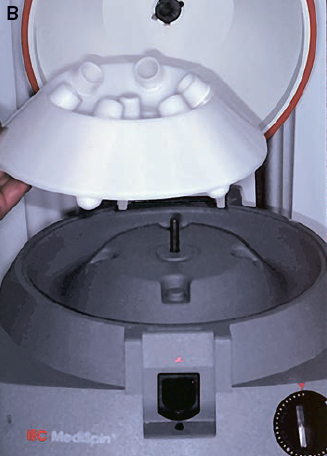
To reduce the chance of bacterial contamination during the refinement process, the rotor and sleeves of the centrifuge should be sterilized each time it is used. The centrifuge manufacturer should recommend that the central rotor be steam sterilized. Many central rotors will rust and corrode, and the paint will peel off when placed in an autoclave or in liquid solutions for sterilization. The method of securing the central rotor of the centrifuge is also important. The bolt that holds the rotor in place can rust and become difficult to secure, so I recommend a central rotor that is held in place by gravity.

Each 10 cc syringe is placed into an individual sleeve of the central rotor of the centrifuge. The placement must be even so that each syringe is balanced on the opposite side or in every other sleeve. These sleeves can be changed or emptied if the aqueous portion of the syringe spills. Care should be taken to choose 10 cc syringes and sleeves that fit into each other easily; some types of 10 cc syringes are bigger than others, and some of the centrifuge sleeves are too small.
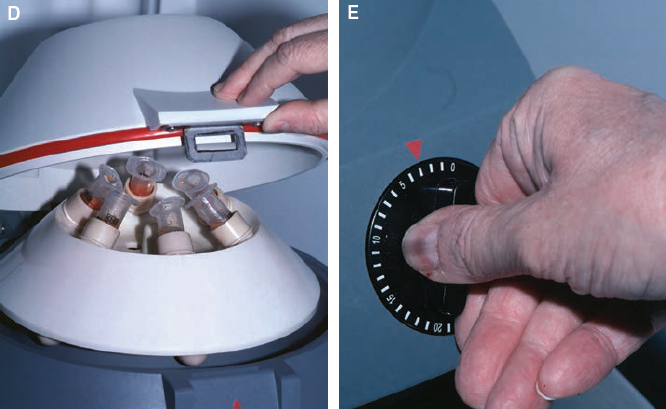
The lid on the centrifuge is then closed and locked by the circulating nurse, and the timer is set. Because the timers on centrifuges vary in reliability, it is best to check the accuracy of the timer.
After the rotor of the centrifuge has stopped completely, the circulating nurse should open the cover and the sterile technician should remove the centrifuged syringes, being careful not to touch the cover or other nonsterilized parts of the centrifuge.
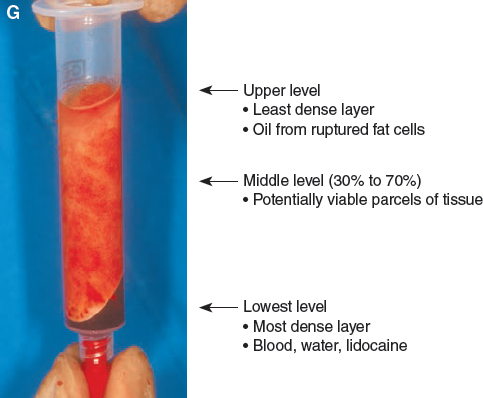
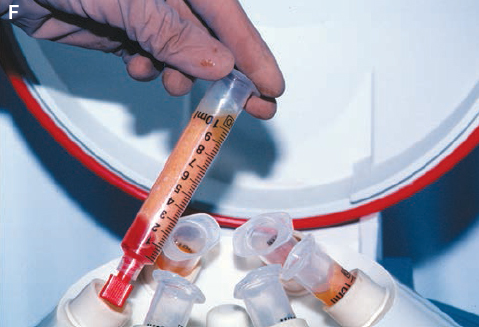
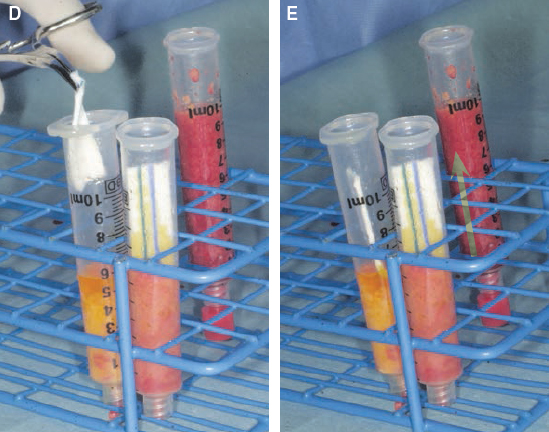
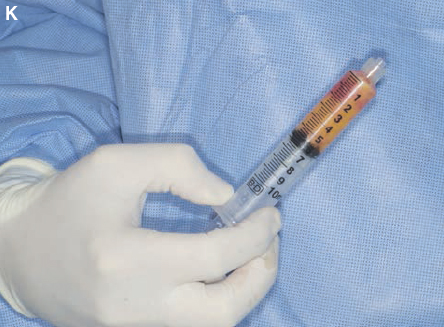
This separates the denser components from the less dense components to create the multiple layers noted previously. The upper level or the less dense level is composed primarily of oil, presumably from ruptured cells. The middle portion is composed primarily of potentially viable parcels of tissue, with more oil present in the upper portion and denser connected tissue present in the lower portion. The lowest level is the densest layer and is composed primarily of blood, water, and lidocaine.
SEPARATION OF COMPONENTS
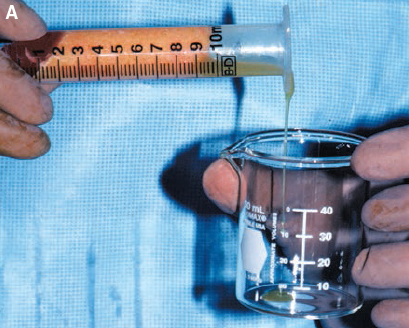
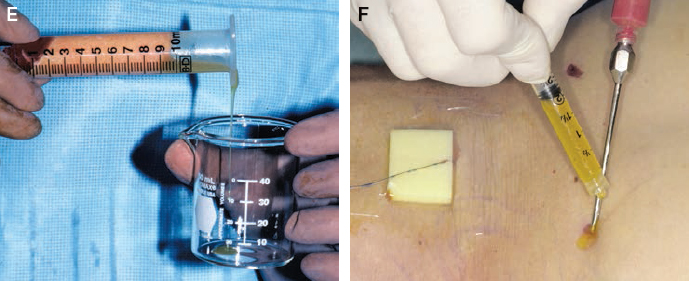
The oil layer is initially decanted before removing the plug from the Luer-Lok syringe. If the plug is removed before decanting, it will cause the vacuum that holds the contents in place to be lost, and the contents of the syringe will leak out during the decanting process. (This oil is used for lubricating both the harvesting and insertion site incisions.)
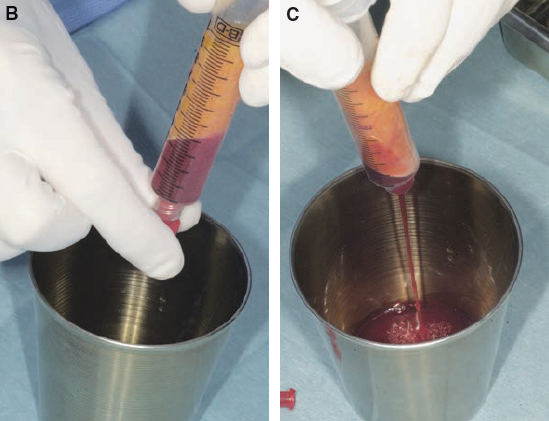
After the oil is decanted, the plug can be removed from the Luer-Lok connection. A collection vessel should be used during this maneuver, because the aqueous component will usually pour out of the syringe. Occasionally a small wad of tissue at the opening will prevent the fluid from exiting, in which case the proximal end of the syringe should be tapped lightly to free the obstructing tissue and allow the aqueous portion to drain out. On rare occasions it may be necessary to use a hemostat to pull out a bit of tissue from the aperture of the Luer-Lok syringe.
Wicking the most superior portion of the harvested fat can make it easier to remove the oily component of the harvested material. Codman neuropads are used for wicking and are placed into the surface of the refined fatty tissue; they allow the oil to gradually wick in a superior direction after a few seconds.
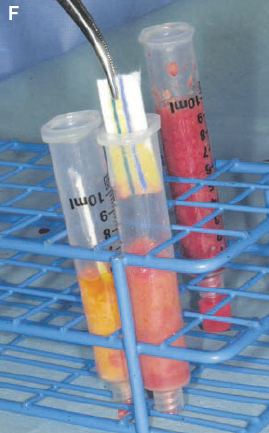
After 4 minutes the wick is replaced with another neuropad. Wicking is performed at least twice. Even though it is important to spend an adequate amount of time wicking to remove as much oil as possible, every attempt should be made to minimize prolonged exposure of any of the parcels of cells to air.
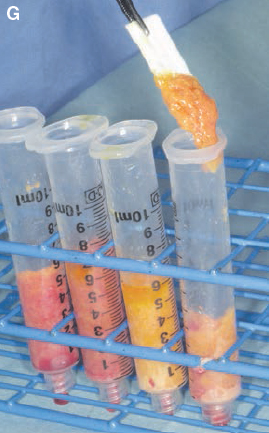
Fat will often stick to the neuropad when removed; scraping the fat off the neuropad can irreparably damage the fat. If the surgeon suspects that some of the fat has been damaged by excessive exposure to air or as a result of mechanical trauma, the fat should be discarded.
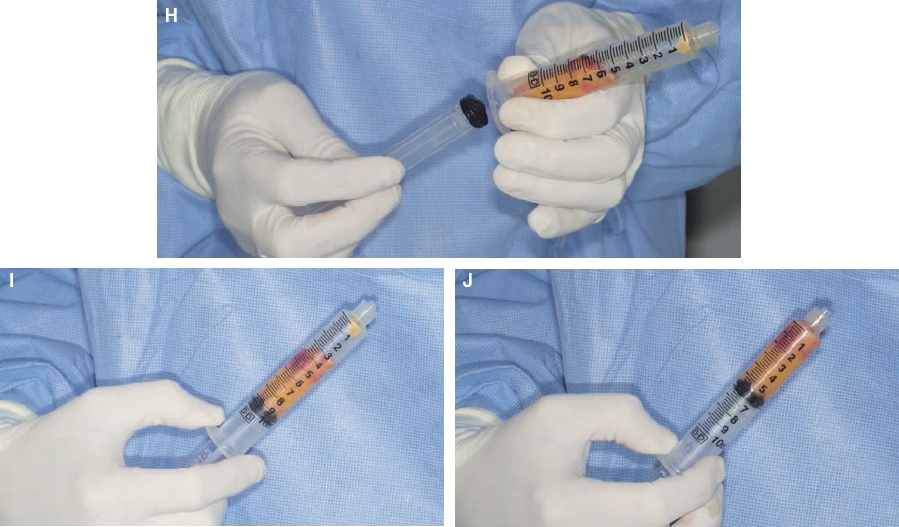
The plunger is replaced after allowing the fatty tissue to slide down to the edge of the syringe. A finger should be pressed over the Luer-Lok aperture to control the fat slippage with air pressure. The plunger is then placed into the syringe and advanced to remove the dead space.
The fat can be stored in the 10 cc syringe in this fashion for brief periods of time before it is transferred to smaller syringes for infiltration.
Related posts:
 Chapter 7 AUTOMATED SYSTEMS FOR PROCESSING THE STROMAL VASCULAR FRACTION AND CALCULATING THE NUMBER OF STEM CELLS
 Chapter 5 ANTIINFLAMMATORY STEM CELL PRINCIPLES
 Chapter 9 GROWTH FACTORS IN THE LIPOASPIRATE
 Chapter 8 DETERMINATION OF FAT VIABILITY
 Chapter 2 ANALYSIS OF THE PATIENT
 Chapter 10 AN OVERVIEW OF FAT GRAFTING TECHNIQUES
Stay updated, free articles. Join our Telegram channel

Full access? Get Clinical Tree


