7 Implant-based breast reconstruction: Tissue expander placement after mastectomy
INDICATIONS
Desire for breast reconstruction after mastectomy
Lack of adequate breast skin envelope tissue for immediate placement of permanent implant
INTRODUCTION
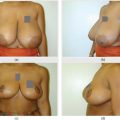
Breast reconstruction after mastectomy can be both challenging and rewarding. It offers the patient a sense of femininity and beauty following this disfiguring procedure. The immediate placement of tissue expanders after mastectomy is the most popular American method for breast reconstruction. The eventual results are pleasing from both an aesthetic and a reconstructive standpoint. The technique described in this chapter utilizes AlloDerm Acellular Dermal Matrix (LifeCell™, Branchburg, NJ) (Table 7.1) as we believe that its use allows for the creation of natural breast mound ptosis in the reconstruction. Variations of this technique have evolved since their original description in the literature more than 8 years ago. 1
AlloDerm®, 6 × 16 or 8 × 16 cm thick Antibiotic irrigation solution comprised of
Warm saline bath not to exceed 37°C Ancef 1–2 g IV and vancomycin 1 g IV given prior to mastectomy incision Blake drains, 19F, two per side Tissue expanders (author preference is low-profile, integrated port type) Sterile antiseptic skin preparation BioPatch® antibiotic-impregnated dressings for Blake drains |
PREOPERATIVE MARKINGS
Midline from sternal notch to umbilicus.
Bilateral inframammary folds (IMFs).
Measure the approximate base diameter for tissue expander size estimate.
Optional marking of circum-areolar “keyhole” or ellipse for the general surgeon to use as a skin-sparing mastectomy incision.
INTRAOPERATIVE DETAILS
Irrigate copiously with warm normal saline (NS).
Inspect for and achieve hemostasis multiple times.
Redrape with clean towels and remove all instruments and equipment used during mastectomy.
Begin soaking AlloDerm in a warm saline bath. AlloDerm is ready to use when soft and pliable throughout. This may take 10–40 minutes depending on thickness.
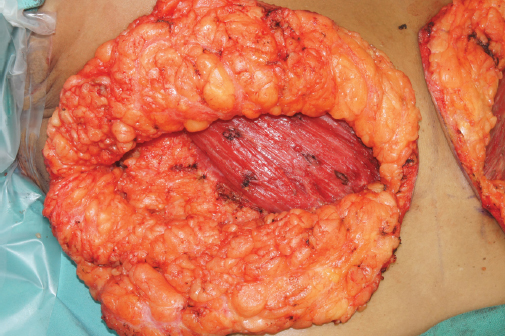
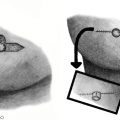
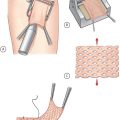
Identify the pectoralis major muscle and release the inferolateral margin of this muscle up to the 3-o’clock position on the right and the 9-o’clock position on the left (Figure 7.1).
Elevate the pectoralis major muscle off the ribs, intercostal muscles, and pectoralis minor muscle lateral to medial using Bovie electrocautery. Leave the sternal attachment above the 3- and 9-o’clock positions intact on the right and left chest, respectively.
Incise the inferior margin of the pectoralis major off the ribs, making sure to leave a cuff of fascia at the inferior margin.
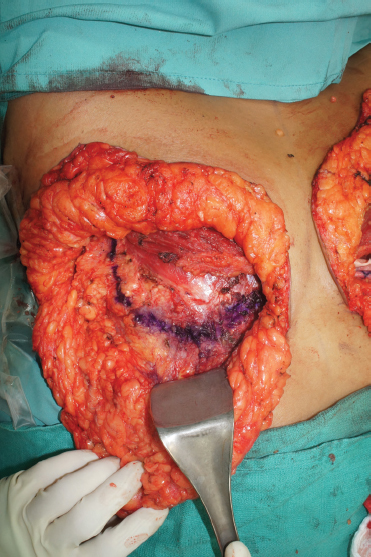
Transpose a mark of the IMF onto the chest wall by inserting a 25-gauge needle through the skin along the previously marked IMF. Use a sterile marking pen to mark the fold directly onto the chest wall (Figure 7.2).
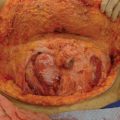
Place the AlloDerm onto the chest wall and excise a small area of its inferomedial corner for a more rounded sling. Proper orientation of the AlloDerm is imperative. It has two surfaces: dermal and basement membrane. These can be distinguished by their physical properties. The dermal surface is smooth and shiny and absorbs blood; the basement membrane surface is rough and dull and repels blood. The dermal surface should always be oriented toward the more vascularized tissue. In this case, the dermal surface (smooth and shiny) should face the underside of the skin flap, and the basement membrane surface should contact the tissue expander.
Suture the superomedial corner of the AlloDerm to the inferomedial corner of the pectoralis major muscle in a horizontal mattress fashion using 2-0 PDS (polydioxanone) suture.
Run this suture caudally along the medial border of the AlloDerm, tacking it to the periosteum or pericondrium of the underlying ribs.
Continue this suture along the inferior border of the AlloDerm, now taking purchase first of the remnant of Scarpa’s fascia at the IMF, then the AlloDerm, then the underlying periosteum along the mark that was previously drawn on the chest wall as the transposed IMF. Be sure to keep the fascial sutures from causing skin dimpling at the external IMF. Run this suture laterally along the transposed IMF and then cranially at the lateral border of the AlloDerm. Now, the AlloDerm is tacked down on three sides. (Purchase of Scarpa’s fascia is only taken along the inferomedial aspect of the IMF, stopping at the mid-clavicular line.)
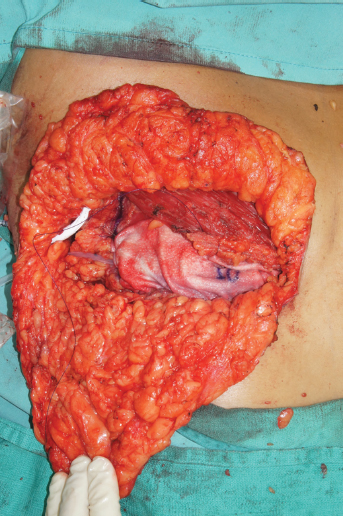
Next, place a 2-0 PDS suture from the superomedial corner of the AlloDerm to the inferomedial corner of the pectoralis major muscle and run this suture laterally, attaching AlloDerm to the fascial extension of the pectoralis major. This suture can be run midway to the end of the AlloDerm, and the suture can be protected and left attached at this point (Figure 7.3).
Now, measure the base width of the pocket. Selection of the tissue expander is based on this measurement.
Copiously irrigate the pocket with warm NS.
Place one drain into the pocket posterior to the AlloDerm along the IMF. Place the other drain anterior to the pectoralis muscle and tracking superiorly, then medially, and then down the medial border of the pectoralis major muscle. These drains should exit the skin inferior and lateral to the IMF at the anterior axillary line. Secure to the skin with 3-0 nylon sutures.
Irrigate the pocket first with copious amounts of NS to remove fat and debris. Then irrigate with the antibiotic irrigation solution described previously and allow this solution to sit in the pocket until the implant is placed.
Re-prep the skin with sterile antiseptic skin preparation solution and re-towel the area.
Change gloves.
Irrigate the expander in antibiotic irrigation solution.
Prepare the expander first by aspirating all air from the implant.
Inject 120 mL sterile injectable saline into the expander.
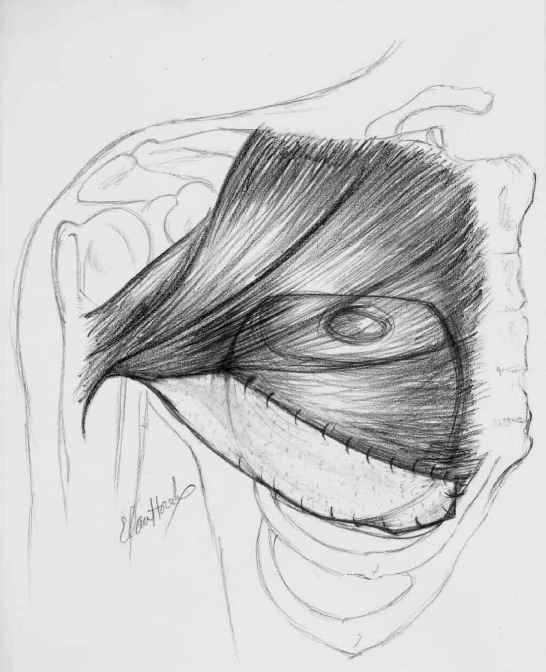
Place the implant under the pectoralis major and AlloDerm. Use caution so the implant does not contact the skin.
Continue the suture that was started and protected from the medial to the lateral margin of the AlloDerm and pectoralis major muscle (Figure 7.4).
Now, the implant can be inflated in vivo to an appropriate size that does not place tension on the pocket or the overlying skin but fills the implant as much as possible to prevent “dead space” for seroma collection.
Prior to closure of the skin, the incisional edges are sharply debrided of 1–2 mm of divitalized skin that was traumatized by retraction during the mastectomy.
The skin is then closed with 3-0 PDS suture in a deep dermal layer and a running 4-0 Monocryl® (Ethicon, Somerville, NJ) in the subcuticular layer.
Dermabond® (Ethicon) is applied to the incisions, and the drain sites are dressed with BioPatches® (Ethicon) held in place with a semi-occlusive adherent dressing.
Finally, abdominal (ABD) pads and a surgical brassiere are placed. Care is taken to keep the brassiere snug but loose fitting. Compression could compromise the skin flap.
Related posts:

Stay updated, free articles. Join our Telegram channel

Full access? Get Clinical Tree


