Introduction
It is more than a century since Alexis Carrel introduced the techniques of vessel repair in 1906. The triangulation technique founded by him was used for the repair of major vessels. The origin of modern microvascular practice is credited to Jacobson and Suarez, who borrowed the use of the operating microscope from their otolaryngology colleagues in the 1950s. With time, the diameter of the vessels anastomosed has become smaller. Achieving over 98% patency rates in the anastomosis of vessels of 1 mm in diameter is now common. In many units, surgeons have perfected techniques to regularly repair vessels as small as 0.5 mm in diameter. This has come to be called “supermicrosurgery.” It has been made possible due to the excellent optics in present-day microscopes, improved design of microsurgical instruments, availability of fine microsutures, and the stress on laboratory training by early pioneers, such as Acland.
Current research in microsurgery has shifted to designing new flaps and refining existing ones. But no matter where the advances lead, ultimate clinical success in microsurgery will depend on good technical skill in vessel anastomosis. Hence, the contents of this chapter are important. We are dealing with maneuvers where the margin for error is low. Strict adherence to basic rules during vessel preparation and actual suturing skills will ever remain the cornerstone for good microsurgical work.
Preparation of Recipient Vessels
Selection of Recipient Vessels
The location and length of the recipient vessels will be factored into the design and size of the flap. While this step is important for every flap, in some situations, such as the lower leg, it is so important that free flap surgery of the lower leg is considered to be the surgery of dissecting the recipient vessels. Recipient vessels should be away from the zone of trauma and sites of irradiation. In limb surgery, on rare occasions, recipient vessels are chosen distal to the zone of trauma. While success has been reported, this should be resorted to only when the proximal side is not available. If possible, the vessel is selected away from the joints, since around the joints the arteries have more branches and there is a valve in the vein where every tributary joins.
Exposure must be adequate to access a good length of recipient vessel. The length dissected depends upon the depth at which the vessel is situated, the size of the vessel, and the technique of anastomosis to be employed. The deeper the plane of the vessel, the greater the length of vessel that needs to be dissected for ease of maneuverability. If single clamps are used during anastomosis, it is sufficient to dissect a short length of vessel. If double clamps are used, a minimum length equal to five times the diameter of the vessel needs to be dissected on either side, for ease of application of clamps and turning the vessel to suture the back wall. The surgeon should operate with good technique, always handling the vessels by holding the adventitia and never by grasping the wall directly with forceps.
Choosing the Site of Anastomosis
The site of anastomosis is chosen away from branches and away from venous valves. As a rough guide, it is preferable to avoid them within the segment of the vessel that will be included in the clamp. If there is an arterial branch very close to the site of anastomosis, it is better to divide it because:
- •
The arterial ends retract after division and if there is any undivided branch close by, it may act as a tethering restraint and cause a kink.
- •
It makes clamp application and turning the vessel to suture the back wall difficult.
- •
It may act as a restraint in positioning the pedicle prior to wound closure.
Division of venous tributaries close to the anastomosis might also be useful in some situations. If two or three branches of the artery or vein have been ligated near the site of anastomosis, it is better to trim the vessel proximal to this region in order to avoid turbulence near the site of anastomosis.
Gross Trimming of the Adventitia
One need not strip the whole length of the vessel. Prior to applying the vessel clamp, gross trimming of the adventitia using sharp adventitia scissors is performed in the area of the proposed anastomosis and in the area where the clamp is to be applied. Trimming prior to vessel division is easier to perform and allows for the vessel clamp to work more effectively without slipping. Fine trimming is performed after division and placement of the vessels within the clamp and is described later in the chapter.
Assessing the Quality of the Recipient Vein and Artery
Recipient Vein
Large recipient veins that are at least as large as the flap vein or larger (up to twice as large) are ideal. A single or double clamp is applied and the vein is divided. If there is any doubt about the quality of the vein, the vein is flushed with dilute heparinized saline using a 5 cc syringe with a blunt small catheter, in order to assess the ease of drainage. This is judged by feel and, as a general rule, the syringe should flush smoothly and with minimal pressure. If upon division of the vein, a large amount of backflow appears, this is not necessarily a contraindication to utilizing that vein. High pressure might cause resistance to venous drainage of the flap and, in such situations, tying off one or more tributaries that drain to the vein near the anastomosis might help to reduce the backflow. In other words, what might appear as high flow from the vein after division does not affect the patency of the anastomosis provided that, when flushing the vein using a 5 cc syringe, the flow is without significant resistance. We do not have a clear guideline by which to judge whether the pressure is truly too much. But whenever we feel that there is a high backflow, particularly in lower extremity reconstructions, we make a point of keeping the leg elevated over two pillows, at least to the heart level, when the patient is lying down during the postoperative period.
Recipient Artery
After vessel dissection, good expansile pulsation of the recipient artery and clear flow in the recipient veins, as seen under the microscope are adequate to proceed with flap dissection. If in doubt, a single or double clamp is placed on the artery, the artery is sectioned, and flow is confirmed. With normal pressure maintained and no evidence of spasm, the blood should be spurting from the artery for it to be considered a good recipient vessel. This step is not required in elective free flap transfer but may be required while performing emergency free flaps and replantations. When this step is performed, the surgeon should be aware of the length of time the clamp has been placed on the vessel prior to the anastomosis. If vessel length is not an issue, we favor the use of a clip at the end of the vessel after the testing procedure, or trimming the part of the vessel where the clamp was placed. The patient should be maintaining their normal blood pressure when flow in the recipient vessels is being tested. Good-quality clamps when applied for up to 30 min have not been found to cause increased incidence of thrombosis, but clamp application for more than 60 min should be avoided. On rare occasions, the arterial backflow may be stronger than the antegrade flow. The scenario will be a good pulsatile vessel, which on division reveals a jet of flow from the distal end and a thin stream of flow from the proximal end. If spasm of the vessel is excluded as the cause for the poor antegrade flow, then the distal end could be used to supply the flap. The veins should be anastomosed in the regular manner. Backflow from the radial artery, facial artery, and superior thyroid artery have all been utilized successfully. On a few occasions, we have used the distal arterial segment to perfuse flaps in the lower leg without problems. This is recommended only in exceptional circumstances and not as the preferred option. During and after dissection, the vessels are bathed in warm irrigating solution (around 37°C), prepared by adding 20 mL of plain lidocaine and 2000 units of heparin to 200 mL of Ringer’s lactate. We use 2% plain lidocaine irrigation to prevent spasm of the vessels. Higher concentrations of lidocaine are more potent in experimental situations, but clinically we have found that 2% lidocaine is also effective. If the vessel does go into spasm, one should avoid handling the vessel; keep lidocaine- or papaverine- (3%) soaked gauze pieces over the area and flood the field with warm irrigating solution. The surgeon should avoid the temptation of frequent inspection and handling of the vessel. Usually, the spasm clears in about 5 min. When the vessel is in spasm, recognize the problem and avoid cutting the vessel end proximally in search of good flow. The cut end will still be in spasm and one may end up losing valuable length of the vessel. Excess manipulation will make things worse and patience is the key. Topical vasodilators, when used, must not be infused into the vessels. Soaked lidocaine gauze pieces are also irrigated with warm saline. Because of this irrigation and washing out, the chances of systemic problems are negligible.
Management of Flap Vessels
The length of the flap pedicle dissected depends upon flap anatomy and the recipient vessel diameter. In elective flap surgery, proper planning usually obviates the need to use vein grafts. The diameter of the vessels becomes larger as the flap vessels are dissected more proximally. One only needs to dissect until an appropriate length and reasonable match of vessel size occur. For example, if one is performing a latissimus dorsi muscle flap to the lower leg, it is sufficient to dissect up to the take-off of the thoracodorsal artery after the subscapular gives off the circumflex scapular and not go further. The size match between the thoracodorsal vessels and the tibial vessels and between the venae comitantes is reasonable. Further dissection only accentuates the size difference between the veins. The same principle is followed in dissecting perforator flaps.
It is not necessary to skeletonize the whole length of the pedicle. If the pedicle is to be tunneled beneath the skin, for example in toe transfers where one tunnels beneath the dorsal hand skin to reach the recipient vessels in the snuff box or wrist, the vessels are dissected free of excess soft tissue over a greater distance. Otherwise, a short-segment skeletonization of 2 cm is sufficient. An end-to-side anastomosis demands a relatively longer length of flap vessel than an end-to-end anastomosis, for ease of handling during suturing of the back wall.
At the end of flap dissection, leave the flap perfused for about 15–20 min. The flap vessels are not handled during this time and are bathed with warm irrigating solution and 2% plain lidocaine. Spasm is relieved and equilibration of flow dynamics occurs in the flap. If the vessel is divided when it is in spasm, after anastomosis it will also be in spasm. During pedicle division, the flap artery is clamped before the vein. If the vein is clamped first, the continuing inflow causes the flap vein to bulge, which may cause a severe vessel size discrepancy. Perfusion of the dissected flap with prepared tissue preservation solutions is never necessary prior to transfer.
It is not clear whether the blood within the flap is drained or not after flap harvest. We have always cut both the artery and the vein and allowed the blood to drain out and have not noticed any problem utilizing this method. Marking the artery and vein may not be necessary in most cases, the veins being thinner and more pliable and the presence of valves and communicating branches between the two venae comitantes being characteristic markers. But for the beginner and in certain flaps, such as the lateral arm flap, where the difference is less clear, it may be useful to mark the vessels by either vascular clip or suture. Whatever system is used, the same must be followed by every member of the team at all times to prevent confusion.
The flap vessels are divided only when everything is ready at the recipient site, to minimize the ischemia time. It is prudent to re-check the status of the recipient vessels just before division of the flap vessels. The mucosa of free jejunal flaps and free functioning muscle transfers do not withstand long ischemia times compared with pure skin flaps or bone flaps. Hence, it is better to keep the flap perfused until the recipient site is ready for transfer.
Microsurgical Instruments
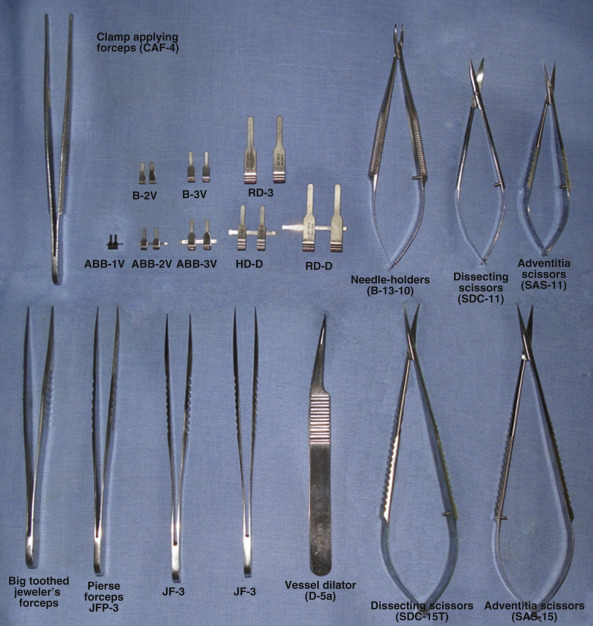
Only a few instruments are needed for regular microsurgical work, but they must be of high quality ( Fig. 25.1 ). It is preferable that a surgeon always uses the same set so that there is familiarity with the feel of the instruments. A set of jeweler’s forceps, vessel dilator, scissors, needle holders, appropriate vessel clamps, and clamp applicator forceps comprise the basic set. The tips of the forceps must be aligned with a precision of 1/1000 inch, since that is the diameter of the 10/0 nylon suture. When closed with moderate pressure, the jaws should meet not only at the tips but also evenly over a length of 3 mm, so that the thread can be picked up easily. We find Pierse forceps, distinguished by their minute “hole in the tip” ( Fig. 25.2 ), remarkably useful for holding the adventitia during general vessel preparation steps. The vessel dilator is a modified jeweler’s forceps with a slender, smoothly polished, non-tapering tip. It is designed for controlled intraluminal vessel dilatation but many use it also as a counter pressor during suturing and for tying the knots. The 10° angulated vessel dilator forceps is generally used. The scissors are of two types: the dissecting scissors have curved blades with the tips rounded at the point with a radius of 0.3 mm – they are safe for dissection; the adventitia scissors have straight blades pointed at the tip for fine trimming at high magnification – it is not advisable to use adventitia scissors for blood vessel dissection, since their sharp points pose a real danger of puncturing the vessel wall. Pick a needle holder with slender curved jaws, which permit the handling of the smallest needles and the easy tying of the knots with fine thread.

Instruments of 12 cm in length are generally used. Smaller ones can only be used on the surface. The deeper the work that needs to be done, the longer the instruments that are required. Spring tension of the instruments is important. There must be a balance between strong tension, which causes fatigue of the thenar muscles, and weak tension, which causes the instruments to slip from the hand. To test the spring of an instrument for weakness, Acland advises the surgeon to pick it up and hold it with just enough force that the limbs are 1–2 mm apart. Then, maintaining just that force, pronate the forearm completely so that the instrument hangs upside down. If it falls away from the hand, the spring is too weak. To test for excessive firmness, hold the instrument gently closed for 10 min. If one feels pain in the thenar muscles, the spring is too strong. The spring tension must lie between these two extremes. Locking instruments are no longer used.
Suture Material
Sutures for microvascular surgery are now exclusively made of nylon or polypropylene and are available in the range of 8.0–12.0. Only rarely are the finer sutures beyond 10.0 used in free flap surgery. They find their use mostly in very distal fingertip replantations, in small children, and in lymph vessel anastomoses. The needles are of a taper point with a round body, flattened in the middle to improve stability in the needle holder. Standard needles are 50 µm and 70 µm in size. They are honed under the microscope and the needle to thread attachment is rigidly tested to avoid breakage during use. Choice of suture material depends upon the diameter and thickness of the vessel wall. Thinner sutures create finer-looking repairs but a greater number of sutures are needed. Thick-walled vessels need more solid needles and thicker sutures. As a general guide, use 9.0 sutures for vessels of ≥2 mm in diameter, 10.0 sutures for vessels of 1–2 mm, and finer sutures for vessels of lesser diameter.
Coaptation Devices
Attempts to find a safe and easy non-suture technique of microvascular anastomosis have been in progress for more than three decades. Non-suture techniques can be categorized into five groups based on the materials used: ring coupling devices, clips, adhesives, stents, and laser welding. The most successful is the microvascular coupler system ( Fig. 25.3 ). The coupler device has rings that consist of 1–4 mm diameter in two equally-sized opposing rings, into which six pins are machined, with the pins being of 0.16 mm shaft diameter in the small ring. Each end of the vessel is fed through the center of an appropriately sized ring, the vessel ends are a ring and everted 90°, and then impaled on small pins, which pass from the outer to the inner surface of the vessel over each pin in turn. This is achieved using specially designed forceps, which allow passage of the pin through a small hole in the tip, while pressing the everted vessel wall down onto the ring. Closing the coupler device brings the two rings into opposition, so that each set of pins becomes seated into the opposite ring, bringing “clamping” of the inner surfaces of the two vessel ends together.
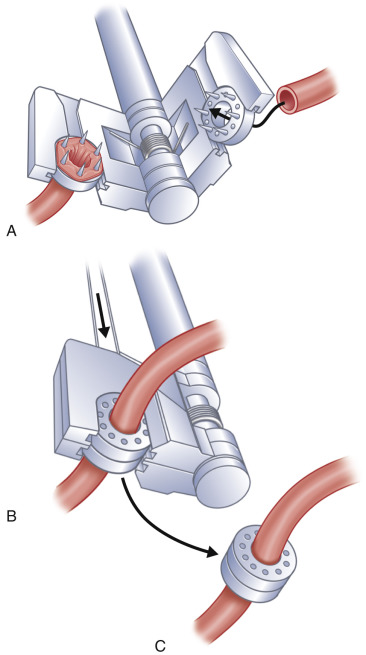
The coupler technique involves preparing the vessel ends as described earlier. A special sizer is used to measure the lumen diameter of each vessel. Seven sizes of coupler are available, from 1.0 mm to 4.0 mm, with increments of 0.5 mm. When there is a discrepancy in the size of the two lumens, the smaller of the two is used to select coupler size. Up to a 3 : 1 discrepancy in size can be accommodated in this way. The coupler devices are intended for vessels with an outside diameter of 0.8–4.3 mm, with a wall thickness of ≤0.5 mm. As with hand-sutured anastomoses, it is important to pay attention to the orientation of the vessels to prevent kinking. It is also helpful to fix the coupler to the longer, or more mobile vessel first, as this makes passage of the second vessel through its ring easier. Care must be taken not to exert excessive traction on the vessels while maneuvering the coupler device. Once both vessel ends are everted over the pins, the coupler is closed by turning the handle. A final squeeze is applied with a hemostat to ensure closure, before carefully retracting the device.
Compared with the “gold standard” of small vessel anastomosis with 10.0 sutures, many studies have proven that anastomoses by coupler devices are completed 4–5 times faster, with patency rates approaching 100%. The strength of the anastomosis is also good and it is especially useful for anastomoses in deep wounds with difficult access. It is a little more difficult to do in thicker arteries or atherosclerotic vessels, since eversion is difficult. Coupler devices are best suited for minimally discrepant, soft, pliable venous microvascular anastomoses, though now it is being advocated even for veins with a 3 : 1 discrepancy in size. The coupler is less suited to thicker arteries or atherosclerotic vessels, since eversion is difficult.
The technique involves preparing the vessel ends, as described earlier. The MCA microvascular sizer is used to measure the lumen diameter, while the vessel is being dilated with the vessel dilator. There are five sizes, from 1.0 mm to 3.0 mm, with increments of 0.5 mm. When there is discrepancy of the vessel lumen, the use of the coupler size is equivalent to that diameter measured on the smaller vessel. Couplers have also been used for arteries, but their use is better restricted to good vessel conditions.
The coupler has been described for use in an end-to-side anastomosis, particularly in head and neck surgery, where it can be used to anastomose onto the internal jugular vein. A coupler may also be useful for anastomoses in deep wounds with difficult access. In future, the frequency of usage of ring pin couplers, clips, and other non-suture techniques will increase, but suturing will still be needed for vessels with severe atherosclerosis and in circumstances where vessel edges are difficult to evert.
The literature is sparse in articles dealing with the use of couplers with atherosclerosis and with size discrepancy. Draper and colleagues, in a large series of breast reconstructions (47 TRAM and 22 DIEP), had a high rate of success but in optimal conditions of artery and of caliber.
Vessel Set-Up for Suturing
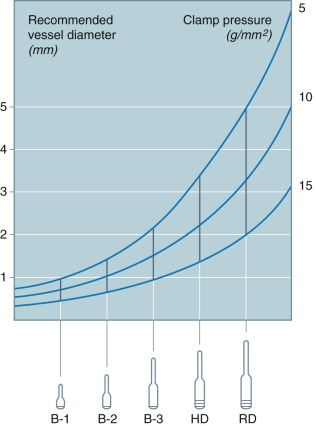
If the two ends of the vessels to be sutured are kept well approximated without tension and the pedicle lies without kinking, the stage is set for success. The actual maneuver of suturing then becomes a simple exercise. It is important to choose the correct clamp size for the vessels. Clamps for microsurgery come in five sizes: B-1, B-2, B-3, HD, and RD, with a suffix V or A attached to each. Thus in each category, we will have two clamps (e.g., B-1V and B-1A). The clamps with code V are not designated solely for veins, but are used as the general-purpose clamp for application to all veins and practically all arteries. The A pattern is used for exceptionally thick-walled and slippery arteries. The slight incurve of the tips of the A pattern jaw gives extra security against slippage. If, when applying a V clamp, the vessel slips out, an A clamp can be used. Clamps may also slip if the adventitial stripping is inadequate or inappropriate smaller clamps are used. The clamps are available in two finishes, black or plain, with the black being preferred to avoid glare from the bright microscope light.
Closing pressure is an important consideration when choosing the clamp. The pressure is determined by the closing force of the clamp (in grams, g) divided by the area of the vessel wall that is compressed between the jaws (in square millimeters, mm 2 ). Thus, the pressure is inversely proportional to the vessel size. The smaller the vessel inside the clamp, the higher the pressure. A good-quality clamp exerts a pressure of 5–10 g/mm 2 when used on the largest vessel in its size range, and 15–20 g/mm 2 when used on the smallest recommended vessel. There is a 50% overlap in the recommended vessel diameter range between each clamp size and the next larger or smaller ( Fig. 25.4 ). Thus, for any exact vessel diameter, there will always be two suitable clamps. The smaller clamp is preferred whenever possible.