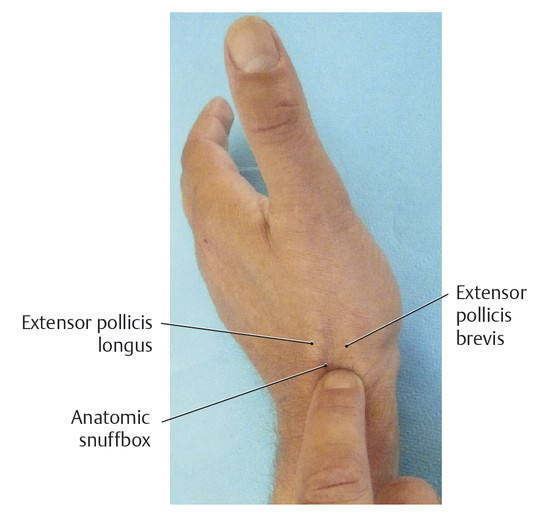
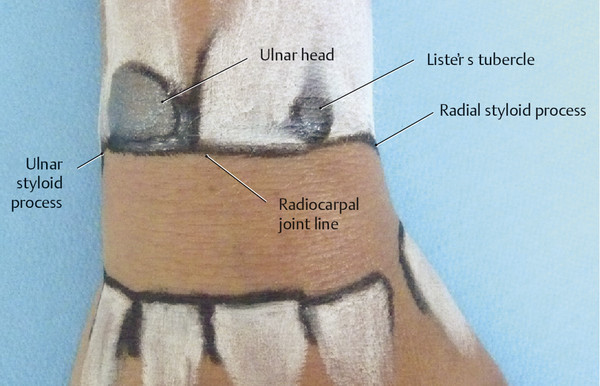
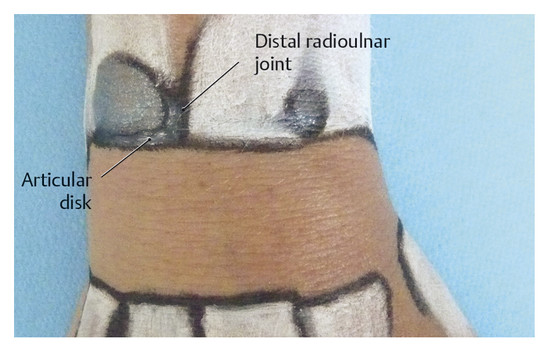
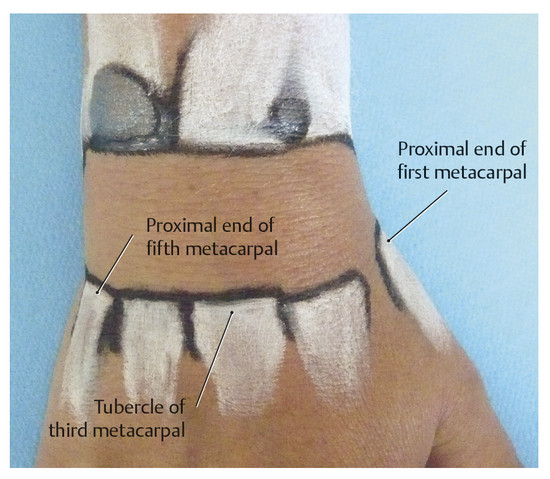
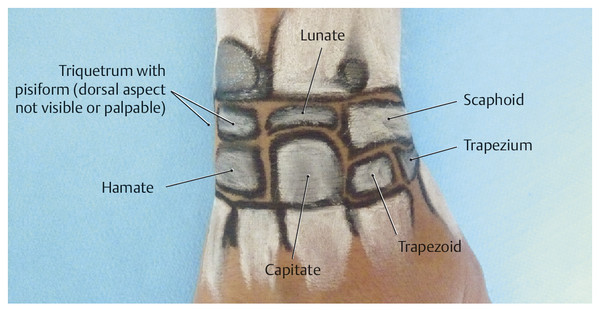
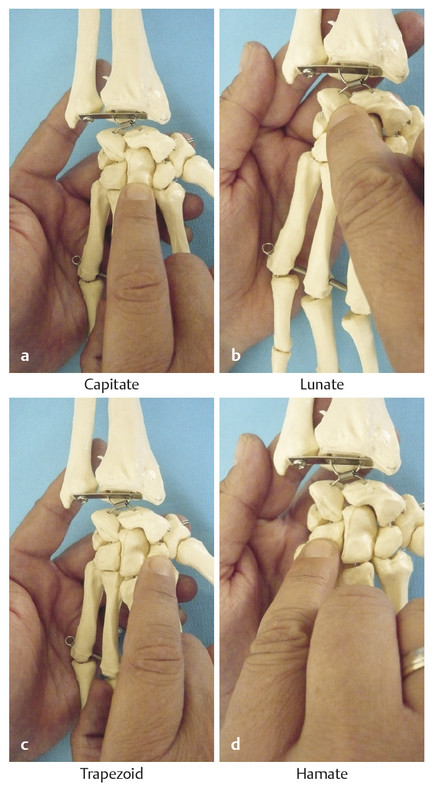
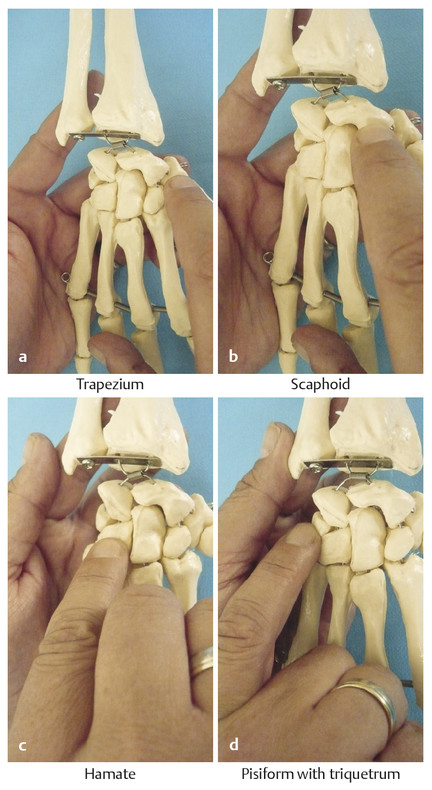
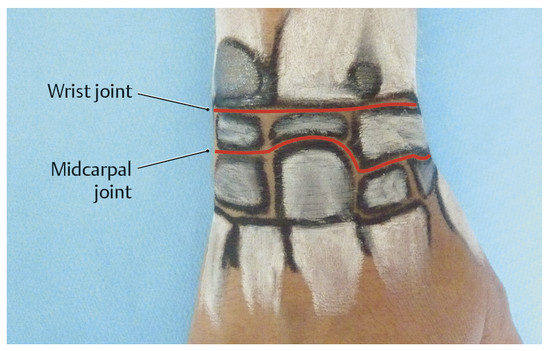
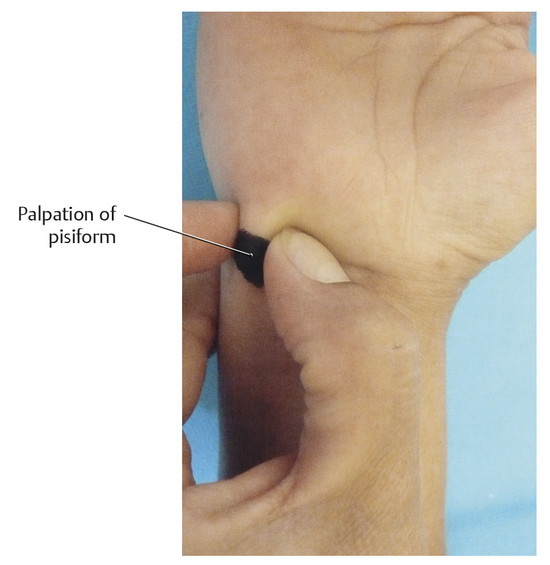
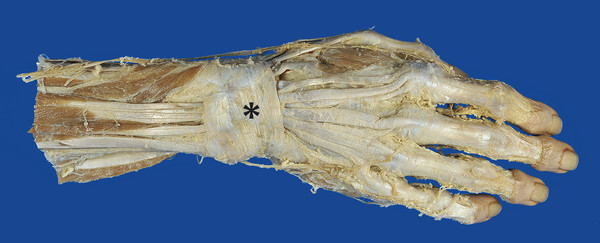
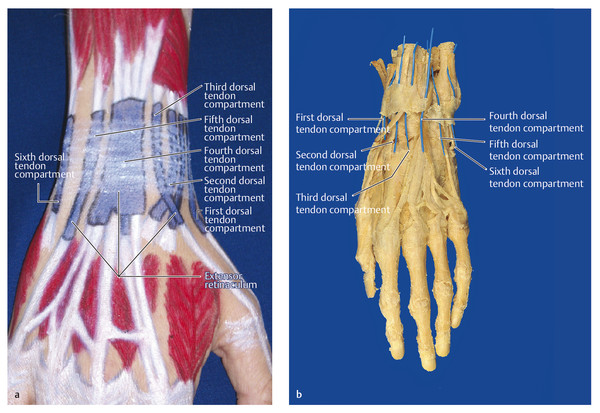
Surface Anatomy of the Forearm, Wrist, and Hand Structures Surface anatomy provides an opportunity to transfer theoretical knowledge of anatomy to treatment procedures. It enables practitioners to palpate, locate, and define structures of the human body. It also gives therapists an impression of how a specific tissue feels and enables them to assess its structure to distinguish physiological from pathological tissue changes. Surface anatomy therefore provides the basis for making an accurate diagnosis and prescribing an appropriate treatment. Without the ability to implement theoretical and anatomical knowledge in the living patient, appropriate tissue-specific treatment cannot be applied. Lack of familiarity with location and the uneasy feeling that one’s knowledge of muscles is inadequate (i.e., origins and attachments, as well as of tendons and tendon sheaths, joint structures, fascia, etc.), often results in an uncontrolled, nonspecific, erratic, and inappropriate choice of treatment techniques. This signifies an unqualified approach to treatment. This in turn results in disproportionately long treatment times and possible progression of the disease process, which is not in the patient’s best interest. Surface anatomy involves the specific systematic implementation of topographic and anatomical knowledge through targeted palpation of the living human body.207 This chapter on surface anatomy intends to provide practitioners with a systematic method for quickly and reliably finding all of the structures that are important for treating the hand. Targeted palpation of hand structures is featured in five major areas related to hand treatment: Palpation serves to identify, differentiate, and determine the location of tissues of the forearm, wrist, and hand, and directly compare the types of tissues based on inspection and palpation. Surface anatomy plays an important role in the examination and treatment of skin, muscles, tendons, tendon sheaths and joints, etc. For diagnosis and treatment, surface anatomy specifically helps to identify pathological structures that can then be treated through specific, coordinated movements (e.g., testing of the play in the wrist joint). Surface anatomy is an integral component of a professional therapeutic procedure that is specifically related to the damaged tissue. Practicing surface anatomy on patients on a daily basis is a prerequisite for locating and differentiating tissue (e.g., muscle tone). It is based on experience and requires constant refinement and training, even among therapists who have been practicing for years. Note Surface anatomy can be defined as follows: Conclusions Surface anatomy involves the palpation and visualization of visible and nonvisible but inferable structures of the living human body. It helps in applying theoretical anatomical principles to the living human and provides the foundation for functional and kinetic mode of thought in the sense of homeokinesis. Since not all of the structures of the human body can be palpated, in-depth knowledge of the anatomical setting is an absolute prerequisite, since this is the only way to discern the location and trajectory of nonvisible structures. “Surface anatomy” is therefore a prerequisite for proper diagnosis and treatment. The fingertips are the tools of surface anatomy. In addition to the face and the tongue with the mouth,8 the fingertips, with approximately 300 receptors per square centimeter of skin, are the structures of the body with the largest number of proprioceptors.104 Owing to its great mobility, the index finger is the most important finger for identifying surface anatomy. By applying pressure from the fingertips, the examiner attempts to feel and analyze the underlying tissue and assign it a specific tissue structure. The amount of pressure used and the structure’s resistance to the pressure provide direct feedback about the type of tissue. Dos Winkel et al’s classification (1985)275 is helpful for defining the palpated structures: Hard: Structures that cannot be deformed by the pressure of the examiner’s hand (bone or horn). Firm and elastic: Structures that yield to pressure and spring back lightly without being able to be deformed (e.g., tendons, ligaments). Firm: Structures that yield to pressure easily but are not elastic (e.g., hypertonic muscles, tumors). Soft: Easily deformed tissue (e.g., muscles, fatty tissue). For this classification, it is very important for the examiner to apply the right amount of pressure.207 Minimal pressure should be used for surface palpation or palpation of muscle tone. Strong pressure should be used for deep palpation or for palpating bones. As a guide, you should observe your own fingernails, which will be white when the pressure is strong and will remain red when the pressure is light. Not all of the tissue structures can be palpated in a certain area. Hence, it is important to be familiar with the topographic anatomy. With this knowledge, the easily palpable structures can be used to locate the nonpalpable structures. When examining the muscles of the lower arm and hand, the following landmarks should be identified to help with orientation: carpal bones, and the six dorsal and three palmar tendon compartments in the wrist area. Once these structures have been located, the superficial and deep extrinsic extensor and flexor muscles of the hand can be identified. The hand should be in a relaxed position during palpation. It is imperative that the patient avoid any muscle activity; otherwise the overlying tendons and muscles will tense up and prevent the examiner from identifying the deeper-lying structures. To indicate position and direction, the following terms are used: radial (toward the thumb), ulnar (toward the little finger), distal (away from the body), proximal (toward the body), dorsal (toward the back of the hand), and palmar (toward the palm).207 To visualize the palpable tissue, the structures are marked or outlined with a skin marker. To locate the radioulnar joint and the individual carpal bones dorsally, the first step is to mark the delimiting surfaces of the wrist. To do this, the lower arm of the person being palpated is placed in a relaxed, pronated position. To identify the proximal border of the carpus, the radial styloid process, dorsal tubercle of the radius (Lister’s tubercle), and styloid process of the ulna with the ulnar head must be palpated. With these three landmarks, the radiocarpal joint line can be identified and the location of the distal radioulnar joint and the proximal wrist joint can be discerned. The index finger is moved laterally over the anatomic snuffbox proximally, toward the radius. The radial side of the anatomic snuffbox is formed by the tendons of the abductor pollicis longus and extensor pollicis brevis muscles (= first dorsal tendon compartment) ( ▶ Fig. 2.1). On the ulnar side, it is delimited by the tendon of the extensor pollicis longus muscle. When the thumb is extended, the anatomic snuffbox is easy to see, as it forms a hollow space. The large, blunt radial process can be felt as a clear bony edge and is marked with a skin marker. Lister’s tubercle is located in the middle of the distal radius, slightly proximal/ulnar to the radial styloid process. The index finger used for palpation follows between the second and third metacarpals to the distal radius. Lister’s tubercle can be felt directly as a prominent bony tuberosity at the dorsal radial surface. If the finger moves slightly distally from this point, it will directly meet the proximal edge of the wrist joint. A skin marker can be used to mark two landmarks at the same time, namely Lister’s tubercle and the proximal wrist joint line. The ulnar head can be easily seen and palpated at the distal end of the ulna and should be circled with the marker. Then, the index finger used for palpation is moved proximally and laterally to the hypothenar, toward the ulnar head. At the ulnar head, the ulnar styloid process can be easily palpated as a rod-shaped process and it is marked to serve as an additional reference point. If all the marked points are connected, the radioulnar joint line will become visible ( ▶ Fig. 2.2). In so doing, it will become clear that the orientation of the joint line is not exactly at a right angle to the forearm, but instead follows a proximal trajectory from the radial aspect toward the ulna at an angle of approximately 15°. Fig. 2.1 Anatomic snuffbox. Fig. 2.2 Radiocarpal joint line and its structures. If the palpating index finger is moved from the ulnar head toward the radius, the fingernail will end up directly between the ulna and the radius, that is, across the joint line of the distal radioulnar joint ( ▶ Fig. 2.3). Fig. 2.3 Distal radioulnar joint. The metacarpophalangeal joint line is described based on the following three reference points: Proximal end of the first metacarpal: The palpating finger is placed in the snuffbox. During the alternating reposition and opposition of the thumb, the prominent part of the proximal end of the first metacarpal can be palpated and then is marked with the marker as the first reference point. Tubercle of third metacarpal: The palpating index finger is moved in proximal direction toward the wrist across the middle finger and the third metacarpal. Directly after the base of the metacarpal bone, a definite hollow can be felt in which the capitate is located. The second reference point is located directly in front of the hollow of the capitate and marked. Proximal end of the fifth metacarpal: Palpation continues in a proximal direction across the lateral part of the little finger and across the hypothenar. Shortly behind the fifth metacarpal, a small hollow can be palpated in which the lateral surface of the hamate is located. The area in front of the hamate hollow is marked as the third reference point ( ▶ Fig. 2.4). The three bone points are then connected with the marker and the metacarpal joint line becomes visible. Between this and the proximal radiocarpal joint line, the location of the seven carpal bones can be nearly exactly defined and palpated ( ▶ Fig. 2.5). The eighth carpal bone, the pisiform, can only be palpated from the palmar side. However, it is also possible to locate it indirectly from the dorsal aspect via the triquetrum. Fig. 2.4 Proximal part of the metacarpals. Fig. 2.5 Carpal bones. The starting point for palpating the seven dorsal carpal bones is the capitate ( ▶ Fig. 2.6a). Its hollow distinguishes it from the other carpal bones, making it easy to palpate. The lunate is located proximal to the capitate ( ▶ Fig. 2.6b), while the trapezoid is located on the radial side of the capitate ( ▶ Fig. 2.6c) and the hamate is located on the ulnar side of the capitate ( ▶ Fig. 2.6d). Fig. 2.6 Palpation of carpal bones I. (a) Capitate. (b) Lunate. (c) Trapezoid. (d) Hamate. After these carpal bones have been palpated, the trapezium is palpated radially via the trapezoid ( ▶ Fig. 2.7a). The scaphoid is located between the trapezium and the radius ( ▶ Fig. 2.7b). On the radial side, these two bones can also be palpated easily via the snuffbox. To do this, both of the palpator’s index fingers are placed in this hollow with the proximal index finger making contact with the scaphoid and the distal index finger making contact with the trapezium. While alternating between ulnar and radial deviation of the wrist, the finger gliding down the radial styloid process and, palpating deeply, feels the joint line between the scaphoid and the radius. The radial collateral carpal ligament is located here, but cannot be palpated. Fig. 2.7 Palpation of carpal bones II. (a) Trapezium. (b) Scaphoid. (c) Hamate. (d) Pisiform with triquetrum. With the wrist in ulnar deviation, the joint line can be felt one fingerbreadth further distal between the scaphoid and trapezium ( ▶ Fig. 2.8).275 The radial artery and its pulse can also be palpated at the radial styloid process below the tendon of the abductor pollicis longus muscle, lateral of the snuffbox. Fig. 2.8 Proximal and distal wrist. The palpation then continues across the capitate to the hamate. The triquetrum is in front of or proximal to this bone with the pisiform located on the palmar aspect ( ▶ Fig. 2.7d, ▶ Fig. 2.9). The articular disk is located proximal to the triquetrum, with the ulna next to this carpal bone. Fig. 2.9 Palpation of the pisiform. The proximal joint line of the wrist is located between the proximal carpal bones (triquetrum, lunate, and scaphoid) and the ulna and radius. Between the proximal carpal bones on one side and the hamate, capitate, trapezoid, and trapezium on the other side, the S-shaped joint line of the distal wrist can be palpated. All of the carpal bones and the two joint lines are outlined with the skin marker. Note The ability to palpate the carpal bones competently is a basic prerequisite for diagnosing and treating wrist problems. Improper palpation or failure to maintain mobilization between the individual carpal bones (“joint play mobilization”) leads to inadequate results that can actually worsen the existing pathology. The central part of the extensor retinaculum arises from the radial styloid process ( ▶ Fig. 2.10). It is approximately 1.5 cm wide, courses proximally and is attached to the ulnar styloid process up to the palmar surface of the triquetrum. Its fibers fan out proximally and distally up to around 5 cm. It forms six osteofibrous canals and is fused with the tendons and tendon sheaths running within it, as well as with the underlying bones and the distal radioulnar joint.229 Via the extensor retinaculum, all extrinsic extensor tendons of the hand retain their relationship to the forearm, even during extensive movements of the hand and during pronation and supination ( ▶ Fig. 2.11).207 Fig. 2.10 Extensor retinaculum (*) in a specimen. Fig. 2.11 The six dorsal tendon compartments. (a) Overview of the six dorsal tendon compartments. (b) The six dorsal tendon compartments in a specimen.
2.1 Introduction
Surface anatomy =
anatomical topography × technique × experience
2.2 Practical Foundations of Surface Anatomy
2.3 Practical Procedure for Surface Anatomy of the Forearm, Wrist, and Hand
2.3.1 Surface Anatomy of the Distal Radioulnar Joint and Wrist
Radiocarpal Joint Line and Its Structures
Metacarpophalangeal Joint Line and Its Structures
Dorsal Carpal Bones
2.3.2 Surface Anatomy of the Six Dorsal Tendon Compartments
Stay updated, free articles. Join our Telegram channel

Full access? Get Clinical Tree


