Summary
Two distinct flaps, the paramidline forehead flap and the nasolabial flap, are most suitable for nasal reconstruction.
Although they should not be considered interchangeable, either pedicle flap can be considered for the majority of defects without lining.
Paramidline forehead flaps should be considered the gold standard for the majority of nasal reconstruction and the only flap suitable for nasal reconstruction with lining deficits.
8.1 General Considerations
Two distinct pedicle flaps for nasal reconstruction are described: the interpolated nasolabial flap and the paramedian forehead flap. The flap selection between nasolabial flap and paramedian forehead flap is dictated primarily by surgeon’s preference, but the flaps should not be considered interchangeable. Nasolabial flaps are suitable for patients with a distinct nasolabial fold and cheek redundancy and who have either ala, tip, or soft triangle defects with intact lining. Advantages of the nasolabial flap include technically simpler flap harvest, the ability to harvest under local or intravenous sedation only, and much easier postoperative wound care.
The disadvantages include a tendency toward pincushioning and the inability to provide large areas of robust soft-tissue coverage in comparison to the paramidline forehead flap.
The paramidline forehead flap is exceedingly reliable and predictable and should be the first choice for nasal defects of any significance. The contraindications to forehead flaps are few and include current anticoagulation with clopigel and the inability of the patient to understand or comply with the postoperative course, including follow-up visits, surgery, and dressing changes. Forehead flaps can be performed with some difficulty under local or sedation anesthesia, but greater precision and greater patient comfort result if the initial procedure is performed under general anesthesia.
8.1.1 Nasolabial Flap (▶ Fig. 8.1a–f)
Flap Design
For the nasolabial flap design, the only sizing decision is the height of the defect. The vertical height of the defect is transposed to the cheek after placing the cheek under stretch and marking the vertical height of the flap with calipers and ink. A reverse Gilles test will confirm sufficient flap length, and remembering that the majority of the nasolabial flap laxity is obtained from the perioral cheek, the distal extent of the flap can be positioned lateral to the commissure. 1 The absence of a nasolabial fold is an absolute contraindication to elevation of a nasolabial flap as the scarring will be unacceptable. 2 After the vertical and horizontal dimension of the flap is determined, the flap is designed again with the cheek placed under mild stretch to avoid oversizing. The flap dimensions include a planned dog-ear excision and this excess skin is utilized as a handle before being discarded (▶ Fig. 8.2, ▶ Fig. 8.3, ▶ Fig. 8.4, ▶ Fig. 8.5, ▶ Fig. 8.6, ▶ Fig. 8.7, ▶ Fig. 8.8).
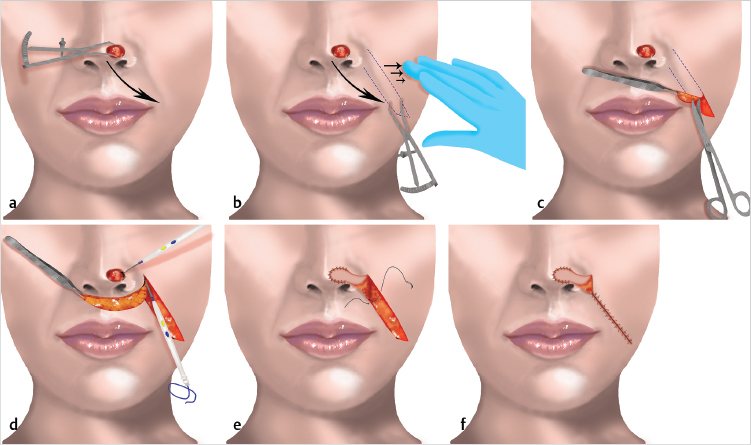
Fig. 8.1 (a,b) The vertical height of the defect is transferred to the cheek with the inferior margin being the nasolabial fold. General traction is placed to prevent oversizing the flap. (c) The flap is sharply elevated to the level of the ala. (d) Bovie cautery is utilized at the flap corners and proximal defect. (e,f) The cheek is meticulously closed, but care is taken to avoid compression of the pedicle.
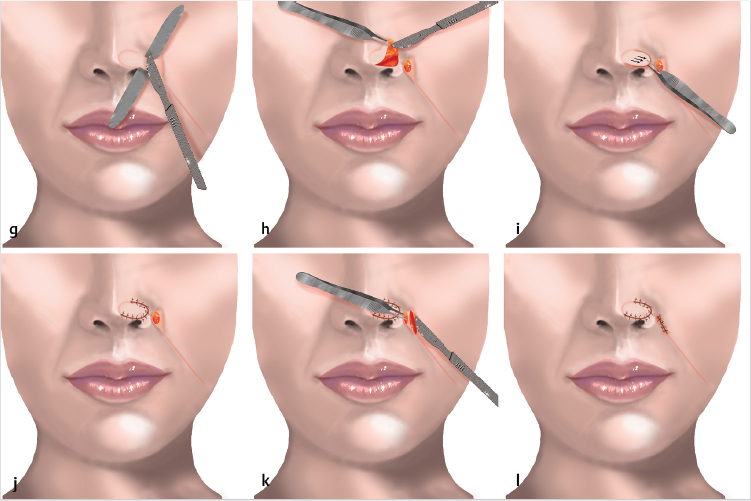
(g) The flap is sharply divided at 3 to 5 weeks. (h) The flap is elevated up to 80% of its volume and aggressively thinned prior to final inset. (i,j) The flap is inset under slight tension. (k,l) No attempt is made to keep any of the pedicle remnants; it is excised and discarded and the resulting incision closed.
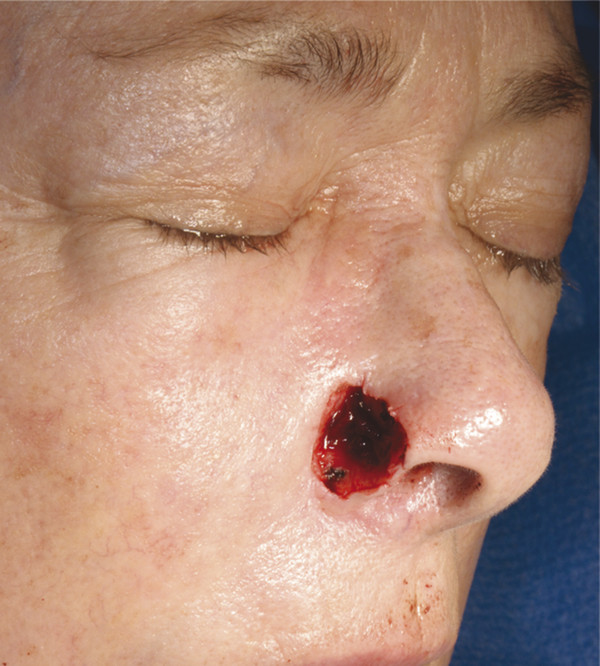
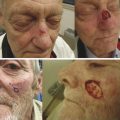
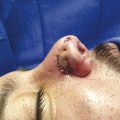
Fig. 8.2 A 72-year-old female patient status post Mohs excision for basal cell carcinoma at right ala.
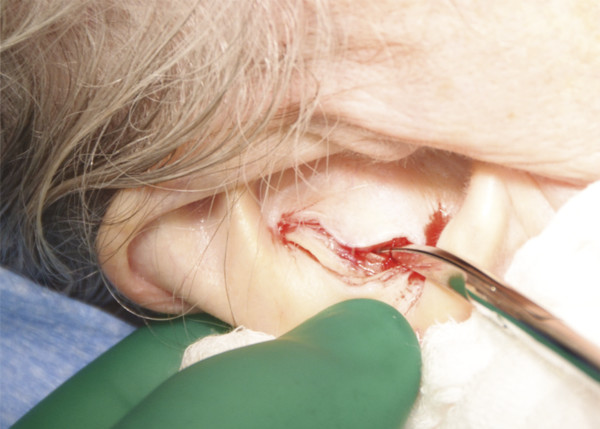
Fig. 8.3 Alar rim cartilage graft is harvested from anterior conchal bowl incision.
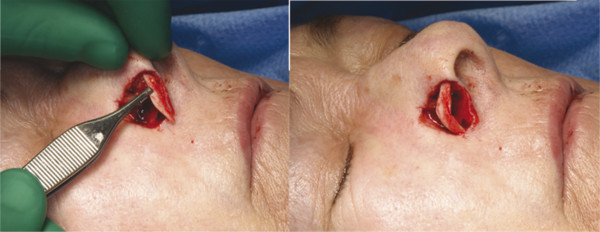
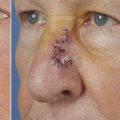
Fig. 8.4 The anterior portion of the graft is placed within a previously dissected subcutaneous tunnel and then the remainder of the graft is meticulously inset to the lining soft tissue.

Fig. 8.5 Graft is inset with 5–0 Vicryl.
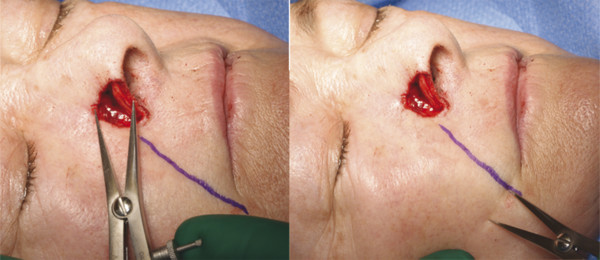
Fig. 8.6 The vertical height of the nasal defect is transposed to the cheek.
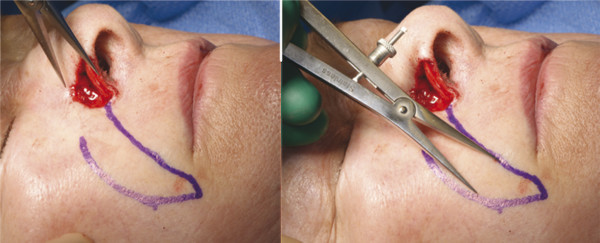
Fig. 8.7 Measurements verified by repeat measurement of flap design following transposition to cheek while cheek is under slight tension.
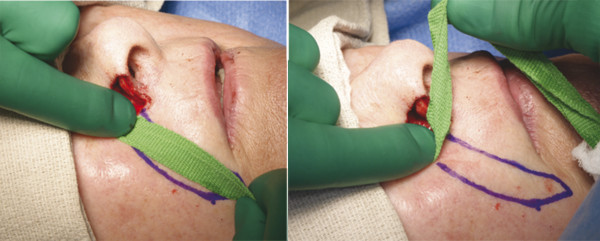
Fig. 8.8 Reverse Gilles test is performed to ensure adequate flap length.
Elevation and Inset
Elevated sharply in the deep subcutaneous plane and then approaching medially, it is elevated with either scissors or bluntly with cotton-tipped applicators, taking care to identify the angular perforating vessels and maintain them as the medial extent of the incision is approached. The most medial corners of the inset flap will then undergo electrocautery, as these frequently bleed postoperatively. The flap is always rotated medially, trimmed on inset, and inset under slight tension with 6–0 black nylon sutures. The donor site is meticulously closed with 3–0 Vicryl deep sutures followed by 4–0 subcuticular Monocryl followed by 6–0 black nylon sutures. The flap is trimmed on inset (▶ Fig. 8.9, ▶ Fig. 8.10, ▶ Fig. 8.11, ▶ Fig. 8.12, ▶ Fig. 8.13, ▶ Fig. 8.14).
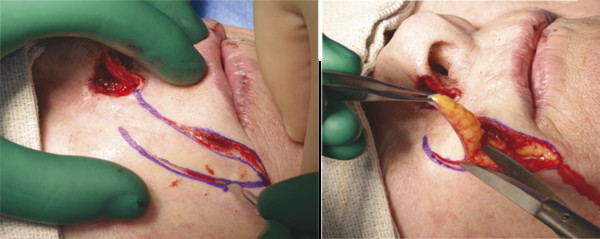
Fig. 8.9 Flap is sharply elevated to the level of the nasal ala. Care is taken to protect any perforating vessels at the base of the flap.
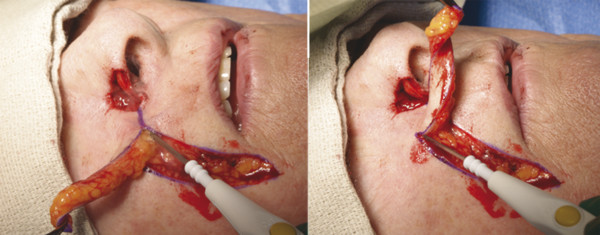
Fig. 8.10 Hemostasis is achieved at the base of the flap.
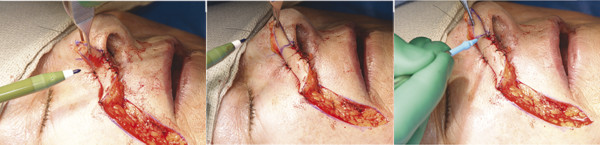
Fig. 8.11 Flap is accurately marked for inset.
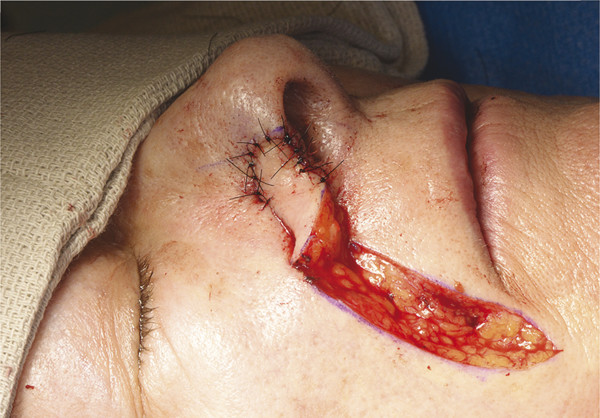
Fig. 8.12 Flap is inset with 6–0 nylon.
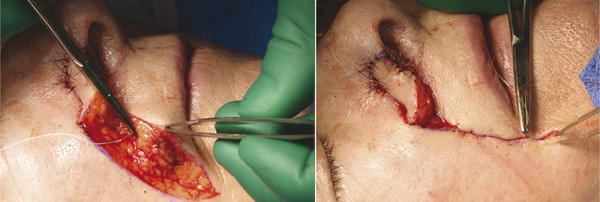
Fig. 8.13 Cheek is meticulously closed with 3–0 Vicryl and care is taken to avoid compression of the flap pedicle.
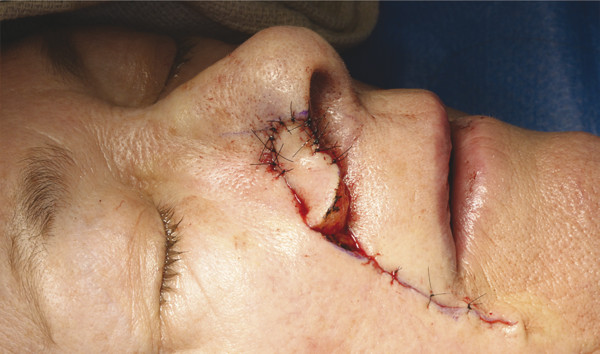
Fig. 8.14 Final cheek closure achieved with 5–0 nylon.
Postoperative Care
The flap is dressed with fibrillar collagen immediately postoperatively and the pedicle donor site deliberately packed with either fibrillar collagen or sterile cotton for hemostasis and the patient is instructed to simply shower away the dressings on the third postoperative day and then the flap is treated with just petroleum ointment until it is divided between the third and fourth weeks. 3 The patient is allowed to return to full activity and as long as the pedicle is not compressed, the patient can wear a CPAP mask (▶ Fig. 8.15).
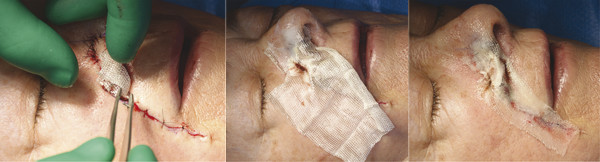
Fig. 8.15 The flap is coated in nitropaste and wrapped in oxidized cellulose with care taken to avoid compression of the pedicle.
Division and Inset
At the time of division and inset, the pedicle is excised and discarded and the cheek is closed as a linear incision with no attempt to reinsert the pedicle. The cheek scar undergoes initial dermabrasion and the flap is re-elevated over 70 to 80% of its maximal length and is inset under slight tension with 5 and 6–0 black nylon suture (▶ Fig. 8.16, ▶ Fig. 8.17, ▶ Fig. 8.18, ▶ Fig. 8.19, ▶ Fig. 8.20, ▶ Fig. 8.21, ▶ Fig. 8.22, ▶ Fig. 8.23, ▶ Fig. 8.24).
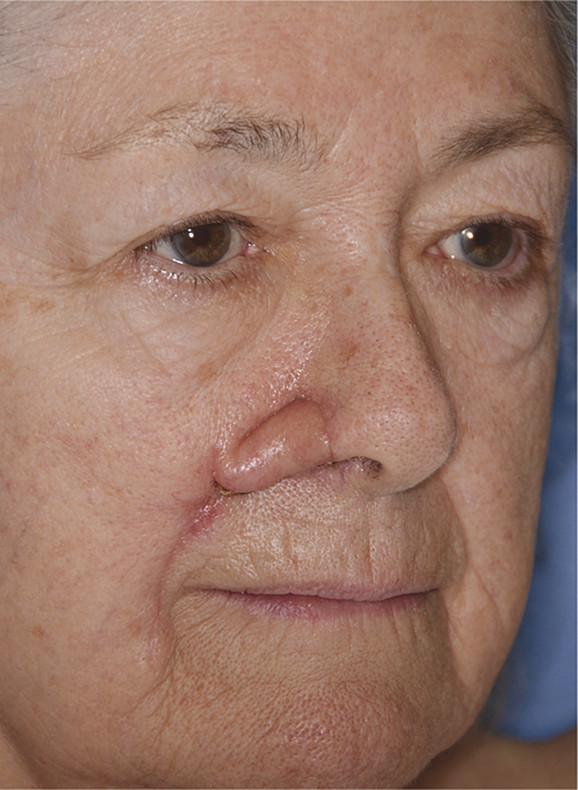
Fig. 8.16 Four weeks following initial flap elevation and inset.
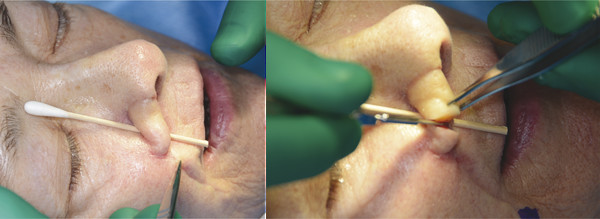
Fig. 8.17 Pedicle is sharply divided.
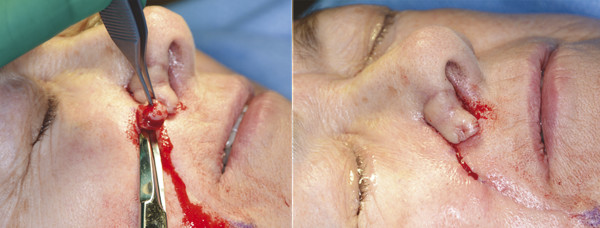
Fig. 8.18 Pedicle on cheek is completely excised and resulting wound closed with 3–0 Vicryl and 6–0 nylon.
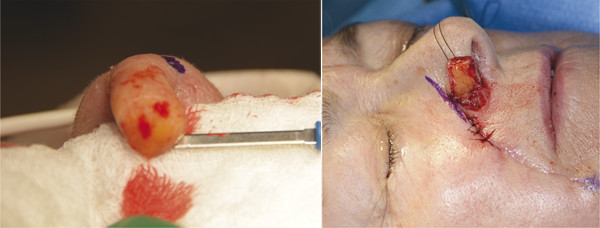
Fig. 8.19 Flap is elevated up to 80% of its maximal volume and inset under slight tension.
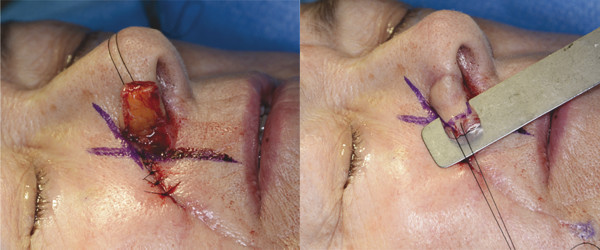
Fig. 8.20 The border of the defect is marked to determine flap outline for inset and flap is then sharply cut to size and shape.
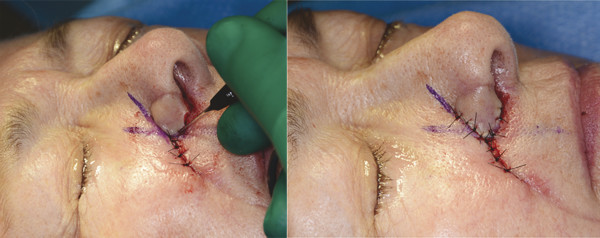
Fig. 8.21 Flap is then inset with 5–0 nylon.
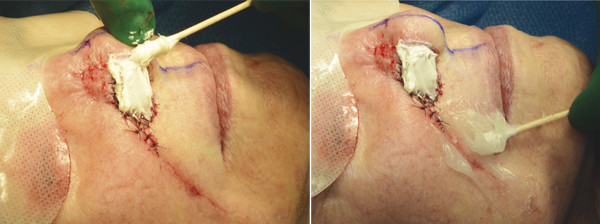
Fig. 8.22 Flap is coated in nitropaste. Following dermabrasion with Bovie scratch pad of cheek scar, it is coated in bacitracin ointment.
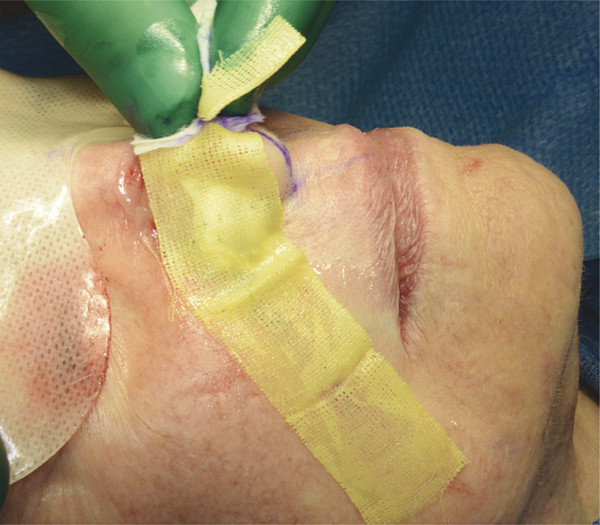
Fig. 8.23 Xeroform is placed over stitches as final dressing.
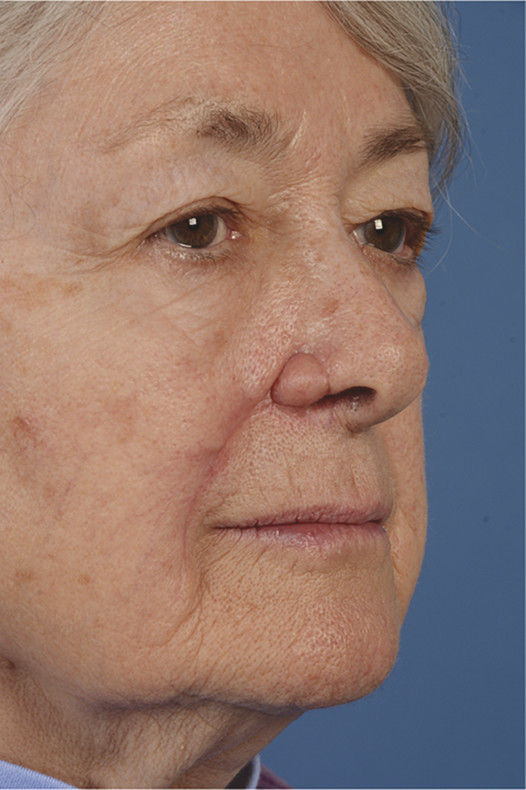
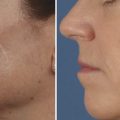
Fig. 8.24 Final results at 3 months.
Related posts:
Stay updated, free articles. Join our Telegram channel

Full access? Get Clinical Tree


