Fig. 9.1
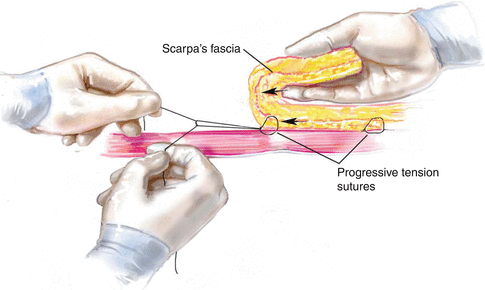
Placement of PTS: While the flap is retracted by the assistant, the surgeon stabilizes the flap with the nondominant hand and places a suture through the superficial fascia. Then the surgeon aggressively advances the flap with the nondominant hand and places a suture into the deep fascia

Fig. 9.2
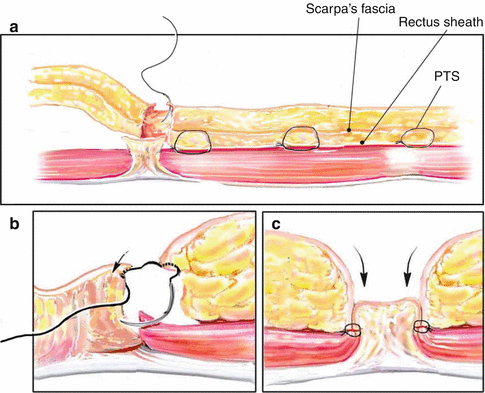
Securing the flap: The assistant now holds the flap in the advanced position so that the surgeon can tie the suture without tension. The process is repeated with each PTS
0 Vicryl (polyglactin 910) is used in the midline and 2-0 Vicryl in the periphery. Thin patients may only require the 2-0 suture. A large needle is helpful and Ethicon CTX (Ethicon, Inc., Somerville, N.J.) or similar needle is a good size for easy placement and assuring adequate bites of tissue for secure fixation. It is imperative that the suture in the abdominal flap includes the superficial fascia but not the dermis. The superficial fascia supplies the strength to the advancement.
It is important to note that a dimple on the skin will be seen at the level of the most distal progressive tension suture. This is normal and expected as it represents the transition between the advanced tissue under tension and the tissue not yet advanced. Once the next PTS is secured, transferring the tension to that suture, the depression will disappear and move to the more distal advancement. This has been termed the “advancement dimple.” If the sutures are properly placed to include the superficial fascia and not the dermis, persistent dimpling is not possible. If there is any question, the suture can be removed and replaced. Occasionally, a dimple or crease is noted with a deliberate or inadvertent change in the vector of advancement. If the sutures are properly placed and do not include dermis, the skin will relax, often in as short as 24 h, and this crease will go away.
9.2.5 In-continuity Umbilical Inset
An attractive and natural-appearing umbilicus with a hidden scar is a key component to an excellent abdominoplasty result. Unfortunately, the umbilicus has been an aesthetic Achilles heel of the traditional abdominoplasty. A natural umbilicus is a gentle depression in the abdominal contour with an attractive shape and size and a hidden scar. Too often, contour is unnatural, scars are visible, and the umbilicus is either too big or constricted. While most women worry more preoperatively about the long, low transverse scar, it is the umbilical appearance that is commonly visible in swimsuits and other revealing clothing that is the telltale sign of surgical intervention.
The last progressive tension suture that abuts the umbilical stalk determines the position of umbilical inset. From the underside of the abdominal flap, a circular area of about 2 cm is defatted. The overlying skin is identified and horizontally oriented oval is marked on the skin. This oval of skin is excised and some additional defatting is done along the edges. Beginning at the superior or 12 o’clock position of the hole in the flap, a 3-0 Vicryl is placed in the dermis from deep to superficial, then superficial to deep on the 12 o’clock position of the umbilical stalk dermal edge, and finally through the deep fascia then tied. A similar suture is placed at the 3, 6, and 9 o’clock positions around the umbilicus. When tied, the flap skin is pulled down toward the deep fascia creating a natural-appearing depression and hiding the scar in that depression. The fixation of the incision to the fascia also tends to stent the scar preventing contraction. The inset is completed with a few sutures to approximate the skin edges (Fig. 9.3).


Fig. 9.3
In-continuity umbilical inset: (a) Once the PTS advancement of the flap has reached the level of the umbilical stalk, the umbilical remnant is reduced to approximately 1 cm diameter. A 2 cm area of subcutaneous fat is excised and a 1.5 × 1 cm vertically oriented oval of overlying abdominal skin is excised. (b) An absorbable three-point suture is placed from the dermis of umbilicus (superior pole), to the dermis of flap, and finally to the deep fascia. This is repeated at 3, 6, and 9 o’clock positions. (c) Placement of these three-point sutures secures each quadrant of the flap to the deep fascia, producing an inverted umbilicus, pulling the incision into the depression hiding the scar, and stenting the scar from contracting
9.2.6 Progressive Tension Suture Placement: Lower Abdomen
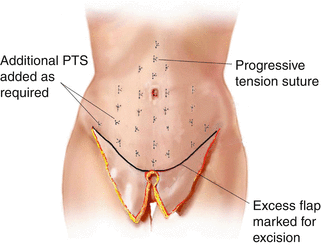
After completing the umbilical inset, placement of progressive tension sutures is continued until the abdominal flap has reached the inferior wound edge. The greatest advancement is in the midline. These sutures are under the most tension so 0 Vicryl is typically used. Additional sutures are placed laterally to anchor the flap, but with less advancement. As tension is less, 2-0 Vicryl is often more appropriate. The placement of the lateral sutures is determined by that number needed to secure the flap and eliminate dead space (Fig. 9.4). The infraumbilical sutures are much easier to place, and this can be done very rapidly and with less need for an assistant.


Fig. 9.4
The approximate distribution of PTS is illustrated. However, the number and position of PTS placement vary from patient to patient and are determined by the surgeon’s judgment to securely anchor the flap and reduce the dead space. Absorbable sutures are used with 0-0 used in the midline and 2-0 in the periphery. When the flap advancement progresses to the inferior limits, the excess skin is resected and the incision is closed under minimal or no tension
When the level of the lower incision is reached, the excess skin and subcutaneous tissue are excised. Three point sutures of 2-0 Vicryl are placed in the superficial fascia of the flap and inferior wound edge, then to the deep fascia. The closure is completed with interrupted deep dermal sutures and a running 3-0 absorbable barbed subcuticular suture. The low transverse incision is dressed with Steri-Strips, and antimicrobial ointment is applied to the umbilicus. Finally, an absorptive dressing is placed and an abdominal binder positioned and secured with moderate tension.
9.2.7 Aesthetic Considerations
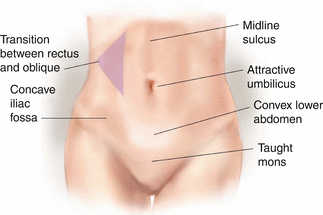
The traditional concept of abdominoplasty involves thinning and tightening the abdominal flap as much as the blood supply will allow. This often results in a featureless, unnatural, and operated look to the abdomen. If we carefully consider an attractive female abdomen, they are not flat, tight, and featureless, but have well-defined and consistent contours. These features that contribute to the attractive and natural female abdominal contour include an upper midline depression and a convex contour over the rectus muscles, which flattens out laterally over the oblique muscles. There is a concavity in the iliac fossa and a well-defined iliac crest. The infraumbilical, central abdomen in convex and the mons pubis are taut without sag. The umbilicus is in a natural position on the abdomen with an attractive shape and contour (Fig. 9.5). When performing an abdominoplasty, the surgeon should make an effort to recreate these contours when possible.


Fig. 9.5
Characteristics of an aesthetically ideal female abdomen: An attractive female abdomen has consistent contours that should be recreated in abdominoplasty. Not all of these elements can be created in all patients but even subtle suggestions of these can enhance the final result. Traditional abdominoplasty techniques often result in a flattened, featureless contour. PTS provide the surgeon with an additional tool to help create an attractive contouring of the abdomen
Some thoughts and technical considerations for approaching each of these are as follows in the order they are addressed in our abdominoplasty technique. When appropriate, liposuction is carried out in the anterior abdomen at the onset of the operation. While each patient’s needs are highly variable, in the typical normal BMI patient, the focus of the anterior liposuction is to create an attractive waistline and to create a flattened area lateral to the rectus muscle, over the oblique muscles. A vertical line can be drawn on the skin to mark the approximate lateral edge of the rectus, and liposuction is focused in a triangle created by this line, the costal margin, and the iliac crest. The infraumbilical portion of this triangle need not be suctioned as this area will be later resected. Central, supraumbilical liposuction should be limited to just excessive fat as one considers that this will become the convex infraumbilical abdomen once the flap is advanced. Over-suctioning can lead to an unnaturally flat lower abdomen and mismatch in tissue thickness when inset to the thicker mons area.
Once the abdominal flap elevation and rectus diastasis repair have been completed, the mons pubis is assessed. If elevation is indicated, appropriate undermining and defatting is done. (The mons defatting can also be addressed with liposuction prior to flap elevation.) The mons is then advanced superiorly and secured in an attractive position with a few 2-0 Vicryl sutures from the superficial to deep fascia.
Stay updated, free articles. Join our Telegram channel

Full access? Get Clinical Tree


