Nasal Region
The reader is advised at this point to review the esthetic units of the nose (see p. 15 and Fig. 2.20b, c ).
Glabella and Nasal Root
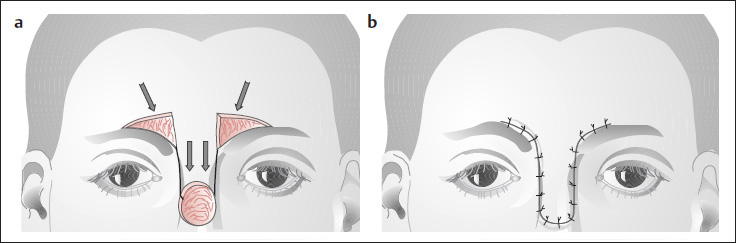
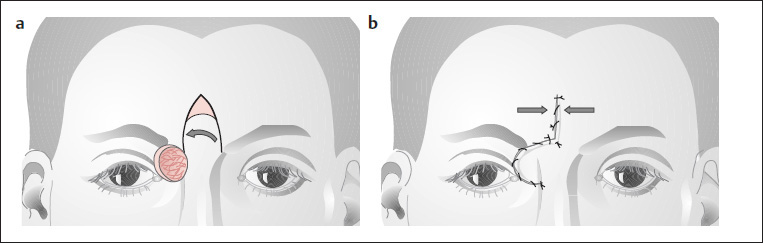
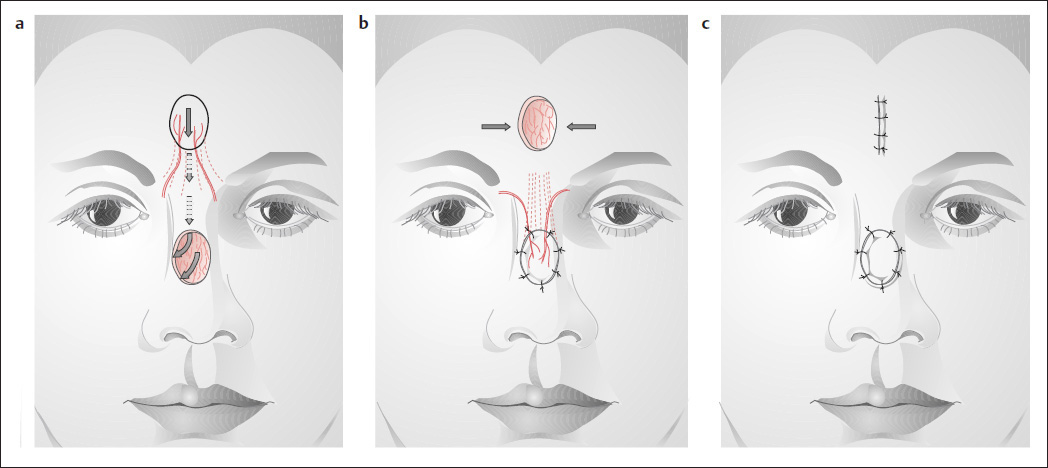
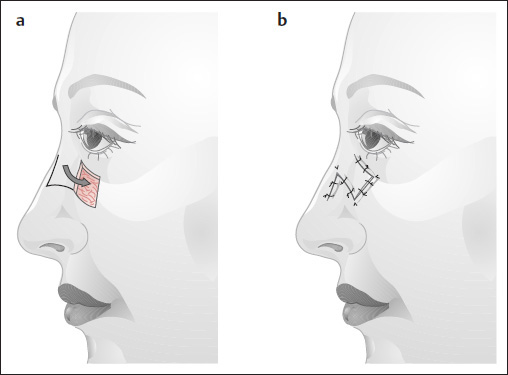
U-Advancement Flap of Burow
( Fig. 5.1 )
A simple U-shaped advancement flap can be used to cover smaller defects in the area of the glabella and upper nasal dorsum (see p. 21). Burow’s triangles are excised just above the eyebrow, resulting in unobtrusive scars.
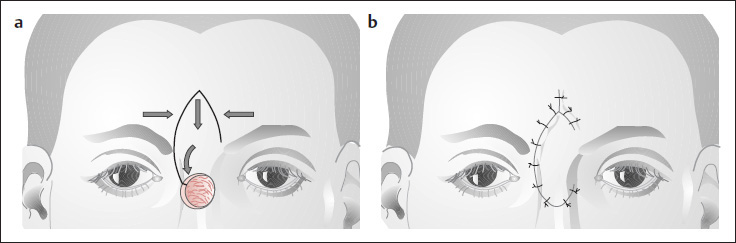
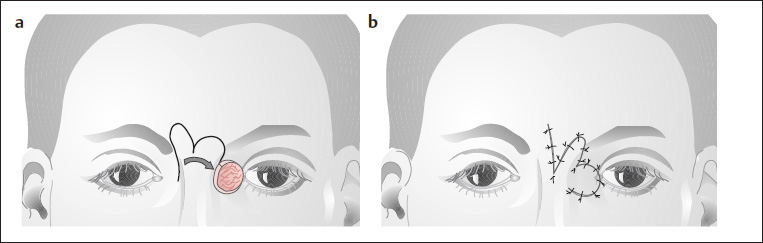
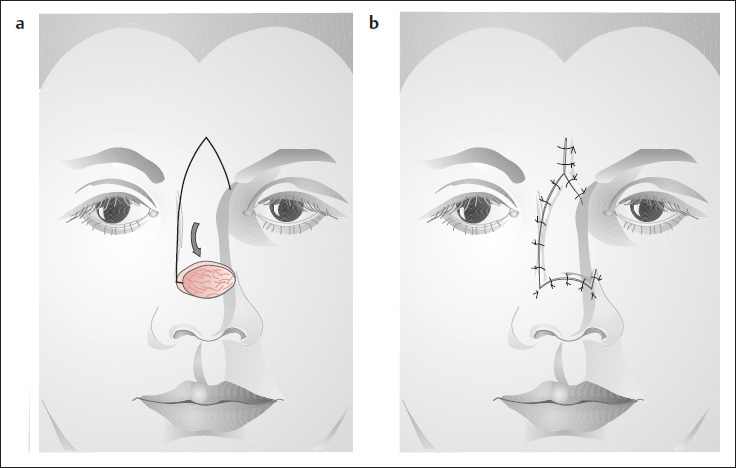
V-Y Advancement
( Fig. 5.2 ; see also Figs. 3.8–3.10 )
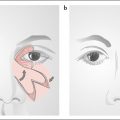
Trapezoidal rotation flaps are useful for reconstructing defects of the upper nasal dorsum ( Fig. 5.2a, b) and canthal area ( Figs. 5.3–5.6 ). The flap geometry corresponds to a V-Y advancement, and the secondary defect is closed by mobilizing the surrounding skin ( Figs. 5.2b, 5.3, 5.4 ). Because these flaps receive a good blood supply from the supratrochlear artery on one side, the pedicle can be kept relatively thin, allowing for good mobilization and downward rotation of the flap.
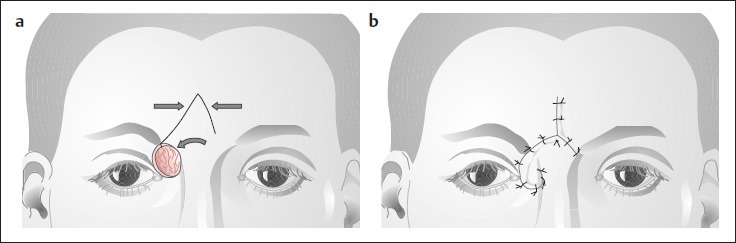
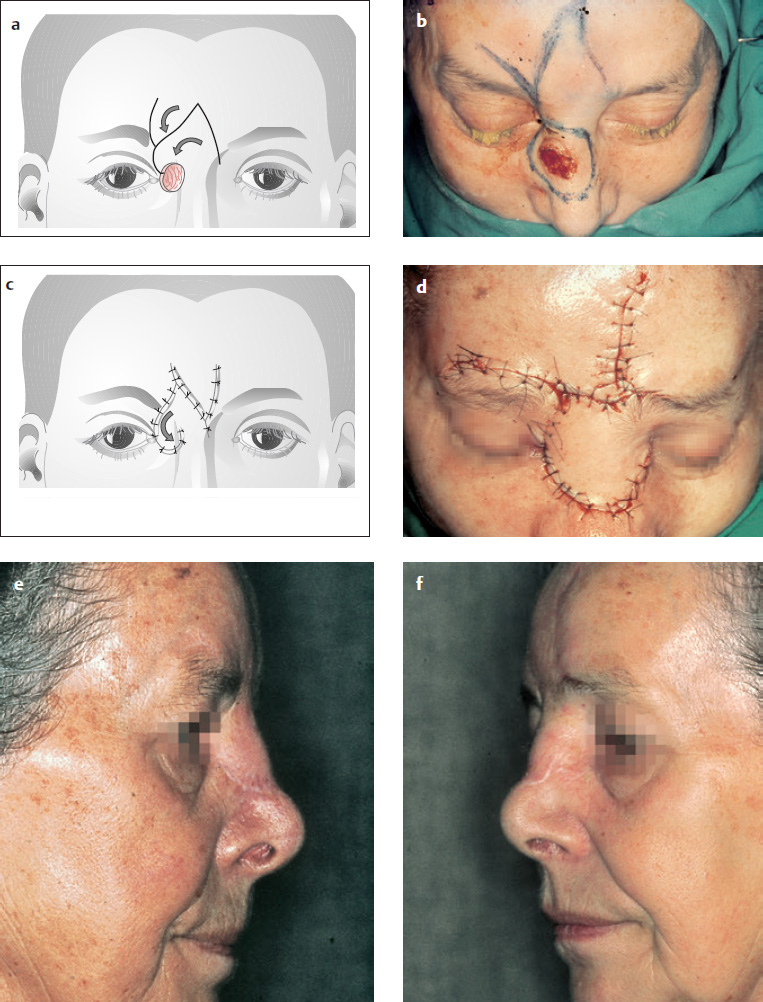
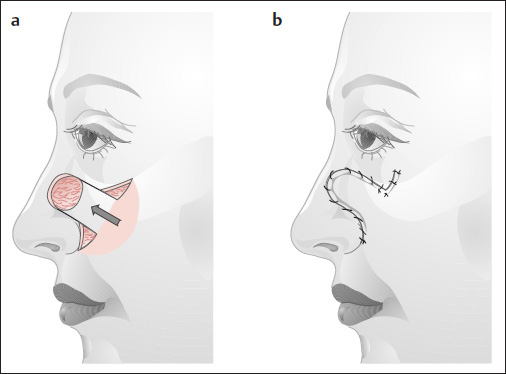
Sliding Flap
( Fig. 5.7 )
The sliding flap of Barron and Emmet (1965), which has a lateral subcutaneous pedicle (see p. 22 and Figs. 3.11–3.14 ), has proven useful for reconstructing defects located more in the upper lateral portion of the nasal bridge. Besides a simple transposition flap ( Fig. 5.5 ), a specially designed V-Y advancement flap ( Fig. 5.3 ) or V-Y advancement with a Z-plasty ( Fig. 5.4 ) can be used.
Nasal Dorsum
Because the skin of the nasal dorsum is very tight, only relatively small defects extending across the dorsum can be closed by mobilizing the surrounding skin. A great many defects in this area can be closed with local tissue transferred from above or from the side. It should be noted, however, that the skin of the cheek and forehead is considerably thicker than the dorsal nasal skin.
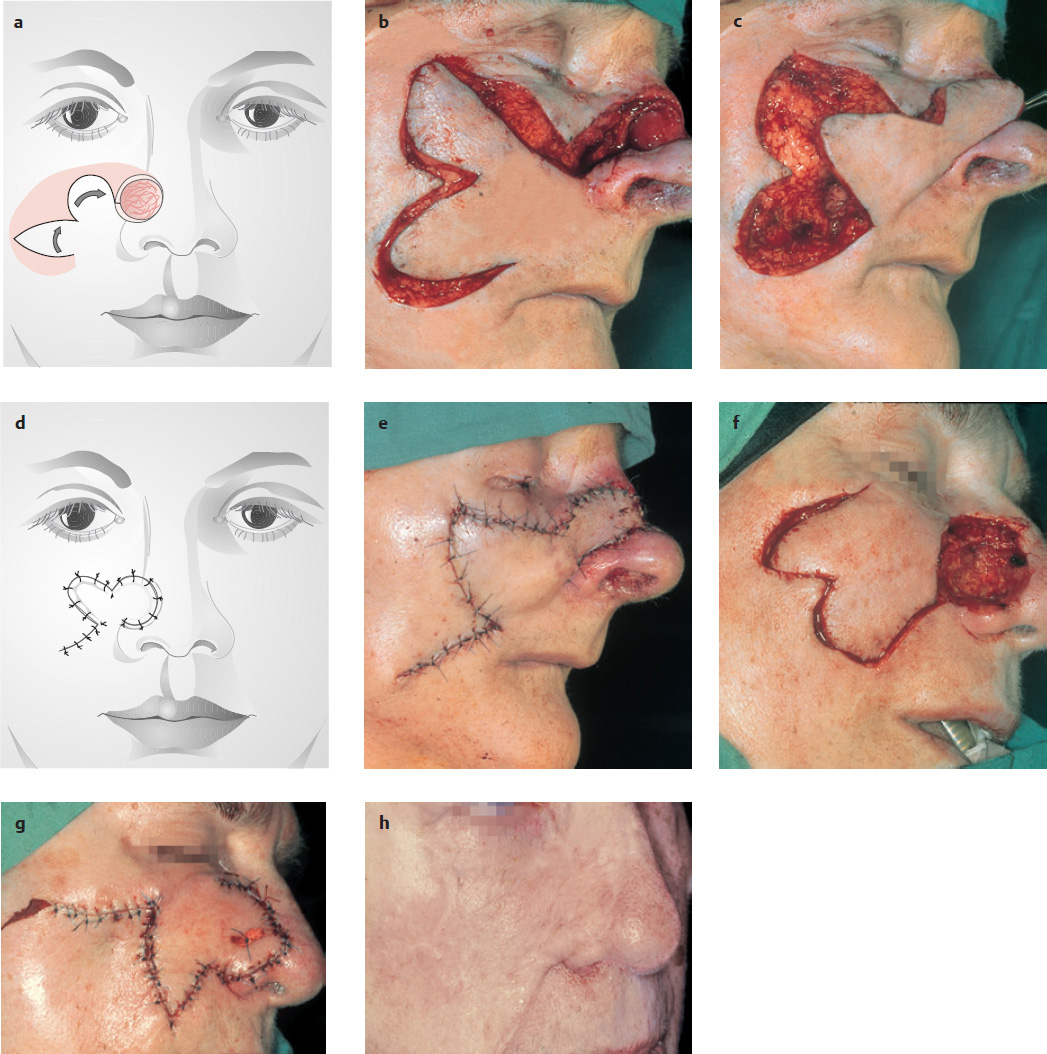
Bilobed Flap
( Fig. 5.8 )
Superiorly or inferiorly based bilobed flaps have proven excellent for the reconstruction of defects in the nasal dorsum and sidewall ( Fig. 5.8 ; see pp. 25, 26 and Fig. 3.23 ). Both small and larger defects can be managed in this way. The first lobe of the flap is moved into the primary defect, the second lobe is moved into the defect created by the first lobe, and the other secondary defect is closed by cheek mobilization ( Fig. 5.8a, b ). The angle between the primary defect and first lobe should approximately equal the angle between the first and second lobes, and all the angles should be 90° or less if possible. Larger angles lead to greater torsion and a bulkier dog ear at the pivot point of the flap (see pp. 25, 26 and Figs. 3.22 and 3.23 ). If the transfer creates a relatively large cheek defect, care should be taken that the closure does not distort the lower eyelid. For this reason, the subcutaneous tissue of the lower wound margin is usually attached to the periosteum of the upper wound margin after the cheek has been mobilized.
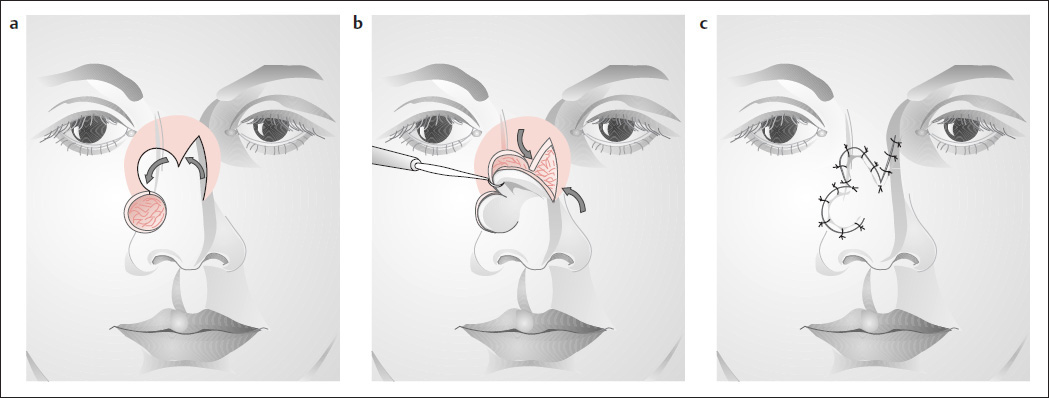
Island Flap
( Fig. 5.9 )
The island flap described by Converse (1977), based on one or both trochlear arteries, is also useful for reconstructing defects in the nasal dorsum ( Fig. 5.9 ). The bridge of skin between the island flap and the primary defect can be partially or completely divided if the flap shows livid discoloration because of excessive pressure on the pedicle. This flap can also been taken more laterally based on one supratrochlear artery.
Rieger Flap
( Fig. 5.10 )
The trapezoidal Rieger flap ( Fig. 5.10 ) is another option for reconstructing dorsal nasal defects (see also Figs. 5.2, 5.3 ).
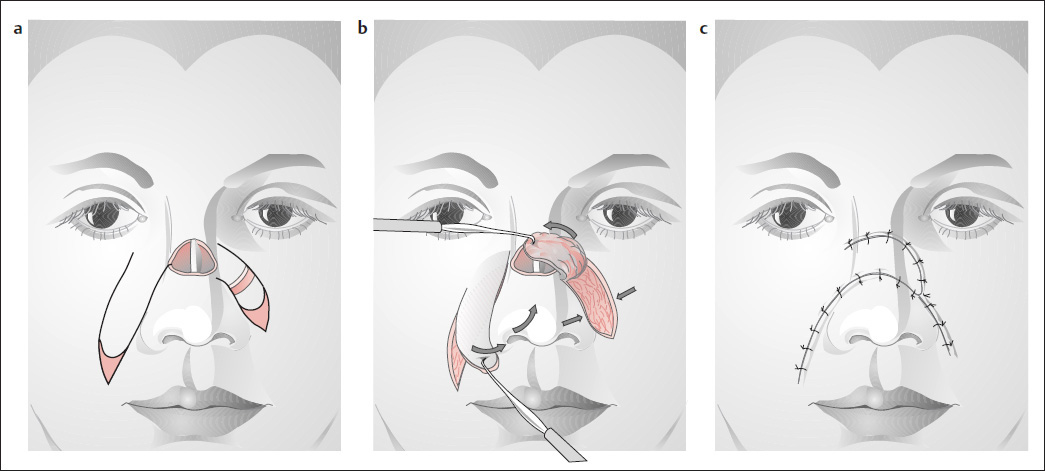
Nasolabial Flap
( Fig. 5.11 )
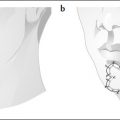
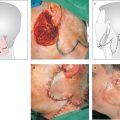
Cameron (1975) suggested using two nasolabial flaps to reconstruct full-thickness nasal defects. The first flap ( Fig. 5.11a, b ) is swung into the defect with the epithelial side inward, after first removing the epithelium from the area that will overlie the septum. The second flap is then used for cover ( Fig. 5.11c ). One nasolabial flap is sufficient for reconstructing a two-layer defect.
Median Forehead Flap
( Fig. 5.12 )
If a large defect of the nasal flank cannot be adequately covered with a bilobed flap (see Fig. 5.8 ), the median forehead flap is useful for this type of reconstruction ( Fig. 5.12 ; see also Fig. 5.15 ).
Nasal Tip
( Figs. 5.13–5.17 )
While small defects in the nasal tip area can be reconstructed with local flap transfers, larger defects that extend to the ala and columella require the use of median forehead flaps or the relatively difficult frontotemporal flap described by Schmid and Meyer (1962) (see Figs. 5.17 and 5.18 ).
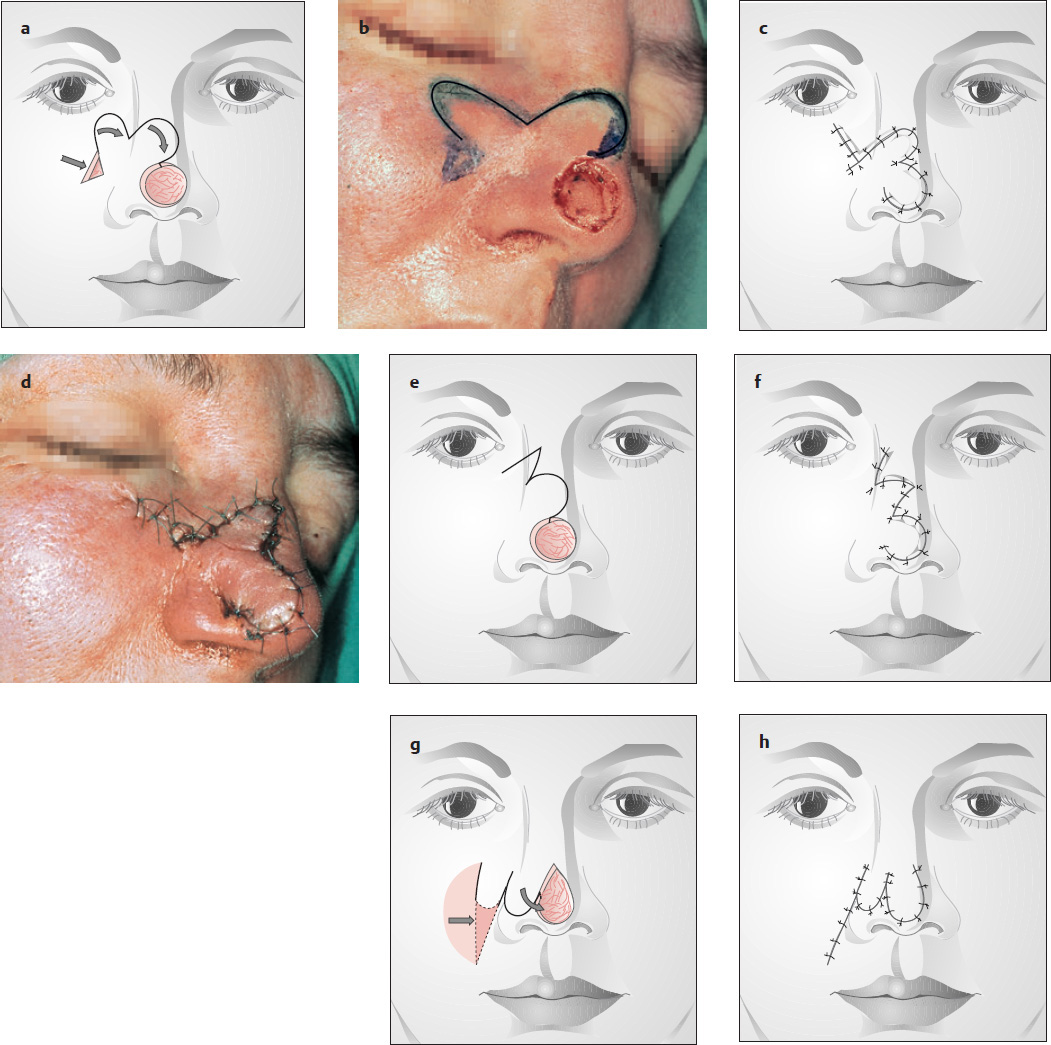
Bilobed Flap
( Fig. 5.13 )
The nasal tip area can be reconstructed using bilobed flaps that are based inferiorly ( Fig. 5.13a ), laterally ( Fig. 5.13e ), or superiorly ( Fig. 5.13g ). The scars should be placed approximately in the RSTLs. If the flaps are sufficiently large and mobile, a defect in the upper columella can be repaired concurrently with the tip defect (see Figs. 3.22, 5.6, 5.8, 5.28, 5.29, 5.46 ).
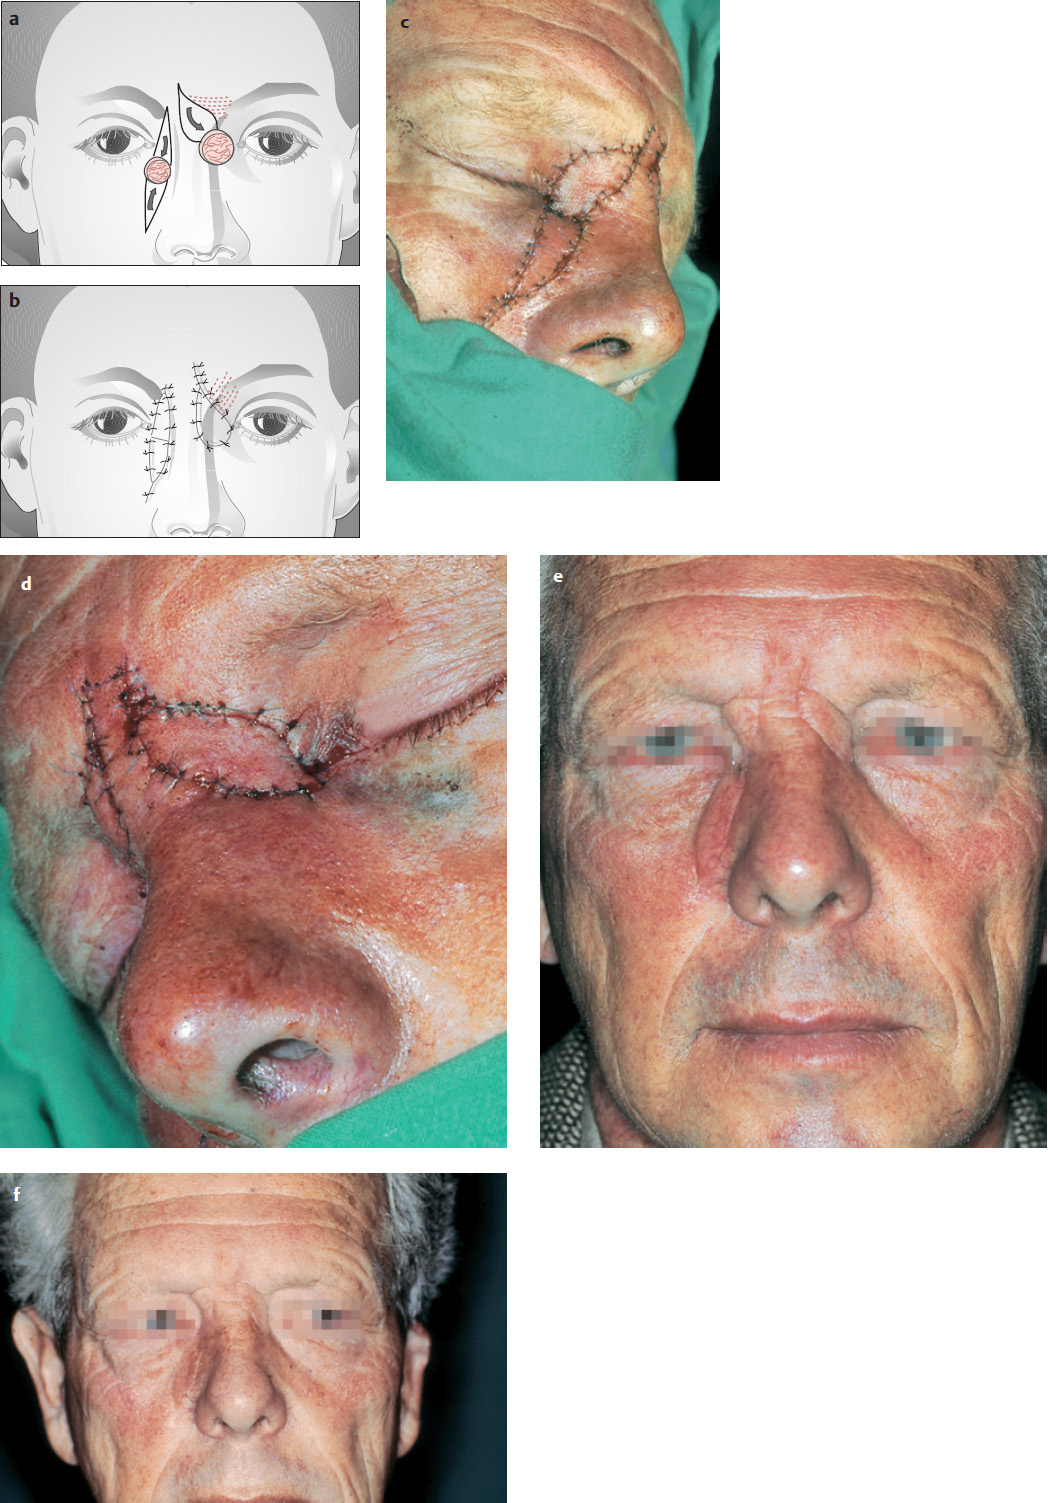
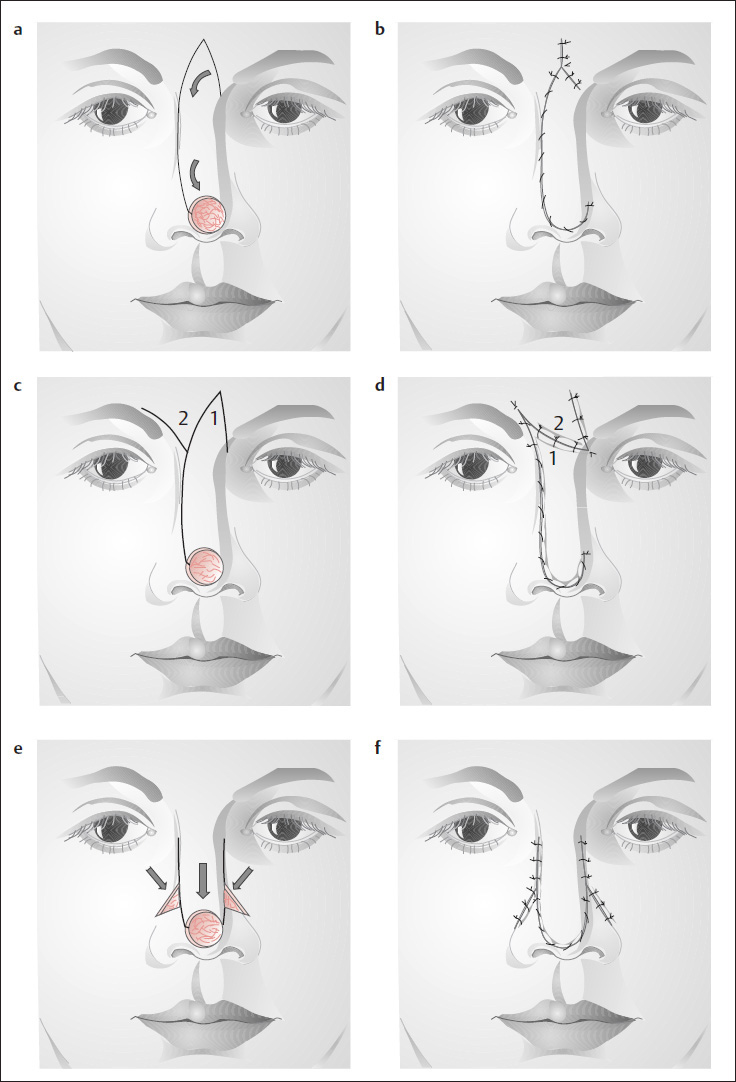
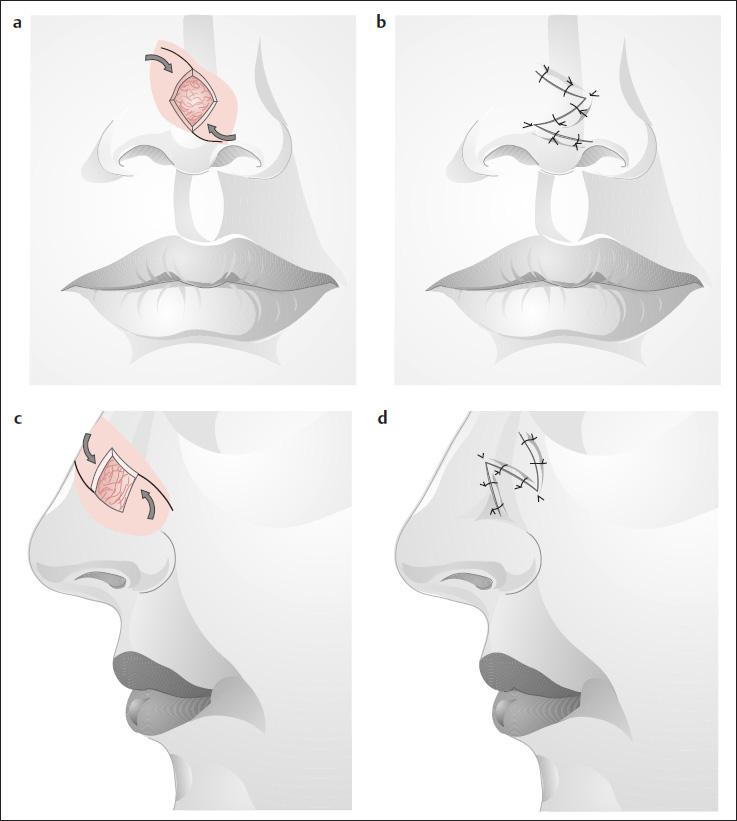
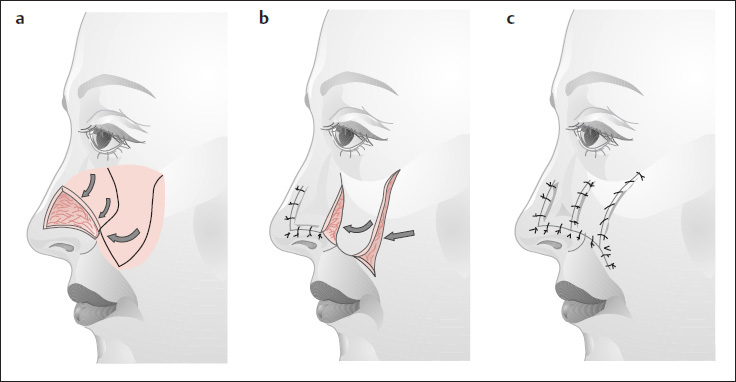
V-Y Advancement Flap of Rieger (1957)
( Fig. 5.14 )
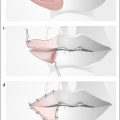
Larger nasal tip defects can be covered with a Rieger advancement flap based on the side of the nose ( Fig. 5.14a ). The glabellar portion of the flap has a trapezoidal design. The flap is mobilized along the opposite nasal flank, and a V-Y advancement is performed ( Fig. 5.14b ). A small Z-plasty may be necessary with larger defects ( Fig. 5.14c, d ). The U-advancement is another option ( Fig. 5.14e, f ).
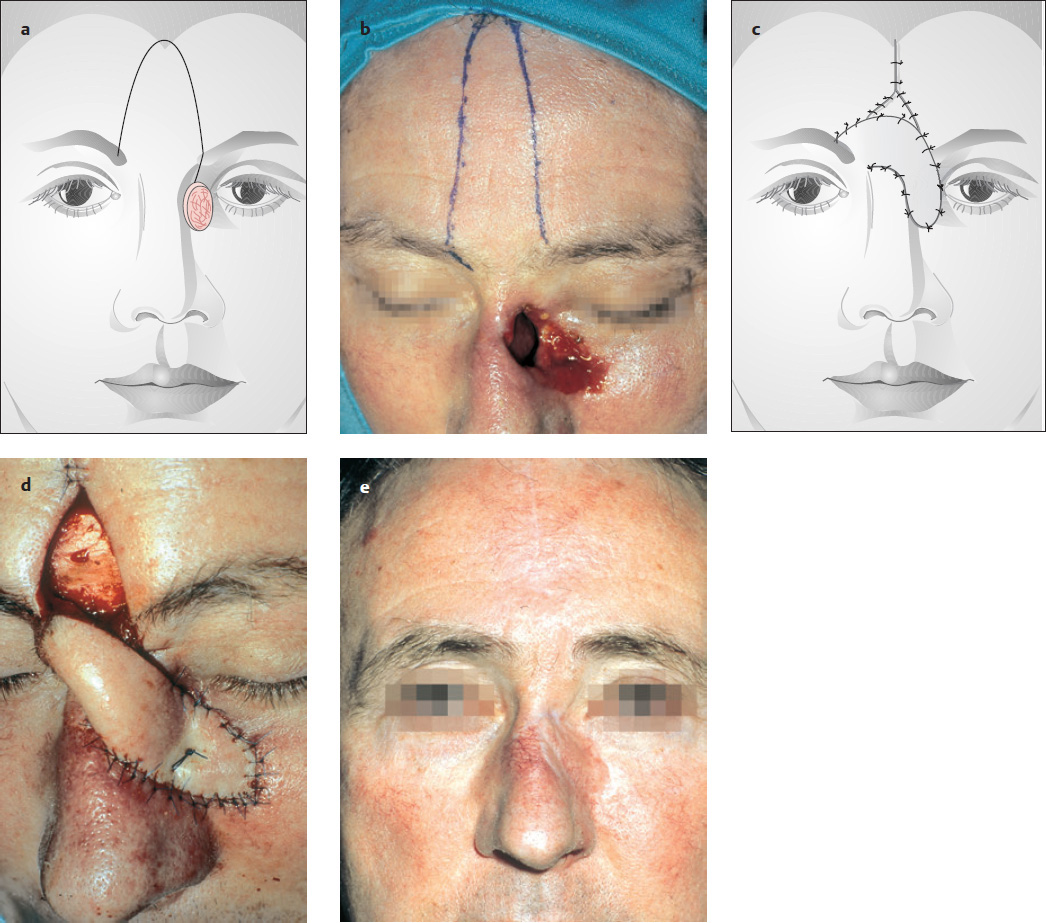
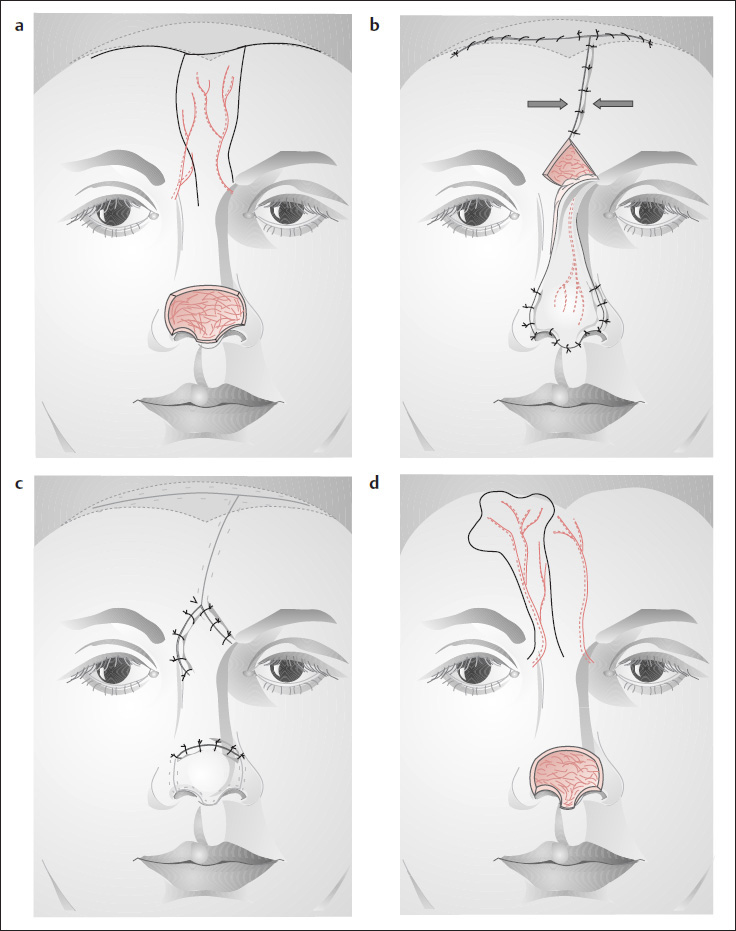
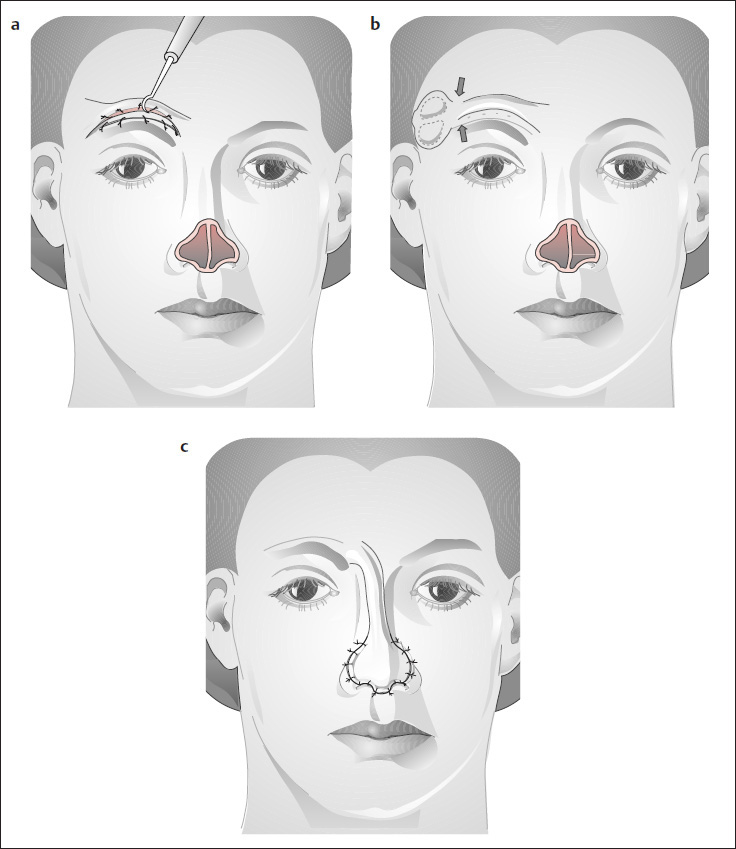
Median and Paramedian Forehead Flap
( Fig. 5.15 )
The median and paramedian forehead flaps are used to reconstruct larger defects of the nasal dorsum, sidewall, and tip, as well as partial and total nasal reconstruction (see Figs. 5.47, 5.51a and 5.54 ). The flap receives its blood supply from the supratrochlear artery on one or both sides ( Fig. 5.15a, b ). These vessels can be identified with a Doppler probe. The forehead should be high enough to permit the end of the flap to reach the nasal tip (using a pattern as a guide). The width of the flap should not exceed 3 to 3.5 cm, so that the donor defect in the forehead can be closed primarily without special preparations. The flap can be used immediately, owing to its excellent blood supply. The medial vertical scar in the forehead can be dispersed with a primary Z-plasty or W-plasty (see pp. 10 and 33). If the flap is broad, resulting in a tense suture line, we prefer secondary revision of scars that are still conspicuous 1 year after the operation ( Figs. 5.53 and 5.54 ; see also Figs. 4.1–4.4 ).
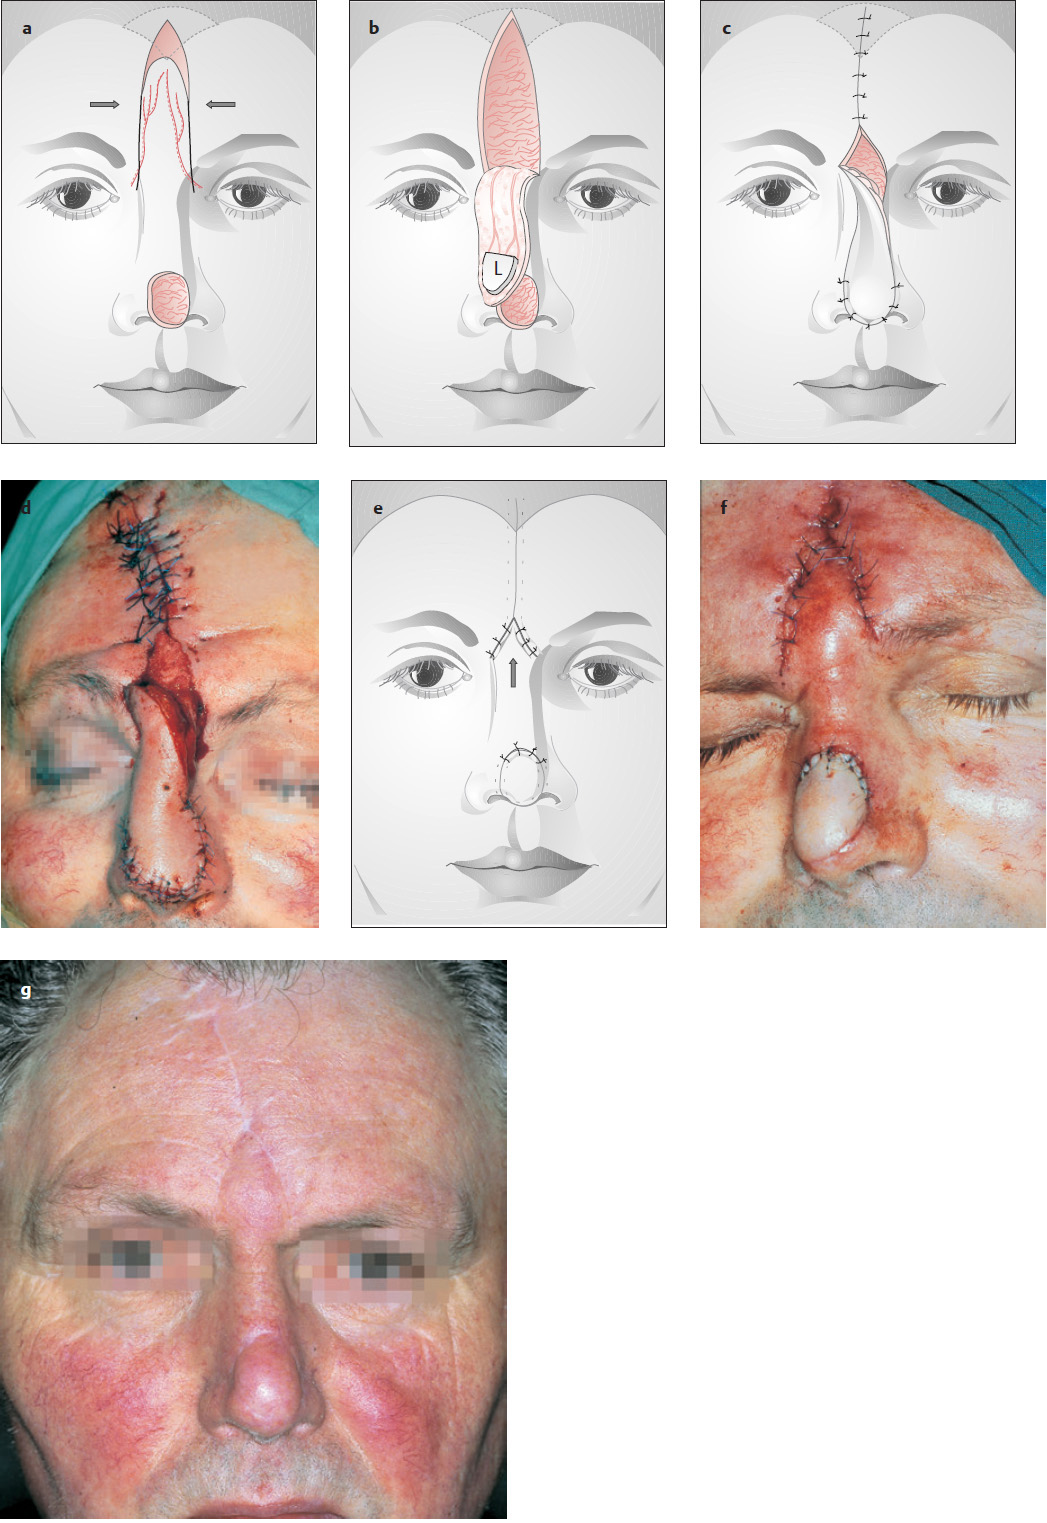
The flap incision can be made through all layers down to the level of the eyebrow ( Fig. 5.15a ). In the glabellar area, the flap is bluntly dissected with a sponge stick or curved clamp to expose and preserve the artery on one or both sides (if we use the median forehead flap) ( Fig. 5.15c, d ). The skin incision can then be continued down below the brow level. If one artery is lost, the second artery ensures adequate flap perfusion. The residual triangular defect in the interbrow area ( Fig. 5.15d, e ) is covered with meshed tulle or a similar dressing. About 17 to 20 days are needed for the forehead flap to take at the recipient site ( Fig. 5.15d, f ). At that time, its pedicle is divided and inset into the triangular interbrow defect, which is first cleared of granulation tissue ( Fig. 5.15e ). The interbrow wound should not be reapproximated at the time of flap transfer, as this would distort the eyebrows by drawing them toward the midline. The wound edges should be freshened prior to inset of the flap pedicle ( Fig. 5.15f ).
As in all operations, meticulous hemostasis is required.
The flap takes from 6 months to 1 year to heal completely ( Fig. 5.15g). If it is too thick, or if unsightly scars have formed, the flap may be thinned (defatted) and/or the scars revised by means of small Z-plasties or W-plasties (see pp. 10 and 11). For larger defects, we recommend using 50- to 100-mL tissue expanders on one or both sides (see Fig. 4.4 ) before raising the median or oblique forehead flap.
Modifications are asymmetric, paramedian forehead flaps ( Fig. 5.16a–c ) and oblique forehead flaps ( Fig. 5.16d; s. Fig. 5.54 ).
Larger Defects of the Nasal Tip and Ala
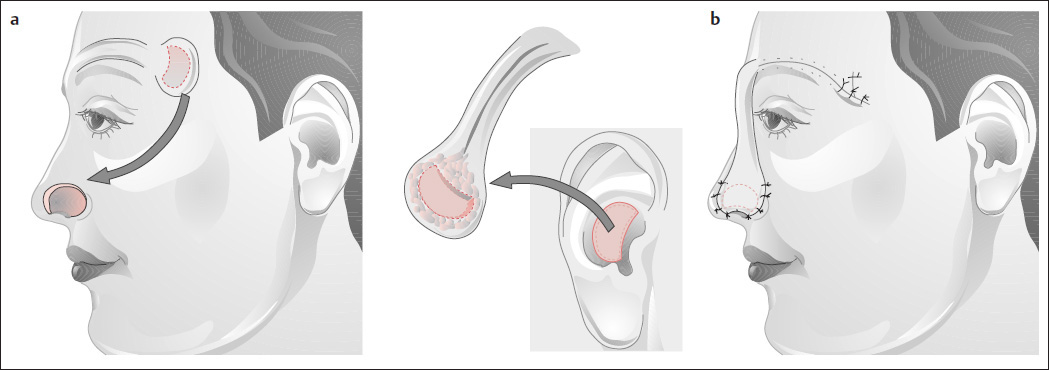
Frontotemporal Flap of Schmid and Meyer
( Figs. 5.17 and 5.18 )
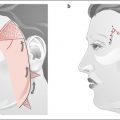
If the median or oblique forehead flap cannot adequately cover a defect, or if larger, full-thickness defects are present, excellent results can be achieved with the somewhat difficult frontotemporal flap of Schmid (1952) as modified by Meyer (1964, 1988) ( Fig. 5.17 ). Because of its technical complexities, however, this flap is no longer widely used.
The flap is mobilized in stages ~16 to 20 days apart. In ~8 weeks, the surgeon can swing the flap downward, freshen the wound edges, and inset the flap into the defect.
Stage I:
First, a narrow, superciliary bipedicle flap is created. The flap incisions above the eyebrow should be spaced at a width of no more than 8 mm, but the lateral ends can be angled superiorly and inferiorly in a trapezoidal design. The superciliary defect below the bipedicle flap is closed by mobilizing the forehead skin ( Fig. 5.17a ). The upper edge of the wound is tacked subcutaneously to the periosteum of the frontal bone, to prevent eyebrow distortion. The superciliary segment of the flap is then sheathed with a split-thickness skin graft. The bipedicle flap serves merely as a transport flap; the reconstructive flap is outlined in the temporal area, to conform to the nasal defect ( Fig. 5.17b ). Split-thickness skin, cartilage, or composite grafts can be added to the temporal flap during the initial sitting ( Fig. 5.18 ).
Stage II:
About 15 to 20 days later, the bridge between the prelined temporal flap and the transport flap is incised ( Fig. 5.17b ).
Stage III:
After a total of 3 to 4 weeks, the entire flap can be raised on its median pedicle, and the temporal flap is inset into the nasal defect ( Fig. 5.17c ).
Stage IV:
About 3 to 4 weeks later, the pedicle can be divided or opened up, inset to reconstruct the columella (Meyer 1988), or discarded.
Additional stages:
Further steps may be needed to complete the insetting of the temporal flap in the nose, or scar revisions may be necessary to improve the outcome. This technique can also be used for alar reconstruction using a composite graft from the auricular concha ( Fig. 5.18 ). Other flap options for partial nasal reconstruction are described on the next pages.
Nasal Flank
We use small transposition or rotation flaps from the cheek to reconstruct defects of the nasal flank ( Figs. 5.19–5.21 ).

Below we shall illustrate some special flap designs that can be used when the flaps described above are inadequate for reconstruction.
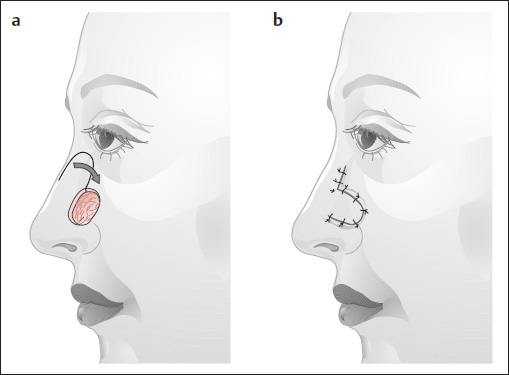
Flap Advancement of Burow (1855)
( Fig. 5.22 ).
Wedge-shaped defects in the nasal sidewall can be closed using a simple Burow′s advancement flap. The scars run along the nose at the boundary of the esthetic unit (see Fig. 2.19 ) and in the nasolabial fold.
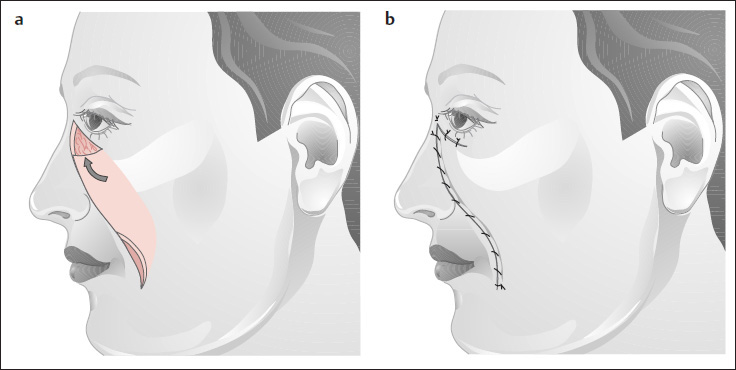
Median Cheek Rotation of Sercer and Mündich (1962)
( Fig. 5.23 )
Rotating the cheek medially on a superiorly based flap results in scars at the boundary of the esthetic units.

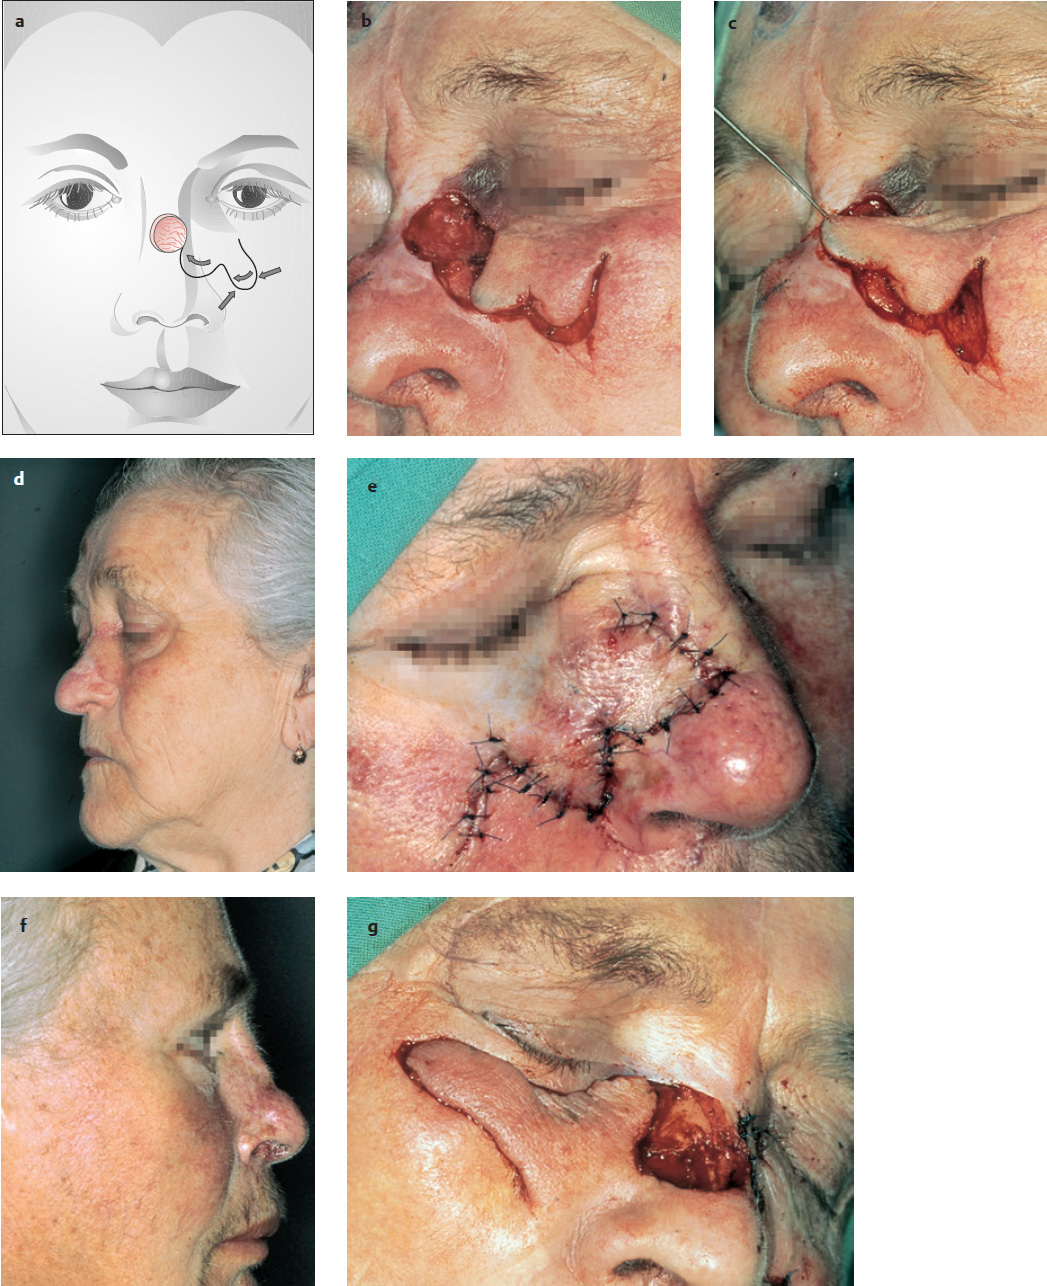
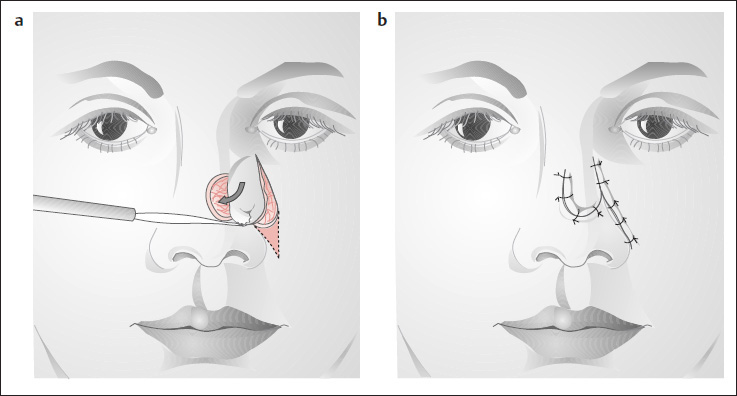
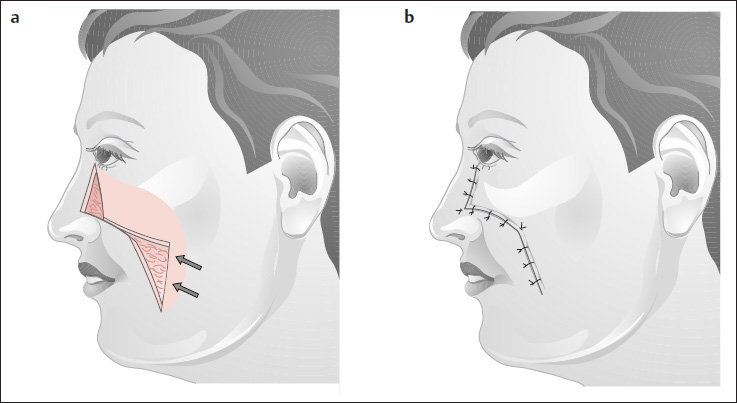
Imre’s Cheek Rotation (1928)
( Fig. 5.25 )
Imre developed a laterally based, wedge-shaped cheek rotation flap for reconstructing nasal flank defects that extend into the lower eyelid. Instead of a Burow′s triangle, a banana-shaped incision is made in the nasolabial fold. The subcutaneous tissue of this flap should be fixed to the periosteum of the orbital margin, to prevent eversion of the lower eyelid. For the same reason, the flap should not be sutured under tension.
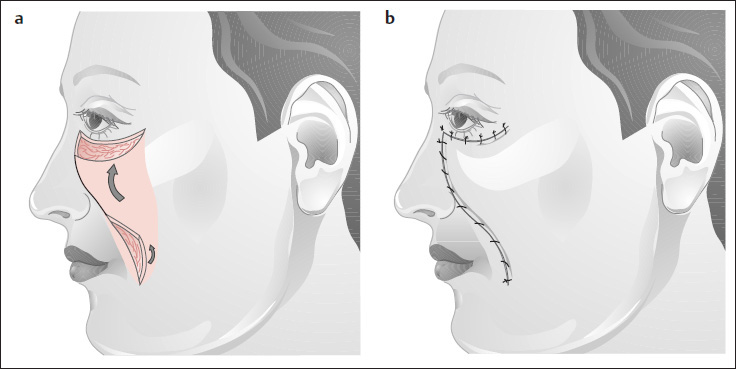
Cheek U-Flap
( Fig. 5.26 )
This flap is rarely used because it conforms poorly to the RSTLs, especially in its superior portion. It can be used in cases of tumor recurrence involving the nasal flank and medial canthal area, especially if median forehead flaps have already been used. Banana-shaped excisions can be made at the end of the flap instead of Burow′s triangles. One alternative to the U-flap is the Esser–Imre cheek advancement (see Fig. 8.2 ).
Figs. 5.27–5.31 illustrate several practical flap techniques that can be used to reconstruct smaller defects throughout the nasal region:
The double Dufourmentel flap ( Fig. 5.27 ), well suited for reconstructing smaller defects
The bilobed flap ( Figs. 5.28 and 5.29 )
Transposition flaps (see Fig. 5.19 )
Advancement flaps ( Fig. 5.30 )
Double transposition flaps ( Fig. 5.31 ).
Island Flap
( Fig. 5.32 )
An island flap from the cheek is also useful for reconstructing small defects in the nasal flank area. The flap may be based on the facial artery or may be designed with a subcutaneous pedicle that has an inferolateral or superolateral position in relation to the flap. The skin between the flap and the defect is undermined, and the pedicle is pulled through. Care is taken not to place excessive torsion or pressure on the flap pedicle. Because the subcutaneous pedicle often creates fullness at the pull-through site, this is not one of our favorite flaps. The cheek must be mobilized somewhat more widely than with other flaps, to avoid distorting the upper lip.
Related posts:

Stay updated, free articles. Join our Telegram channel

Full access? Get Clinical Tree


