The Auricular Region


10.1055/b-0034-99033

The Auricular Region

H. Weerda

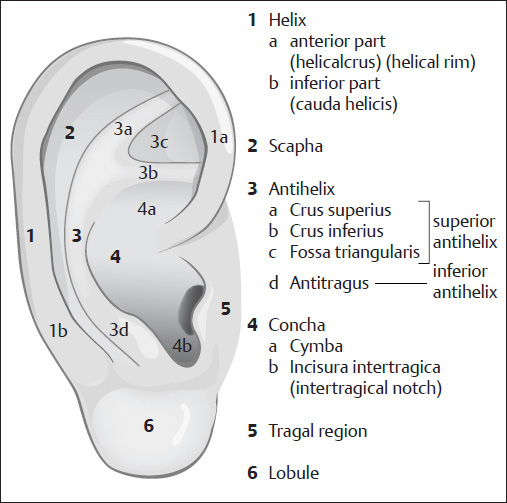
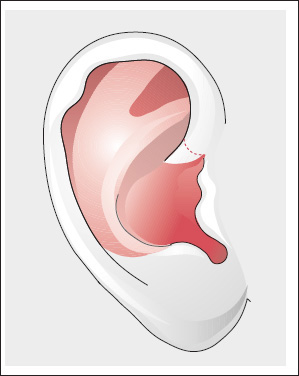
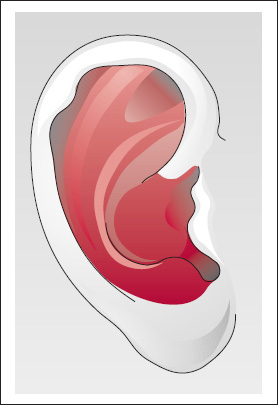
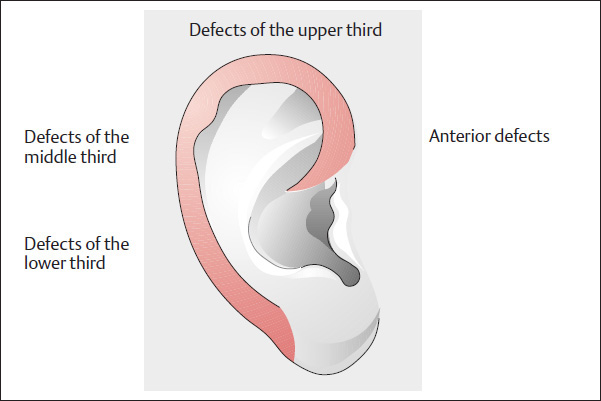
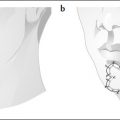
Classification (Table 10.1) and Esthetic Units (Fig. 10.1)


Although there will inevitably be overlaps when attempting to classify auricular defects, we still regard it as worthwhile to classify the defects for didactic reasons, to offer a system of surgical reconstruction (Weerda 1980b, 1984, 1987, 1989c, 1994d, 2001; Weerda and Siegert 1999a; Mellette 1991) ( Table 10.1 ). The esthetic units ( Fig. 10.1 ) cannot always be taken into consideration, and reconstruction of the auricle is performed in accordance with surgical requirements (see Weerda 2004, pp. 13, 12).


Central Defects: Recommended Defect Coverage (Fig. 10.2)

Esthetic units and subunits of the auricle (Weerda 1980, 2001; Melette 1991; see also Sherris and Larrabee 2009). 1 Helix (helical rim). a Anterior part (helical crus). b Inferior part (cauda helicis). 2 Scapha. 3 Antihelix. a Superior antihelix: crus superius. b Inferior antihelix: crus inferius. c Fossa triangularis. d Inferior antihelix: antitragus (see Fig. 10.8 ). 4 Concha. a Cymba. b Incisura intertragica (intertragical notch). 5 Tragal region. 6 Lobule.


Table 10.1 Classification of auricular defects (Weerda 1980, 1987)

1. Central defects


  • Conchal defects


  • Defects of the antihelix and combined central defects


2. Peripheral defects


  • Helix reconstruction with auricular reduction


  • Helix reconstruction without auricular reduction


3. Partial Reconstruction of the auricle


  • Upper-third auricular defects


    • Reconstruction with auricular reduction


    • Reconstruction without auricular reduction


  • Middle-third auricular defects


    • Reconstruction with auricular reduction


    • Reconstruction without auricular reduction


  • Lower-third auricular defects


4. Reconstruction of the earlobe


  • Traumatic earlobe cleft


    • Reconstruction without preservation of the earring perforation


    • Reconstruction with preservation of the earring perforation


  • Defects of the earlobe


  • Loss of the earlobe


5. Posterior defects


  • Postauricular defects


  • Retroauricular defects


  • Combined postauricular and retroauricular defects


6. Subtotal defects


7. Loss of the auricle


  • Fresh avulsion injuries


  • Auricular reconstruction following total amputation


  • Reconstruction of the ear or auricular region in patients with skin loss or burns


  • Reconstruction of defects of the auricular region after partial or total amputation

Central defects: concha–antihelix–combined defects.
a–h Coverage of a central defect with full-thickness skin. a–c Outline of a full-thickness skin graft harvested from the sulcus or mastoid region and fashioned by means of a template of aluminum foil (c) (suture wrapping material) or glove paper. d Defect and full-thickness graft. e, f Inset using a few approximation sutures (6-0 monofilament) and fibrin adhesive. g Primary closure of the wounds. h Result.
a–h Two-layer defect of the concha (a, b) or the triangular fossa: and cymba (c–e), coverage using a superiorly (a) or inferiorly (c) based transposition flap. a, b Retroauricular, superiorly based transposition flap with de-epithelialized area located beneath the tunnel (I in c). c Inferiorly based transposition flap (alternative technique to a). d Inset into the defect, the retroauricular defect is closed. e Result 6 weeks after excision of the pedicle. f Inferiorly based transposition flap for reconstruction of the lower concha and the ear canal (see c). g Inset of the flap. h Result after 1 year.


Conchal Defects


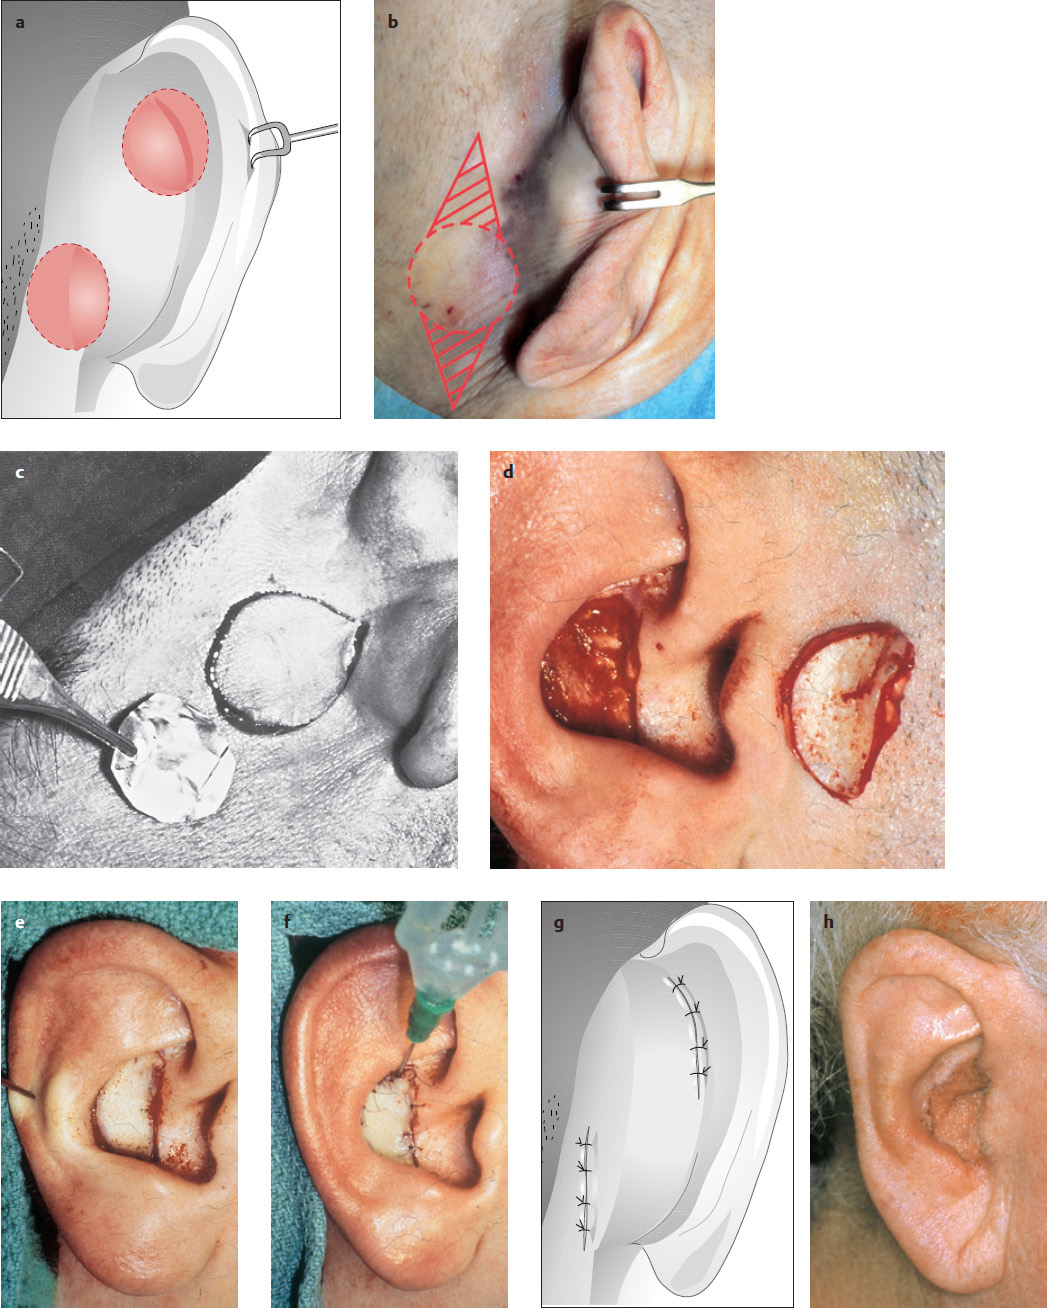
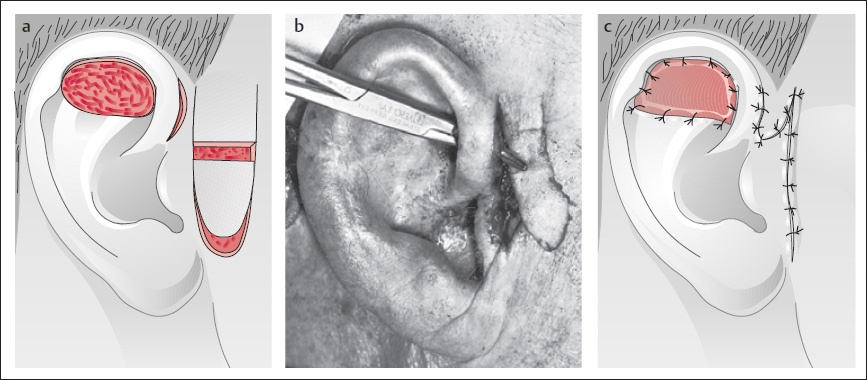
Reconstruction with a Full-thickness Skin Graft

( Fig. 10.3 )


Since large parts of the concha adjoin the mastoid region, full-thickness skin is an option for reconstructing the concha. Reconstruction with a full-thickness skin graft is shown in Fig. 10.3a–h .


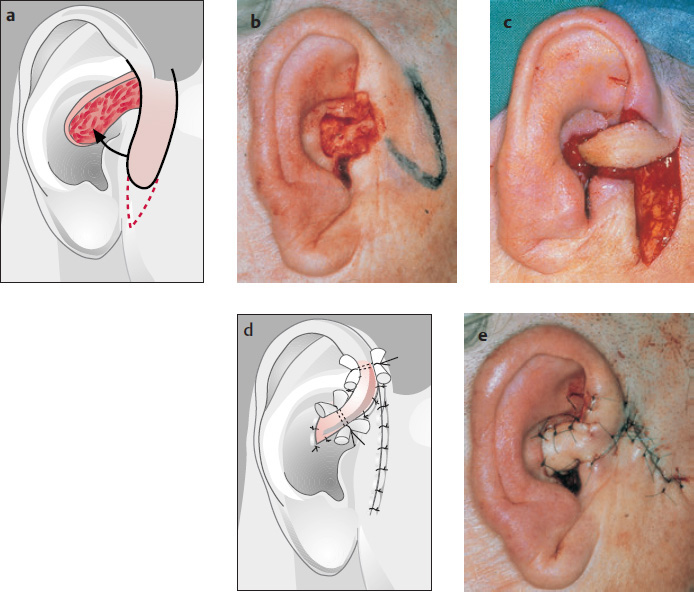
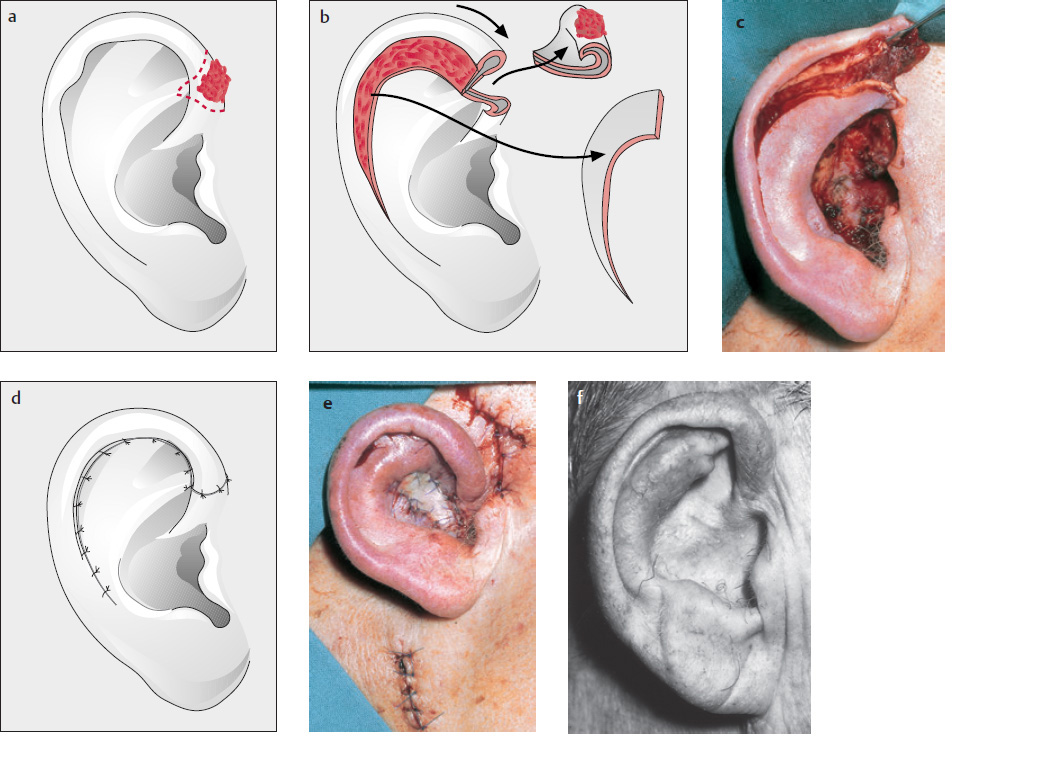
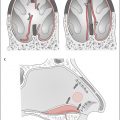
Transposition Flap and U-shaped Advancement

( Fig. 10.4 )


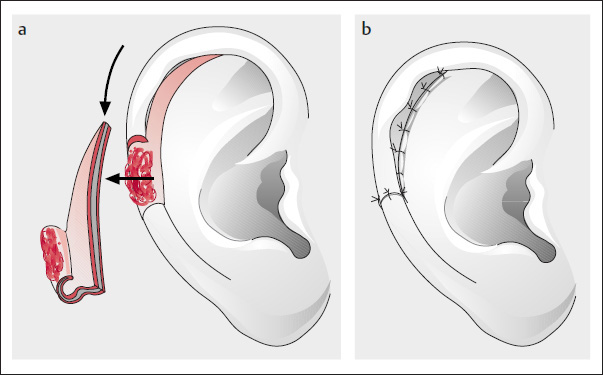
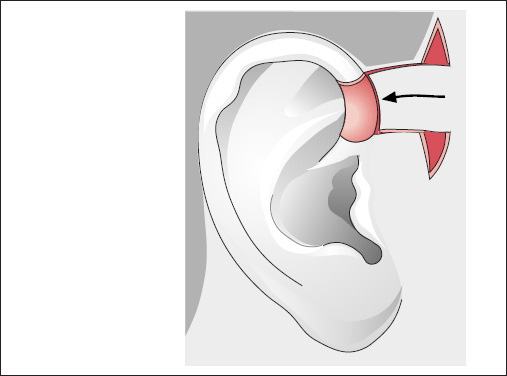
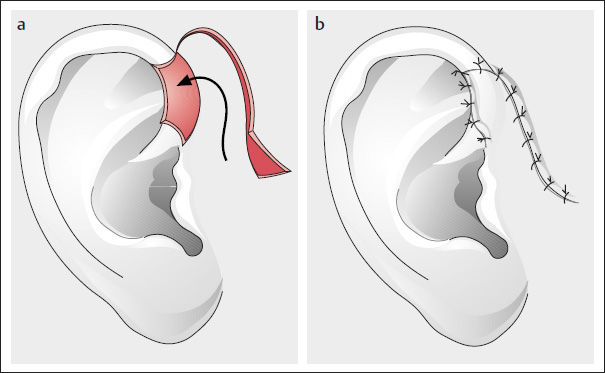
When the defects are situated somewhat higher, and extend into the antihelix, or into the auditory canal, it is possible to use superiorly or inferiorly based transposition flaps, de-epithelialized at the site that comes to lie beneath the tunnel when passed anteriorly (pull-through technique; Fig. 10.4c ).


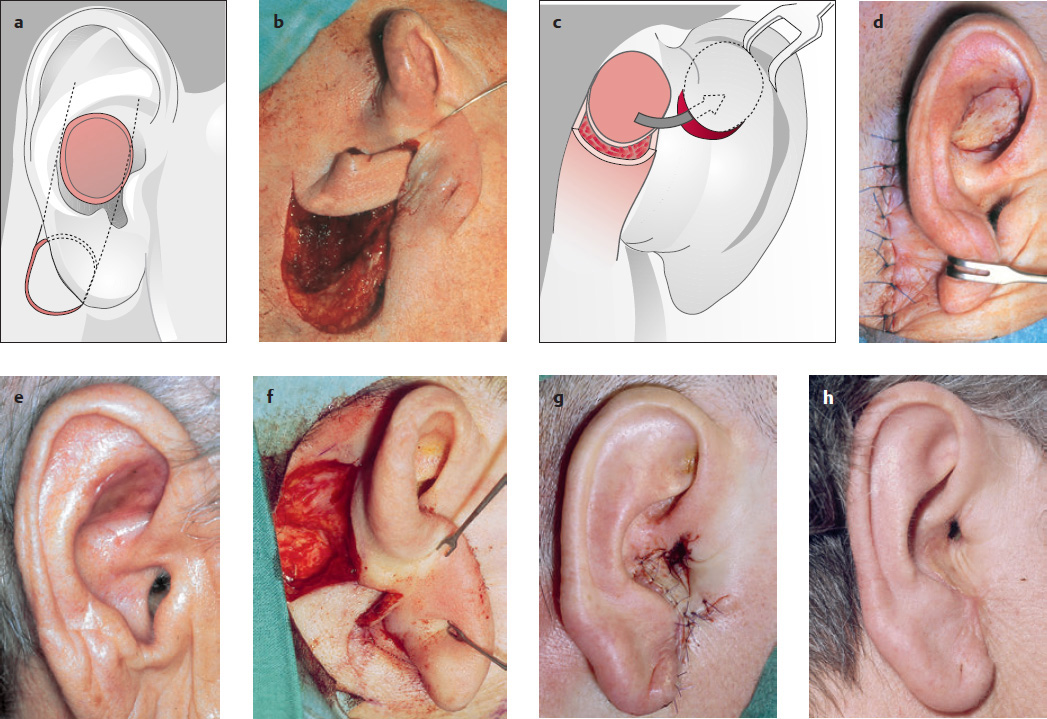
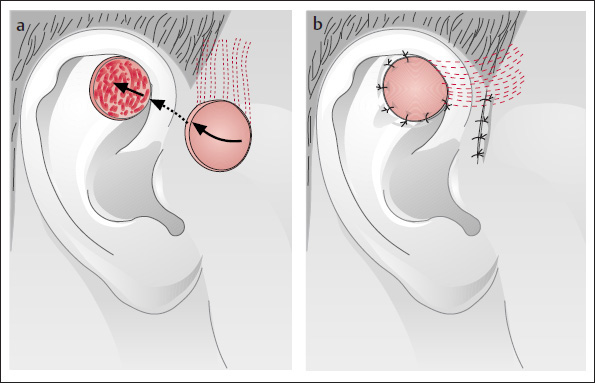
Reconstruction with Island Flaps

( Figs. 10.510.7 )


“True” island flaps are flaps that are supplied by an artery but disconnected from the surrounding tissue (Kazanjian 1958; Weerda 1999b, 2004). The following techniques are used:


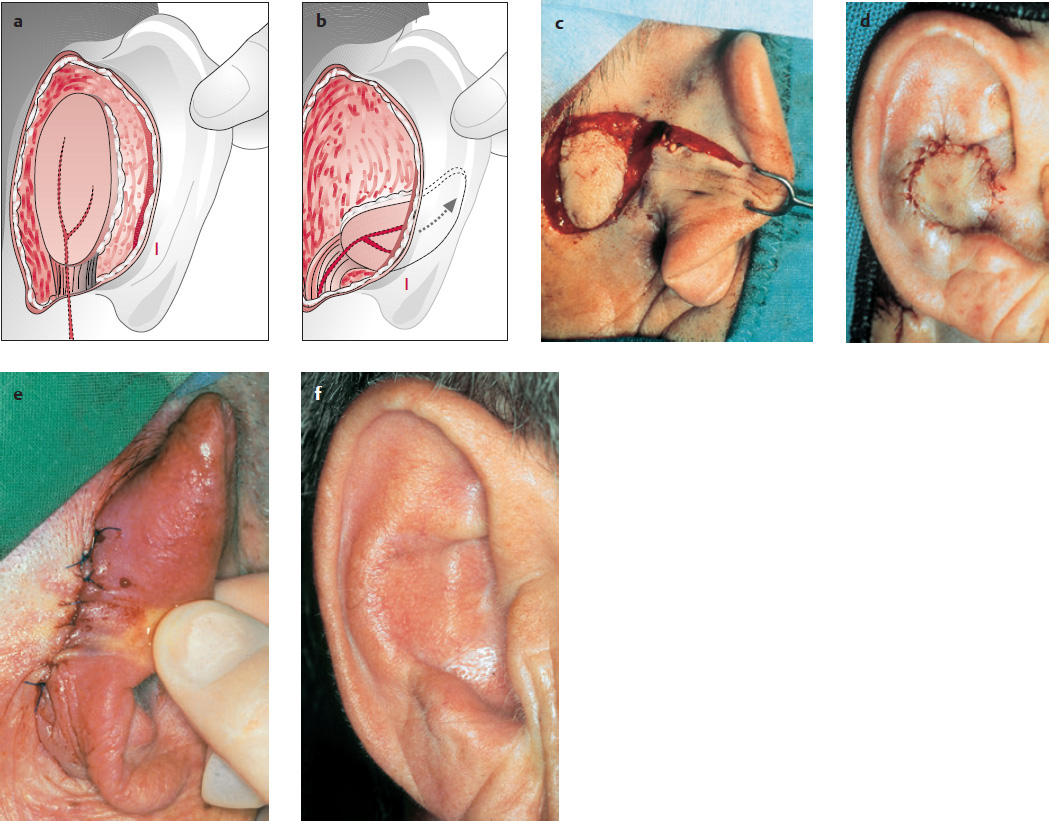
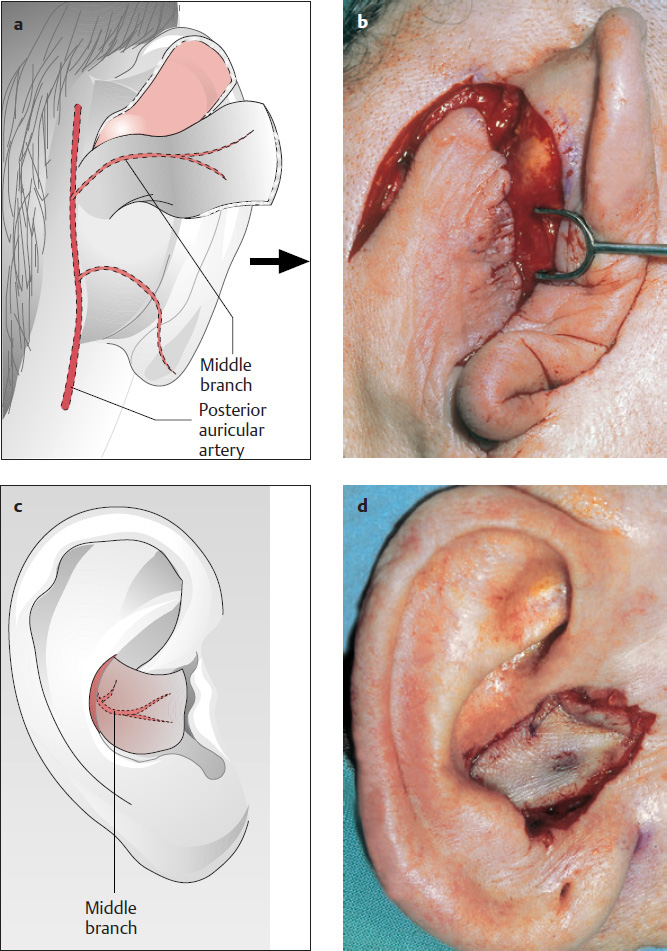
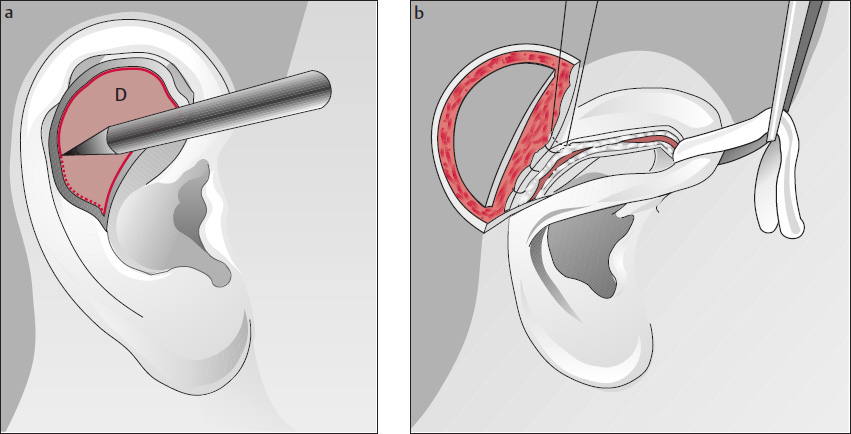
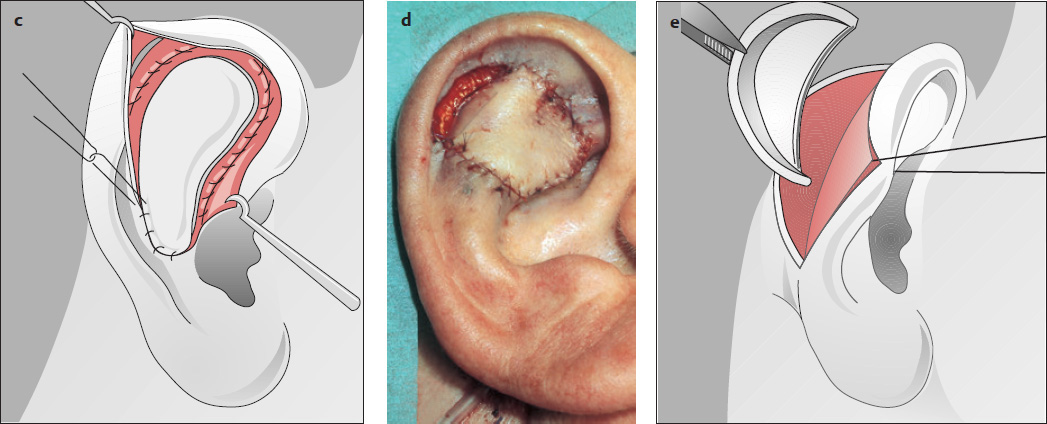
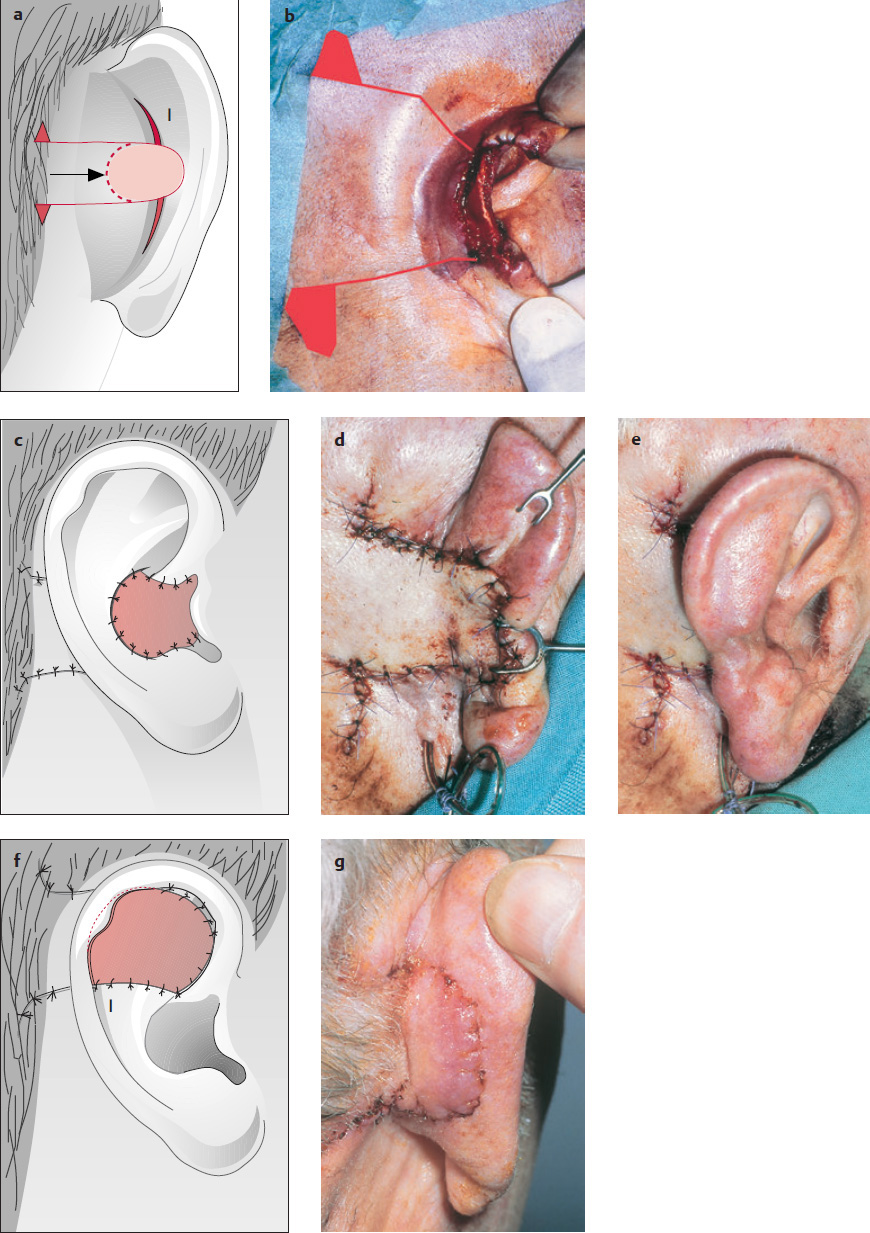
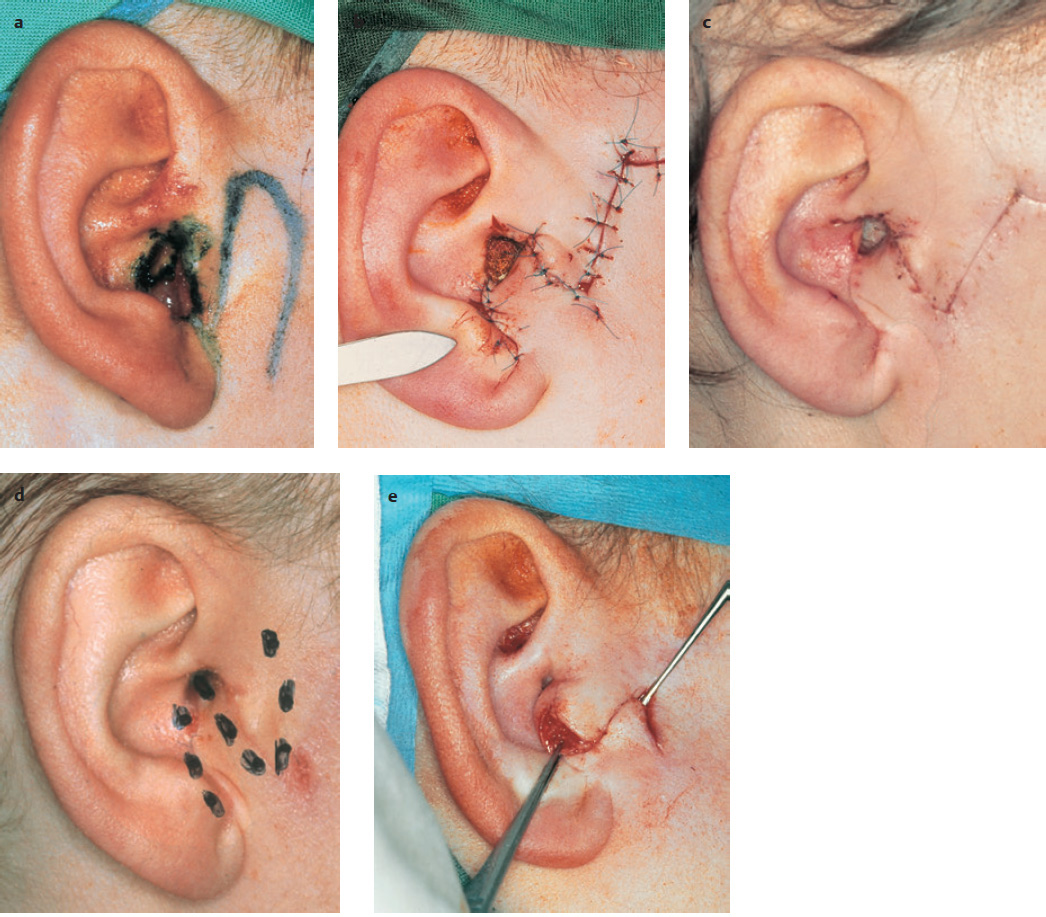
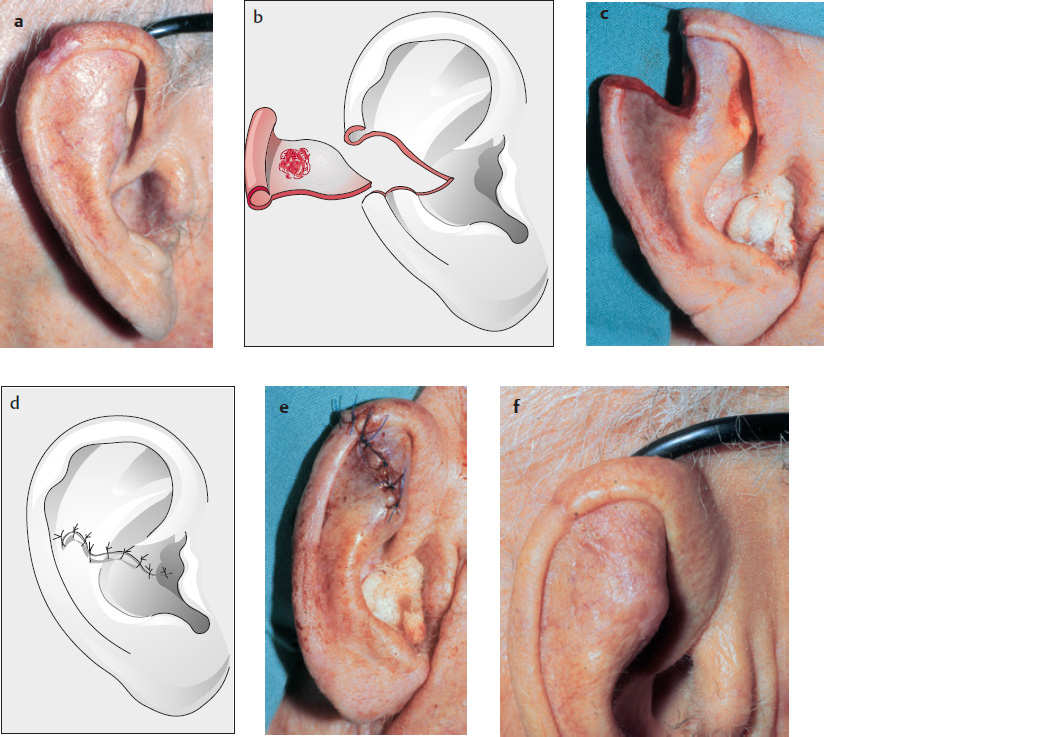
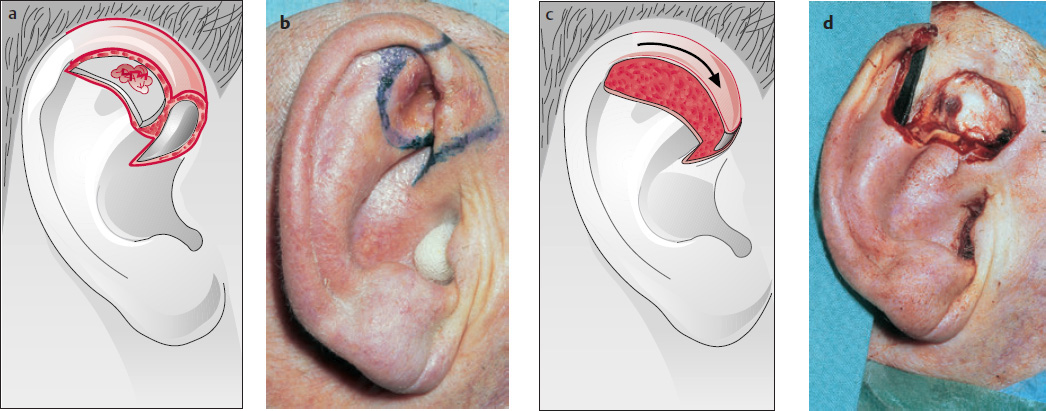
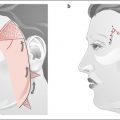
  • Reconstruction of a two-layer defect using a myocutaneous island flap based posteriorly on the posterior auricular artery (Krespi et al. 1983; Weerda and Siegert 1999a; Weerda 2001; Fig. 10.5a–f ).


  • Zong-ji and Chao (1990) also use an island flap based posteriorly on the posterior auricular artery.


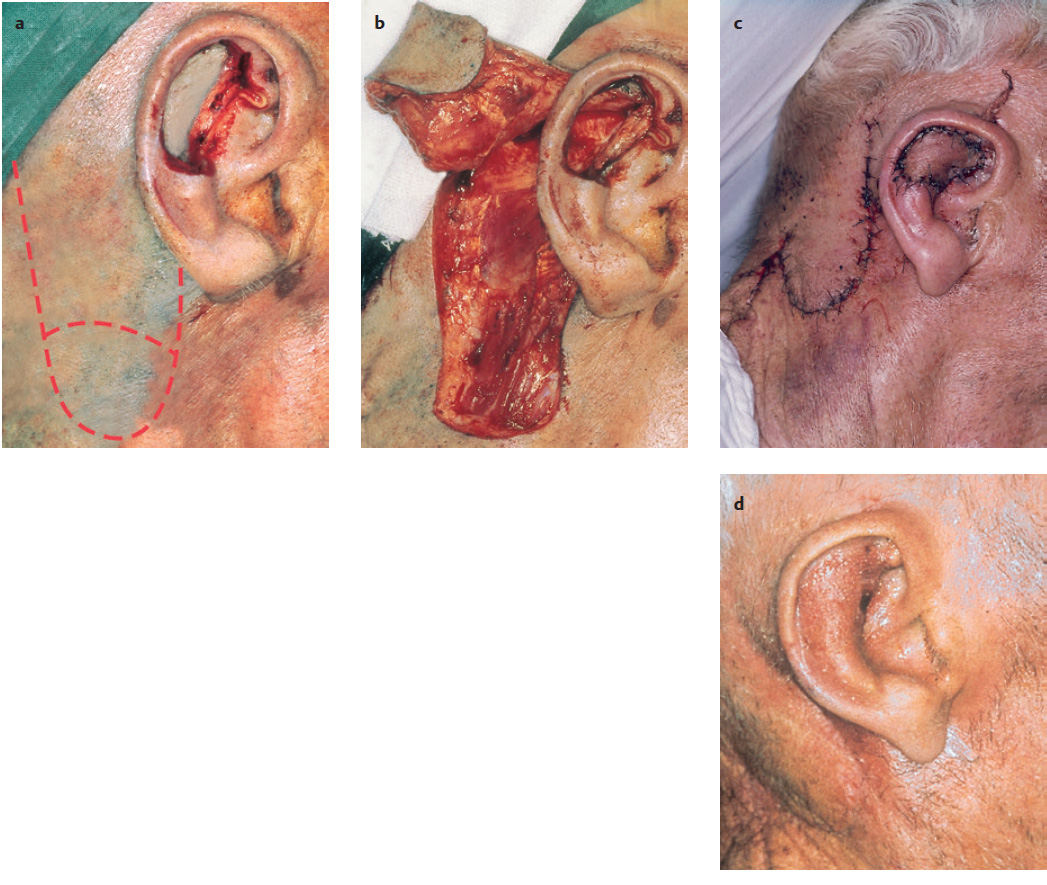
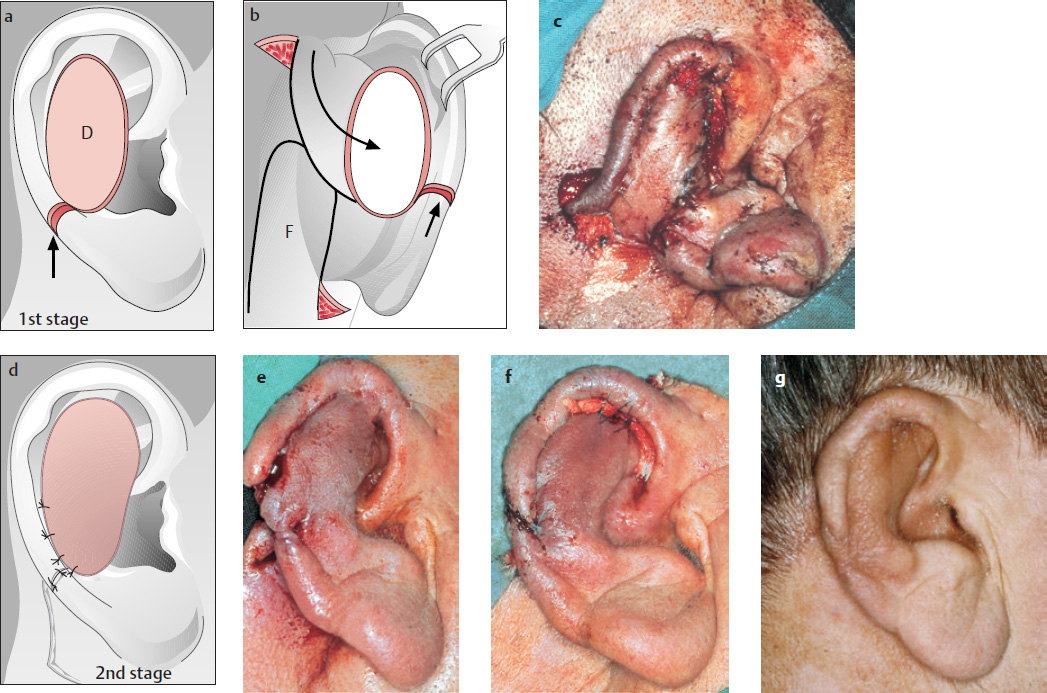
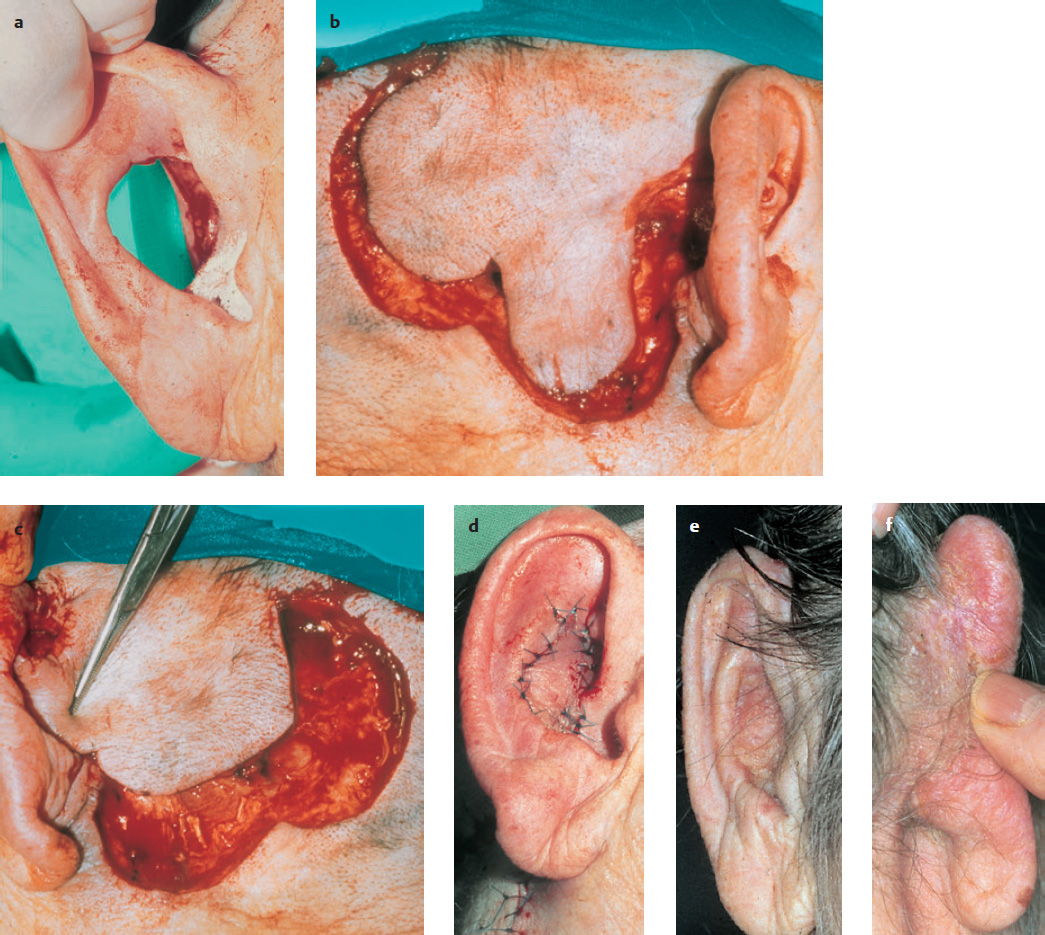
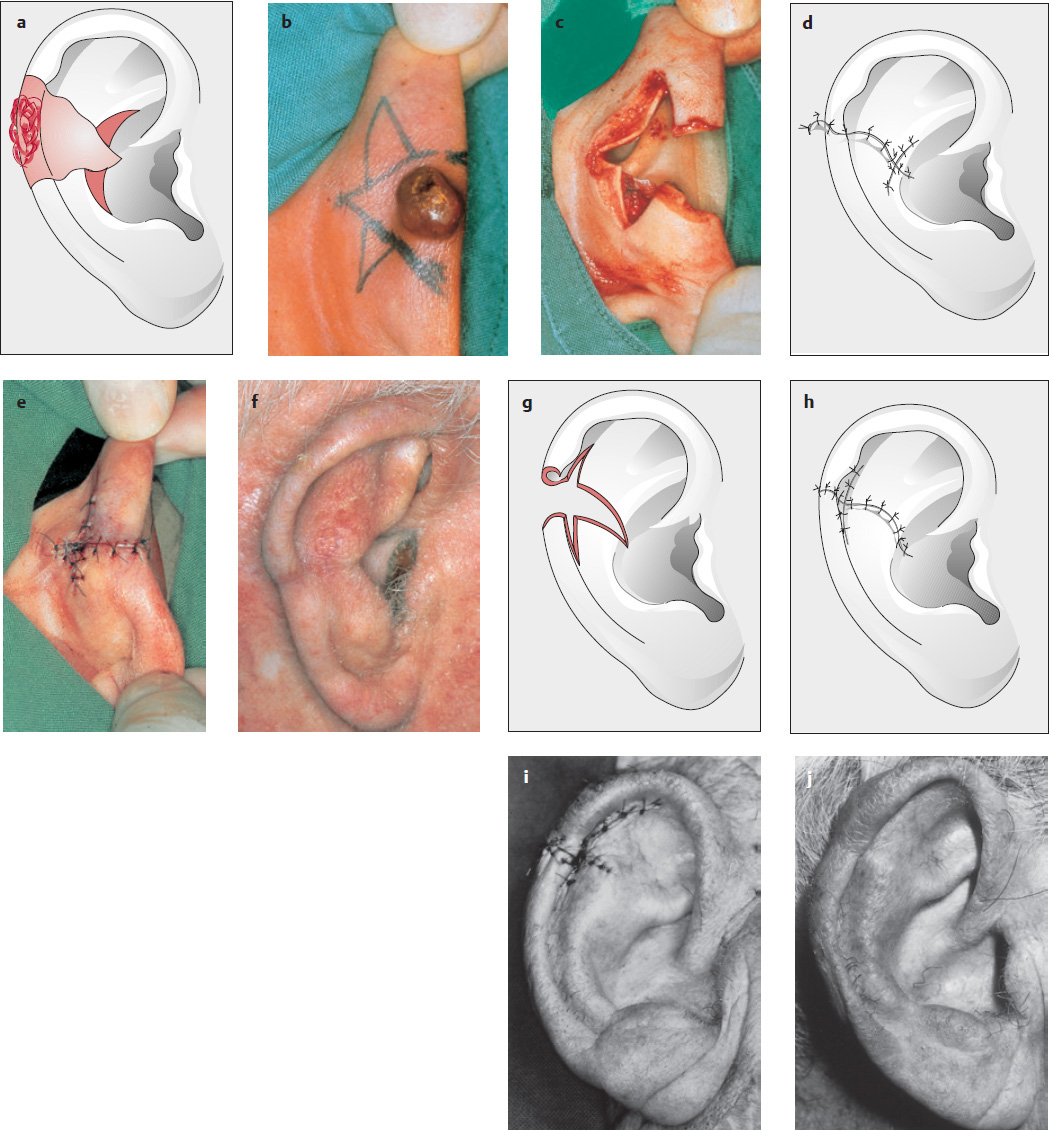
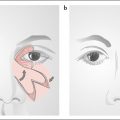
  • Large island flap based on a dermal pedicle (as described by Masson 1972; Renard 1981; Koopmann and Coulthard 1982; Jackson 1985b; Fig. 10.6a–g )


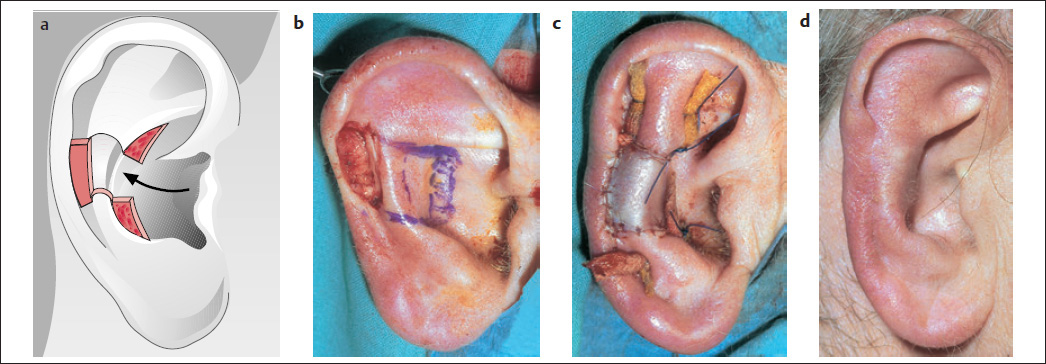
  • Island flap as described by Park et al. (1988; Fig. 10.7a, b ).

a–f Two-layer central defect: coverage using a myocutaneous island flap based on the posterior auricular artery (Krespi et al. 1983). a, b The flap is incised according to a template of the defect, while protecting the vessels arising from beneath, as well as the muscular pedicle. c The postauricular skin is undermined as far as the anterior defect; I = tunnel. d, e The flap is inset into the anterior defect and the posterior wound is closed. f Result after healing onto the concha.
a–g Coverage of a full-thickness conchal defect using a two-layer island flap based on a dermal pedicle. a Defect in the concha, antihelix. Advancement flap for tragal repair (d). b Retro- and postauricular island flap, based on a dermal pedicle; D = defect in concha and antihelix. c, d The island flap is brought out anteriorly onto the defect and sutured (anterior surface). e, f Suture of the secondary defect (posterior surface); there is considerable reduction of the sulcus: the postauricular surface was sutured onto the defect on the mastoid surface (see Fig. 10.80 , p. 184). g Result after 2 years.
a–d a, b Reconstruction of an anterior defect using a postauricular island flap as described by Park et al. (1988). c, d The vessels are identified using Doppler ultrasound and the flap is elevated. The flap is brought out anteriorly and sutured onto the defect.
a, b Antihelical defects (see Fig. 10.1 ). (Transposition flap: see Figs. 10.4 and 10.11 ; island flap: see Fig. 10.6 ; U-shaped advancement flap: see Fig. 10.12 ). a Superior antihelix. b Inferior antihelix.

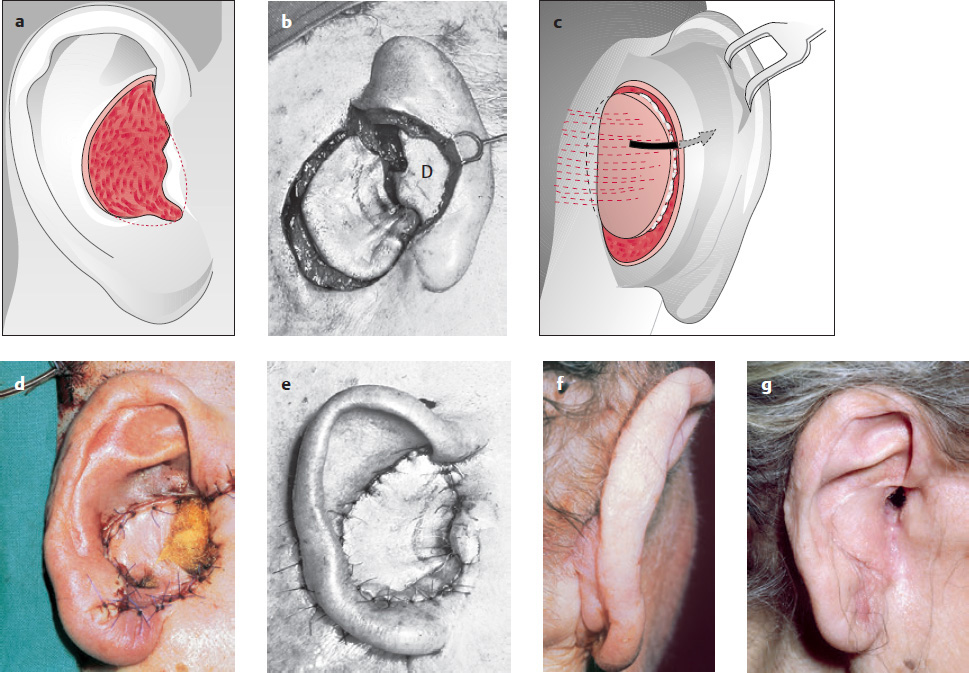
Park and Chung (1989) have pointed out that the direction of blood flow is reversed after the flap is inset. The donor site is covered with a split-thickness or full-thickness skin graft.


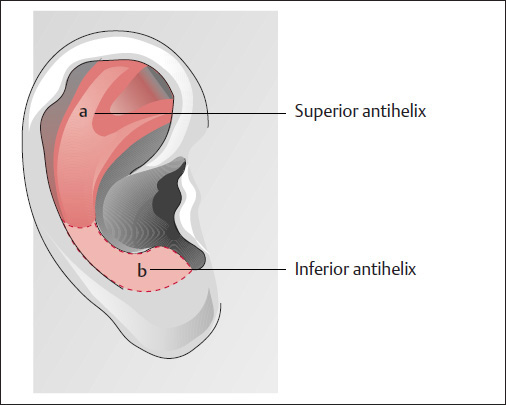
Defects of the Antihelix and Combined Central Defects (Figs. 10.8 and 10.9)


In particular, posterior transposition flaps and island flaps based posteriorly on a dermal pedicle or on the posterior auricular artery can be used (see Figs. 10.410.6 ) for the reconstruction of defects in the antihelical region ( Fig. 10.8a, b ) or for more extensive central defects (combined central defects; Fig. 10.9 ), as previously described (see pp. 138, 139).

Combined central defects. Flaps as used for conchal and antihelical defects can be used (see Figs. 10.1, 10.6, 10.14 ).


Converse and Brent’s (1977) Three-stage Reconstruction of Full-Thickness Defects of the Antihelix

( Fig. 10.10 )


The flap can be extended onto the postauricular skin to cover large defects of the concha and antihelix (Jackson 1985b; see Fig. 10.6 ).


Superiorly or Inferiorly Based Transposition Flap

( Fig. 10.11 ; see also Fig. 10.4 )


Stage I:


A large, superiorly based, retroauricular transposition flap is raised, which, depending on the size of the defect, can be extended to the neck ( Fig. 10.11a ). The flap is de-epithelialized at the site where it is brought through, and then inset ( Fig. 10.11c ). Behind the ear, the flap may also be used to cover the postauricular defect (Weerda 1994b; see Fig. 10.4 ).

a–e Reconstruction with a large island flap (Converse and Brent 1977). Stage I: a The defect (D) is outlined on the mastoid skin. b Incision around the flap, with minimal mobilization of the margins of the flap and the mastoid skin (the flap remains pedicled to the mastoid). The mastoid skin is sutured to the skin of the posterior auricular defect. c, d The island flap is sutured to the margins of the anterior defect (see Fig. 10.4e ). Stage II: Elevation after 3 weeks and insertion of a framework. e Conchal cartilage from the ipsi- or contralateral side or from costal cartilage. Stage III: After a further 3–4 weeks, the framework, together with its fibrous coating, is elevated and the defect is covered with a split-thickness or full-thickness skin graft (see Fig. 4.48d–f, p. 164).
a–d Single-stage coverage of a large central defect using a superiorly based transposition flap. a, b The superiorly based transposition flap is outlined and de-epithelialized at the site that will come to lie beneath the tunnel when passed anteriorly. c The flap has been set into the defect (see Fig. 10.4 ), the secondary defect is closed by a rotation flap). d Result.

Stage II:


The flap pedicle can be divided after 3 weeks. The remnants of the pedicle are thinned out and incorporated into the mastoid surface, and the wound is closed in two layers. Full-thickness defects that are not too large can be covered on their postauricular surface with a split-thickness or full-thickness skin graft. Double rotation (see also Fig. 10.88 or transposition–rotation flaps (see also Figs. 10.61, 10.86 and 10.87 ) can be used for the single-stage resurfacing of particularly large central defects (see also pp. 137141).

a–g U-shaped advancement flap as described by Gingrass and Pickrell (1968; see also Figs. 10.57 and 10.59 ). a–c Defect in the concha, U-shaped advancement flap to be drawn anteriorly to close the defect and Burow’s triangles; l = tunnel. d, e Coverage of the conchal defect. f Reconstruction of the fossa region and superior antihelical region. g Postauricular region after reconstruction.


U-shaped Advancement Flap of Gingrass and Pickrell (1968)

( Fig. 10.12 )


After ~3 weeks, the pedicle is divided and the post-auricular wound closed. This flap is also suitable for defects in the region of the posterior auditory canal and the antitragus.

a–g Temporary repositioning of the helix for a large two-layer or full-thickness auricular defect (Weerda 1984; Weerda and Siegert 1999a). Stage I: a Defect (D) and helix divided inferiorly above the earlobe (arrow). b Inferiorly based transposition flap (F) to cover the anterior surface, rotation flap to cover the posterior surface (a thick split-thickness skin graft may also be used here). c The flaps have been inset. Stage II: d–f Separation of the transposition flap and replacement of the helix after ~3 weeks. g Appearance after healing.


Weerda’s Reconstruction with a Transposition Flap and Temporary Repositioning of the Helix

( Fig. 10.13 ; Weerda 1984)

a–f Reconstruction of large, full-thickness defects with a bilobed flap (transposition–rotation flap; Weerda and Münker 1981; Weerda 2001). a Defect. b Incision of the non-hair-bearing transposition flap (reconstruction flap 1) and hair-bearing rotation flap (transport flap 2). c, d The flaps are inset after de-epithelialization beneath the helix, the cartilaginous strut is inserted, and the primary and secondary defects are closed. e Result, anterior aspect; 1 = transposition (reconstruction) flap. f Posterior aspect.


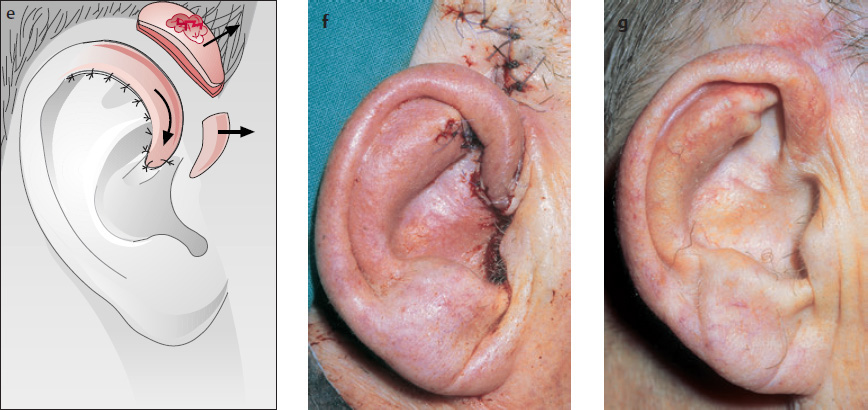
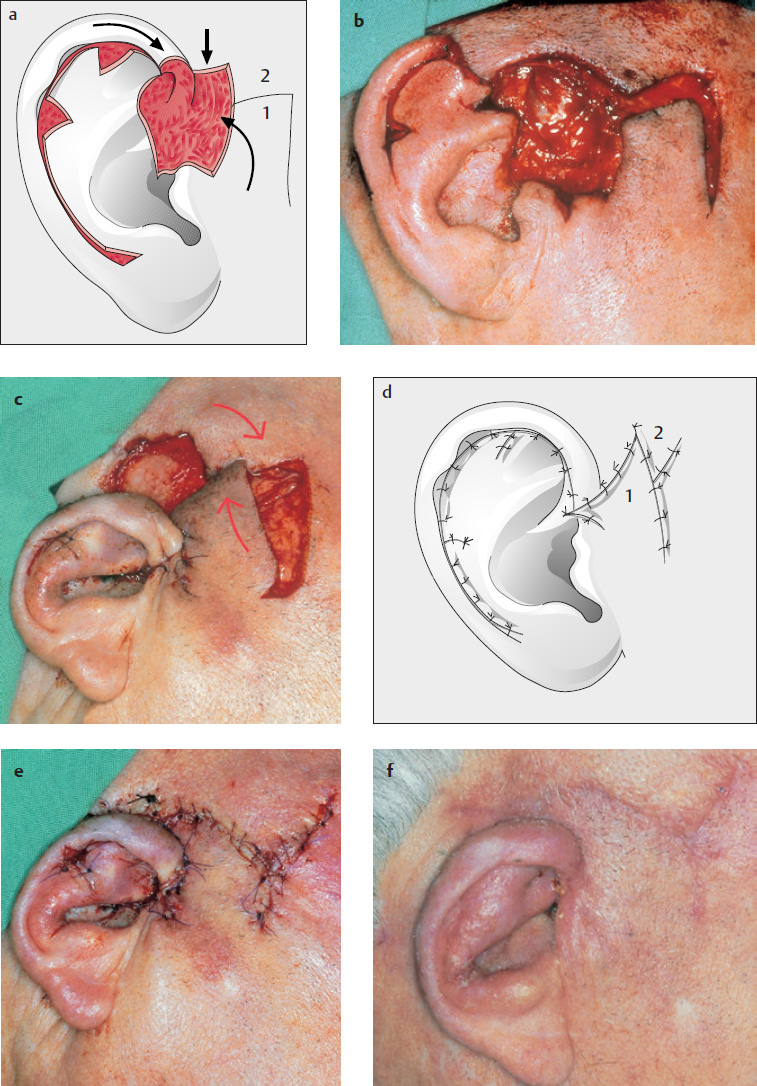
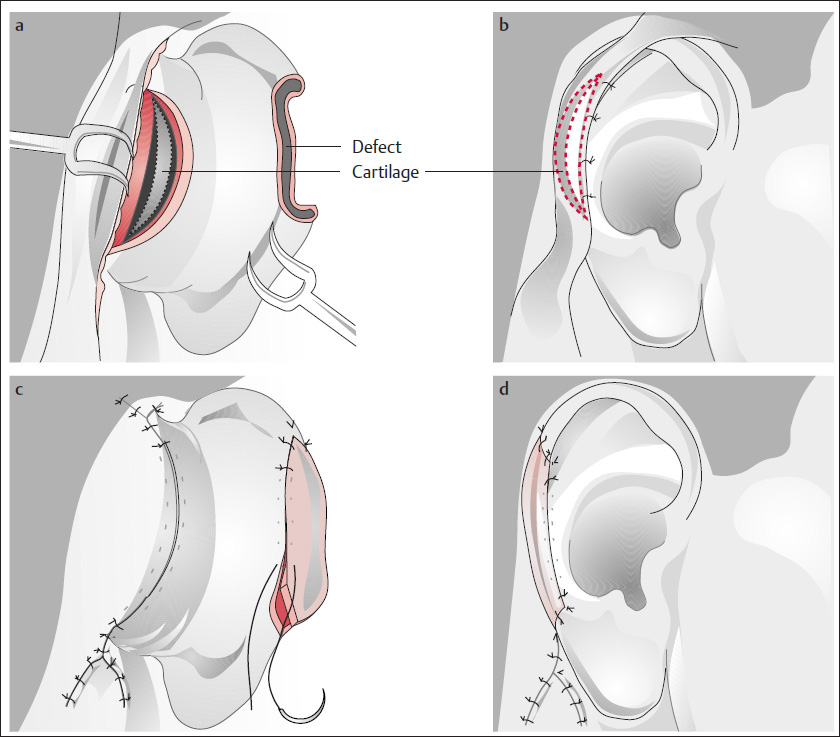
Weerda’s Bilobed Flap as a Transposition–Rotation Flap

( Fig. 10.14 ; Weerda and Münker 1981)


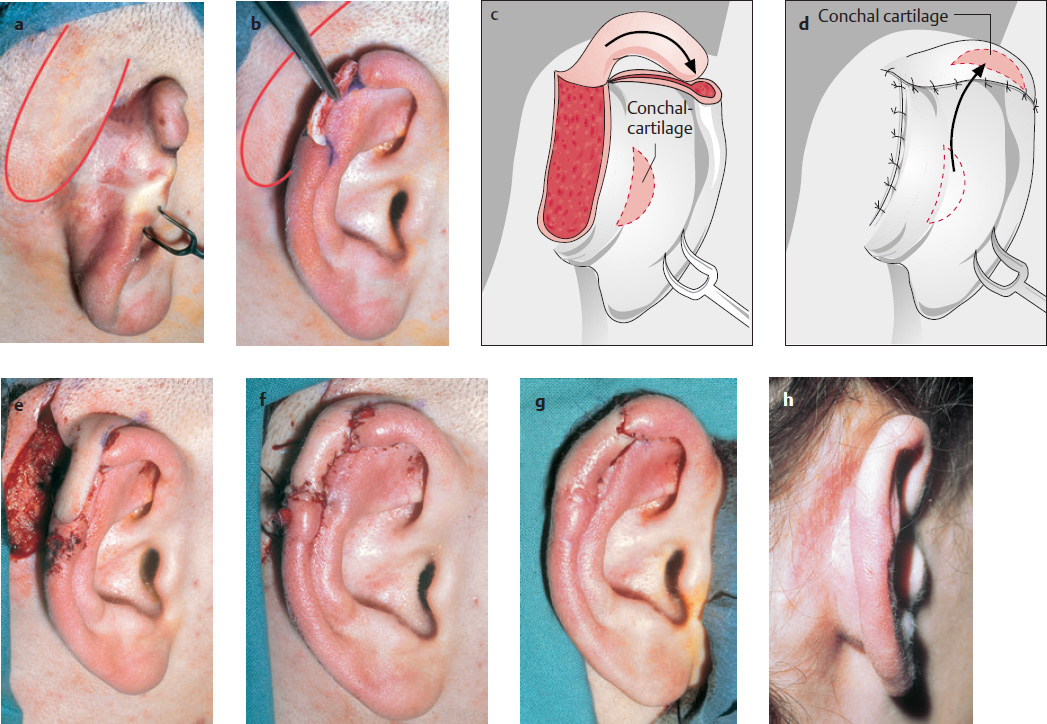
As will later be described in detail, a bilobed flap ( Fig. 10.14b, c ) can also be used for larger, full-thickness antihelix–conchal defects ( Fig. 10.14a ). The flap is de-epithelialized below the helix and supported with cartilage ( Fig. 10.14d ).


Weerda’s Scaphal Reconstruction with a U-shaped Advancement Flap

( Fig. 10.15 )


Preauricular Flaps


Many authors use preauricular flaps for smaller central defects.


Tebbetts’ (1982) Superiorly Based, Preauricular Flap for the Triangular Fossa

( Fig. 10.16 )

a–d Weerda’s technique of scaphal reconstruction using a U-shaped advancement flap from the concha. a, b Defect in the scapha, skin incision over the antihelix, Burow’s triangles in the concha, cartilage strut from the concha. c The defect is closed by U-shaped advancement; the flap is adapted with mattress sutures (5-0 monofilament, P3 or PS 3 needle) tied over small cotton bolsters. d Result.
a–c Technique by Tebbetts (1982) for coverage of the triangular fossa using a superiorly based preauricular flap. a, b Elevation of the flap and deepithelialization at the site that will come to lie beneath the tunnel. c The flap has been inset.
a–e Reconstruction of the helical crus (Weerda 1999a, 2004; 2007). a, b Outline of the flap Elevation of the flap adjacent to the helical stump. c Transposition of the flap. d, e Closure of the defects.


Mellette’s (1991) Preauricular Flap Based Superiorly on the Helical Crus

( Fig. 10.17 )


This technique is also suitable for reconstruction of the helical crus. The flap is pedicled on the ascending limb of the helical crus and can be used to cover defects in the region of the concha and the entrance to the auditory canal. Sometimes, improvements can be made to the helical crus in a second stage (Weerda and Siegert 1999a, 2001).


Subcutaneous Pedicle Flap of Barron and Emmett (1965)

( Fig. 10.18 )


Inferiorly Based Preauricular Flap

( Fig. 10.19 )


An inferiorly based preauricular flap can be used for covering the intertragic notch and the inferior concha, for the posterior surface of the tragus and the lateral auditory canal.

a, b Subcutaneous island pedicle flap, as described by Barron and Emmett (1965). a Elevation of the flap and development of a tunnel. b Inset and closure of the secondary defect (Weerda).
a–g Reconstruction of the intertragic notch. Stage I: a–c Reconstruction of the intertragic notch, lower concha, and lateral auditory canal, using an inferiorly based transposition flap. Stage II: d, e After the notch has been widened in this way, it is subsequently reduced with the use of a Z-plasty. f Result. g Tragus reconstruction with a superiorly based pretragal flap.
Peripheral defects: helical defects (see Fig. 5.41 ).


Peripheral Defects


( Fig. 10.20 )


Peripheral defects refer in particular to defects located on the helix ( Fig. 10.20 ; see Fig. 10.1 ).


Helix Reconstruction with Auricular Reduction


The techniques described for reduction of the auricle during correction of macrotia are very well suited for treating defects of the helix secondary to tumor excision or trauma (see, for example, Di Martino 1856, as cited in Joseph 1931; Trendelenburg 1886, as cited in Joseph 1931; Cocheril 1894, as cited in Tanzer et al. 1977; Joseph 1896, 1931. If the age and general condition of the patient allow it, some of these operations can be performed under local anesthesia, on an outpatient basis.

a–f Wedge-shaped excision without Burow’s triangles (for defect sizes up to ~1 cm). a Helical tumor. b, c Wedge-shaped excision. d, e Closure. f Result.


Recommended Defect Reconstruction

Wedge excisions and reconstruction with advancement of the helix can be recommended.


Simple Wedge Excisions

( Fig. 10.21 )


For small helical lesions or small defects, a simple extension of the wound in the form of a wedge excision is enough to achieve an adequately pleasing esthetic result (see Fig. 5.41 ; p. 55).


Wedge Excision and Burow’s Triangles

( Fig. 10.22a–j )


Because irregularities in form and contour can result from simple wedge excision, Trendelenburg (1886, as cited in Joseph 1931) recommended the removal of Burow’s triangles. This procedure has since been modified in many ways (see for example Trendelenburg 1886, as cited in Joseph 1931; Joseph 1896; Goldstein 1908; Lexer 1933). Whenever possible, we place the Burow’s triangles in the scapha ( Fig. 10.22e ) or along the border between the concha and its transition to the antihelix ( Fig. 10.22a ; Converse and Brent 1977).


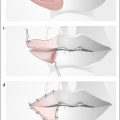
Gersuny’s (1903) Technique of Defect Closure by Transposition of the Helix

( Fig. 10.23 )


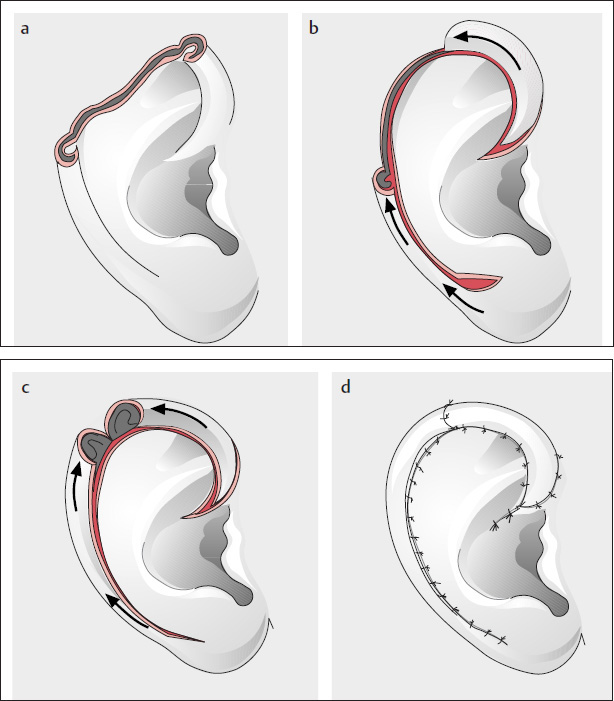
Gersuny performed a full-thickness crescent-shaped excision in the scapha of a female patient who had sustained a helical lesion, and transposed the helix into the resultant defect ( Fig. 10.23a, b ). This elegant method has been modified in several different ways (see Figs. 10.24, 10.29, 10.30 ).

a–j Wedge-shaped tumor excisions with Burow’s triangles (for defect sizes up to ~2 cm). a–f Excision with Burow’s triangles in the concha (Joseph 1896). g–i Burow’s triangles in the scapha. j Result.
a, b Gersuny’s (1903) technique for full-thickness tumor excision. a Tumor excision and full-thickness, crescentshaped upper scaphal excision. b Closure of the defect by rotating the helix downward (see Figs. 10.23, 10.28, 10.29 ).
a–h Excision of small defects in the helical region and closure using Gersuny’s technique (1903), modified after Antia and Buch (1967), Antia (1974), and Weerda and Zöllner (1986). a, b Tumor excision and two-layer, crescent-shaped excision in the scapha with a Burow’s triangle in the earlobe. c–e Mobilization of the entire helix on the postauricular skin and closure of the wounds. f, g Excision of a dog ear on the postauricular surface and suture. h Result.


Modification of the Gersuny Technique by Weerda and Zöllner (1986)

( Fig. 10.24 )


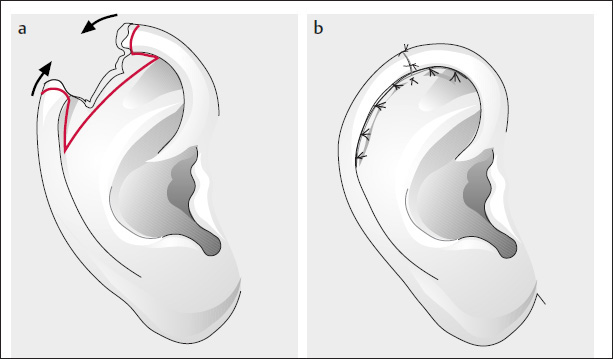
Similar to Antia and Buch (1967) and Antia (1974), and in contrast to Gersuny (1903; see Fig. 10.23 ), we made only a two-layer, crescent-shaped excision in the scapha after excision of the tumor and dissected the skin on the posterior auricular surface ( Fig. 10.24b, d, e ).


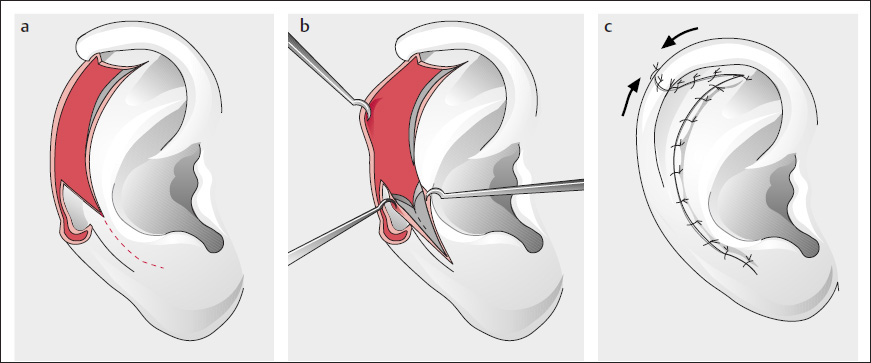
Antia and Buch’s Modification with Mobilization of the Helical Crus

( Fig. 10.25 ; Antia and Buch 1967, Antia 1974)


In a modification for larger defects, the helical crus was additionally incised (it remains pedicled posteriorly and superiorly).


Lexer’s (1933) Modification

( Fig. 10.26 )


This modification is a full-thickness crescent-shaped excision from the scaphal and antihelical margin after excision of the tumor. The postauricular skin is excised slightly higher and then elevated. The defects are slid into each other, and the auricle is reduced by closing cartilage and skin ( Fig. 10.26b ; Ginestet et al. 1967).


Argamaso and Lewin’s (1968) Technique of Ear Reduction and Defect Reconstruction

( Fig. 10.27 )


For smaller defects, a Z-plasty is performed by transposing the inferior portion into the superior segment ( Fig. 10.27c ) in the form of a chondrocutaneous flap ( Fig. 10.27a, b ).


Meyer and Sieber’s (1973) Modification of the Technique

( Fig. 10.28 )


The concha or the preauricular defect can be treated together with tumors of the ascending helix ( Fig. 10.28a–d ; Argamaso 1989).


Tenta and Keyes’ (1981) Excision of the Triangular Fossa with Reduction of the Auricle

( Fig. 10.29 )


After full-thickness excision ( Fig. 10.29a ), the helix is used to cover the defect ( Fig. 10.29c ), as with Gersuny’s technique (1903); Fig. 10.29b ; see also Figs. 10.30 and 10.42 ).

a–d Helix reconstruction of a small defect (Antia and Buch 1967; Antia 1974). a Debridement of the wound margins. b Incisions around the helical crus and dissection of the postauricular skin pedicled on the entire helix extending from the scapha; incision within the scapha down to the earlobe, where a small Burow’s triangle is excised. c, d Closure of all defects with transposition of the helical crus and reduction of the auricle (see Fig. 10.25 ).
a, b Lexer’s method for reconstruction of a helical defect with scaphal excisions (Lexer 1933; Ginestet et al. 1967).
a–c Ear reduction (defect reconstruction), using the technique of Argamaso and Lewin (1968). a Tumor excision, crescent-shaped, two-layer excision from the scapha (antihelix). b Elevation of the postauricular skin and excision of the cartilage toward the earlobe. c Closure of all defects; excision of a dog ear from the earlobe and the postauricular skin.
a–f Wedge excision of an anterior tumor of the helix and closure with auricular reduction, as described by Meyer and Sieber (1973). a Tumor excision. b, c Crescent-shaped, two-layer excision from the scapha. (Excision of an additional tumor of the concha). d Closure. e Closure, full-thickness skin graft covers the defect of the concha. f Result (see Figs. 10.24 and 10.25 ).

Critique:


Here too, techniques that preserve the size of the auricle should usually take preference.


The techniques of reconstruction described here for conchal defects and defects of the antihelix can also be used for larger combined defects of the concha and antihelix (see also p. 137ff.).


Weerda and Zöllner’s (1986) Technique for Defects of the Helical Crus and Preauricular Region

( Fig. 10.30 ; Weerda and Zöllner 1986; Weerda 1988d; see also Fig. 10.43 )


The entire helix can be rotated anteriorly to treat tumors in the region of the anterior ascending helix, the helical crus, and the preauricular region, with the preauricular defect subsequently being covered by a Dufourmentel rhomboid flap (see also p. 26).

a–g Tumor excision in the triangular fossa with reduction of the auricle, as described by Tenta and Keyes (1981; see Figs. 10.30 and 10.42 ). a, b Excision of a tumor in the triangular fossa. c, d Excision of the skin behind the tumor, including part of the helical crus. e, f Closure of all defects. g Result 1 year after reconstruction.
a–f Defect of the preauricular region and in the region of the helical crus and anterior helix. a, b Elevation of a preauricular Dufourmentel flap and anterior transposition of the helix as a Gersuny plasty (see Fig. 3.26 ). c–e Closure of all defects. f Result (see also Fig. 10.28 ).


Nonrecommended Methods of Defect Reconstruction


Pegram and Peterson’s (1956) Reconstruction with a Free Full-Thickness Composite Graft from the Contralateral Ear

(Pegram and Peterson 1956; see also the section “Middle third of the auricle”, p. 168).


Even Körte (1905) and Lexer (1910) had previously used composite grafts for reconstruction of the ear. Similar techniques to reconstruct partial defects are described by Day (1921), Melchior-Breslau (1928 as cited in Joseph 1931), Wachsberger (1947), Pegram and Peterson (1956), Nagel (1972), Brent (1975), and Converse and Brent (1977). The margins of the defect are freshened, or the tumor excised; a wedge-shaped, full-thickness composite graft of half the defect size is removed from the contralateral ear and inset into the defect; the cartilage is adapted with a 5-0 braided suture; and the skin is closed with a 6-0 or 7-0 monofilament suture. The wedge defect of the contralateral side is closed in a similar fashion.

U-shaped advancement flap to cover a defect of the ascending helix.

Critique:


These techniques may be suitable, if at all, for smaller defects (see Fig. 3.16 ) because adequate nutrition of larger, freely transplanted composite grafts cannot be guaranteed. We see a high rate of graft loss, especially when this technique is performed by less experienced surgeons (see Weerda 2007, pp. 3240, 57).


Helix Reconstruction without Auricular Reduction


Since the defects (see Fig. 10.21 ) frequently involve more than one region, reference will be made in the text and in the figure legends to similar reconstructions in other chapters.


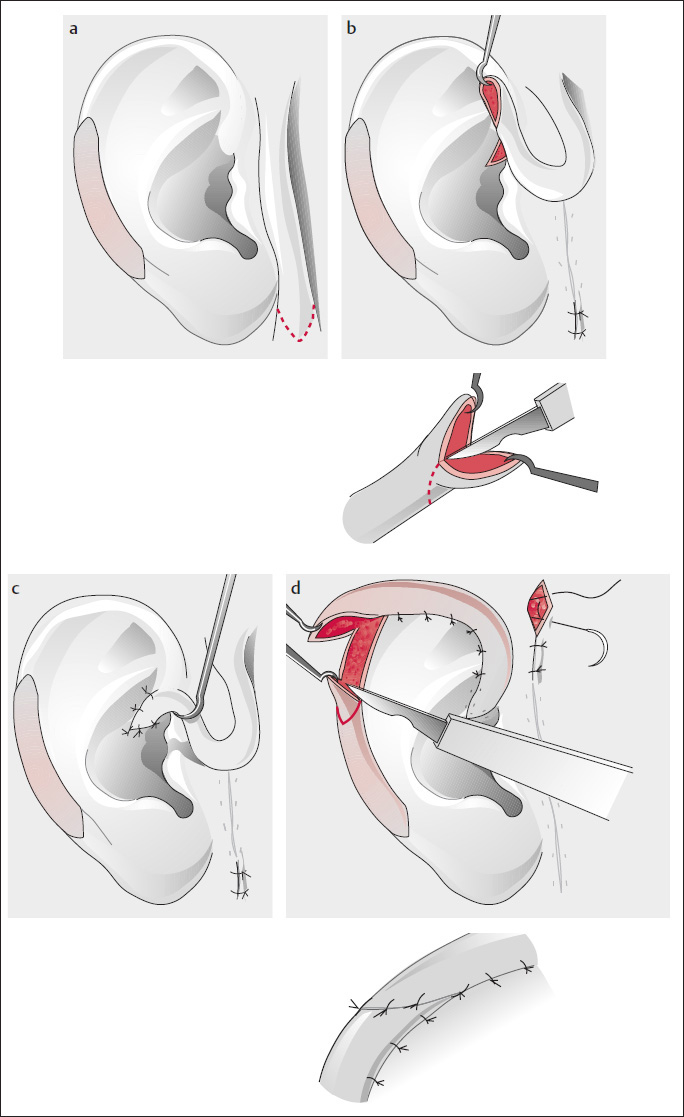
Anterior Defects: Helical Crus and Ascending Helix ( Figs. 10.31 and 10.32 )


The ascending helix, as well as the helical crus, can be reconstructed with a small U-shaped advancement flap ( Fig. 10.31 ), a rotation flap ( Fig. 10.32a, b ), or a preauricular, superiorly or inferiorly based transposition flap ( Fig. 10.32 ).


Superior and Middle Thirds of the Helix


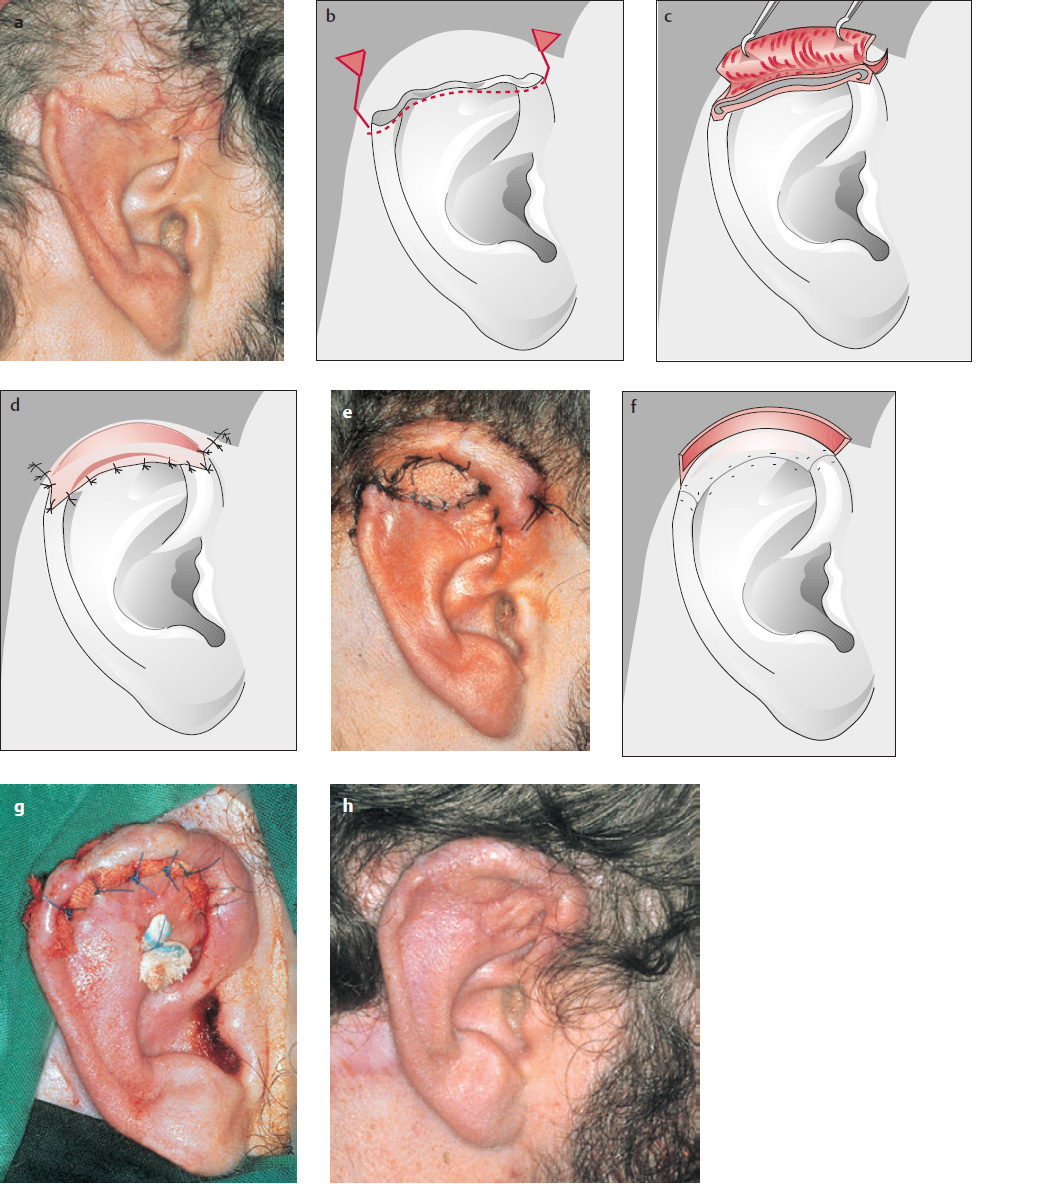
Superiorly Based Postauricular Transposition Flap

( Fig. 10.33 ; Weerda and Siegert 1999a; Weerda 2007)


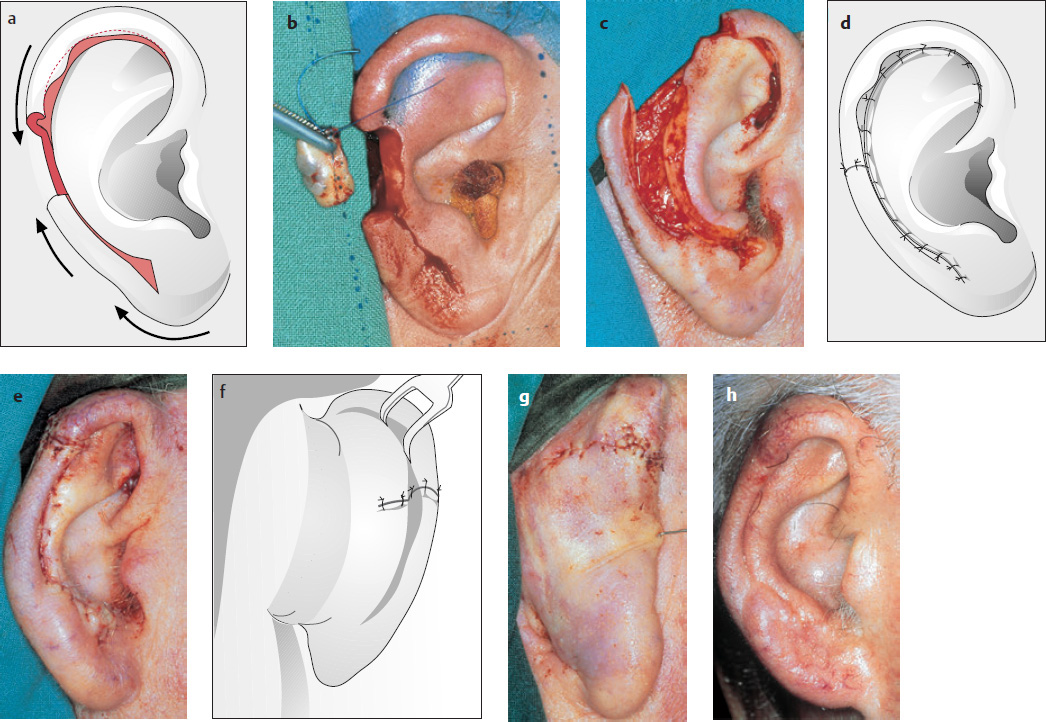
A superiorly based posterior flap is raised in the sulcus, patterned from a template made from aluminum foil (Pennisi et al. 1965; Tebbetts 1982; Mellette 1991; Weerda and Siegert 1999a; Weerda 2001) and inserted over a cartilaginous support ( Fig. 10.33a–f . After resection of the pedicle in a second stage, we can obtain a good result ( Fig. 10.33d, g, h ).


Preauricular Transposition Flap

( Fig. 10.34a–c )


As with the posterior flap, a patterned preauricular flap is used to reconstruct the superior helix.

a, b Coverage of the ascending helix with an inferiorly based rotation flap.
a–h Reconstruction of the superior helix with a posterosuperiorly based transposition flap. Stage I: a, b The superiorly based transposition flap is marked and the helix supported by a conchal cartilage strut. c–f The flap is brought into position. Stage II: g After at least 3 weeks, the base of the flap is inset in a fish-mouth manner (see Figs. 10.38 and 10.39 ). h Result after 2 years.
a–c Reconstruction of the superior helix with a preauricular flap secondary to necrosis of this region after total auricular reconstruction following an avulsion injury. a Total reconstruction, necrosis of the superior helix: the superior helix has been reconstructed with cartilage from the contralateral concha and the preauricular tubed flap has been incised (it must be of adequate length; see Figs. 10.3810.40 ). b The flap is brought into position and attached in a fish-mouth fashion; the non-epithelialized end of the flap is protected with a small silicone plate (arrow). c Result after the flap pedicle is inset, ~3 weeks later.
a–h Coverage of the superior, middle, and inferior helix with a broad-based superiorly pedicled retroauricular flap, as described by Smith (1917). a Resorption of the cartilage after insertion of the denuded cartilage placed into a cutaneous pocket secondary to an avulsion injury. Stage I: b The flap is outlined. c Incision and dissection. d, e Inset with cartilage strut (pink) in a fish-mouth manner onto the helix (see Fig. 10.38d ). Stage II: f, g After ~3 weeks, separation from the mastoid skin and posterior inset, coverage of the mastoid defect with thick split skin (Nagata 1994ad). h Result after 4 months.


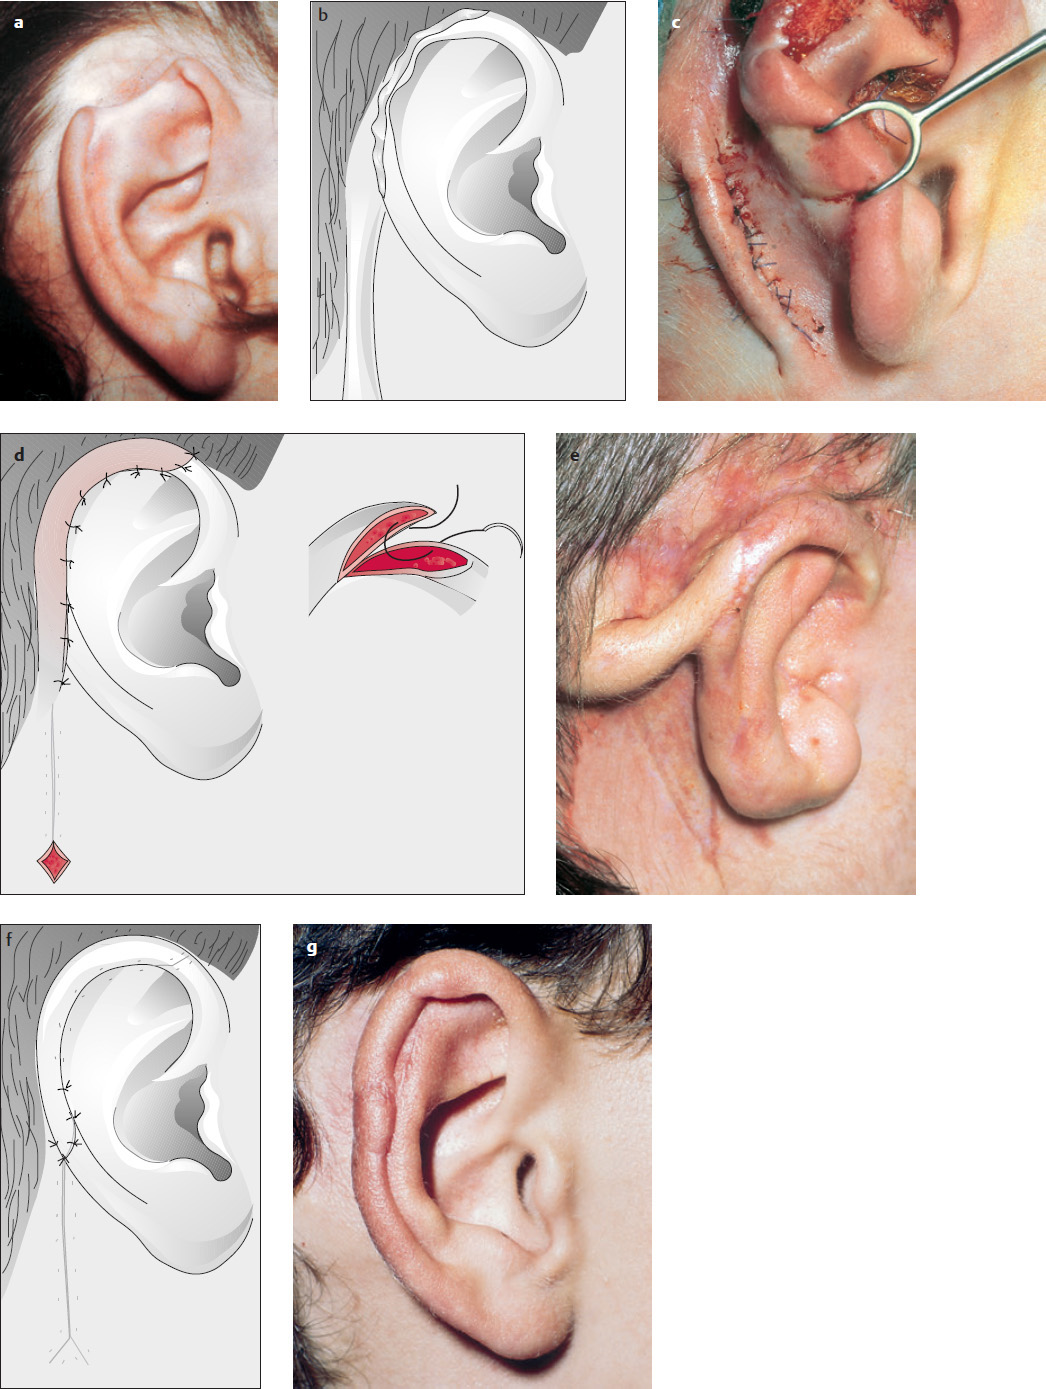
Retroauricular Flap of Smith (1917)

( Fig. 10.35a–h )


The upper (middle) third of the auricular helix is reconstructed with a broad-based, superiorly pedicled retroauricular flap (see Fig. 10.57 ).


Tube-Pedicled Flap

( Fig. 10.36 )


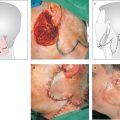
Pre-, post-, and retroauricular tube-pedicled flaps can be employed for all regions of the helix. Tube-pedicled flaps of the neck ( Fig. 10.36a ; Pierce 1925; Hamblen-Thomas 1938; McNichol 1950; Converse 1958; Cosman and Crikelair 1966; Pitanguy and Flemming 1976; Davis 1987) can usually no longer be recommended, given that they produce conspicuous hypertrophic scars in the neck region ( Fig. 10.36b ). “Migrating” flaps of the supraclavicular region are better.


Defects of the upper, middle, or lower third of the helix can be reconstructed with a tunneled (bipedicle) or tubed pedicle flap that is raised in the sulcus and initially based superiorly and inferiorly (see Fig. 10.37 ; Streit 1914; Troha et al. 1990; Dujon and Bowditch 1995).

a, b Tube-pedicled flap from the neck, as described by McNichol (1950): a technique no longer used. a Reconstruction of the helix with a tube-pedicled flap from the neck. b Unsightly scar on the neck after a reconstruction by the author in the early 1970s.
a–d Reconstruction of a longer helical defect with a tubed bipedicle, tunneled fap in three stages (see text; Steffan of 1948; Weerda and Siegert 1999a; Weerda 2001). Stage I: a Cartilage harvested from the concha, access via the donor defect of the tunneled flapinthesulcus. b After suturing in the cartilage strut, the wound margins are freshened before the tunneled flap is inset onto the defect. Stage II: c Three weeks after reconstruction, the flaps are separated and inset onto the helical defect at an acute angle The remains of the tunneled flap are incorporated into the mastoid surface (see Figs. 10.38 and 10.39 ). d Result at the end of the second stage.


Recommended Techniques for Defect Reconstruction


Tube-Pedicled Flap for the Superior Helix

( Fig. 10.37 ; see also, Fig. 10.34 )


The tube-pedicled fap for the superior helix can also be used as a tubed bipedicle (tunneled) fap (see also Fig. 10.38 ).

a–g Reconstruction of the helix with a tubed bipedicle flap in three stages, as described by Steffanoff (1948). a Defect. Stage I: b, c The flap is incised and rolled up; if insufficient skin is available, the flap is enclosed in a silicone foil (0.2 mm thick). Stage II: d, e After 3 weeks; separation of the flap base inferiorly and incorporation into the defect in a fish-mouth manner. If necessary, a cartilage strut may be incorporated (see Fig. 10.33 ). Stage III: f After ~3 further weeks, incorporation of the remaining flap. g Result.


Tubed Bipedicle Flap for Defects of the Superior and Middle Thirds

( Figs. 10.38 and 10.39 )

a–d Reconstruction of the entire helix with a tubed bipedicle flap, modified from the technique of Converse and Brent (1977). Stage I: a The posterior helix is reconstructed (see Fig. 10.37 ); a preauricular tubed bipedicle flap can be raised concurrently. Stage II: b, c Incorporation of the flap as a helical crus. Stage III: d After 3 weeks at the earliest, incorporation of the flap (see Fig. 10.38d ) into the helix (for a similar technique of flap elevation in two stages, see Fig. 10.34a, b ).


Three-stage Reconstruction of a Defect of the Middle Third with a Tube-Pedicled Flap

( Fig. 10.39 ; Steffanoff 1948; Converse and Brent 1977; Weerda and Siegert 1999a; Weerda 2001)


Unlike reconstruction with a tunneled flap (see Fig. 10.37a ), the tube-pedicled flap is first raised and rolled into a tube ( Fig. 10.39b, c ). If there is not sufficient skin for closure, we use split skin for coverage, or wrap the exposed tube-pedicled flap with silicone foil (see also Fig. 10.33b ).


Converse and Brent’s (1977) Reconstruction with a Preauricular Tube-Pedicled Flap

( Fig. 10.39 )


Similar to the flap previously described, a preauricular tube-pedicled flap can be raised for defects of the anterior and superior helix as well as for the helical crus (Berson 1948; Converse 1958; Converse and Brent 1977).


Reconstruction with a Superiorly Based Posterior Flap

(see Fig. 10.33b )


Inferior Helix


These reconstructions are similar to those of the superior and middle thirds of the helix; further reconstructions are discussed under “Lower partial reconstructions” (see p. 174).

Only gold members can continue reading. Log In or Register to continue

Stay updated, free articles. Join our Telegram channel

Jun 15, 2020 | Posted by in Reconstructive surgery | Comments Off on The Auricular Region

Full access? Get Clinical Tree

Get Clinical Tree app for offline access