Fig. 7.1
Operative room layout for performing V-NSM with hand retractor
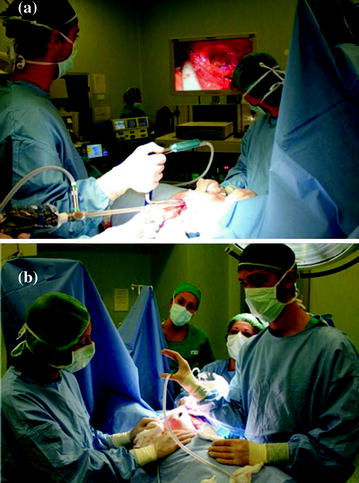
Fig. 7.2
The surgical team performing V-NSM with hand retractor: the surgeon stands at the same site of the diseased breast in front of the video monitor, the assistant is close to the surgeon and the third surgeon handles the retractor; a front view; b reversal view
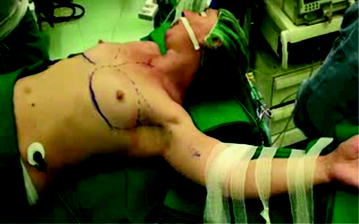
Fig. 7.3
Patient’s position on the operative bed
Generally, the column with the monitor and mini-invasive tools (camera, light source, insufflator CO2) are positioned close to the thorax of the patient along the opposite side respect to the diseased breast that is subjected to mastectomy. In the case of NSM with retractor, the surgical team will consist of three surgeons: the operator and his assistant who will place themselves in front of the video column, along the side to be subjected to surgery, the third surgeon stands on the opposite side and will have the delicate task of handling the mammary retractor. In this case, to facilitate the work of the third surgeon, you should use a second monitor to be placed on the opposite side of the first column video so that the third surgeon can follow the action without having to turn back.
In the case of NSM with SILS, the strictly necessary surgical team will be made by only two elements: the operator and his assistant, who of course will be positioned in front of the video column, along the side to be subjected to mastectomy. It is therefore not request a second column video.
The scrub nurse will be positioned on the same side in which are arranged the operator and his assistant, by placing the table with the surgical instruments to the legs of the patient; the anesthesiologist will be in the standard position, in proximity of the ventilator and the intraoperative monitor.
The patient under general anesthesia and orotracheal intubation is placed in the flat supine position. The arm was abducted 90° without disturbing the operative maneuvre, particularly toward the caudal direction.
Key Point
In preparation for surgery, the key point is represented by the position of the patient on the operating table. In fact the correct positioning of the arm sufficiently abducted from the body plays a fundamental role for two reasons: first, to allow an optimal employment of the surgical devices upon the operative field, camera, and scope included, considering the very limited space in the axillary area and the encumbrance of so many instruments required; the second to prevent an excessive opening of the arm associated with a rotation that may cause an injury of the brachial plexus by stretching. Keep in mind that the complete MS procedure provides a certain duration and then if there is the condition for causing injuries of the plexus, the damage will be surely ranged from middle to severe.
7.3 Surgical Steps
The video-assisted nipple sparing procedure is divided into the following stages:
(i)
preoperative evaluation and skin marks;
(ii)
skin incision;
(iii)
biopsy of sentinel lymph node (SLNB) identified by radiotracer and axillary lymph node dissection (AD) (levels I, II, and III), if indicated;
(iv)
skin flap formation and NAC dissection;
(v)
pectoralis muscle fascia dissection;
(vi)
peripheral gland dissection and extraction;
(vii)
immediate breast reconstruction with a prosthesis.
PreOperative Evaluation and Skin Marks
On the day of surgery, the patient is evaluated in an upright position (front view and lateral view) in order to make the skin marks which helped to identify the landmarks necessary to conduct a thorough breast gland dissection and to ensure the most symmetrical reconstruction as possible with the contralateral breast. Preoperative skin marks are made as follows: sternal superior margin and midline, submammary folds, upper limits and axillary tail of both breasts, skin projection of the tumor eventually under sonographic assistance, and finally the planned incision in the axilla (Fig. 7.4).
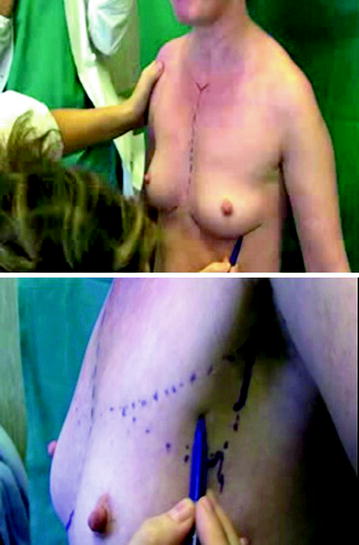
Fig. 7.4
Preliminary step to the intervention: drawing the skin marks on patient
Key Point
Preoperative evaluation and skin marks implementation are a key point for planning the reconstructive phase in order to warrant a satisfactory esthetic outcome in term of volumes and symmetry with the contralateral breast.
7.4 Mini-Invasive Video-Assisted Nipple Sparing Mastectomy with External Retractor
Skin Incision
The skin incisionis made most often along the wrinkles in the axilla and is 3–4 cm long. The site of the skin incision is independent of the location of the tumor within the breast. The same access port is used for all surgical procedures planned, including axillary surgery (SLNB, AD) under direct vision and NSM with immediate silicon gel prosthesis reconstruction under video assistance (Fig. 7.5a, b).
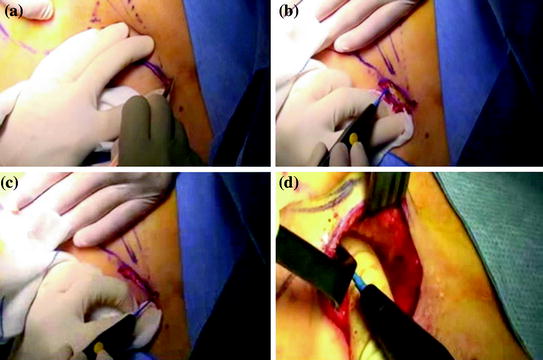
Fig. 7.5
Skin incision and preparing the skin flap for lodging the hand retractor and the scope
Key Point
The skin incision is performed in the same site both in the NSM with retractor and the NSM with SILS. As well as for the length.
Sentinel Lymph Node Biopsy and Axillary Dissection
SLNB is routinely performed in the oncological patients unless the axilla is clinically and ultrasonographically positive. The biopsy is taken either during a preliminary surgical staging step under local anesthesia or at the beginning of a one-step operation, before gland resection, with intraoperative histological examination. SLNB is performed with a combined radiotracer and dye staining technique. When indicated (clinical N + or positive histology after SLNB for metastases), formal axillary dissection is performed at levels I, II, and III with an ultrasonic scalpel through the same incision. All axillary procedures are performed under direct vision with no need to increase the scar length.
Skin Flap Formation and Nipple-Areola Complex Dissection
A thin superficial skin flap is obtained by applying a radio frequency/ultrasonic scalpel (Fig. 7.5c, d). This operative step represents the superficial dissection of the breast gland. The thickness of the skin flap is between 3 and 4 mm and the skin flap includes the dermo-epidermal and subdermal vascular layers together with the most superficial subcutaneous fat tissue, which is carefully separated from the gland under direct vision or endoscopic guidance.
The first phase of the skin flap formation is realized under direct visual control; the aim is to prepare a superficial 3–4 cm deep skin flap detached from the gland tissue of the breast tail, representing the initial skin pocket in which the retractor with the endoscope would be placed for pulling up the skin and creating the working space. (Figs. 7.6, 7.7) A suction tube set at the tip of the retractor allows evacuation of smoke and fluids.
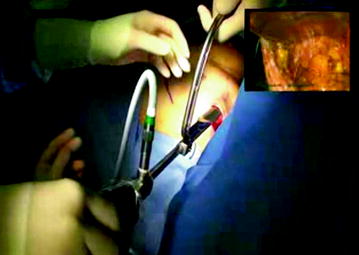
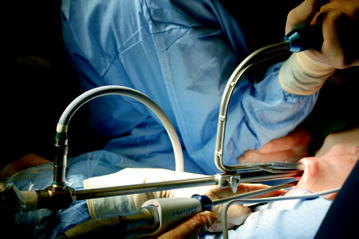
Fig. 7.6
Insertion of the breast retractor endowed with the 10 mm scope for video-assisted procedure
Fig. 7.7
Operative setup instruments for performing the V-NSM mastectomy after creation of the cutaneous flap
In the second phase, the dissection of the skin flap is completed under video-assisted control. The gland tissue is separated from the superficial subcutaneous fat layer with an ultrasonic scalpel, by applying continuous traction and counter traction at the dissection plane made through correct positioning of the tip of the retractor blade. The boundary between the cutaneous fat tissue (including the subdermal vascular layer) and the mammary gland is quite evident since gentle traction revealed Cooper’s ligaments (Fig. 7.8), magnified by the video camera, which run branching out through and around breast tissue to the dermis of the skin overlying the breast. Adequate tension also limits the lateral transmission of heat from the ultrasonic scalpel, avoiding skin injury; in this phase, Cooper’s ligaments together with fat tissue and penetrating vessels are treated using the ultrasonic scalpel. The technique provides a very fine dissection of the gland from the superficial layer with optimal haemostatic control (Fig. 7.9). The skin layer over the marked tumor projection is left particularly thin.
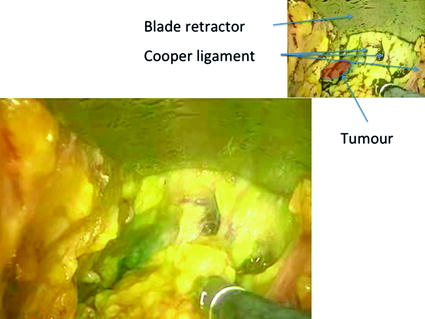

Fig. 7.8
Detachment of the gland from the under skin fat layer: the traction of the retractor blade highlights the Cooper Ligaments that are easily divided by the high-energy scalpel. Blue dyed zone corresponds with neoplastic lesion
Fig. 7.9
Division of the perilesional tissue
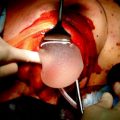
The third phase is complete dissection of the areola including the core of the nipple. We perform accurate dissection of the retroareolar tissue and nipple core with cold scissors under the surgeon’s visual control of both internal (through the video camera’s magnified images) and external fields. This operation is aided by previous NAC subdermal injection of a saline solution containing adrenaline (0.02 mg adrenaline in 20 ml saline solution), according to the hydrodissection technique described by S. Folli (see reference no. 67, Chap. 1) (Fig. 7.10), which facilitates precise blunt dissection along the subdermal plane of the NAC, obtaining the retroareolar tissue with a completely removed nipple core (Figs. 7.11, 7.12); the NAC radial vascularization is fully respected.
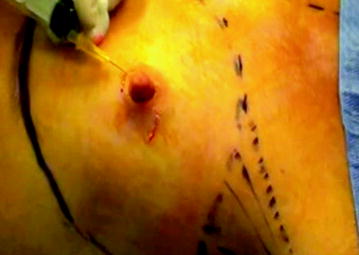
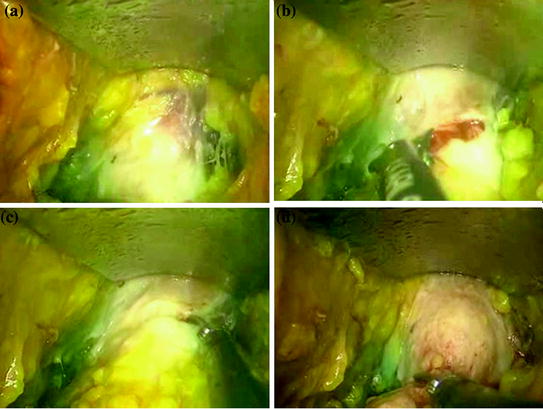
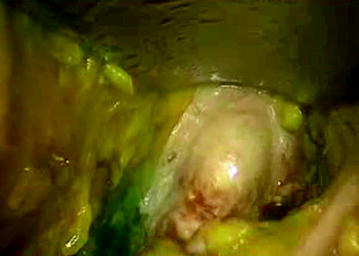
Fig. 7.10
hydrodissection of the NAC just before proceeding to the dissection of the nipple-areola plaque using cold blade
Fig. 7.11
Division of the retroareolar plaque using a cold scissor (from a to d); the hydrodissection performed just before limited the bleeding
Fig. 7.12
The division of the retroareolar plaque is completed and the nipple-areola complex is completely emptied. No more glandular tissue is left
After dissection, a medium-sized titanium staple is applied in correspondence to the nipple core and the retroareolar tissue is colored for the histopathological examination.
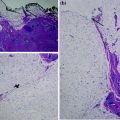
We do not perform intraoperative frozen sections since we opt for a definitive light microscopy examination of hematoxylin–eosin stained specimens. The pathological examination had to demonstrate a margin of at least 5 mm of NAC free from tumor in order for the NAC to be preserved safely; if this is not the case, it is planned that the NAC would be removed postoperatively as the first choice.
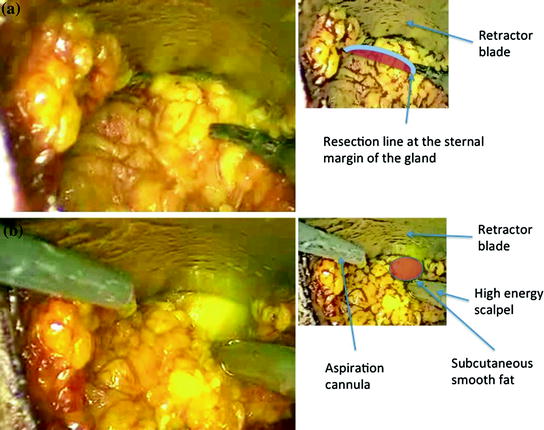
Finally, the last phase is complete detachment of the gland tissue from the subcutaneous fat tissue up to the sternum and the inferior breast fold.
Key Point
In this section, we point out at least 2 crucial aspects: the choice of the dissector and the technique of pulling the skin
The choice of high-energy scalpel for tissue dissection is of basic importance to limit the transmission of heat to the skin, and thus prevent the formation of anti-esthetic skin scabs. Among the various devices on the market, we believe that the ultrasound LigaSure dissector represents the best device to ensure a limited heat damage to the skin and optimal hemostasis.
The second aspect to be underlined, is represented by the dissection technique to use. Because the skin flap has a limited thickness and must be absolutely certain to remove all the glandular tissue, to facilitate this operation it must make a calibrated traction outside of the skin to stretching the Cooper’s ligament and facilitating the identification of the cleavage plane. This maneuvre therefore provides a continuous control of the operating field both on the internal and on the external side. Moreover, the identification of the correct cleavage plane allows to avoid skin warm injuries also when we may remove too much tissue over the dermo-epidermal limit.
At this stage, a key role is played by the third surgeon, who controls the breast retractor, since it has the delicate task of determining the force with which lifts the thin skin layer. Excessive tension can cause ischemic injury of skin envelope and thereby minimize the esthetic impact of the procedure.
Finally, the most effective strategy with which to begin the dissection of the superficial plane using the retractor, is to create narrow and parallel channels of the breast tissue release.
We speak of narrow channels as the amplitude of the dissection is bound to the size of the blade which forms the retractor. Since this part of the instrument is not larger than 2.5 cm, the progress of the glandular tissue detachment is made along strips of this size. The confluence of these channels of detachment, lead to the creation of larger areas of mammary dissection. It is more useful and convenient to make a gradual dissection of the entire front of the gland from the lateral margin to the medial margin, and to bring it to the inferior breast fold, instead of pushing the gland dissection immediately from cranial to caudal direction along a channel of detachment granted by the blade of the retractor. This strategy ensures the creation of a more comfortable working space in the mammary lodge for controlling the operating field.
Dissection of the Pectoralis Muscle Fascia
The skin and the mammary gland are pulled up with the endoscopic breast retractor, enabling to continue with the next step of the operation: dissection of the deep side of the mammary gland from the pectoralis muscle fascia using the high-energy scalpel (Figs. 7.13, 7.14). The penetrating arteries are coagulated with the scalpel itself or a bipolar electrocoagulator. This coagulation sealing of the vessels enables stable hemostasis to be achieved without the use of sutures.
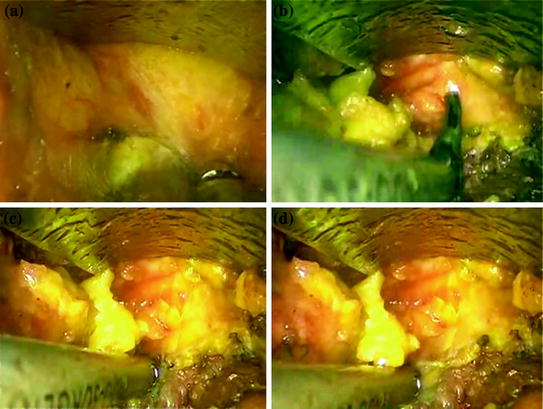
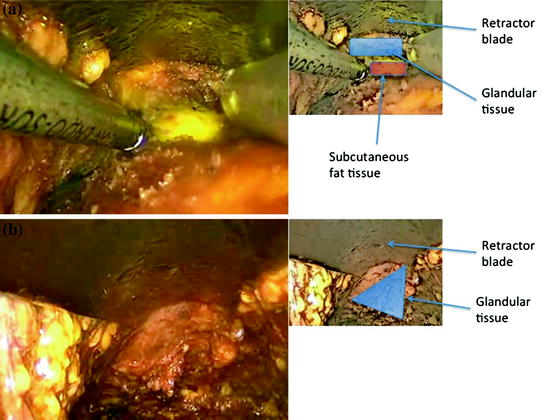
Fig. 7.13
Detachment of the gland tissue from the deep muscular layer: a opening the cleavage plain with the high-energy scalpel; b–d easy division of the gland from the great pectoral muscle fascia
Fig. 7.14
Complete division of the deep plain: a the appearance of the smooth yellow subcutaneous fat is the land mark indicating the end of the deep glandular attachment; b deep plain division completed
Key Point
The deep plane of dissection in the breast is more easily separable as consisting of loose tissue, and this step can be performed even without scalpel although the latter gives more safety for the control of bleeding. The crucial aspect is the identification of the lateral border of the pectoralis major, which represents the landmark where to start the dissection of glandular tissue on the deep side. The risk is to isolate between the muscle fibers (between large and minor pectoral muscles) creating a false pathway.
Peripheral Gland Dissection and Extraction
For complete excision of the mammary gland, it is necessary to unite the superficial and deep planes of dissection. This is possible through the dissection of the peripheral gland tissue extending along the peripheral margin of the breast. The starting point is at the axillary extension of the gland (breast tail); the dissection is continued both toward the clavicular margin up to the sternal margin and toward the lateral aspect up to the inferior mammary fold, thus leaving the edge of the infero-internal quadrant as the last connection (Fig. 7.15). The tissue dissection is performed with the high-energy scalpel; the plane of dissection is exposed through gentle traction of the gland tissue in a caudal direction or in a medial and cranial direction. The final detachment of the infero-medial connections leaves the mammary gland completely free: it is then possible to extract the breast through the axillary access port (Figs. 7.16, 7.17, 7.18).