MICROSURGERY
I. DEFINITIONS
A. Microsurgery: Surgery with the aid of an operating microscope. Includes vascular, neural, lymphatic, otologic, and ophthalmologic surgeries.
B. Microvascular surgery: Anastomosis of small vessels with illuminated magnification.
C. Reconstructive microsurgery: Free tissue transfer and replantation.
II. MICROSURGICAL EQUIPMENT
A. Microscope
1. Two heads for operator and assistant, independently adjustable.
2. Up to 40× magnification: Use moderate magnification (10× to 17×) for suturing.
3. Can also use 3.5× loupes alone without microscope for larger vessels (>1 mm).
B. Instruments
1. Fine jeweler forceps: For handling tissue; vessels should be handled by adventitia only. Available as straight, curved, varied lengths/widths.
2. Curved scissors: For dissection and cutting adventitia
3. Straight scissors: For cutting suture
4. Needle holder: Curved tip, nonlocking easier to use, can also use angled forceps to hold needles.
5. Clamps (e.g., Acland microvascular approximator clamps).
a. Single
b. Double with adjustable bar for vessel approximation.
6. Vessel dilator: Thin, smooth tip to dilate intraluminally without damage.
7. Olive tip cannula: Blunt, rounded metal-tip cannula attached to syringe to flush intraluminally without damage.
8. Background: Colored plastic (yellow/blue/green) to contrast with vessel/suture, also available with built-in suction to keep field dry.
9. Anastomotic coupler: Handheld device that anastomoses two vessel ends (usually vein) with interlocking stainless steel pins mounted on a polyethylene ring.
a. Ring sizes vary from 1 to 4 mm allowing coupling of vessels from 0.8 to 4.3 mm.
b. Excellent patency rates, saves time versus hand-sewn anastomosis.
c. Helpful to use sizer prior to choosing coupler size.
10. Suture: Typically 7.0 to 12.0 nonabsorbable monofilament (nylon, prolene).
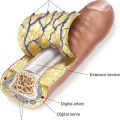
a. 8.0 for >1 mm (wrist vessels, internal mammary arteries, thoracodorsal, most head and neck vessels, larger nerves).
b. 9.0 to 10.0 for <1 mm (digital arteries/nerves).
c. 11.0 for <0.5 mm (distal digital vessels, pediatric).
C. Solutions
1. Heparin (10 to 100 U/mL in lactated Ringer’s solution (LR) or normal saline solution (NS)): Use to flush vessels, irrigate field.
2. 2% lidocaine: Use to alleviate vasospasm.
3. Papaverine (30 mg/mL): Use for vasospasm, causes smooth muscle vasodilation (caution: precipitates with heparin).
4. If lidocaine and papaverine are used simultaneously, it can create precipitate.
______________
*Denotes common in-service examination topics
A. Preoperative planning
1. Discuss with anesthesia provider the need for nerve monitoring, avoidance of pressors, blood pressure requirements, and anticoagulation.
2. Check microscope/equipment.
B. Operator comfort
1. Can be seated or standing depending on location. Adjust microscope position for operator and assistant comfort. Adjust sitting stool and table height as needed. Comfort is key.
2. Secure operative field to prevent motion (e.g., lead hand for replantation, suture-free flap to surrounding skin for stabilization).
3. Stack towels to rest forearms/wrist to reduce tremor.
4. Place moist towels around operative field to wipe instruments as needed.
5. Adjust ocular distance and microscope focus in final position.
C. Use of microinstruments
1. Rest forearms/wrists in comfortable position.
2. Hold microinstruments lightly between thumb and forefinger like a pencil.
3. Microinstruments should be controlled primarily with fingers, minimal wrist/forearm motion.
IV. MICROVASCULAR ANASTOMOSIS
A. Vessel preparation
1. Exposure of vessels and early preparation can be done with loupes.
2. Once under scope, debride any traumatized areas with curved scissors.
3. Curved scissors to dissect vessel away from surrounding tissue to increase length, allowing for tension-free anastomosis.
4. Curved scissors to cut away periadventitia from vessel ends. Only cut away enough to allow suture placement. Excessive stripping disrupts vaso vasorum and can damage vessel walls.
5. Release proximal clamp on artery to check for spurting flow.
6. Dilate vessel ends with smooth vessel dilator.
7. Flush lumen of debris/clot with heparinized LR/NS.
B. Goals for anastomosis
1. Evenly placed interrupted or continuous sutures circumferentially.
2. No “backwall” sutures—(accidentally grabbing the opposite wall through the lumen while suturing, thereby occluding the lumen).
3. No tears in the vessel.
4. No leaks between sutures when clamps released.
C. Anastomotic techniques
1. End-to-end
a. Setup
i. Set vessel ends in double Acland clamps or single clamps in correct orientation for anastomosis, leaving enough vessel exposed for suturing.
ii. Slide clamps together with hemostat to approximate vessel edges.
b. Halving technique: Place first two sutures 180 degrees apart at points furthest away from and then closest to you, then place interrupted or running sutures along backwall, flip vessel over and complete front wall after checking lumen for patency.
c. Triangulation: Place three sutures 120 degrees apart, leaving long tails. Use tails to retract while placing interrupted sutures in between.
d. “Backwall-up”: Place first suture at deepest point on backwall, then suture up from each side toward the most superficial point. Good for deep spaces.
2. End-to-side
a. Clamp donor vessel proximally and distally with single Acland clamps.
b. Slit donor vessel with no. 15 blade or scissors to create fishmouth incision.
c. Line up recipient vessel in orientation that avoids kinking/tension.
d. Suture toe and heel first with interrupted sutures.
e. Place running suture along backwall, then front wall.
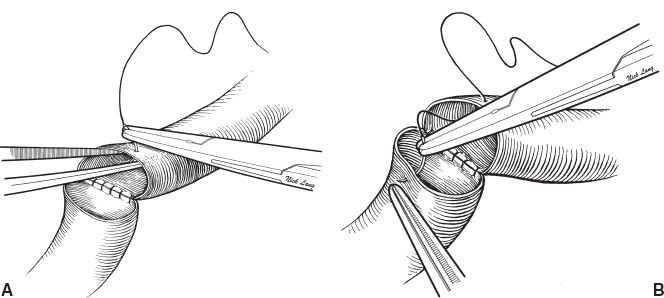
Figure 6-1. Vessel suturing technique in microsurgery. A: The “back wall” has been sutured and the surgeon is now beginning to suture the “front wall” of the anastomosis. The vessel dilator is placed into the lumen of the vessel, preventing the needle from inadvertently entering the back wall. B: The surgeon passes the needle through the other vessel wall at right angles. (© 2014 The University of Texas MD Anderson Cancer Center, used with permission.)
D. Suture Technique (Fig. 6-1)
1. Enter vessel from outside at 90 degrees, push needle through vessel wall using curve of needle for guidance—do not torque on needle or pull through, will tear delicate vessel wall. Can use vessel dilator inside lumen to provide counter tension for suture placement. Be careful not to place any sharp instruments inside lumen.
2. Enter other vessel inside out directly across from last suture.
3. Pull suture through making sure not to pull up, leaving a short tail for tying.
4. Tie square knots with three throws just tight enough to approximate vessel edges.
5. Cut tails, but can leave some tails long to use as handles when placing other sutures.
6. Repeatedly check lumen to confirm that you are taking full-thickness bites and not backwalling. Use heparin flush to aid in visualization and keep lumen clear.
E. Anastomotic coupler technique
1. Usually for veins, best for healthy vessels with approximately equal diameter and wall thickness.
2. Prepare vein ends same way as above, clamp donor vein with single Acland clamp.
3. Bring sizer under scope to determine size of coupler ring (1 to 4 mm). Sizer peg should be same as outer diameter of vessel. Use largest size that will fit on smaller vessel.
4. “Ship to shore”: Pass recipient vein (“ship”) through coupler ring and anchor vessel walls onto steel pins. Confirm that intima is completely everted and impaled onto each pin. Repeat with donor vein (“shore”).
5. Turn coupler knob clockwise until rings join each other and are ejected from device.
6. Squeeze rings together with hemostat to confirm secure placement.
F. Options if size discrepancy
1. Spatulation
2. Vein graft
3. Wedge excision out of larger vessel and subsequent anastomosis to small vessel.
G. Checking the anastomosis
1. Release distal clamp, check for backflow, repair any visible leaks.
2. Release proximal clamp by “flashing”—open for a moment to check for large leaks. Have suture ready to repair leaks.
a. If large, spurting leak, have assistant flush leak with saline continuously to identify exact location (most commonly gap between sutures or tear in vessel wall), then repair. Continuous saline flush allows visualization of leak site during repair.
b. If small leak or ooze from needle pokes, allow vessel to sit untouched for 5 minutes. Most small leaks will stop without intervention.
3. Confirm patency of artery by direct visualization of flow in vessel proximal and distal to anastomosis.
a. Can Doppler vessel proximal and distal or feel for pulse.
b. Can also check distal tissue for bright-red bleeding from edges.
4. Confirm patency of vein by visualizing inflation of vein proximal and distal to anastomosis. Can also strip vein gently with jeweler forceps and watch refill.
V. POSTOPERATIVE CARE
A. Flap monitoring
1. *Clinical evaluation (the gold standard)
a. Q1 hour checks × 24 to 48 hours by nurse, periodic checks by surgical team.
b. Arterial compromise: Pale, cool, slow, or no capillary refill
c. Venous congestion: Purple, tense, brisk capillary refill
2. Doppler
a. Handheld probe: Skin paddle Doppler site marked intraoperatively with prolene suture, ideally have audible arterial and venous signal.
b. Implantable Doppler: Can be placed around artery or vein intraoperatively, connects to external flow monitor with audible signal.
3. Commercial flap monitoring devices: Require expensive equipment, use is surgeon/facility dependent
a. Surface temperature monitoring.
b. Laser Doppler flowmetry.
c. Near-infrared spectroscopy.
d. Color duplex sonography.
e. Microdialysis.
B. Anticoagulation: Controversial, surgeon-dependent, no definitive data supporting use of any postoperative anticoagulants.
1. Heparin: Reduces platelet aggregation, activates antithrombin III, and lowers blood viscosity (Sample dose: 5,000 U IV intra-op, 1,000 U/h postop × 5 days).
2. *Aspirin: Inhibits prostaglandin synthesis and platelet aggregation (Sample dose: 325 mg PO qday × 30 days, first dose in PACU given PR).
3. Dextran: Volume expander, inhibits platelet aggregation, modifies fibrin (Sample dose: Dextran-40 at 25 mL/h × 5 days). Can cause flash pulmonary edema and acute renal failure.
C. Flap Salvage
1. Clinical examination by experienced observer is the gold standard for recognizing flap compromise.
2. If arterial or venous compromise suspected:
a. Remove dressings to release any constriction and inspect entire flap.
b. Release insetting sutures to alleviate pressure from tight closures, hematoma, swelling.
c. Return to OR expeditiously for exploration.
3. Intraoperative re-exploration
a. Release inset of a flap to inspect for hematoma, compression of vessels.
b. Inspect lie of vessels for kinks/twists/compression.
c. Check artery and vein for thrombosis, most commonly at anastomosis
i. Revise anastomosis as needed.
ii. Consider thrombolytics (streptokinase/urokinase).
iii. Consider postoperative anticoagulation.
4. If venous congestion continues with patent anastomosis, consider leeches (patient needs to be on antibiotics for Aeromonas).
VI. MICRONEURAL SURGERY
A. Nerves are “coapted,” whereas vessels are “anastomosed.”
B. Nerve coaptation methods
1. General
a. Must be tension-free, otherwise a nerve graft is indicated.
b. In most cases of transection of small peripheral nerves, no difference is seen in outcomes following the various types of repair.
2. Epineurial repair
a. Most common
b. Nerve edges are anatomically aligned and then sutures are placed at regular intervals. Surface vasculature and fascicular patterns are used to guide alignment.
c. The needle should pass through the epineurium 2 to 3 needle breadths from the cut edge, avoiding deep penetration.
d. The first two sutures can be left long and used for manipulation.
3. Fascicular repair
a. Individual fascicles are coapted.
b. The theoretical advantage of greater anatomic alignment has not translated into superior outcomes.
4. Group fascicular repair
a. Indicated in the repair of larger nerves at levels that allow identification of specific branches.
b. Individual fascicular groups are coapted at the inner epineurial level.
VII. ENDOSCOPIC SURGERY
A. Overview
1. Allows the surgeon to operate through minimal incisions and less invasive techniques by augmenting visualization with an endoscope.
2. Requires a cavity in order to introduce light which can then be reflected to the endoscope and allow for visualization and may be maintained with the insufflation of gas (e.g., CO2) or fluid (e.g., saline).
a. Abdomen, thorax, joint.
b. Potential space is created subcutaneously.
3. Benefits
a. Less donor site morbidity and scar.
b. Shorter recovery (for selected procedures).
c. Allows improved visualization through small incision.
4. Disadvantages
a. Expense of additional equipment and longer operative duration.
b. Technically demanding with higher learning curve.
B. Instruments
1. Endoscope
a. Size: The diameter of the scope varies depending on the procedure performed (4 to 10 mm scopes). Larger scopes have more fiber optic bundles and allow for greater visualization.
b. The lens may be straight (0 degree) or angled (e.g., 30 degrees or 45 degrees), depending on the visualization required. Angled scopes may allow for enhanced viewing around obstructing structures.
2. Light source: Connected through fiber optic cables to the endoscope
3. Camera
a. Single-chip camera: Alternating pixels detect red, green, and blue.
b. Three-chip camera: Separate chips to detect red, green, and blue, providing a superior image.
C. Applications
1. Aesthetic surgery
a. Breast augmentation
i. Access through axilla, which may provide superior visualization of the subpectoral space.
ii. Either saline or silicone implants may be placed.
iii. Difficult to adjust the inframammary fold and may cause trauma to the implant.
b. Brow lift
i. Minimizes scarring, alopecia, paresthesias seen with coronal incision.
ii. Allows direct visualization of important structures.
d. Abdominoplasty
i. Ideal for patients with excellent skin quality, but require limited rectus plication.
2. Reconstructive surgery
a. Placement of tissue expanders (e.g., scalp)
b. Nerve harvest (e.g., sural nerve)
c. Skull reconstruction for cranial synostosis
d. Flap harvest (e.g., latissimus dorsi)
3. Hand surgery
a. Carpal tunnel release
b. Cubital tunnel release
VIII. ROBOTIC SURGERY
A. Initial concept developed by NASA for use on space missions, where devices can be manipulated remotely.
B. Should maintain at least equivalent precision and dexterity as a surgeon from afar, with some ability to supersede human abilities.
C. Benefits
1. More rapid microsurgical manipulation.
2. Overcome physiologic tremor.
3. Bony fragments can be aligned to 0.1 mm.
4. Can compensate for moving targets (e.g., cardiac surgery).
5. Allows for greater dexterity in close spaces (e.g., pelvic surgery, pharyngeal procedures.
D. Current applications
1. Oropharyngeal reconstruction.
2. Urologic resection and reconstruction (e.g., prostatectomy).
3. Hepatobiliary procedures.
4. Cardiac surgery.
PEARLS
1. Check equipment function before the case begins (i.e., turn on the microscope).
2. Be comfortable: Take regular breaks, drink your usual amount of caffeine.
3. Set up the best position (scope, flap, chair height, etc.) before starting microsurgery.
4. Tight splints and dressings can kill flaps. Take the time to construct well-padded splints and dressings that do not put pressure on pedicles and flaps.
5. Clinical examination is the gold standard for postoperative flap care. Have a low threshold for return to OR to evaluate potential flap compromise. The window of opportunity to salvage compromised flaps is limited.
QUESTIONS YOU WILL BE ASKED
1. If arterial or venous compromise is suspected, what maneuvers should be undertaken?
a. Arterial: Use Doppler distal to check. Make sure vessel not in spasm, strip vessel. Ultimately usually need to take down anastomosis (can open one side at a time if you think one backwall stitch or you just need to flush). Consider heparinizaiton of large amount of clot in vessel.
b. Venous: Strip, redo. Often need additional venous anastomosis if the vein is draining but flap is still congested.
2. What are the options for postoperative flap monitoring? What is the gold standard?
a. Options: Physical examination, implantable Doppler, external Doppler, surface temperature monitoring, laser Doppler flowmetry, near-infrared spectroscopy, color duplex sonography, and microdialysis
b. Gold standard: Physical examination
3. What is the mechanism of action of heparin, dextran, and aspirin?
a. Heparin: Binds antithrombin III inducing conformational change and inhibiting thrombin and factor Xa
b. Dextran: Exact mechanism unknown but thought to cause volume expansion, cause inactivation of von Willebrand’s factor, impart negative charge on platelets, and cause fibrinolysis
c. Aspirin: Inhibits platelet aggregation though inhibition of cyclooxygenase. Low doses inhibit thromboxane without affecting prostacyclin
4. What solutions should be available on the field during microvascular anastomoses?
a. 2% lidocaine
b. Heparin: (10 to 100 U/mL in LR or NS)
c. Papaverine: (30 mg/mL)
Recommended Readings
Grunwald T, Krummel T, Sherman R. Advanced technologies in plastic surgery: how new innovations can improve our training and practice. Plast Reconstr Surg. 2004;114(6):1556–1567. PMID: 15509950.
Pacella SJ, Codner MA. The transaxillary approach to breast augmentation. Clin Plast Surg. 2009;36(1):49–61. PMID: 19055961.
Pratt GF, Rozen WM, Chubb D, et al. Modern adjuncts and technologies in microsurgery: an historical and evidence-based review. Microsurgery. 2010;30(8):657–666. PMID: 20734321.
Rowe DJ, Guyuron B. Optimizing results in endoscopic forehead rejuvenation. Clin Plast Surg. 2008;35 (3):355–360. PMID: 18558228.
< div class='tao-gold-member'>