Fig. 16.1
Esophageal hiatus
The greater curvature of the stomach starts at the left of the cardia and runs from the fundus along the left border of the body and the inferior border of the pylorus. The lesser curvature starts at the right of the cardia and runs a short distance along the right border of the body and the superior border of the pylorus.
The upper part of the stomach is attached to the liver by the hepatogastric ligament (the left portion of the lesser omentum), to the left hemidiaphragm by the gastrophrenic ligament, and to the spleen by the gastrosplenic ligament. The lesser sac is an isolated portion of the peritoneal cavity lying dorsal to the stomach and extending craniad to the liver and diaphragm (Fig. 16.2).
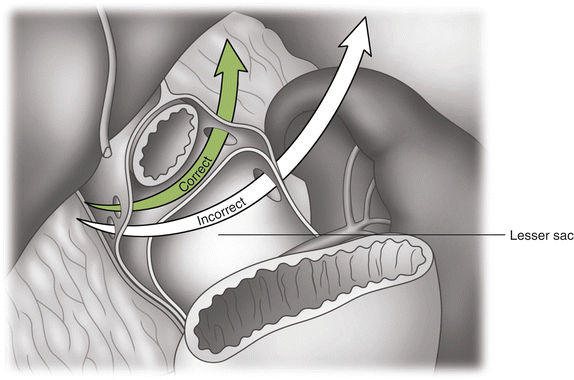

Fig. 16.2
Lesser sac anatomy with “correct” posterior tunnel creation during band placement
Blood Supply
The left gastric artery (LGA) is one of the three branches of the celiac trunk and runs toward the lesser curvature of the stomach and divides into an ascending branch (supplying the abdominal esophagus) and a descending branch (supplying the stomach).
The aberrant left hepatic artery (ALHA) is an anatomical variation that consists of an arterial branch off of the LGA that courses through the gastrohepatic ligament to provide blood supply to the left lobe of the liver. The reported incidence is variable. In the presence of an ALHA, hiatal dissection can be more challenging. Preservation of the ALHA can be accomplished with identification and meticulous dissection. Transection has been associated with transient liver enzyme elevations, and a rare but potential risk exists of hepatic ischemia.
Nerve Supply
The esophageal plexus of the vagus (parasympathetic) nerves divides into two vagal trunks that enter the abdomen along with the esophagus through the esophageal hiatus. The right (posterior) vagus is behind and to the right of the intra-abdominal esophagus, whereas the left vagus is in front of the intra-abdominal esophagus. Vagal afferents are extensive in the cardia. The intraganglionic laminar endings (IGLEs) are mechanoreceptors that lie attached to the sheath of the myenteric ganglia and are known to detect tension within the wall of the stomach. These low-threshold and slowly adapting sensors could play a role for detecting continued compression of the cardia.
Swallowing
Primary peristalsis in the esophagus is initiated by the swallowing center through vagal signals by a reflex mechanism from its proximal to distal end. Secondary peristalsis follows. The esophagus typically generates pressures of more than 100 mmHg. The lower esophageal segment (LES) relaxes in response to swallowing before the arrival of the peristaltic waves of the distal esophagus. This relaxation generally lasts a few seconds and is then followed by a transient contraction. The resting tone of the LES ranges from 10 to 30 mmHg.
The concept of the lower esophageal contractile segment (LECS) described by Burton et al. [2] is made up of four parts: the esophagus, the lower esophageal sphincter, the proximal stomach (including the 1 cm or so above the band and the 2 cm of stomach behind the band), and the band itself. As the esophageal peristalsis transports the bolus of food down toward the band, the LES relaxes as this peristaltic wave approaches. It then generates an after-contraction, which can maintain some of the pressure of the peristaltic wave as a part of the food bolus is passed into that small segment of the upper stomach. The upper stomach, including the area under the band, can be sensitive to these pressures through mechanoreceptors from the IGLEs. Appropriately adjusted bands generate a basal intraluminal pressure of 25–30 mmHg, providing a resistance to flow. The passage of food bolus through this area of band resistance can generate myoenteric pressure signals.
Technique
Patient Position and Trocar Placement
Patient position and trocar placement are determined by the surgeon’s experience and personal preference. In our approach, a 5-port technique is used, with four 5-mm ports and one 15-mm port. The patient is placed supine with the arms extended, in the modified lithotomy position, with the surgeon standing between the patient’s legs and all extremities well padded. A Foley catheter or nasogastric tube is unnecessary; invasive monitoring of anesthesia is rarely required. An orogastric tube is used for gastric decompression.
Important principles of laparoscopy should be followed to optimize the likelihood of success: placement of ports apart to decrease torque of a thick abdominal wall, use of long instruments, and exposure of the gastroesophageal junction with use of appropriate liver retractor. The aim of liver retraction is to elevate the liver away from the gastroesophageal angle and spleen, which allows safe dissection at the angle of His.
A 5-mm optical trocar is used to access the abdominal cavity in the left subcostal region. The position of the trocars is as follows: Trocar 1 is inserted subxiphoid in a midepigastric position. Trocar 2, used for liver retraction, is inserted at the patient’s right subcostal margin in the midclavicular line; trocars 3 and 4, in an arc extending from trocar 2 toward the patient’s left; and trocar 5, laterally on the left subcostal margin (Fig. 16.3). Other approaches include placing the patient in the supine position with the surgeon standing on the patient’s right.
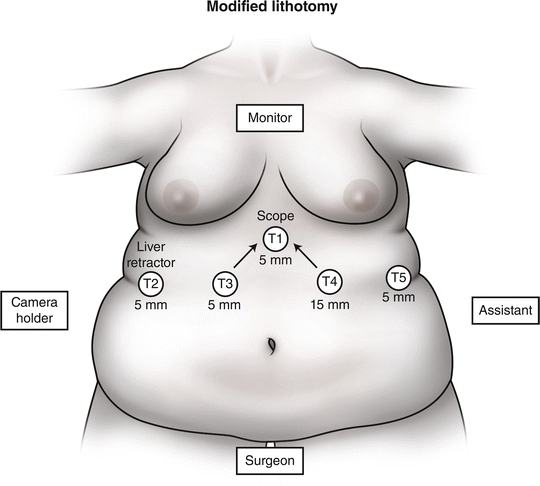

Fig. 16.3
Trocar position
Angle of His and Pars Flaccida Dissections
The omentum covering the angle of His is gently swept to the side to facilitate exposure during the creation of a small incision lateral on the left side of the gastroesophageal junction within the gastrophrenic ligament; this small “window” initiates the plane of dissection for the retrocardiac tunnel. Care must be taken to preserve the gastrophrenic attachments to help secure the band and maintain stability of the fundus (Fig. 16.4). Fat pads surrounding the gastroesophageal junction can be excised, if needed, to expose the stomach wall or identify and repair a crural defect or hiatal hernia.
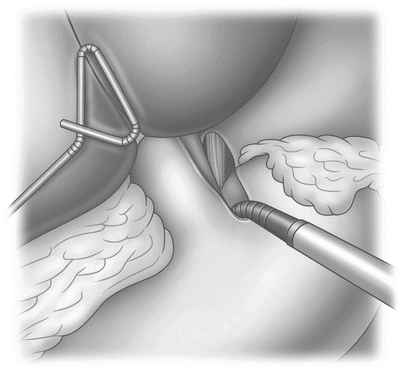

Fig. 16.4
Angle of His dissection
In the lesser omentum (“pars flaccida”) dissection at the lesser curvature, the pars flaccida is stretched to make an incision cranial to the left gastric artery but caudal to the gastroesophageal junction. It is important to avoid making an opening in the lesser sac to avert future pouch dilation, and care should be taken to avoid injury to the nerves and vessels in the area of the pars flaccida. If a large aberrant hepatic artery emanates from the left gastric artery, the “two-step” dissection can be used by creating an additional perigastric passage above the aberrant hepatic vessel and next to the lesser curvature.
The fat on the posterior wall of the lesser sac is retracted to give exposure of the right crus of the diaphragm. The point of dissection is along the anterior border of this muscle, at its lower aspect. This is the point of confluence of the right and left pillars of the right crus and where the peritoneum is incised. It is essential not to confuse the right crus and the inferior vena cava, which lies farther to the right. An articulating blunt dissector is introduced, inserted at the incision at the right crus, and gently advanced to emerge at the angle of His incision. A 5- or 10-mm size dissector can be used. In the early experience, a blunt 10-mm dissector can be safer. The dissector comes through a right-sided port and passes gently into this area of dissection without any torque. It then passes for a very short distance behind the gastroesophageal junction to emerge into the already dissected angle of His. This critical step requires no force at all. Although blind, this dissection is safe because of the short distance traversed and the use of fixed anatomic points. Any resistance encountered means that the point of dissection at the right crus is too high and that the dissector is pushing into the esophagus or stomach. The dissector should be gently withdrawn and inserted 5–10 mm caudad to follow a new course behind the gastroesophageal junction. Once the dissector comes through the pars flaccida tunnel, it is ready to hold the band by its tubing or suture loop to pull it through (Fig. 16.5).
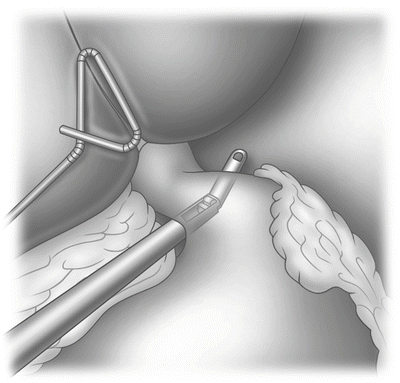

Fig. 16.5
Blunt articulating dissector used to create the posterior tunnel
Hiatal Crural Repair
Crural defects and hiatal hernias should be repaired during band placement. The fat pad around the gastroesophageal junction is removed when “dimpling” of the anterior crus is noticed or if there is laxity of the right crus posteriorly. All sliding hiatal hernias are reduced with full mobilization of the distal esophagus and repaired primarily with posterior nonabsorbable figure-of-eight sutures. Complete posterior crural exposure can be obtained with careful dissection staying cranial to the lesser sac. If no sliding component is visualized but a crural defect is noted, the anterior esophagus is mobilized, and an anterior crural repair is performed for small defects or posterior dissection and repair for larger defects with elevation of the esophagus to obtain good exposure. If complete dissection of the pillars is performed, the repair will be tension-free (Fig. 16.6). Rarely, there is a larger defect with some tension that may require the placement of a mesh. It is our preference to use a biocompatible mesh repair through a posterior approach. Aggressive hiatal crural exploration and repair has been shown to potentially decrease the incidence of band reoperations for intractable reflux, prolapse, and pouch enlargement [3, 4].


Fig. 16.6
Hiatal crural repair
Introduction and Placement of Band
Selection of the band size depends on the thickness of the upper stomach and perigastric fat. Most of the patients can have the smaller size of each band brand available in the United States. The patients that usually require a larger band size are males, with higher body mass index that have thicker tissues. But in general, that decision can be made intraoperative after the posterior dissector has been passed.
Depending on the band type, preparation on the back table needs to be performed. The Lap-Band AP® (Apollo Endosurgery, Inc; Austin, TX) requires priming with saline to aspirate the air from the system. The Realize® (Ethicon Endo-Surgery, Inc.; Cincinnati, OH) band only requires aspiration of the air until the balloon is emptied completely.
The band is inserted into the abdomen through the 15-mm trocar (Fig. 16.7). Using this trocar prevents injury to the band. After the band is inside the abdomen, the band is pulled through the posterior esophagogastric tunnel. The Lap-Band is pulled from the end of the tubing as opposed to the Realize band, which is pulled from the suture loop attached to the band side (Fig. 16.8). Sometimes the band snags on retroperitoneal tissue, but usually slides relatively easy.
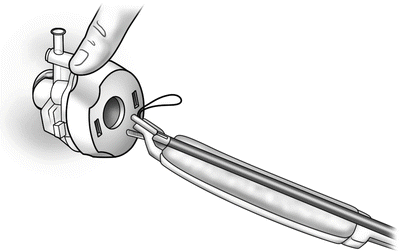
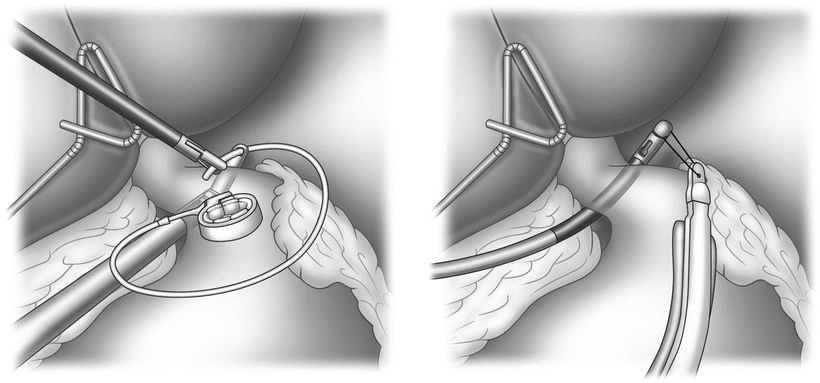

Fig. 16.7
Band introduction into the trocar

Fig. 16.8
Dissector tip holding the Lap-Band end tubing and Realize suture loop
In order to buckle the Lap-Band, the tubing tag is fed through the locking mechanism of the band, and the band is secured. Closure of the Realize band is achieved by inserting the dissector through the band’s buckle opening to grasp the end flap, which is pulled through the buckle (Fig. 16.9). The locked band should not be tight on the stomach but rather should be able to rotate freely around the upper stomach. If the band appears snug or does not rotate easily, the band needs to be unbuckled and more perigastric fat must be excised.
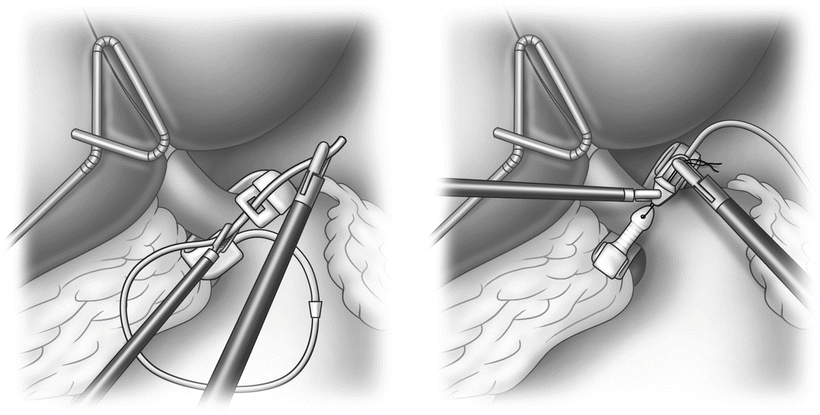

Fig. 16.9
Locking the Lap-Band and Realize Band
The band is naturally secured posteriorly by retroperitoneal gastroesophageal attachments. Anteriorly, a plication of the fundus and cardia below the band to the upper gastric pouch is needed. Gastrogastric suturing over the band is completed with a permanent suture material. The plication should be without tension to prevent any risk for band erosion. This is achieved by placing the sutures on the distal part of the fundus to allow soft rotation of the stomach up over the band without tension (Fig. 16.10). The plication begins at the greater curvature, as far left as possible. A curved needle is preferred to ensure secure “bites” of tissue between the seromuscular layer of the fundus and the pouch. These stitches protectively tunnel the anterior aspect of the band, except at the location of the buckle, to minimize the risk of erosion. The band should lie without tension within the tunnel to allow for filling during the adjustments. Usually the plication can be accomplished with two or three interrupted sutures. Some authors prefer a continuous running suture.
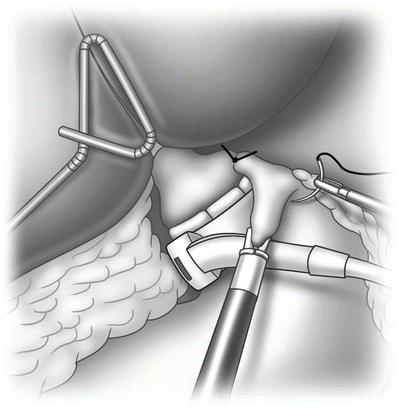

Fig. 16.10
Gastrogastric plication
If there is redundant floppy fundus below the band, an additional plication suture can be placed to fix the greater curvature fundus to the more stable lesser curvature below the band. This suture needs to be placed below and away from the band to avoid constriction and tension on the band anterior gastric tunneling (Fig. 16.11). This additional inferior plication suture has been suggested to improve the stabilization of the band. The free end of the band tubing is pulled out through the 15-mm port in preparation for fixation of the port system. Alternatively, the tubing can be removed through a distant 5-mm port and tunneled to the larger incision area or through a newly placed 5-mm port placed in a tangential trajectory through the fascia to potentially decrease the possibility of kinking of the tubing.
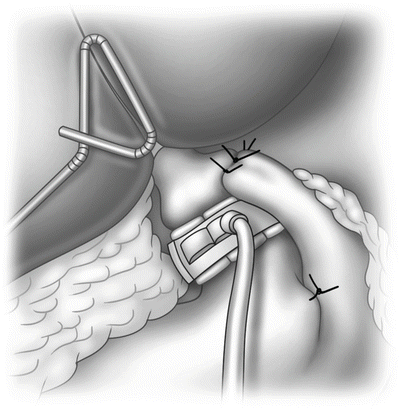

Fig. 16.11
Inferior anterior gastric plication stitch
Access Port Placement
After the tubing is retrieved and delivered into the field, all trocars and the liver retractor are removed. With the Lap-Band, the tubing tab is excised, and the tubing is connected to the access port via a metal connector. The tubing should be kept long, not shortened, so that it lies loose within the peritoneal cavity. It is not necessary to close the 15-mm trocar site. The access port is secured to the anterior rectus sheath with four nonabsorbable sutures (Fig. 16.12). Exposure of the anterior fascia in a deep abdominal wall can be challenging but is best achieved with the use of deep, narrow Richardson or Deaver retractors. Four sutures are placed firmly into the sheath and threaded through the four corner holes of the access port. It is important to place the access port at a location distal to the exit point of the tubing to allow a smooth curve into the abdominal cavity. The critical tenet for successfully securing an access port is to make sure that the stitches go through fascia, not through the fat. Other authors have suggested the use of mesh for fixation. In this method, the subcutaneous pocket should be made very small so that the port fits very tight to avoid early dislocation or rotation. A small piece of mesh is secured to the port on the back table with nonabsorbable sutures. The mesh is then trimmed to follow the circumference of the base of the port. The basic principle of this method is the creation of adhesion formation around the mesh that will allow for a natural fixation.
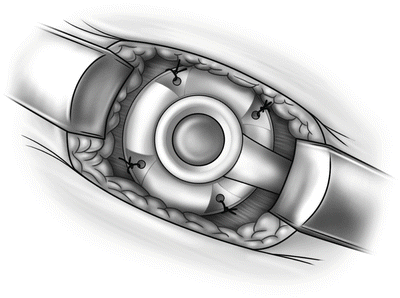

Fig. 16.12
Band access port fixation with four sutures in the anterior rectus muscle fascia
The mechanical port fixation is available for both band brands. In this method the incision is expanded to 4 cm to contain the length of the port applier. Fat is dissected away from the fascia on the anterior rectus sheath. The locking connecter of the port is placed around the band tubing with the tubing snug against the port housing. This port has fastening hooks that will attach to the fascia. The port snaps into the applier and the applier is grasped in the palm and inserted into the incision at an angle so that the port base lies uniformly flat on the fascia. The applier’s safety trigger is released, the palm compresses the applier firing lever, and the port is fixed to the fascia (Fig. 16.13


Stay updated, free articles. Join our Telegram channel

Full access? Get Clinical Tree


