Intraoperative photographs are a necessity when sharing unusual pathology or details of a procedure with peers in presentations or publications. Obtaining the proper equipment and taking time to refine settings for the operative suite will typically yield excellent images. Regularly taking time out of procedures to shoot photographs can yield a formidable archive of intraoperative images that will regularly be accessed for many purposes.
A collection of intraoperative photographs demonstrating a variety of techniques and pathology is a valuable asset for any facial plastic surgeon. Intraoperative photographs are useful for peer-reviewed publications, presentations, patient education, and self-assessment. Further, in the era of digital photography, all surgeons can afford the equipment and storage space necessary to maintain an archive of high-quality intraoperative photographs. Frequently the same camera and lens being used for pre- and postoperative photography in the clinic can be used in the operative suite as well, with some minor modifications. Although there are variables in the operating room not present in a clinic photography studio, similar camera settings, adequate lighting, and consistent framing will allow the surgeon to capture comparable images during every procedure. The greatest obstacle to capturing excellent intraoperative images is often forcing oneself to take time out from the procedure to shoot photographs.
Equipment
Obtaining a camera, lens, and lighting apparatus suitable for operative suite photography should be a priority for every facial plastic surgery practice. The initial investment in time, money, and space will pay great future dividends to the surgeon, constantly assisting him or her in both demonstrating and improving skills. Two types of cameras are commonly found in facial plastic surgery practices today, digital point-and-shoot (PAS) and digital single lens reflex (dSLR). The portability of a PAS camera is an advantage when equipment must be transported to the operative suite for intraoperative photography. However, a dSLR is preferable and will produce the most consistent images. An additional advantage is compatibility with a variety of interchangeable lenses. A dSLR is also compatible with high-powered external flashes that are effective for close-up images and for the illumination of poorly lit areas such as the nasal cavity (eg, ring flash).
Once the decision has been made to go with a dSLR, an appropriate lens and flash must be selected to obtain the best intraoperative photographs. There are a wide variety of lenses on the market that can be used with a given dSLR. A multipurpose zoom lens is often packaged with many new dSLRs. (Alternatively, the camera body can often be purchased alone if one inquires, and this option may be the most cost efficient for a camera to be used exclusively for a surgical practice.) “Zoom” implies that the lens functions at a variety of focal lengths (eg, 18 to 55 mm). Zoom lenses are most valuable when the photographer wants to experiment with different compositions such as in travel photography. Unfortunately, the flexibility of a zoom lens is more of a liability than an advantage when every photograph needs to be shot at fixed magnification—as is the case for pre- and postoperative photographs. Although a zoom lens might make a little more sense in the operating room, the authors find that a fixed focal length, or fixed magnification, lens is preferable for intraoperative photography as well. When trying to rapidly obtain photographs mid-procedure, the ability to leave all settings except fine focus roughly the same is ideal. Conversely, shooting at different focal lengths with a zoom lens during the procedure would inevitably require valuable time spent making adjustments to the lens aperture or shutter speed to maintain the correct exposure. A fixed focal length macro lens with a focal length somewhere between 60 and 110 mm is optimal depending on the camera body’s sensor size. The term “macro” implies that the lens has additional corrective groups that allow close focus to within inches of the subject. A single lens with these characteristics can be purchased, that will function well in the clinic and operating room.
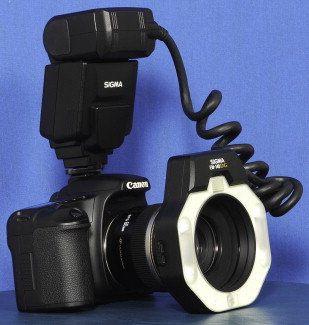
While a single lens will serve the surgeon well in both the clinic and operating room, different lighting setups are needed. Floor- or wall-mounted flash units are ideal for the clinic but are not practical or portable enough to be used in the operative suite. The pop-up flash integrated into most dSLRs is portable but will not provide even lighting to subjects that are very near to the lens. Integrated flashes are also not especially powerful. An externally mounted macro flash will solve both of these problems. A ring flash is the most commonly used macro flash, and consists of a flash ring that encircles the end of the camera lens. Ring flashes are powerful enough to allow for the use of a small aperture (eg, f-stop of f/16 to f/32), increasing depth of field and producing sharply focused close-up images. In addition, these flashes are popular with dentists and otolaryngologists because they can provide even illumination of procedures or pathology in the oral or nasal cavities. Fig. 1 demonstrates the following equipment setup that the authors use for all intraoperative photography: a Canon EOS 30D camera body (Canon USA Inc, Lake Success, NY, USA) is fitted with a Canon EF-S 60 mm f/2.8 Macro USM lens (Canon USA Inc, Lake Success, NY, USA) and a Sigma EM-140 DG Macro Flash (Sigma Corporation of America, Ronkonkoma, NY, USA).
Technique
One must first decide who will shoot the photographs in the operating room. Higher quality and more consistent images result when the same photographer is shooting every procedure. The individual who is always present and most likely to be concerned with the quality of the images obtained is the surgeon. Further, for intraoperative photographs the surgeon also has the best understanding of the information he or she will be attempting to later convey with images obtained. If the surgeon is unable or unwilling to shoot the pictures, a training physician or a regular surgical assistant may be an acceptable alternative. Selecting someone different to shoot photographs during each procedure is unlikely to result in useful images with even the highest quality equipment. During the authors’ procedures, the surgical assistant throws several extra pairs of gloves a size larger than the sterile operating gloves that can be worn as needed for taking intraoperative photographs. Slipping the extra gloves on and off allows the surgeon to transition quickly between operating and shooting photos.
Whoever is performing the intraoperative photography should take a few moments before the beginning of the procedure to determine whether adjustments to the camera settings are needed. As described earlier, the authors use a dSLR with a 60-mm macro lens and a ring flash. For this specific setup, one begins with an aperture of f/32 and a shutter speed of 1/100 second with the camera in manual mode. ISO, or film speed, is set to 200. The ring flash is set to manual mode and full power. Manual focus is always used so that the surgeon—not the camera—decides what key element in an image must be in the sharpest focus. Taking time before the procedure to fine tune these settings and account for changes in positioning, lighting, or other variations in the operating environment is always worthwhile. With the camera focused at a distance between 1 to 2 feet from the subject, several test photographs are shot. While shooting the test photos, the LCD screen is of sufficient quality to reveal when minor adjustments to aperture and shutter speed are needed to provide more optimal exposure. In many cases it is worthwhile to take test shots with and without the aid of the overhead surgical lighting so as to determine the effect this will have on the images as well. Ideally, the aperture should remain between f/22 and f/32 to maintain sufficient depth of field and sharp focus. The shutter speed should be between 1/60 second and 1/100 second to avoid blurring of pictures through camera motion and to keep the flash synchronized with the shutter. Continued minor adjustments to the shutter speed or lens aperture may be necessary throughout an intraoperative photography session, especially if shooting from various distances. It should be obvious that shooting from a greater distance will reduce the amount of flash lighting that strikes the subject. The technique of “bracketing” may be useful in these situations. Bracketing is the practice of taking 2 to 3 shots at 3 different, adjacent f-stop settings to ensure that one shot is acquired with the proper exposure. Taking a few extra seconds to bracket and capture 2 additional images may save precious minutes (or hours) that would be required later to fix an incorrectly exposed image through digital processing. The typical camera settings used by the authors in the operating room are an ISO of 200, a shutter speed of 1/60 second, and an aperture setting of f/32. The ring flash is set at half to full power.
The use of a dSLR’s “macro” mode is worth mentioning, as the novice photographer might consider this automated setting an alternative to shooting in manual. Most dSLRs have a macro, or close-up, mode as one of the available automatic modes on the setting dial (this is denoted with a small image of a flower on the Canon EOS 30D). In this mode, the camera selects a very large aperture (eg, f/2.8) that will result in a very shallow depth of field with blurring of the immediate background. This image might be desirable for artistic macro photographs but not images of a surgical field where the entire view needs to be in focus. The manual mode with an aperture of at least f/22 will produce the sharpest images, keeping pertinent details at various distances from the lens in focus simultaneously.
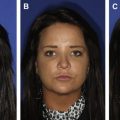
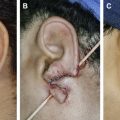
With an understanding of the general and effective intraoperative camera and lens settings, the surgeon must check and fine tune these settings frequently to ensure proper exposure. Identifying consistent settings that will work in the operating room is easier if the surgeon routinely obtains specific views and stops at certain points during surgery. Shooting from roughly the same position and distance during each photography session saves time because it requires fewer camera adjustments ( Fig. 2 ). Routine operative stopping points also help the surgeon avoid missing an opportunity to record a key portion of the procedure. In general, the best intraoperative photographs are tightly cropped or very close-up. This focus emphasizes the intended subject and eliminates the distracting operating room background from the image. Fresh surgical towels or a blue gown provide a distraction-free background. Great care should be taken to keep the field free of blood. Excess blood makes it difficult to interpret images and also absorbs a large amount of light, affecting exposure. Keeping hands or fingers out of the field by using hooks and retractors eliminates another potential distraction. Markings on the skin or tissue may be made before taking a photograph to help a surgeon convey the operative plan through an image ( Fig. 3 ). Objects such as cotton-tipped applicators can also be used strategically to clarify a technique (see Fig. 2 ). Rulers included in an image beside a defect or graft can illustrate scale ( Fig. 4 ). There are no established standardized views for intraoperative photography, but orientation should be considered so that the final images are clearly understood. An ear might be included in an image of the temporal region or an eye in an image of the cheek to orient the viewer (see Fig. 3 ). Frontal, base, and surgeon’s views work well when recording intraoperative rhinoplasty images ( Fig. 5 ). Routine stopping points are also helpful. For example, to photograph a patient undergoing lateral crural strut grafting, the authors stop immediately after opening the nose, after dissecting out the lower lateral crura, and after attaching the lateral crural strut grafts (see Figs. 4–5 ). Other techniques and procedures are amenable to different routines (see Fig. 4 ). On reviewing his or her own intraoperative photographs, the surgeon will modify the views and stopping points to yield better images that will have the greatest impact for his or her needs.