2.5 ml 1 M potassium citrate
5 ml 0.1 M magnesium sulphate
5 ml 0.1 M N-ethylmaleimide to 87.5 ml distilled water
Adjust the final mixture to Ph 7 with 1 M KOH
This storage medium contains ammonium sulfate, N-ethyl-maleimide, magnesium sulfate, potassium citrate buffer, and distilled water, and it allows storage of the specimen in temperatures of up to 37 °C for up to 28 days [6–8].
After punch biopsies have been obtained from the appropriate sites and the specimens have been stored in their respective storage media, suture the wounds accordingly and dress with non-medicated ointment and nonstick dressings. Advise the patient regarding daily cleaning and dressing, and arrange for a follow-up date for removal of sutures and review of results.
15.3 Obtaining Skin Biopsies in Suspected EB
Performing skin biopsies in suspected EB is completely different and more difficult than suspected AIBD cases. First, while the immunofluorescence study used for AIBD is direct immunofluorescence (DIF) of perilesional skin, the tool used for EB is immunofluorescence mapping (IFM), sometimes referred to as IF antigen mapping, of freshly blistered lesional skin. Second, transmission electron microscopy (TEM) of a fresh blister may be done at the same time in suspected EB cases, or later, where IFM has not been conclusive. Third, while immunofluorescence studies for bullous diseases all require fresh blisters, the ideal biopsy site in suspected EB cases is a freshly induced blister that is less than 12 h old. Older blisters, especially ones that have already been stained with blood, may contain confounding factors that would lead to false-negative readings of these skin samples. These variables include enzyme degradation of antigens in the skin and reepithelialization of the blister roof leading to the appearance of multiple cleavage planes [9].
After informed consent has been obtained from the patient (or parent in the case of a pediatric patient), determine the site where a fresh blister is to be induced. This should be a clinically normal-appearing area of the skin that is adjacent to an area where blistering usually occurs. In neonates and infants with more widespread lesions of suspected EB, the lower abdomen or the inner portion of the upper arm may be chosen. As much as possible, do not choose the palms or soles, as the skin thickness in these areas would limit the demonstration of blister formation. For cosmetic reasons, also consider choosing a site where scarring from the biopsy procedure would not be conspicuous [6].
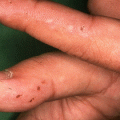
Various experts have suggested various tools in inducing the fresh blister. These include a pencil eraser, a gloved finger or thumb, and even a cotton swab [3]. For instruction purposes, a clean pencil eraser that has been swabbed with alcohol is chosen in this chapter (Fig. 15.1).
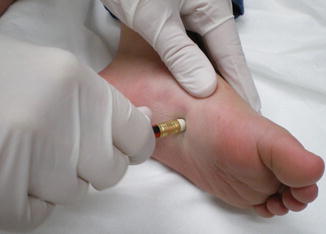
Fig. 15.1
Induce a blister in an EB patient by rubbing the tip of a pencil eraser against the skin
After the biopsy site has been determined, marked, and prepared with an antiseptic solution, firmly press the pencil eraser perpendicularly against the skin. With the eraser pushed against the skin, twist the pencil in opposite directions, at 180° on both sides. This motion causes traction against the skin that would cause erythema, which is the desired endpoint for inducing a blister. For neonates and infants, twisting the eraser about 20 times would be enough in producing the desired erythema. Make sure that the skin does not start to peel off during the process; otherwise, the process would need to be repeated. For less severe forms of EB, such as EB simplex or dominant dystrophic EB, you can instruct the patient or parent to rub the eraser against the skin until the desired endpoint, erythema, is achieved. This process may take a longer time in less severe EB, and so for these patients, they may be advised to arrive at the clinic for the instructions, leave the clinic to induce the blister as advised, and return to the clinic after a few hours. Wait for at least 5 min after onset of erythema; this is to assure that a subclinical microscopic blister has been achieved. After this time has elapsed, the skin samples are now ready to be taken (Fig. 15.2).
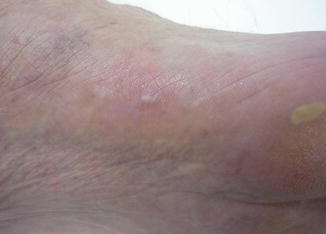
Fig. 15.2
The end result is erythema with or without a blister on the induced area
Although induction of fresh blisters in the clinical setting is generally advised, there are two exceptions wherein the induction of a fresh blister in the clinic need not be done. First, in severe junctional and recessive dystrophic EB, mechanical fragility is so severe that a cleavage plane may be appreciated through routine punch biopsy alone or after only minimal rubbing. Second, in less severe forms of EB, a patient may be instructed to perform the activity that causes their skin to blister and to do so the day before their scheduled biopsy procedure so that the induced blister would be on that day [3, 6, 10].
Related posts:
 Kindlin-1 and Its Role in Kindler Syndrome
 Cyclophosphamide in Autoimmune Blistering Diseases: Safety, Efficacy and Evidence Base
Management of Bullous Systemic Lupus Erythematosus
Cyclophosphamide in Autoimmune Blistering Diseases: Safety, Efficacy and Evidence Base
Management of Bullous Systemic Lupus Erythematosus
 Using Intravenous Immunoglobulins in Autoimmune Bullous Diseases
 Living with Epidermolysis Bullosa: Reviewing the Impact on Individuals’ Quality of Life
 Dermatitis Herpetiformis
Stay updated, free articles. Join our Telegram channel

Full access? Get Clinical Tree


