CHAPTER 13 Eyelid and Orbital Trauma
Evaluation of the trauma patient
History
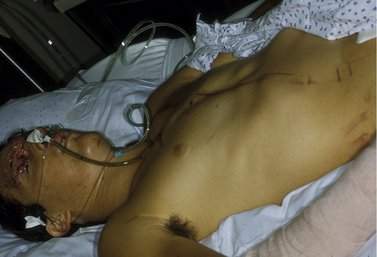
Periocular trauma can occur as an isolated injury or as a small part of multisystem trauma. You must make sure that the patient’s cardiopulmonary and neurologic status is stable before your evaluation and treatment of any ocular or periocular injury (Figure 13-1). Evaluation of the eye precedes evaluation of the soft tissue and bones. You must prevent further injury to the eye as a result of manipulation of the surrounding tissues.
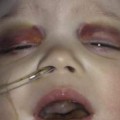
Try to obtain some history about how the injury occurred. A broad area of superficial involvement may initially look worse than a small puncture wound. The puncture wound may extend deeply, causing injuries to the eye, orbital contents, or brain, a much more serious situation than the superficial abrasion. If it appears possible that there was deep penetration into the orbit, try to determine what instrument caused the injury to give you some information about the depth of penetration and the possibility of the presence of a foreign body that may have broken off. Symptoms of diplopia or hypesthesia of the infraorbital nerve should suggest an orbital fracture. Always be skeptical about the history if alcohol was involved or if the patient is a child. Alcohol use has a way of distorting a patient’s perception of the facts. Children may not give an accurate history, fearing they may get in trouble with their parents (Figure 13-2). Your examination will help you decide if the history is plausible and if imaging studies are necessary to rule out injury to deep tissues (Box 13-1).
Examination of the soft tissues
The eyelids
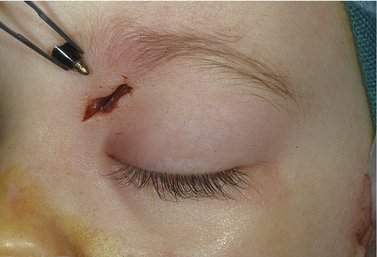
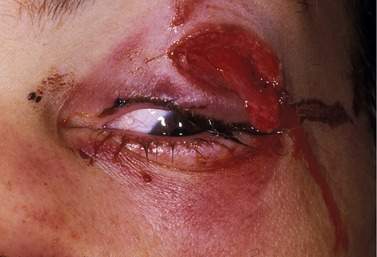
Next inspect the eyelids. Note the location, extent, and severity of injury to the soft tissues. Draw a diagram to describe the soft tissue injury. Develop a routine for examination of the soft tissue. Start with inspection of the continuity of the lid margins. Pay special attention to the lid margins medial to the puncta so you will not miss a canalicular laceration (Figure 13-3). If you suspect a canalicular laceration, pass a 1-0 or smaller Bowman probe through the punctum and inspect the canaliculus. You may be surprised to know that most canalicular lacerations do not occur from direct trauma of the medial lid. Most are the result of an avulsion or tear that occurs when the lid or cheek is pulled laterally. This explains why the patient who has been punched with a fist on the zygoma can be seen with a lower canalicular laceration.
Soft tissue injuries
Soft tissue injuries are classified as:
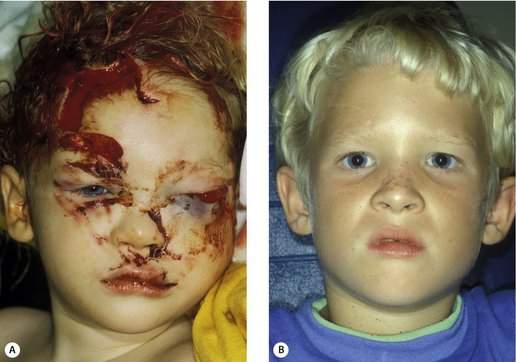
Contusions and abrasions do not require surgical repair. Cleaning and use of topical antibiotics and ice are appropriate. Avulsions imply a tearing of the tissue, sometimes separating with loss of tissue. Tearing often occurs with injuries on pavement, but loss of tissue is extraordinarily rare. Remember that wounds usually spread open, making them look like tissue may be lost. Punctures are caused by long sharp objects that create small entrance wounds, but may extend deeply. Lacerations are caused by sharp objects. “Clean cuts” or simple lacerations require only single-layer closure and heal with minimal scarring. Complex lacerations have extensive “jagged” edges that extend into deeper layers of tissue. These lacerations may require several hours of layered closure but, with good technique, the results can be spectacular (Figure 13-4). Canalicular and lid margin lacerations require special techniques that you can master with some instruction and practice.
Checkpoint
• Recall the steps of a systematic evaluation of the soft tissues. Write down the information in Box 13-2 and memorize it.
• What would make you suspect that a canalicular laceration has occurred? What are the possible mechanisms for this injury?
• What is the significance of fat in an eyelid wound? What layers of the eyelid have been disrupted? What are you concerned about?
• When you evaluate a patient, consider the type and mechanism of soft tissue injury. This information will help you to develop a plan for repair.
• Don’t forget to evaluate for deep injuries that may involve the eye or brain.
Repair of soft tissue trauma
Preparation
Small, simple lacerations are usually repaired with local anesthesia in adults and children. New tissue adhesives are available that show promise for repairing small lacerations without anesthesia, which can be especially helpful in children. More complex lacerations should be repaired with general anesthesia. Facial lacerations should be repaired within 12–24 hours. Operations for life- or vision-threatening conditions take priority over laceration repair. Fractures associated with facial lacerations are either repaired at the time of laceration repair or after 3–5 days when the facial swelling resolves. The specific timing for blowout fracture repair will be discussed later. Although facial lacerations rarely become infected, prophylactic broad-spectrum antibiotics, usually a first-generation cephalosporin, are prescribed for 1 week.
Anterior lamellar repair
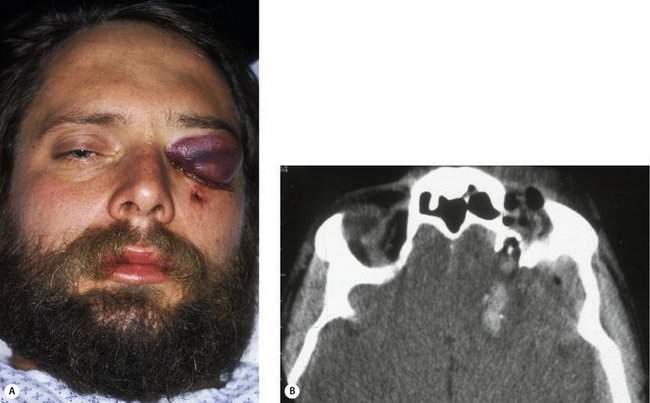
Before repair of any laceration, explore the depths of the wound to ensure that deeper injury has not occurred. Any visible orbital fat means that the orbital septum has been violated (Figure 13-5). Make sure that you are not dealing with a potentially more serious injury involving damage to the orbital contents or brain (Figure 13-6). If the laceration occurs perpendicular to the orbicularis fibers and the wound is pulled open, placement of deep absorbable sutures in the muscle will help to approximate the wound edges without tension on the skin closure.
Complex laceration repair
The steps of complex laceration repair are:
1. Clean and inspect the wound (Figure 13-7, A–C)
3. Close the superficial layer
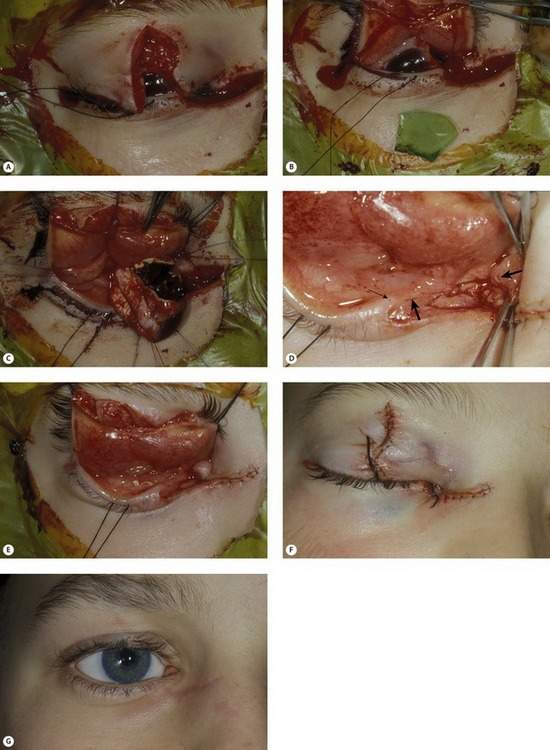
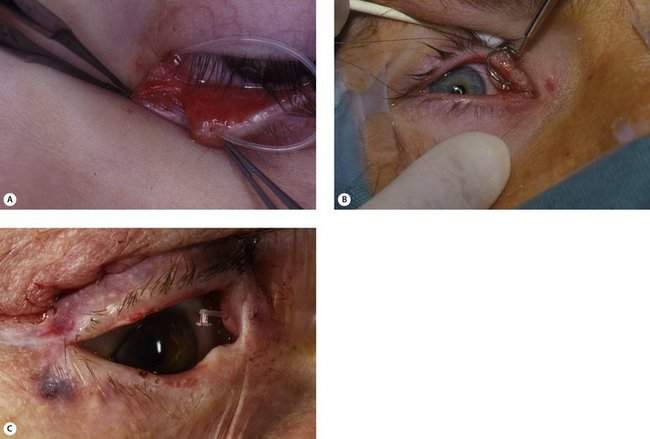
Figure 13-7 Eyelid laceration resulting from an explosion of a bottle containing dry ice. Complex laceration repair series. (A) Upper eyelid and medial canthal lacerations. The eye is soft and filled with blood. (B) A large piece of glass penetrated the cornea. (C) Primary enucleation was performed. (D) A canalicular laceration was identified and repaired (small arrow points to punctum; large arrows point to cut ends of canaliculus). (E) The posterior lamella and eyelid were repaired. (F) The anterior lamella was repaired last. (G) Nine months after repair with ocular prosthesis in place.
Suture removal should be done between 5 and 10 days after surgery. If you are removing sutures early, you may want to remove every other suture initially and have the patient return a few days later for removal of the remaining sutures. Superficial wound healing occurs within the first week or two. Scar maturation does not occur until 6–12 months after surgery. You need to be supportive during this period. Avoid revisions until all healing is complete and scars are flat and nonerythematous (Box 13-3).
Box 13-3 Complex Laceration Repair
Preparation
Lid margin repair
You will see lid margin lacerations as isolated minor injuries or in the context of large facial wounds (Figure 13-7, Box 13-4). The technique for repair is the same in either situation. Repair begins with identifying the appropriate anatomic landmarks of the eyelid, especially the landmarks of the lid margin. The strength of the closure is in sutures placed in the tarsal plate. Eyelid margin eversion is necessary to prevent lid notching.
Eyelid margin repair includes:
The steps of eyelid margin repair are:
2. Align the lid margin: Use a 7-0 Vicryl vertical mattress suture passed through meibomian gland orifices to align the lid margin. Keep this suture long for traction (Figure 13-8, A).
3. Suture the tarsal plate: Use two or three interrupted 5-0 Vicryl sutures passed in a lamellar fashion to align the tarsal plate. Traction on the initial lid margin suture will help with the positioning of your tarsal sutures (Figure 13-8, B).

Figure 13-8 Lid margin repair. (A) Align the lid margin using a vertical mattress suture passed through the meibomian gland orifices. (B) Suture the tarsal plate using two or three interrupted sutures passed in a lamellar fashion. (C) Suture the lid margin using an additional vertical mattress suture anterior to the gray line. (D) Close the skin.
Canalicular reconstruction
Diagnosis of canalicular laceration
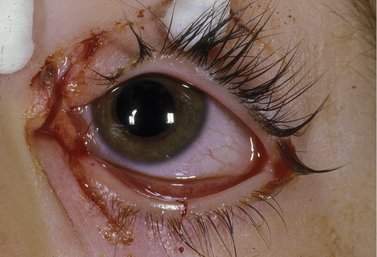
Assume that the canaliculus has been cut if there is any injury extending close to the lid margin medial to the puncta of the eyelids (Figure 13-9). If there is any question, confirm the presence of a laceration by passing a probe through the canaliculus. Canalicular lacerations may occur because of a laceration from direct trauma to the canaliculus or, as stated above, as a result of an avulsion from lateral tension on the eyelid. Direct laceration of the canaliculus is easier to fix than an avulsion type injury. Direct lacerations involve the middle portion of the canaliculus, making it easier to find and repair the ends of the lacerated canaliculus. Avulsion type injuries generally tear the canaliculus close to the sac, making visualization of the proximal cut end of the canaliculus difficult. For these injuries, the operating microscope is helpful.
Remember, suspect a canalicular laceration when there is any laceration at or near the medial canthus of the upper or lower lid. Repair of the laceration without special attention to the canaliculus will likely cause occlusion. Approximately 50% of young adult patients will have tearing if one canaliculus is occluded. This percentage is less for older adults. The upper and lower canaliculus contribute nearly equally to the drainage of tears. In most patients, you should attempt to repair the lacerated canaliculus.
Repair of canalicular laceration
Three intubation techniques are used to repair the torn canaliculus:
• Repair using bicanalicular intubation with nasolacrimal duct intubation using Crawford stents
• Repair using bicanalicular intubation with the pigtail probe
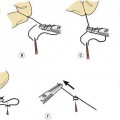
The first technique uses standard Crawford stents for intubation of the canaliculi and the nasolacrimal duct (Figure 13-10, A). The second technique requires intubation of only the canalicular system using a pigtail probe (Figure 13-10, B). Several types of monocanalicular stents are available.
You may have been biased by older literature condemning the pigtail probe. Despite its poor reputation, the pigtail probe can be used successfully in all but a small percentage of patients. Intubation of the canaliculi with the pigtail probe is more difficult than using Crawford stents, but no retrieval of the stent in the nose is required. Try to learn both techniques (Box 13-5 and Box 13-6).
Box 13-5 Canalicular Laceration Repair Using Crawford Stents
Box 13-6 Canalicular Repair Using the Pigtail Probe
Pass the pigtail probe
• Use the pigtail probe with a closed needle eye not an open hook
• Choose the end of the pigtail probe that corresponds to the direction of rotation required
• Rotate through the intact punctum to the medial canthus
• Go posterior to the medial canthal tendon. Use gentle pressure
• The probe emerges through the cut proximal end of the canaliculus
Thread the suture through the canalicular system
• Thread a 6-0 nylon suture through the eye of the probe and rotate the probe out of the intact canaliculus
• Pass the probe from the punctum of the torn canaliculus out of the end of the cut canaliculus
• Thread the suture through the eye of the needle and rotate the probe and suture out the punctum
Canalicular repair using Crawford stents includes:
• Identifying the cut ends of the canaliculus
• Passing the stent through the torn canaliculus
• Passing the stent into the nasolacrimal duct
• Suturing the pericanalicular tissue
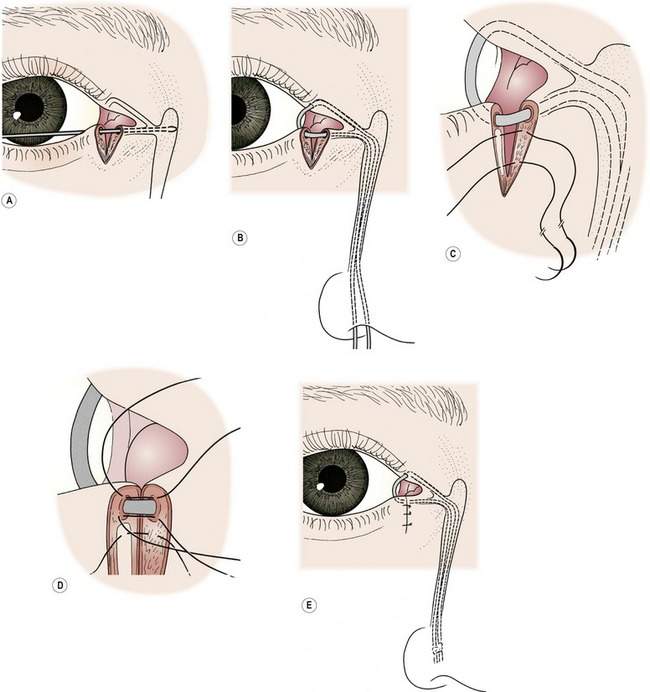
The steps of canalicular laceration repair using Crawford stents are:
1. Identify the cut ends of the canaliculus
2. Pass the stent through the canaliculus
3. Pass the stent down the nasolacrimal duct (Figure 13-12, B)
4. Suture the pericanalicular tissue around the stent
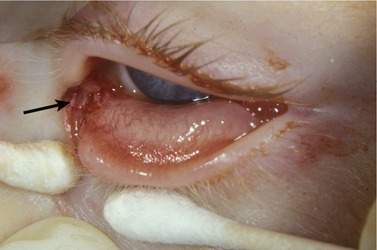
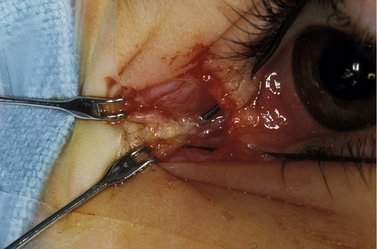
Figure 13-11 Lacerated canaliculus: note the ring of mucosa on the proximal side of the lacerated canaliculus (arrow).
Canalicular laceration repair using a pigtail probe includes:


Stay updated, free articles. Join our Telegram channel

Full access? Get Clinical Tree


