Enucleation, Evisceration, and Exenteration

CHAPTER 16 Enucleation, Evisceration, and Exenteration


The Care of the Eye Socket


Introduction


For many ophthalmologists, the enucleation of an eye is the end of a series of medical or surgical failures resulting in the loss of the eye. The procedure may bring an end to a long relationship between the ophthalmologist and the patient because there is “nothing else that can be done.” This is far from the truth. The removal of the eye starts a lifelong relationship between the ophthalmologist and the patient centered on maintaining a healthy socket for the patient. The good news is that most patients undergoing enucleation today can expect to wear an ocular prosthesis that will be comfortable and not apparent to the public at large. The purpose of this chapter is to give you the tools to prepare for that relationship. Remember: if you don’t know how to take care of the socket, who will?


We will start this chapter with the indications for removing an eye. The option of a scleral shell is often overlooked for blind and disfigured eyes in patients without pain. If pain cannot be controlled medically, enucleation or evisceration is an option. We will talk about the indications and steps for each procedure in detail.


We will review the normal examination of the socket. Many residents don’t get training in how to deal with common socket problems. We will cover the discharging socket, implant exposure, extrusion and migration, the superior sulcus syndrome, and the stock eye syndrome. If you don’t already have a working relationship with a well-trained ocularist, consider a visit to the ocularist’s laboratory. You will find the ocularist’s experience and insight into the anophthalmic patient’s problem extremely valuable. The better you know each other, the better off your patient will be.


Unfortunately, some patients have tumors extending into the orbit secondarily, which require removal of the entire socket and sometimes the surrounding tissues. The most common causes are tumors extending into the orbit from the sinuses or eyelids. We will discuss the technique of orbital exenteration in general terms. We will touch on some orbital prostheses and some advanced socket procedures that can prevent loss of the eye.


I hope you will put this information to good use. Don’t be the ophthalmologist who doesn’t remove the prosthesis to look at the socket. Learn about the normal socket and the common problems that can occur. Your expertise as the surgeon removing an eye and as the physician providing the long-term care of the socket will be greatly appreciated by your patient.


When to remove the eye


The scleral shell


When a patient comes to you with a blind eye requesting removal of the eye, the first question to ask is, “Does the eye cause you pain?” If the answer is no, consider a scleral shell. A scleral shell is a thin ocular prosthesis that fits over the blind eye (Figure 16-1). The shell provides a natural appearance and is comfortable for most patients. No surgery is required to treat the patient. Patients who are ideal candidates for wearing a scleral shell are those with:


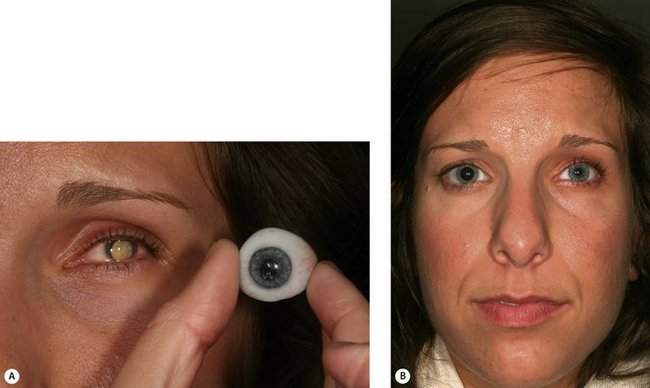
Patients with severe pain probably will require enucleation or evisceration. You can sometimes treat patients for the mild aching pain that may accompany phthisis with prednisone ophthalmic (Pred Forte 1%) and atropine drops to control any intraocular inflammation. Undoubtedly, your enthusiasm for a scleral shell decreases as the complexity of any treatment to minimize pain increases. For many patients, removal of the eye is better than long-term treatment with drops and a shell, but at least consider the option of controlling mild pain medically. Most patients can tolerate the fit of a shell even with normal corneal sensation. Although the scleral shell sits over the eye, the posterior face of the shell is vaulted to sit off the cornea. If there is any question about pain, consider a trial period with a custom conformer. This prosthesis is custom-made to fit the shape of the socket, but does not have any color applied. The cost of the custom conformer is only 10–20% that of a completed prosthesis, so a trial is worth the cost if doubt exists that the shell will be tolerated. Although the scleral shell can be thin, an element of enophthalmos or phthisis makes it easier to get symmetry (Figure 16-1). Don’t recommend fitting a scleral shell if you think that the eye is continuing to shrink. In a few months, the shell will not fit and time and money will have been wasted. Obviously, enucleation should be considered for an eye with an intraocular tumor. Most patients wearing a scleral shell are blind in the eye that is covered. A patient with normal vision cannot see through the shell. For any patient with a disfigured iris who has good vision, a cosmetic contact lens (a special contact lens painted with matching iris details) should be considered.


Enucleation or evisceration?


Once the decision has been made to remove the eye, there are two options:


The enucleation operation removes the eyeball in its entirety. The extraocular muscles are cut off the eye, and the optic nerve is severed. The orbital contents are otherwise undisturbed. The evisceration procedure “eviscerates” or removes the contents of the eye. The sclera is opened, and the intraocular contents are scooped out. The extraocular muscles and optic nerve are left attached to the sclera.


The indications for enucleation are:


Most of the eyes that you are likely to remove will have been damaged by trauma. Occasionally, eyes may have been blinded by infection (endophthalmitis or corneal ulcer) or glaucoma. Choroidal melanoma is the most common intraocular tumor in adults requiring enucleation. Retinoblastoma is the most common intraocular tumor in children requiring enucleation.


Blind, painful eyes may be considered for evisceration instead of enucleation. Contraindications for evisceration are:


Evisceration does not permit a complete, controlled removal of an intraocular tumor. Surgical margins are impossible to evaluate. Eyes that are shrunken as a result of phthisis should not undergo evisceration because the sclera cannot hold an adequate-sized implant.


In the absence of tumor or phthisis, either enucleation or evisceration can be performed. So how do you choose? More and more, it has become the surgeon’s choice. It used to be said that the incidence of sympathetic ophthalmia was much higher with evisceration than with enucleation. This swayed the decision in favor of enucleation for eyes blinded by trauma or those having exposure to the S antigen through surgery or perforating corneal ulcer in an attempt to prevent sympathetic ophthalmia. Since that time, it has become increasingly apparent that the incidence of sympathetic ophthalmia is exceedingly low after evisceration.


Factors favoring evisceration over enucleation are theoretically better eye movements and less chance of postoperative enophthalmos, both owing to less disruption of the orbital tissues. Evisceration requires less operating time as well. For these reasons, many surgeons now perform evisceration in all patients without intraocular tumor or phthisis. It is said that evisceration does not eliminate pain in all patients because the posterior ciliary nerves are not cut. I don’t know if this is true. In my practice, a large percentage of the eyes that are removed are for choroidal melanoma, so we perform many more enucleations than eviscerations. The majority of eyes that meet the indications for evisceration are enucleated as well, mainly because of habit.


An important use for evisceration is for the blind, painful eye with severe conjunctival scarring, as in an alkali burn. Evisceration requires less conjunctival dissection than enucleation. This allows a more normal-sized prosthesis to be fit because the fornices are not shortened by tearing the conjunctiva when you try to free it from the eye.


You should know that many of my trusted colleagues have switched to evisceration whenever possible.


The enucleation operation


Preoperative considerations


Goals


The goals of the enucleation operation are:


Removal of the eye is carried out in a routine fashion by severing the attachments of the extraocular muscles and optic nerve from the eye. The technique for controlled enucleation with minimal bleeding is described below. You must be careful when removing an eye with an intraocular tumor not to penetrate the eye with any needle. The goal of restoring orbital volume is usually met by placing an orbital implant. The majority of implants placed today fit within Tenon’s space in the same position as the eye. No doubt, many times the implant will be pushed posteriorly into the intraconal space as it is placed. You should minimize the manipulation of the orbital fat to avoid postoperative fat atrophy. The movement of the implant and the conjunctival fornices pushes the prosthesis to provide natural eye movements within the “conversational range” (10–15 degrees).


The volume of the orbit is approximately 30 ml. The volume of the eye is 7.5 ml. The volume of the eye must be replaced with volume provided by the combination of the implant and the prosthesis. A 16 mm sphere replaces 2 ml of volume. A 20 mm sphere replaces 4–5 ml of volume. An average-sized prosthesis can make up for the additional 2.5 ml of volume lost during enucleation. In general, patients receive implants that are 20 mm in diameter. Occasionally, a 22 mm implant can be placed without undue tension on the closure.


Remember that any surgical trauma, such as retraction and cautery, can cause additional loss of orbital volume (the fat atrophy we mentioned above). Any loss of orbital volume occurring due to enucleation that is not replaced creates an enophthalmic appearance to the prosthesis, usually apparent as a hollowing of the superior sulcus. A larger than average prosthesis provides only a temporary solution because the lower eyelid cannot support the additional weight of the prosthesis and eventually sags. We will discuss this problem later under “Superior Sulcus Syndrome.”


Choice of implant


With the introduction of the hydroxyapatite implant in 1985, a resurgence of interest in orbital implant design has occurred. Implants can be classified as:


A buried implant implies that the entire implant is covered with a closure of conjunctiva. Exposed implants were used primarily in the 1940s when a portion of the implant was allowed to project through an opening in the conjunctiva. This exposed portion of the implant was physically linked or “integrated” to the prosthesis. These implants failed because of chronic infection and eventual extrusion. Almost all implants in use today are covered with conjunctiva or buried.


To provide the maximum motility of the ocular prosthesis, the extraocular muscles should be attached to the implant at the time of enucleation. The point of attachment may be directly to the implant or indirectly by suturing the muscles to a covering over the implant such as human sclera or fascia, or Vicryl mesh. Some surgeons feel that a significant amount of movement of the ocular prosthesis is provided by movement of the conjunctival fornices. These surgeons often attach the extraocular muscles directly to the fornix rather than to the implant.


The term integrated implant was originally used to describe the attachment of a prosthesis to the implant. As was stated earlier, exposed implants were integrated directly to the prosthesis through an opening in the conjunctiva. This integration provided excellent motility of the ocular prosthesis. Experimentation with different shaped implants led to the development of the quasi-integrated implant (the Iowa and the universal implants). These buried implants had an irregular anterior surface, projecting mounds on the surface of the conjunctiva. An ocular prosthesis was fit with impressions on its posterior surface to “mesh” or “quasi-integrate” with the prosthesis. These implants provide good motility, but they require more time to place and are sometimes associated with migration or rotation of the implant.


Materials used in implant construction can be either porous or solid. Porous materials include hydroxyapatite (HA) and MEDPOR (a high-density polyethylene material). The most common solid material for implant design is polymethylmethacrylate (PMMA). Porous implants have gained favor in recent years.


The idea of a porous implant that would allow vascular ingrowth and support “integration” of the prosthesis and implant brought a renewed interest in the anophthalmic socket in the late 1980s. During this same decade, oculoplastic surgery, as a specialty, flourished. Both these factors have benefited patients wearing prosthetic eyes, who had, more or less, been ignored by all but a few surgeons.


The idea of an “integrated” implant was borrowed from the earlier exposed integrated implants of the 1940s and 1950s that we have just talked about. The vascular ingrowth has mistakenly been called “orbital integration” by the makers of hydroxyapatite implants. This term should not be used because it creates confusion with the descriptive term “integration” with regard to the attachment of the ocular prosthesis to the implant. With a porous implant, an integration of the implant with the prosthesis could be accomplished while at the same time having a buried implant not predisposed to infection.


As you probably know, after satisfactory vascular ingrowth into hydroxyapatite implants (usually after 6 months), a hole can be drilled into the implant. Conjunctiva will migrate into the hole and the vascular ingrowth will support a conjunctival epithelium, which lines the drill hole. A peg can be attached to the ocular prosthesis, which then fits into the hole in the implant. This “lock and key” fit provides a firm attachment between the prosthesis and the implant that provides great movement. Because this implant is covered with conjunctiva, it is truly a buried implant. In theory, the best of all worlds is achieved—a truly integrated implant and prosthesis providing great movement with a covered implant not likely to get infected.


Unfortunately, for many patients, the epithelium over the peg site is not able to withstand the pressures of the peg against the implant created by the eye movements. Not infrequently, exposure and problems with granulation tissue occur at the junction. Several revisions of the integration have not solved these problems. Consequently, most surgeons have abandoned any attempts at pegging or “integrating” an HA implant with the prosthesis.


Porous polyethylene spheres (MEDPOR) were introduced as an alternative to hydroxyapatite. Tissue ingrowth prevents implant migration, as with other porous implants. MEDPOR implants appear to have a lower exposure rate than HA, perhaps due to a smoother anterior surface. A titanium screw integration system was introduced, but did not gain wide acceptance. A new magnetic coupling device has been introduced more recently.


Synthetic hydroxyapatite and other ceramic materials continue to be tested as implant materials. A few surgeons still peg these implants with reasonable success due to diligent attempts at revisions as needed.


There is no perfect anophthalmic socket implant. Everyone agrees that the implant should restore adequate orbital volume requiring at least a 20 mm sphere. Most surgeons would agree that the extraocular muscles should be reattached to the implant. There are differing opinions regarding whether porous or solid implants are best. My current personal choice for an ocular implant is a 20 mm MEDPOR SST sphere. This implant has predilled holes that allow easy attachment of the muscles, and the anterior surface of the implant is smooth, so that exposure is an infrequent problem (MEDPOR PLUS SST porous polyethylene spheres: 16 mm #80046, 18 mm #80048, 20 mm #80050, 22 mm #80052, http://www.porexsurgical.com). We use no integration of the implant and the prosthesis. Movement is good in the conversational range (within 10–15 degrees of primary position).


We can all look forward to new implant designs in the future as this area of surgery continues to evolve. For the most part, the problem of migration, sometimes seen with nonporous implants, is solved. Replacing the orbital volume is reasonable with current implants. If a deficit remains, additional orbital volume can be added later. There remain issues with an exposure rate that should be reduced. Likely, a better tolerated integration system will be devised that will give even better movement of the prosthesis.


Enucleation operation


Enucleation procedure


Enucleation of the eye is most commonly performed under general anesthesia. In selected patients, the procedure can be performed using local anesthetic and sedation.


The enucleation procedure using a MEDPOR SST spherical implant includes:


The steps of the enucleation operation with placement of a MEDPOR PLUS SST spherical implant are:


1. Prepare the patient


2. Detach the extraocular muscles


D. Pass the typical von Pirquet suture through the muscle insertion. I use 5-0 Vicryl on a spatula needle (Ethicon J571, S-14 needle) (Figure 16-2, E). I find the traditional strabismus technique in which the surgeon holds the muscle hook in one hand and the needle holder in the other hand to be cumbersome. This technique may be important for a strabismus surgeon where the muscle is sutured and cut in a precise position, but is not important for enucleation surgery. I would suggest you try one of two options. Either (1) hold the muscle hook yourself and have your assistant load the second arm of the needle back-handed for you on an additional needle holder; or (2) have your assistant hold the muscle hook, leaving you two free hands to load the needle and manipulate the tissues.


F. Hook the oblique muscles and cut them from the eye (near Tenon’s capsule, not at the eye) (Figure 16-2, G). Hook the inferior oblique muscle in the inferior and temporal quadrants with the tip of the muscle sweeping from posterior to anterior toward the muscle as it leaves the lower lid retractors heading for the eye. Cauterize the inferior oblique muscle before cutting it.


3. Sever the optic nerve


4. Insert the implant


C. Place the implant “colored side up” in the introducer (Figure 16-2, K). With upward traction on the rectus muscle sutures, push the introducer deep into Tenon’s space (Figure 16-2, L).

D. After placing your index finger on the implant, slowly withdraw the introducer (Figure 16-2, M). Inspect the position of the implant. Using a “hand-over-hand” technique with Paufique forceps, pull Tenon’s capsule anteriorly over the sides of the implant to insure that the implant is deeply placed. The edges of Tenon’s capsule should meet over the implant with little tension.


5. Attach the muscles to the implant


6. Close Tenon’s capsule and the conjunctiva


7. Provide postoperative care


Stay updated, free articles. Join our Telegram channel

Mar 14, 2016 | Posted by in General Surgery | Comments Off on Enucleation, Evisceration, and Exenteration

Full access? Get Clinical Tree

Get Clinical Tree app for offline access