Chapter 5 Brachioplasty with liposuction resection
• Include the deformity of the axilla and upper chest in the arm reduction plan.
• Close the excision along the posterior half of the medial arm and zigzag across the axilla.
• Fully remove excision site fat and reduce excess fat elsewhere through liposuction.
• Anchor the proximal posterior flap to deltopectoral fascia.
Introduction
The operative strategy relates to the magnitude of deformity.1 For the vast majority of presentations, arm skin reduction surgery is needed from the axilla to elbow.2–4 Experience with severe arm and upper body deformity after massive weight loss (MWL) led to the design of the inclusive L-brachioplasty, so named for the L shaped pattern of excision with the long limb from the elbow to the axilla and the short limb extending at right angles through the axilla and along the lateral chest.5,6
Preoperative Preparation
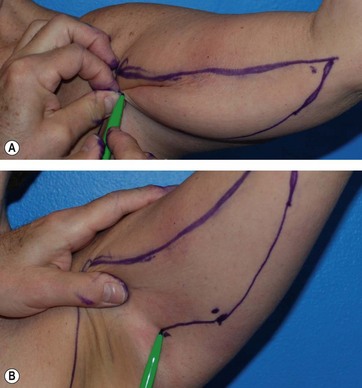
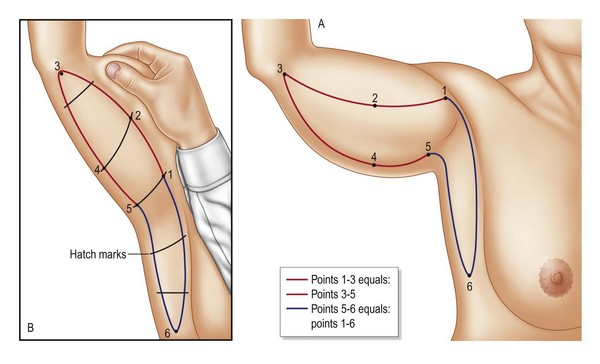
The L-brachioplasty marking begins with a hemi-elliptical skin excision of the medial arm, with the anterior straight line at or slightly above the bicipital groove and the descending curved line along the posterior arm. The six critical points are found with the patient’s arm abducted and the forearm flexed 90°. Ink dots are made at point 1 at the deltopectoral groove, point 2 at the widest portion of the mid arm near the bicipital groove, and point 3 the termination of the brachioplasty about the medial elbow or beyond. The straight or slight bowed line connecting these points is the anterior incision line (Fig. 5.1). The width of the mid-arm excision is determined next by gathering and pinching excess skin and fat posterior to the mid-arm point 2 to mark point 4 along the mid-posterior margin of the arm (Fig. 5.1, upper). With the arm raised and the skin put on stretch, a straight line is drawn from that widest posterior arm point 4 to meet the anterior line termination at point 3. The proximal portion of the posterior incision line is then drawn by finding the critical point 5 that can be advanced to the deltopectoral point 1. Pinching the approximation of point 5 to the deltopectoral groove point 1 advances the posterior axillary fold to tightly suspend the posterior arm (Fig. 5.1, lower). So far an incomplete hemi-ellipse has been drawn. The anterior incision from deltopectoral groove point 1 to the elbow point 3 is measured by tape measure to confirm it is equal in length to the curved posterior incision from elbow point 3 to the advancement point 5. With the arm extended, the posterior line continues across the axilla, staying several centimeters away from the posterior axillary fold to descend to a tapered lateral chest point 6 as the posterior incision line of the lateral chest. The length of this line (points 5 to 6) will vary according to the skin laxity and rolls of the lateral chest. A line roughly perpendicular to 1–3 descends from the deltopectoral groove through the axilla and posterior to the lateral pectoral fold to taper to point 6. The skin excision between these last two lines (5–6 and 1–6) removes the excess skin of the axilla and lateral chest (Fig. 5.2).
< div class='tao-gold-member'>
Stay updated, free articles. Join our Telegram channel

Full access? Get Clinical Tree


