Chapter 4 Brachioplasty – the double ellipse technique
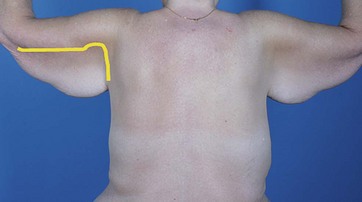
• Upper arm excess in massive weight loss patients most often crosses the axilla onto the lateral chest wall.
• Since upper arm excess most often crosses the axilla onto the chest wall, the resection needs to cross the axilla.
• The arm is a cylindrical structure with a hard inner core that is noncompressible.
• It is important to account for the distance between the pinched fingers in the marking process to prevent over-resection during the operative procedure.
• A complete tailor tacking of the arms prior to making the incisions during brachioplasty will prevent over-resection and banding.
• It is dangerous to leave the arm wound open for any considerable time during a brachioplasty procedure.
• The advantages of a posterior scar in brachioplasty include less visibility in normal life animation and less risk to important anatomic structures.
Introduction
In the development of the presented technique, the senior author had to recognize the basic nature of the deformity in the upper arm of the massive weight loss patient. The excess was noted to be located within the posterior axillary fold as it extends from the axilla to the upper arm. Thus, since the posterior fold traverses from the upper arm to the axilla and onto the lateral chest wall, the excess also involved the upper arm, axilla, and the lateral chest wall (see Fig. 4.1). This was a major advancement in knowledge, which led to the authors’ technique of crossing the axilla with the resection. Other authors have since developed other methods of resection, but they are all based on the need to cross the axilla with the resection onto the chest wall.

FIG. 4.1 The typical “bat wing” deformity in a massive weight loss patient.
The yellow mark demonstrates how the excess crosses from the upper arm onto the lateral chest wall.
The technique presented here accounts for these two major discoveries: the resection should cross the axilla and minimal to no swelling should be allowed to occur during the procedure.1,2
Surgical Technique
Preoperative Markings: Double Ellipse Technique
1. Patient seated with arms abducted to 90° and elbows flexed at 90°.
2. At the axillary crease, located at the junction of the arm with the chest wall, excess skin and subcutaneous tissues are pinched just below the musculoskeletal complex. The anterior and posterior margins of this pinch are marked.
3. This process of pinching just below the musculoskeletal system is repeated at multiple points along the entire upper arm. In some patients the excess will have to be followed past the elbow.
4. The pinching of excess tissue is continued onto the lateral chest wall.
5. The marks are then all connected, both anteriorly and posteriorly, to create the first ellipse. This ellipse does not account for the distance between the pinching fingers and if used to resect tissues will not allow enough skin to be left behind to close the arm.
6. A second ellipse is created, based on the first ellipse, which accounts for the distance between the pinching fingers. Thus at multiple points along the upper arm, this pinch is repeated and the distance between the pinched fingers is noted. Marks that move in from the original ellipse edges by half the distance of the pinch are then made.
7. This process is repeated along the extent of the arm but not the lateral chest wall, since the resection is not around a cylinder at this point.
8. The second set of marks is then connected to create the inner ellipse.
9. Horizontal hatch marks are made at varying distances along the length of the ellipse to assist with final closure (see Fig. 4.2).
Stay updated, free articles. Join our Telegram channel

Full access? Get Clinical Tree


