This article describes the equipment and software used to create facial 3D imaging and discusses the validation and reliability of the objective assessments done using this equipment. By overlaying preoperative and postoperative 3D images, it is possible to assess the surgical changes in 3D. Methods are described to assess the 3D changes from the rhinoplasty techniques of nasal dorsal augmentation, increasing tip projection, narrowing the nose, and nasal lengthening.
Assessment of facial plastic surgery outcomes is predominantly qualitative in the current literature. Results are analyzed by quantifying physician opinion, as well as patient quality of life and satisfaction. Although the surveys used are standardized and validated, the results are still highly subjective.
Emphasis has therefore shifted to a more objective evaluation of outcomes. Facial measurements provide a quantitative assessment of operative results. Originally, these were performed with craniofacial anthropometry, the direct measurement of the patient in the clinical setting using calipers and measuring tape. Because of the time commitment this caused for the patient, direct measurements were replaced by the measurement of photographs, which are quickly obtained and can be archived for analysis without causing any inconvenience to the patient.
Two-dimensional imaging assessment of rhinoplasty techniques in literature
Frontal, lateral, oblique, and base views of the nose are among the standardized images that allow comparison of surgical techniques and results from different surgeons. In the rhinoplasty literature, two-dimensional (2D) photographs have been used to show the effect of cephalic trim, columellar strut, lateral crural steal, and lateral crural overlay on tip rotation and projection. Relative measurements of frontal pictures have also been used to show the change in nasal width after spreader grafts.
Shortcomings of 2D imaging of the nose
When dealing with 2D digital photographs, there are certain limitations. The face and nose are three-dimensional (3D) structures, and subtleties can be lost when they are portrayed in 2 dimensions. Particularly in the frontal view, it can be difficult to appreciate small irregularities of the nose. Patient positioning is important because slight changes in the Frankfort plane can cause apparent changes in tip rotation and nasal length on the frontal view. In addition, the lens used by the photographer should be chosen to produce the least distortion while maximizing the depth of field to ensure that the whole face is in focus (typically met by lenses between 90 and 105 mm). Lenses with shorter focal lengths provide a better depth of field (so the whole face is in focus) but cause obvious facial distortion. Another pitfall of 2D photography is the lighting. When the angle between the subject-camera axis and the flash is more than 45°, tip-defining points seem wider apart (and vice versa). Measurement errors can also be introduced by magnification, parallax, and differences in subject-to-camera distances. Even changing the photographer can cause changes in comparative measurements because of differences in technique and interpretation of the parameters of standardized photography.
3D imaging techniques
3D imaging has been developed to overcome some of these obstacles and enable more precise evaluation of changes of the nose after rhinoplasty. In addition to angle, distance, and area measurements, 3-D imaging allows calculations of volumes and topographic distances.
Several forms of 3-D imaging modalities have been developed and tested. Computed tomography, 3D ultrasonography, moiré topography, laser scanning, and stereophotogrammetry are just a few of these techniques. Stereophotogrammetry involves taking multiple synchronous photographs from different angles, which are then digitally melded to generate a 3D image. This modality has gained popularity because it does not expose patients to radiation, as in computed tomography.
Our institution uses the 3dMD system (3dMD Inc, Atlanta, GA), which consists of 6 digital cameras, 3 on each side of the patient. A random light pattern is then projected onto the patient’s face, and the cameras, which are set in an optimum configuration, capture simultaneous images. The images are captured in 2 milliseconds rather than the 20 seconds necessary for laser scanning, decreasing error from patient movement, and increasing patient convenience. The system is connected to a computer, where the captured dataset is saved. We then use 3dMD Vultus software to upload and manipulate the images. The 6 captured images are merged to produce a single 3D polygon surface mesh, with a resolution of up to 40,000 polygons per 6.45 cm 2 . The wire frame is then layered with soft tissue color and features. This results in a 3D image that can be rotated in space and viewed from any angle. The software has an intuitive interface and requires basic computer skills to navigate. The images are dragged and rotated with a point and click of the mouse and the different capabilities of the system are showcased on the toolbar with picture icons. The 3dMD system is one of a few 3D imaging systems currently on the market. Table 1 shows a list of equipment and software currently available.
| Company | Equipment | Software |
|---|---|---|
| 3dMD (Atlanta, GA) | 3dMDface System | 3dMD Vultus |
| Canfield Scientific Inc. (Fairfield, NJ) | Vectra 3D Imaging System | Mirror Imaging Vectra 3D Sculptor |
| Genex Technologies | 3D Facecam Capture System | 3D Surgeon |
Validation and reliability
In addition to acquiring data rapidly and noninvasively, stereophotogrammetry has proved to have excellent precision and reproducibility. Lübbers and colleagues (2010) compared 201 direct measurements of a mannequin head with measurements of the 3D images captured by the 3dMD device. Measurements were performed by 3 observers, and repeated 5 times. There were no statistically significant differences between the direct measurements and the measurements of the images. The operator error (error resulting from inaccuracies in placing landmarks) was noted to be 0.1 mm without use of a zoom to magnify the images, and 0.04 mm with a zoom. Weinberg and colleagues (2006) compared 2 photogrammetric systems (Genex and 3dMD) with each other and with direct anthropometry. On a sample of 18 mannequin heads, 12 linear distances were measured twice by each of the 3 methods. Statistically significant differences were observed for 9 of the measurements, but these were consistently on the submillimeter level. It was therefore concluded that the 2 systems produce interchangeable results. Wong and colleagues (2008) measured 18 standard craniofacial distances twice, directly on 20 normal adults. The craniofacial surfaces of the 20 adults were imaged using the 3dMD device and the same distances were measured digitally, twice for each subject. Seventeen of the 18 measurements were found to be within 1 mm of the digital distances. Littlefield and colleagues (2004) tested the imaging system against a high-precision coordinate-measuring device and found the error to be 0.236 mm. Aldridge and colleagues (2005) acquired 2 images of 15 subjects and mapped 20 standard anthropometric landmarks on each image. The landmark data were collected twice for each image by a single investigator with a minimum of 24 hours between measurement trials to prevent memory-biased placement of the landmarks. The grand mean of the precision calculated across subjects along all axes (x, y, z) was 0.827 mm. The repeatability was found to be 95% for 181 of the 190 landmarks. In all of these studies, 3D stereophotogrammetry was found to be an objective, accurate, and reliable system for quantifying the dimension of the soft tissues of the face.
Assessment of different rhinoplasty techniques with 3D imaging
By overlaying preoperative and postoperative 3-dimensional stereophotogrammetric imaging, it is possible to assess the resulting changes in every plane. In the literature, this technique has been used to measure the changes in volume of the nose after rhinoplasty for patients with unilateral clefts. Van Loon and colleagues (2010) evaluated the results of 12 patients with unilateral clefts who received 3D imaging before and 3 months after rhinoplasty. The images were superimposed to generate a topographic distance map of preoperative and postoperative tissue changes. The volumes of the right and left half of the nose were also calculated and the preoperative and postoperative results were compared. A similar technique was used to evaluate the results of rhinoplasty with hump reduction. Van Heerbeek and colleagues (2009) studied the results of 12 patients undergoing hump reduction. 3D imaging was performed 1 day before surgery and 6 months after surgery. The images were superimposed using 4 landmarks that did not change during surgery. A distance was then calculated between both surfaces, which resulted in a color-based image indicating unchanged (white areas), decreased (red discoloration), and increased (green discoloration) facial volumes. A higher intensity of discoloration corresponded with a larger volume change. To calculate the amount of maximal reduction, the distance between the preoperative and postoperative images was calculated at the point of maximal discoloration. Honrado and colleagues (2006) compared the preoperative and postoperative imaging of 32 patients who received maxillary advancement surgery. A similar technique to the 2 previously mentioned studies was used to generate color-based histograms of soft tissue volume differences. Changes in nasal measurements such as nasal tip projection, columellar length, and nasolabial angle were also compared in this study by placing landmarks and measuring the distances and angles between them.
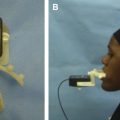
At our institution, every patient receives preoperative imaging, as well as postoperative imaging at designated time intervals. This system allows us to track the 3D changes in the postoperative nose with time. The patient is seated in a chair a set distance from the cameras and positioned with the Frankfort horizontal plane parallel to the floor ( Fig. 1 ). This position gains maximum light exposure to the face. The patient is photographed with all facial muscles relaxed, to ensure that there are no distortions of the nose. It is also important that patients loosely pull back their hair away from their faces; this prevents facial distortion from pulling of the hair and prevents landmarks and registration surfaces such as the forehead from being covered.
Assessment example 1: nasal dorsal augmentation
A deficient nasal dorsum of congenital, iatrogenic, or traumatic cause is corrected with dorsal augmentation. Autologous cartilage grafts are most commonly used and remain the gold standard for dorsal augmentation. Dorsal augmentation can produce other changes in the nose such as nasal lengthening from augmenting the radix and raising the nasal starting point, decreasing the depth of the nasofrontal angle, and increasing dorsal projection. It is important to be aware of these changes when performing a complete evaluation of the results of nasal dorsal augmentation.
As a first step, the change of shape of the nasal dorsum can be evaluated by extracting the profile in the midsagittal plane from preoperative and postoperative 3D images. The profile lines are then superimposed to highlight the differences in dorsal height and nasal length ( Fig. 2 ). The figures show examples of each type of assessment for 2 patients, patient A and patient B.
Related posts:
 Foreword
 3D and the Next Dimension for Facial Plastic Surgery
 The Use of 3D Imaging Tools in Facial Plastic Surgery
 3D Analysis of Dentofacial Deformities: A New Model for Clinical Application
 Teaching 3D Sculpting to Facial Plastic Surgeons
 3D Volume Assessment Techniques and Computer-Aided Design and Manufacturing for Preoperative Fabrication of Implants in Head and Neck Reconstruction
Stay updated, free articles. Join our Telegram channel

Full access? Get Clinical Tree


