5 Room Layout
Abstract
The examination room is the primary setting of contact with a patient and, thus, has the inherent ability to either maximize your efficiency or completely hinder your progress. Creating a room design that is focused on physician efficiency without negotiating patient comfort will enable quick transitions, easy movements, increased productivity, and higher patient and team satisfaction. We believe the key to physician efficiency is standardization of the examination room to promote seamless transitions and provision of easy access to all necessary materials. This chapter will walk through the basic elements that a dermatologist should consider in their clinic room setup and provide some visual examples of design that have been successful in our high-volume clinic.
Top 10 Things You Need to Know
All aspects of the clinic and room design should optimize physician efficiency.
You must understand your patient demographics in order to anticipate their needs and the aim of your practice.
Examination rooms should be standardized to streamline access to materials and instruments while maximizing patient safety.
Standardization should be based on the types of practice (i.e., medical dermatology versus surgical dermatology) or implement a universal care model.
A central patient examination chair that adjusts and converts to a table allows for easy transfers and transitions from consultation to procedures with access from both sides.
Work stations should allow you to face the patient and seamlessly transition the screen for patient viewing.
Rooms should be well-stocked and have the most used materials most easily accessible.
All access points to patient should have easy disposal of sharps and trash.
Communication systems that enable nonverbal cues to staff speed up retrieval of needed supplies and preparation of patients.
Do not underestimate the importance of patient comfort and satisfaction in improving a streamlined visit.
5.1 Introduction
The objectives of a clinic visit are to assess, diagnose, and treat a patient, all of which occur within the confines of an examination room. Thus, the room layout has the potential to help you streamline each visit and fly through your day; conversely, it can hinder your progress, frustrating you, your staff, and your patients, and make your day seem to drag on forever. Creating a room design that is focused on physician efficiency without negotiating patient comfort will enable quick transitions, easy movements, increased productivity, and higher patient satisfaction.
5.2 Where Do I Start?
In order to design a well-organized room layout, it is important to have a full grasp on the demographics you anticipate treating as well as what you will be doing within your scope of practice. Start by asking yourself: How old are my patients? Do they have mobility issues? How often do family members accompany them? What type of procedures do I anticipate performing frequently (e.g., surgical, cosmetics, lasers, etc.)? Some of these questions may be difficult to answer, as you may not know what demographic you will attract until you are open and operational. However, you need to be prepared and ready to treat this population prior to starting, while giving yourself a buffer to accommodate any future expansion.
With most aspects of clinical medicine, there is a constant learning curve and progressive improvements can be made throughout your practice. In this chapter, we will break down the basic elements needed to design an efficient room layout suitable for the general dermatologist. Given the nature of dermatology practice, ranging from medical consultation to surgical procedure and encompassing all age ranges, we recommend using a “universal care” examination room model to avoid any need for lengthy transitions of patients within the clinic to specialized rooms or delays in compiling supplies within the same room for common procedures.
5.3 Elements of the Room Layout
5.3.1 Room Dynamics
The location and the building setup or whether you are designing your own space will contribute to determining room dynamics. However, most importantly, any aspect over which you do have control should be completely standardized. Standardization decreases your cognitive load, mental memory, and overall stress to enable a smoother workflow and more efficient visit. 1 It streamlines your visit, knowing what you have within your reach versus what you need your staff to bring you.
Recent literature debates over designing mirrored rooms (i.e., standardization across a shared wall) versus handedness rooms (i.e., all rooms are truly identical). A study in an acute medical-surgical setting found that there was no clear difference in the two setups, and an overall global view of the patient care environment upon entry is the most important factor to reduce cognitive load. 2
Some clinics are also implementing a two-door system. The overall idea is to increase patient privacy and improve flow of the visit, and it can be implemented in two different scenarios. In some cases, clinics are using separate entrances for physicians versus patients. An alternate option is to have patients enter through one door and exit through the other door, so that patients do not walk back through the waiting room to exit; further, it respects patient privacy postvisit. This approach may be especially useful for certain patients seeking the upmost privacy, such as cosmetics patients and/or in practices that often treat celebrities.
In addition, the size of rooms is an important consideration if you are designing your clinic space. Most physicians prefer at least a 10-foot by 10-foot examination room with an increase to 12-foot by 12-foot for procedure rooms. These sizes allow for easy flow in the room without feeling overcrowded if the patient, nurse, and physician need to be in the room at the same time. We recommend allocating more overall space to examination/procedure rooms than the waiting area to maximize your productivity. You likely need to only have approximately two to three waiting room chairs per examination room.
5.3.2 Exam Table
Upon entry into the room, the examination table should be visible with a clear path for the patient. The examination table is the classic symbol of a “doctor’s office” and its importance stems from the fact that it is the place where the key physician–patient exchange occurs and where all the three tasks of assessment, diagnosis, and treatment are carried out. Use this to your advantage by investing in an examination table that optimizes efficiency, comfort, and safety.
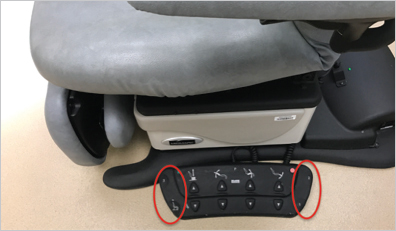
That being said, the classic examination table is no longer practical, can be inconvenient, and even dangerous for both staff and patients when attempting to get a patient onto the table. The best option is an examination chair that can be easily accessible by patients of all mobility statuses and quickly converted into a flat table through a remote control and/or a foot pedal to avoid any potential injury to staff manually adjusting the chair either. One source suggests the height of 17 to 19 inches for best patient access of elderly patients. 3 This should have access from both sides for patient ease, and for later ease of treatment and assessment of all patient sides. Foot pedals are convenient for midprocedure adjustments, so that neither the dermatologist nor the staff has to unglove and reglove (▶Fig. 5.1). Procedure chairs with some memory options (e.g., reclined position, flat table, or sitting position) help expedite proper positioning as well, instead of, for example, individually having to adjust the head, back, and legs. For dermatologists who prefer to sit while performing certain examinations/procedures, chairs that adjust height can also help with efficiency.
It is important to remember that the longer it takes a patient to get on and off an examination table, the more time it will take in reaching the goal toward maximum efficiency. Patient flow in the room depends on physicians’ personal preference; patients can be directed to the examination table immediately (and not any extra seating in the room) by the assistant rooming the patient to limit an extra step in the patient’s evaluation. The assistant should be able to easily access a gown in the room and direct the patient to change into it to help initiate the medical examination. However, some physicians prefer to first sit the patient on a chair beside the desk where the history can be taken and confirmed and a relationship can be established before the patient is seated on the chair for the full examination or procedure depending on the situation.
Friends or family often accompany patients to medical visits, so it is beneficial to have 1 to 2 extra chairs on the side of the examination room which are out of the way for the patients’ companions. Unless absolutely necessary, it is best if any companions beyond 1 to 2 people remain in the waiting room to prevent congestion in the patient’s room. The proximity of the patient to the physician should be the closest to establish that he or she is the focus of the appointment that day. In addition, seating in general should be able to accommodate patients of all sizes as at least 39% of American adults are obese. 4 Having a designated area for placement of assistive mobility devices, such as walkers and canes, out of the workflow path also helps accommodate elderly patients safely. Hooks on walls can also be helpful to have for patients’ clothes if they need to disrobe or even just for their coats.
Related posts:


Stay updated, free articles. Join our Telegram channel

Full access? Get Clinical Tree


