This article focuses on the history, pathoanatomy, clinical examination, management, and rehabilitation of superior labrum anterior to posterior (SLAP) tears in throwing athletes. Additionally, the authors have outlined how to identify and manage capsular injuries in throwing athletes. The study goes into detail about the different surgical options for SLAP lesions including the evolution of SLAP repairs and the role of biceps tenodesis in these patients.
Key points
- •
History of superior labrum anterior to posterior (SLAP) tears.
- •
Evaluation and Imaging of SLAP tears.
- •
Conservative management of SLAP tears.
- •
SLAP repair versus biceps tenodesis.
- •
Capsular injuries diagnosis and management.
Superior labrum anterior to posterior tears
Introduction
Superior labrum anterior to posterior (SLAP) tears are quite common among orthopedic patients. There are several subsets of patients prone to developing SLAP tears, which can be acute or chronic in nature. Chronic SLAP lesions are seen in manual laborers or overhead athletes and become more common through the aging process. In this article, the authors focus on overhead athletes. In 1985, Andrews and colleagues first described different superior labral pathologies. In 1990, Snyder and colleagues had developed a name and classification system for SLAP lesions. The initial Snyder classification system included 4 subsets of SLAP tears. In the 34 years since the initial classification by Snyder and colleagues, numerous authors including Morgan and colleagues and Maffet and colleagues have further subdivided SLAP tears into 10 distinct types.
- •
Type I lesion is characterized by fraying but with no frank tear of the articulating surface of the superior portion of the glenoid labrum and with an intact biceps tendon.
- •
Type II lesion (most common) consists of superior labral fraying with stripping of the superior part of the labrum and attached biceps tendon from the underlying glenoid.
- ○
IIa: anterior
- ▪
Best diagnosed with O’Brien and Speed tests
- ▪
- ○
IIb: posterior
- ▪
Best identified with Jobe’s relocation test
- ▪
- ○
IIc: combined anterior and posterior
- ○
- •
Type III lesion is a bucket-handle tear of the superior portion of the labrum with the central portion of the tear often displaced into the joint and the peripheral portion firmly attached to the glenoid. The biceps tendon and labral-biceps anchor extension are not involved in this type.
- •
Type IV lesion consists of a bucket-handle tear of the superior portion of the labrum similar to the type III lesion, but with the tear extending into the biceps tendon.
- •
Type V Bankart lesion with superior extension to include the biceps tendon and superior labrum.
- •
Type VI anterior or posterior flap tear in conjunction with separation of the biceps tendon superiorly.
- •
Type VII biceps tendon–superior labrum separation extending anteriorly to include the middle glenohumeral ligament
- •
Type VIII lesion is described as a superior labral tear with posterior extension that is similar to Morgan’s IIB lesion but more extensive.
- •
Type IX lesion was described as a complete or almost complete detachment of the entire labrum.
- •
Type X lesion was described as a tear of the superior labrum with extension to the rotator cuff interval
Etiology
As stated earlier, SLAP lesions can be broken down into acute or chronic/attritional injuries. For the purposes of this article, we will focus on the attritional injuries seen in overhead-throwing athletes. The most commonly agreed upon cause for attritional SLAP injuries in overhead athletes is the peel-back mechanism that the glenohumeral joint and surrounding soft tissue structures are exposed to during the late cocking phase of the throwing cycle. During the late cocking/early acceleration phase of throwing, the shoulder is placed in a position of abduction and hyper-external rotation. When the shoulder is in this position, the biceps anchor and superior labrum are being exposed not only to traction forces but also torsional forces due to the extreme external rotation. Combined with the natural posterior shift of the humeral head on the glenoid, the extreme external rotation required in throwing can lead to SLAP tears by delaminating the superior labrum from the underlying glenoid.
The peel-back mechanism is amplified in throwers who develop glenohumeral internal rotation deficit (GIRD). GIRD is the result of posterior capsular contraction leading to a decrease in glenohumeral internal rotation. This is commonly seen in overhead-throwing athletes who have not placed an emphasis on stretching or who performed excessive upper body weight training. GIRD leads to an increase in posterior translation of the humerus on the glenoid during late cocking, subsequently exacerbating the peel-back mechanism. In addition to increasing the peel-back mechanism, GIRD also causes impingement between the articular side of the rotator cuff with the posterior labrum causing further harm to the thrower’s superior labrum and possibly the undersurface of the rotator cuff.
Although the peel-back mechanism is considered by many to be the definitive cause of SLAP tears in throwers, other causes have been considered. Some clinicians believe that SLAP tears can be the result of significant traction on the biceps anchor during the deceleration phase of throwing, which is also the phase in which the rotator cuff sees the greatest forces. In all reality, it is likely a combination of both the peel back during the late cocking phase and traction during the deceleration phase of the throwing cycle.
Pathoanatomy
The glenoid labrum improves shoulder stability in 4 characteristic ways: (1) it acts as a bumper between the glenoid and the humeral head serving to limit the humeral head glide. (2) It increases the “concavity-compression” effect between the humeral head and the glenoid. (3) Most importantly for this article, it contributes to the stabilizing effect of the long head of the biceps anchor. (4) It increases the overall depth of the glenoid fossa.
The superior labrum biceps anchor complex demonstrates varying anatomy within patients. In 1994, Vangsness and colleagues described 4 distinct patterns of the labral–biceps complex categorized based on the biceps origin location in relation to the superior labrum and glenoid.
- •
Posterior, complete—22%
- •
Posterior, dominant—33%
- •
Equal (anterior and posterior)—37%
- •
Anterior, complete—8%
Tuoheti and colleagues reevaluated the findings by Vangsness and colleagues in 2005 and determined that the biceps anchor should be not only considered in its relation to the superior labrum/glenoid but also in relation to the glenohumeral ligament attachments to the labrum. There is now consensus regarding the updated classification by Tuoheti with posterior dominant patterns becoming the most frequent patterns observed.
- •
Posterior, complete—28%
- •
Posterior, dominant—56%
- •
Equal (anterior and posterior)—16%
- •
Anterior, complete—0%
There can be normal anatomic variants to the anterosuperior labrum, 3 of which are well described in the literature. These are the meniscoid subtype, the anterior–superior sublabral foramen, and the Buford complex.
In a minority of patients, the articular edge of the labrum is more prominent than usual and may protrude toward the center of the glenoid without any pathologic significance. The presence of this finding is termed a “meniscoid-type” superior labrum; this is a normal variant and should not be considered a significant pain generator. The presence of a meniscoid superior labrum may lead the clinician to diagnose a SLAP tear during MRI interpretation. A meniscoid-type superior labrum may tear in some athletes through repetitive overhead activity or a traumatic event, and if this occurs, it commonly evolves into a type III SLAP lesion.
Another frequently encountered anatomic variant is an anterior sublabral foramen. These lesions must not be confused with SLAP lesions. This variant usually exists just below the biceps anchor, between the 12 and 3 o’clock positions (in a right shoulder) on the glenoid rim, a depression or indentation in the glenoid is also concomitantly identified at this location with this labral variant. It can appear as if the labrum is detached from the underlying glenoid but there is no obvious lesion or trauma. This is a normal anatomic variant and has no role to play in glenohumeral instability or pain.
The third variant is the Buford complex. Williams and colleagues noted this variant in 1.5% of shoulders evaluated during arthroscopic examination. It was described as a cord-like middle glenohumeral ligament that blended with the anterior superior labrum with the absence of any anterior superior labrum from the 12 to the 3 o’clock position (in a right shoulder) on the glenoid. Again, this is a normal anatomic variant and does not play a role in glenohumeral instability or pain. If this variant is inadvertently repaired, the result could be catastrophic in an overhead-throwing athlete as it would lead to a critical loss of external rotation particularly in the mid ranges of shoulder abduction.
History and Physical
The clinician must be able to identify the common clinical presentations of SLAP lesions in the overhead athlete. Many athletes will complain of deep poorly localized shoulder pain, while others will describe pain in the anterior aspect of the shoulder. This anterior pain is clinically related to the long head of the biceps tendon within the bicipital groove. The athlete may also describe popping or catching that can be attributed to subluxation of the biceps tendon or impingement of the biceps anchor within the glenohumeral joint during internal rotation. Along with pain, a decrease in performance including decreased velocity and control is also often seen.
The complexity of the history and physical examination comes from the vast majority of throwers presenting with concomitant pathologies. Andrews and colleagues reported 45% of patients (and 73% of baseball pitchers) with SLAP tears had concomitant partial thickness tears of the supraspinatus portion of the rotator cuff. The throwers shoulder should be considered distinct from other populations when obtaining a history and physical examination due to these underlying conditions.
The physician must be cautious to rule out concomitant or alternative pathologies that could present in conjunction with or similar to a SLAP lesion. The physician should obtain a careful neurovascular examination to evaluate for cervical radiculopathy, myelopathy, or thoracic outlet syndrome among others. Once additional conditions have been appropriately evaluated and ruled out, the physician can begin a careful examination of the patient’s shoulder.
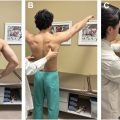
Many physicians agree that the evaluation of the throwing shoulder should begin with the patient’s nondominant extremity. This will allow the examiner to assess musculature, strength, and range of motion for comparison. Many throwers who have developed pain in the shoulder will have more than one concomitant pathology. Physicians should develop a routine for examining shoulders to ensure that all possible pathology is appropriately addressed. This article is on SLAP tears and capsular injuries, as such we will focus our attention on special tests for these pathologies.
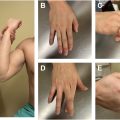
Special Tests for Superior Labrum Anterior to Posterior Lesions
- •
Compression rotation
- ○
Bring the shoulder into 90° of abduction with the elbow flexed to 90°. The examiner then applies a compression force through the humerus at the elbow and rotates the humerus via the wrist into repeated internal and external rotation in an attempt to trap the torn labrum.
- ○
SEN: 0.43 SPE: 0.89
- ○
- •
Yergason
- ○
Performed either seated or standing, with the humerus in a neutral position and the elbow in 90° of flexion and fully pronated position. The patients are asked to externally rotate and supinate their arm against the manual resistance of the physician produced by wrapping the hand around the distal forearm. If a “clicking” sensation familiar to the patient is produced during the test, this is positive for SLAP pathology.
- ○
SEN: 0.20 SPE: 0.92
- ○
- •
Anterior apprehension
- ○
Performed in the supine position. Flex the elbow to 90° and abduct the shoulder to 90°, while maintaining neutral shoulder rotation and the arm in the plane of the scapula. The examiner then slowly applies an external rotation force to the arm to 90° while carefully monitoring the patient. Patient apprehension from this maneuver, not pain, is considered a positive test.
- ○
SEN: 0.74 SPE: 0.45
- ○
- •
Crank
- ○
Performed either sitting or supine with the shoulder and elbow flexed to 90°, the physician stands adjacent to the affected extremity holding the elbow or forearm. An axial joint load is applied with one hand, while the other hand performs humeral rotation then the shoulder is being elevated in the scapular plane.
- ○
SEN: 0.46 SPE: 0.72
- ○
- •
Speeds
- ○
To perform the Speeds Test, begin with shoulder flexion, external rotation, full elbow extension, and forearm supination; manual resistance is then applied by the examiner in a downward direction. The test is considered to be positive if pain in the bicipital tendon or bicipital groove is reproduced.
- ○
SEN: 0.20 SPE: 0.88
- ○
- •
Jobe’s relocation
- ○
This is performed in a supine position. The elbow is flexed to 90° with the shoulder abducted to 90°. The physician then applies an external rotation force to the shoulder, this is the apprehension test. If this portion of the test is deemed to be positive, the physician should apply a posteriorly directed force to the shoulder; if the patient’s apprehension or pain is reduced in this position, the test is considered to be positive.
- ○
SEN: 0.61 SPE: 0.47
- ○
- •
O’Brien
- ○
The shoulder is flexed to 90° with the elbow fully extended and then adduct the arm 10° to 15° medial in the sagittal plane. The arm is then maximally internally rotated and the patient resists the examiner’s downward force. The procedure is repeated in supination. This test is positive if supination reduces or eliminates the patient’s pain.
- ○
SEN: 0.66 SPE: 0.36
- ○
- •
Bicipital groove tenderness
- ○
The physician identifies the patient’s bicipital groove on examination, the examiner then palpates the groove, and the test is positive if palpation elicits pain.
- ○
SEN: 0.26 SPE: 0.74
- ○
The examination maneuver with the highest sensitivity which can be utilized to rule out a SLAP tear if negative is the anterior apprehension test with a sensitivity of 0.74. The test with the highest specificity that can be used to rule in a SLAP tear is the Yergason test with a specificity of 0.92. Ideally there would be one test that is both highly sensitive and specific; however, this is rarely possible. The test that was found to have the highest odds ratio for diagnosing a SLAP tear was the compression rotation test that had an odds ratio of 6.36. On the whole, the physician must use a combination of physical examination maneuvers, special tests, and imaging to appropriately diagnose a SLAP tear.
Imaging Evaluation
Imaging evaluation of the shoulder begins with radiographs. When examining a thrower’s shoulder, it is best to perform a series of 4 shoulder radiographs including anterior to posterior (AP), Grashey, scapular Y, and axillary lateral. The goal of this series of images is to evaluate any underlying pathology that could be associated with, or present in conjunction with, the patient’s symptoms. This can include numerous pathologies from posttraumatic changes such as bony Bankart or Hill Sachs lesions, to chronic or adaptive changes such as glenoid retroversion, glenohumeral arthritis, Bennett’s lesions, or distal clavicle osteolysis. Once the clinician has evaluated the plain radiographs, the next step is to obtain an MRI.
Both MRI and MR arthrography (MRA) are common imaging studies to evaluate for SLAP tears. MRA allows for improved visualization of the superior labrum due to the addition of the intra-articular contrast medium. This can lead to overdiagnosis of clinically insignificant or asymptomatic SLAP tears. Positional changes during the MRI or MRA can also aid in diagnostic accuracy. By placing the patient’s arm in an abducted and externally rotated (ABER) position, the aforementioned peel-back phenomenon occurs and increases sensitivity in identifying SLAP tears.
Miniaci and colleagues evaluated shoulder MRI or MRAs in asymptomatic professional pitchers and demonstrated a 78% occurrence of labral abnormalities within this cohort. With a large percentage of asymptomatic throwers having labral abnormalities on MRI/MRA, the clinician must carefully consider symptom origin before proceeding with any intervention. Numerous studies have evaluated the rate of return to previous level of play following SLAP repair in pitchers, with return to previous level of play rates varying from 7% to 63%.
Conservative Management
The mainstay in treatment of SLAP lesions in the overhead-throwing athletes is conservative. Most patients will consistently improve with nonsurgical management including physical therapy, injections, anti-inflammatory medications, rest (including throwing restrictions), cryotherapy, and activity modifications.
Physical therapy for SLAP tears revolves around assessing underlying shoulder and scapulothoracic biomechanics. As discussed earlier, many patients with SLAP tears have concomitant shoulder pathology commonly including GIRD, scapulothoracic dyskinesia, or variations of sick scapula syndrome. Fedoriw and colleagues evaluated return to play (RTP) and return to previous level of play between conservative management and operative management of SLAP tears in professional pitchers. Those managed with conservative treatment had an RTP rate of 40%, and their return to previous play (RPP) rate was 22%. The RTP rate for those who underwent surgical intervention was 48%, and the RPP rate was 7%. SLAP tears present a poor prognosis for return to previous level of play with operative or nonoperative management, but there is over a 3 times greater likelihood of returning to previous level of play with conservative management based upon this study.
Surgical Management
The surgical management of SLAP tears can vary depending on the subtype of the tear. Many SLAP tears can be managed with simple debridement, most commonly these represent type I and III tear patterns. The debate regarding appropriate management comes in when discussing types II and IV. Historically type II and IV SLAP tears were managed with repair, which did not provide pitchers with acceptable RTP or RPP rates. As a result of the dismal RPP rates following SLAP repairs, recent trends in surgical management have shifted toward performing a debridement or biceps tenodesis in throwing athletes if all conservative efforts have failed to relieve symptoms.
Performing a SLAP repair was the mainstay of surgical treatment of throwing athletes for years following its initial description by Andrews and colleagues in 1985. Initially surgical management of SLAP tears involved the use of large, rigid metal anchors or absorbable devices that would leave the shoulder significantly over-constrained with large bony defects in the glenoid. The technology then transitioned to suture anchors that required tying knots which could be problematic if the knot was not meticulously tied away from the articular surface as many patients would notice catching and squeaking in their shoulder from the knot stack. Current strategies for labral repairs involve the use of entirely suture, knotless anchors that can be manually tensioned to the desired position. In addition to technological advances, the understanding of SLAP morphology is now significantly better. It is well understood at this point in time that pitchers and overhead throwers can have adaptive, good, SLAP tears or pathologic, bad, SLAP tears. The adaptive SLAP lesions are ones that are asymptomatic in nature and allow an overhead thrower to have greater labral mobility enabling improvements in shoulder abduction and external rotation. It is possible for a “good” SLAP to transform into a “bad” SLAP overtime, which can lead to shoulder translational and rotational microinstability as well as pain, and decreased throwing performance.
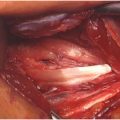
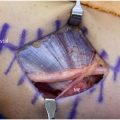
Management of SLAP tears currently involves arthroscopic examination using percutaneous techniques. The surgeon will evaluate the superior labrum using a probing device. Once it is determined that the SLAP tear is unstable and requires repair, the surgeon will use a shaver or rasp device to roughen up the superior aspect of the glenoid to create a bed of bleeding bone for the labrum to heal. Numerous portals can be utilized for repair, but commonly the Neviaser portal is created under direct visualization for anchor insertion and suture management. With increased understanding of the pathoanatomy of the superior labrum, surgeons are careful not to place anchors anterior to the origin of the long head of the biceps as this will greatly restrict glenohumeral motion. Despite advances in surgical technique and implant technology, Gilliam and colleagues found the RTP following SLAP repair in throwing athletes remains around 60%. Position players have higher RPP rates, 66%, compared to pitchers 43%.
Biceps tenodesis became an attractive option for many surgeons as it would alleviate stress on the superior labrum and would be a less constraining surgery in the throwing shoulder. The hope was that this would provide improved RPP rates compared to SLAP repair. Chalmers and colleagues evaluated professional baseball players who underwent biceps tenodesis for the management of SLAP tears and determined that the RPP rate for pitchers was only 17%, whereas for position players, it was 80%. Smith and colleagues demonstrated a 91% RTP rate with biceps tenodesis in pitchers; however, RPP was not reported and the most common complaints from pitchers returning to play were weakness and decreased velocity. Erickson and colleagues demonstrated an 86% RTP in professional baseball players; however, the RPP was around 50%. Ahmad and colleagues outlined indications for performing a biceps tenodesis in throwing athletes: (1) failed slap repair, (2) demand for accelerated recovery, (3) patients who demonstrate significant long head biceps pathology within the groove, and (4) patients who have incarceration of the biceps tendon between the glenoid and lesser tuberosity with internal rotation .
Postoperative recovery following a SLAP repair is rather prolonged; in most instances, a pitcher can expect to miss an entire year of play following this operation. Recovery following a biceps tenodesis ranges from 4 to 6 months allowing for an expedited RTP.
Rehabilitation
- 1.
Phase I—Immediate postoperative phase “restrictive motion” (day 1 to week 6)
Goals
Protect the anatomic repair
Prevent negative effects of immobilization
Promote dynamic stability
Diminish pain and inflammation
Weeks 0 to 2:
- •
Sling for 4 weeks
- •
Sleep in immobilizer for 4 weeks
- •
Elbow/hand range of motion (ROM)
- •
Hand gripping exercises
- •
Passive and gentle active assistive ROM exercise
- ○
Flexion to 60° (week 2: flexion to 75°)
- ○
Elevation in scapular plane to 60°
- ○
External and internal rotation (ER/IR) with arm in scapular plane
- ○
ER to 10 to 15°
- ○
IR to 45°
NO active ER or extension or abduction
- ○
- •
Submaximal isometrics for shoulder musculature
- •
NO isolated biceps contractions
- •
Cryotherapy, modalities as indicated
- •
Weeks 3 to 4:
- •
Discontinue use of sling at 4 weeks
- •
Sleep in immobilizer until week 4
- •
Continue gentle ROM exercises passive and active assisted range of motion (PROM and AAROM)
- ○
Flexion to 90°
- ○
Abduction to 75 to 85°
- ○
ER in scapular plane and 35° abd to 25 to 30°
- ○
IR in scapular plane and 35° abd to 55 to 60°
∗∗NOTE: Rate of progression based on evaluation of the patient.
- ○
- •
- •
No active ER, extension, or elevation
- •
Initiate rhythmic stabilization drills
- •
Initiate proprioception training
- •
Tubing ER/IR at 0° abduction
- •
Continue isometrics
- •
Continue use of cryotherapy
Weeks 5 to 6:
- •
Gradually improve ROM
- ○
Flexion to 145°
- ○
ER at 45° abduction: 45 to 50°
- ○
ER at 45° abduction: 55 to 60°
- ○
At 6 weeks begin light and gradual ER at 90 o abduction—progress to 30° to 40 o ER
- ○
- •
May initiate stretching exercises
- •
May initiate light (easy) ROM at 90° abduction
- •
Continue tubing ER/IR (arm at side)
- •
PNF manual resistance
- •
Initiate active shoulder abduction (without resistance)
- •
Initiate “full can” exercise (weight of arm)
- •
Initiate prone rowing, prone horizontal abduction
- •
No biceps strengthening
- •
- II.
Phase II—intermediate phase: moderate protection phase (weeks 7–14)
Goals
Gradually restore full ROM (week 10)
Preserve the integrity of the surgical repair
Restore muscular strength and balance
Weeks 7 to 9:
- •
Gradually progress ROM:
- ○
Flexion to 180°
- ○
ER at 90° abduction: 90 to 95°
- ○
IR at 90° abduction: 70 to 75°
- ○
- •
Continue to progress isotonic strengthening program
- •
Continue proprioceptive neuromuscular facilitation (PNF) strengthening
- •
Initiate Thrower’s Ten Program
- •
Weeks 10 to 12:
- •
May initiate slightly more aggressive strengthening
- •
Progress ER to Thrower’s Motion
- ○
ER at 90° abduction: 110 to 115 in throwers (weeks 10–12)
- ○
- •
Progress isotonic strengthening exercises
- •
Continue all stretching exercises
∗∗Progress ROM to functional demands (ie, overhead athlete)
- •
Continue all strengthening exercises
- •
- III.
Phase III—minimal protection phase (weeks 14–20)
Goals
Establish and maintain full ROM
Improve muscular strength, power, and endurance
Gradually initiate functional activities
Criteria to enter Phase III:
- 1.
Full non-painful ROM
- 2.
Satisfactory stability
- 3.
Muscular strength (good grade or better)
- 4.
No pain or tenderness
- 1.
Weeks 14 to 16:
- •
Continue all stretching exercises (capsular stretches)
- •
Maintain throwers motion (especially ER)
- •
Continue strengthening exercises:
- ○
Thrower’s Ten Program or fundamental exercises
- ○
PNF manual resistance
- ○
Endurance training
- ○
Initiate light plyometric program
- ○
Restricted sport activities (light swimming, half golf swings)
- ○
Weeks 16 to 20:
- •
Continue all exercises listed earlier
- •
Continue all stretching
- •
Continue Thrower’s Ten Program
- •
Continue Plyometric Program
- •
Initiate interval sport program (throwing, etc.)
∗∗See Interval Throwing Program
- •
- IV.
Phase IV—advanced strengthening phase (weeks 20–26)
Goals
Enhanced muscular strength, power, and endurance
Progress functional activities
Maintain shoulder mobility
Criteria to enter Phase IV:
- 1.
Full non-painful ROM
- 2.
Satisfactory static stability
- 3.
Muscular strength 75% to 80% of contralateral side
- 4.
No pain or tenderness
- 1.
Weeks 20 to 26:
- •
Continue flexibility exercises
- •
Continue isotonic strengthening program
- •
PNF manual resistance patterns
- •
Plyometric strengthening
- •
Progress interval sport programs
- •
- V.
Phase V—return to activity phase (Months 6–9)
Goals
Gradual return to sport activities
Maintain strength, mobility, and stability
Criteria to enter Phase V:
- 1.
Full functional ROM
- 2.
Muscular performance isokinetic (fulfills criteria)
- 3.
Satisfactory shoulder stability
- 4.
No pain or tenderness
- 1.
Exercises
- •
Gradually progress sport activities to unrestrictive participation
- •
Continue stretching and strengthening program
Summary
The thrower’s shoulder is a distinct entity, presenting unique challenges to the clinician. SLAP tears are commonly identified in the shoulders of overhead athletes. While SLAP tears are often seen, they are rarely symptomatic, more often considered an adaptive change due to the repetitive overhead motion. As such, we recommend performing a thorough examination on every thrower who presents for examination to rule out any other potential causes for the pain or dysfunction. Commonly there will be concomitant pathology of the shoulder that could include GIRD, dynamic instability, or scapular dyskinesia, which would be appropriately managed with exhaustive conservative efforts prior to undertaking any surgical procedure. Only when the patient has failed extensive conservative treatment, should surgery be considered. If surgical intervention is required, the approach should be to remain as minimally invasive as possible while trying to preserve the native anatomy as much as possible.
Anterior capsular injuries
Introduction/Etiology
Capsular injuries in the throwing athletes are rare but debilitating injuries. These can be chronic, attritional capsular disruptions, or traumatic disruptions. Due to the infrequent nature of this injury, there is little in the literature regarding evaluation and management. Chronic tears present overtime with patients complaining primarily of decreased ball control and velocity with associated anterior shoulder pain. Acute tears present with a palpable or audible popping or snapping sensation that occurs during late cocking/early acceleration phase of the throwing cycle. The thrower will be incapacitated in most cases following acute injury and will be unable to continue throwing. Despite the paucity of literature on capsular injuries, they make up roughly 10% of the shoulder surgeries performed on professional pitchers.
Pathoanatomy
The anterior capsule of the shoulder provides significant dynamic restraint to the glenohumeral joint, more specifically the glenohumeral ligaments. There are 3 anterior ligaments: the superior, middle, and anterior inferior glenohumeral ligaments. Each one provides stability to the glenohumeral joint in a specific orientation; the superior glenohumeral ligament provides the most restraint with the shoulder fully adducted, the middle glenohumeral ligament provides restraint with the shoulder in 45° of abduction, and most importantly for the throwing athletes, the anterior–inferior glenohumeral ligament provides restraint to the glenohumeral joint when the arm is positioned in 90° of abduction with additional tensioning of the ligament with glenohumeral external rotation. The capsular disruptions seen in throwers tend to be intrasubstance tears extending through the anterior band of the inferior glenohumeral ligament and the middle glenohumeral ligament.
History and Physical
Similar to SLAP tears, most throwers with chronic capsular injuries will describe a deep anterior shoulder pain associated with decreases in both velocity and control. Acute tears are described as a traumatic popping or tearing sensation occurring while throwing after which the athlete cannot continue.
The physical examination of the shoulder should begin again with inspection, palpation, and range of motion testing. Once the generalized examination is complete, the physician can focus their examination on specific provocative tests focused on identifying underlying pathology. The examination maneuvers or provocative tests for capsular injuries are the same tests used to identify patients who have anterior shoulder instability due to the overlapping nature of the pathologies. Specialized examination maneuvers for anterior capsular injuries are as follows:
- •
Anterior load and shift
- ○
Performed in the supine position. The physician stabilizes the scapula with one hand, while the other hand is placed across the glenohumeral joint. With the arm in the scapular plane, the physician applies a “load and shift” of the humeral head across the stabilized scapula in an anteromedial direction to assess stability. Normal motion anteriorly is half of the distance of the humeral head; increased movement is considered to be a sign of glenohumeral joint laxity.
- ○
- •
Anterior apprehension test
- ○
Performed in the supine position, with the elbow flexed to 90° and the shoulder abducted to 90° with the arm in the scapular plane. The physician begins by applying an external rotation force to the shoulder; if the patient reports apprehension, the test is considered to be positive.
- ○
- •
Jobe relocation test
- ○
This test is performed in conjunction with a positive apprehension test. Once the patient demonstrates positivity to anterior apprehension, the physician applies a posteriorly directed force to the glenohumeral joint/humeral head. If the patient’s apprehension is reduced, the Jobe relocation test is considered positive.
- ○
- •
Anterior release or surprise test
- ○
This test is also used in conjunction with a positive result during the apprehension test that was reduced during the Jobe relocation test. The “surprise” receives its name from the spontaneous release of the anterior–to-posterior directed pressure on the glenohumeral joint. A positive finding is re-elicitation of apprehension during the release.
- ○
- •
Anterior drawer test
- ○
Performed in the supine position. The arm is positioned in between 80° and 120° of abduction with roughly 20° of forward flexion and 30° of external rotation. The physician stabilizes the scapula with one hand while shifting the humerus anteriorly using the other. A positive test is determined by increased anterior translation compared to the contralateral extremity.
- ▪
Grade 0: Little or no shift of the humeral head.
- ▪
Grade I: Humeral head reaches glenoid rim.
- ▪
Grade II: Humeral head can be subluxated but spontaneously reduces.
- ▪
Grade III: Humeral head is frankly dislocated and must be manually reduced.
- ▪
- ○
- •
Hyperabduction test
- ○
This test can be performed either supine or seated. Passively abduct the shoulder while stabilizing the scapula to prevent any additional abduction through scapulothoracic motion. If the glenohumeral joint is able to abduct greater than 105°, the test is considered positive and indicates disruption of the inferior glenohumeral ligament. ,
- ○
Imaging Evaluation
Evaluation of the throwers shoulder should begin with plain radiographs. This involves 4 specific views to rule out concomitant pathologies; these include AP, Grashey, scapular Y, and axillary lateral. Once additional pathology has been excluded, the next step in evaluation would be to obtain an MRA. As compared to patients with SLAP lesions where the diagnosis can be confirmed with a high level of accuracy with or without arthrogram, capsular disruptions are difficult to identify without an arthrogram. In patients with capsular disruptions, the MRA will demonstrate extravasation of dye into the anterior soft tissues or down the axillary pouch. With the exception of iatrogenic dye injection into the superficial tissues, visualization of dye in the anterior shoulder or axilla is pathognomonic for a capsular injury.
Management
Most conditions in the throwing shoulder should be managed with an extensive course of conservative management due to the variability regarding RTP following surgical management. Capsular injuries in throwing athletes, on the other hand, should be managed with either arthroscopic or open capsular repair as there is an extremely low propensity for healing with conservative management. Gulotta and colleagues evaluated pitchers with capsular injuries managed with either arthroscopic or open capsular repair and demonstrated an 80% RTP rate at an average of 13 months.
Rehabilitation
The rehabilitation following anterior capsular repair is nearly identical to an anterior Bankart rehabilitation protocol. Patients will be immobilized in a sling for 4 weeks, during that time the therapists will focus on passive range of motion and will limit abduction and external rotation of the glenohumeral joint.
- 1.
Phase I—Immediate Postoperative Phase “Restrictive Motion” (weeks 0–6)
Goals
Protect the anatomic repair
Prevent negative effects of immobilization
Promote dynamic stability and proprioception
Diminish pain and inflammation
Weeks 0 to 2
- •
Sling for 4 weeks for daily activities
- •
Sleep in immobilizer for 4 weeks
- •
Elbow/hand ROM
- •
Hand gripping exercises
- •
Passive and gentle active assistive ROM exercise
- ○
Flexion to 70° week 1
- ○
Flexion to 90° week 2
- ○
ER/IR with arm 30° abduction
- ▪
ER to 5 to 10°
- ▪
IR to 45°
∗∗No active ER or extension or abduction
- ▪
- ○
- •
Submaximal isometrics for shoulder musculature
- •
Rhythmic stabilization drills ER/IR
- •
Proprioception drills
- •
Cryotherapy, modalities as indicated
Weeks 3 to 4
- •
Discontinue use of sling at week 4
- •
Use immobilizer for sleep, ∗∗ to be discontinued at 4 weeks unless otherwise directed by physician
- •
Continue gentle ROM exercises (PROM and AAROM)
- ○
Flexion to 125° at end of week 3
- ○
Flexion to 145° at end of week 4
- ○
ER/IR at 45° abduction in scapular plane
- ○
ER in scapular plane to 30 to 35°
- ○
IR in scapular plane to 55°
∗∗NOTE: Rate of progression based on evaluation of the patient
- ○
- •
No excessive ER, extension, or elevation
- •
Continue isometrics and rhythmic stabilization (submaximal)
- •
Initiate ER/IR tubing at 0° of abduction
- •
Initiate prone scapular exercises
- •
Core stabilization program
- •
Initiate scapular strengthening program
- •
Continue use of cryotherapy
- •
Weeks 5 to 6
- •
Gradually improve ROM
- ○
Flexion to 160° week 5 to 6
- ○
ER/IR at 45° abduction during week 5
- ○
ER/IR at 90° abduction during week 6
- ○
- •
May initiate stretching exercises
- •
Initiate Thrower’s Ten Program
- •
Scapular strengthening
- II.
Phase II—Intermediate Phase: Moderate Protection Phase (weeks 7–14)
Goals
Gradually restore full ROM (week 10)
Preserve the integrity of the surgical repair
Restore muscular strength and balance
Enhance neuromuscular control
Weeks 7 to 9
- •
Gradually progress ROM
- ○
Flexion to 180°
- ○
ER at 90° abduction: 70 to 80° at week 7
- ○
ER to 90° at week 8 to 9
- ○
IR at 90° abduction: 60 to 65°
- ○
- •
Continue to progress isotonic strengthening program (Thrower’s Ten Program)
- •
Continue PNF strengthening
Weeks 10 to 14
- •
ER at 90° of abduction to 105° at week 10
- •
ER at 90° of abduction to 115° at week 12
- •
May initiate slightly more aggressive strengthening
- •
Progress isotonic strengthening exercises
- •
Continue all stretching exercises
∗∗Progress ROM to functional demands (ie, overhead athlete)
- •
Progress to isotonic strengthening (light and restricted ROM)
- •
Two hand plyometrics at weeks 10 to 12
- •
One hand plyometrics at weeks 14 to 15 (light ball)
- •
Initiate hitting program
- •
- III.
Phase III—Minimal Protection Phase (weeks 15–20)
Goals
Maintain full ROM
Improve muscular strength, power, and endurance
Gradually initiate functional activities
Initiate Interval Throwing Program
Criteria to enter Phase III
- 1.
Full non-painful ROM
- 2.
Satisfactory stability
- 3.
Muscular strength (good grade or better)
- 4.
No pain or tenderness
- 1.
Weeks 15 to 18
- •
Continue all stretching exercises (capsular stretches)
- •
Continue strengthening exercises:
- ○
Thrower’s Ten Program or fundamental exercises
- ○
PNF manual resistance
- ○
Endurance training
- ○
Restricted sport activities (light swimming, half golf swings)
- ○
- •
- •
Initiate interval throwing program weeks 16 to 18 (long toss program)
Weeks 18 to 20
- •
Continue all exercises listed earlier
- •
Process interval sport program (throwing, etc.)
- •
- IV.
Phase IV—Advanced Strengthening Phase (week 21–24)
Goals
Enhance muscular strength, power, and endurance
Progress functional activities
Maintain shoulder mobility
Criteria to enter Phase IV
- 1.
Full non-painful ROM
- 2.
Satisfactory static stability
- 3.
Muscular strength 75% to 80% of contralateral side
- 4.
No pain or tenderness
- 1.
Weeks 21 to 24
- •
Continue flexibility exercises
- •
Continue isotonic strengthening program
- •
Neuromuscular control drills
- •
Plyometric strengthening
- •
Progress interval sport programs
- •
Progress to off the mound throwing at week 22 to 24
- •
- V.
Phase V—Return to Activity Phase (months 7–9)
Goals
Gradual return to sport activities
Maintain strength, mobility, and stability
Criteria to enter Phase V
- 1.
Full functional ROM
- 2.
Satisfactory isokinetic test that fulfills criteria
- 3.
Satisfactory shoulder stability
- 4.
No pain or tenderness
- 1.
Exercises
- •
Gradually progress sport activities to unrestrictive participation
- •
Continue stretching and strengthening program
Clinics care points
- •
SLAP tears are commonly seen in throwing shoulders and are often asymptomatic.
- •
Carefully consider the causes of patients’ symptoms rather than attributing them to a SLAP tear just because it is obvious on imaging studies.
- •
Conservative management must be the mainstay of care for all overhead-throwing athletes.
- •
SLAP repairs can provide good outcomes but return to sport, especially in pitchers, is not perfect, and as such, surgical intervention must be approached cautiously.
- •
There is a role for biceps tenodesis in SLAP management; patients presenting with primarily biceps symptoms do well with a good return to sport rates.
- •
Capsular injuries must be managed operatively; there is little-to-no role for conservative management.
Related posts:

Stay updated, free articles. Join our Telegram channel

Full access? Get Clinical Tree


