Revising the Unsatisfactory Breast Augmentation


Revising the Unsatisfactory Breast Augmentation


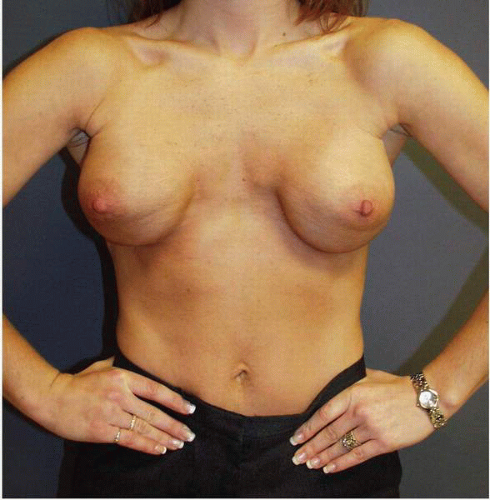
Breast augmentation is a very popular procedure with a high degree of patient satisfaction.1 Over the past 4 decades many types of implants have been used to increase the fullness of the female breast, with the majority of these procedures involving the placement of a silicone gel implant.2 Concerns about safety issues regarding the silicone gel breast implant led the U.S. Food and Drug Administration (FDA) to impose restrictions of their use for routine breast augmentation in the United States in 1992.3 This prompted an immediate shift to saline-filled implants for breast augmentation in the United States. Subsequent scientific evaluations4, 5, 6 and 7 of the published literature on the silicone gel breast implant exonerated this implant from any connection with disease production in humans.

The most common inherent risk or unwanted side effect of all implants is that of capsular contracture,2,4, 5, 6, 7, 8 and 9 which is an exaggerated form of the foreign body reaction10 whenever a foreign substance is implanted in, gains access to, or is accidentally introduced into the human body. It is important to realize that this is an inherent risk (not a complication) of every breast implantation procedure (both breast augmentation and breast reconstruction). The next most common inherent risk for patients who have undergone breast augmentation is the need to undergo additional surgery to treat a problem with an implant.7

Revisional surgery following breast augmentation occurs for a variety of reasons. These reasons relate to technical aspects of the previous surgery, the implant itself, or the response of the body to the implant. In addition, some breast augmentation patients request revision for cosmetic issues such as inadequate size (change to a larger implant); breast asymmetry; implant malposition; implant palpability; and wrinkles, ripples, or folds seen in the breast tissue and the skin overlying the implant. The complications following breast augmentation are almost exclusively local, i.e., they are confined to the breast itself.7

Revision surgery following the previous placement of a breast implant can be very challenging. This is due to the effects of the previous surgery or the implant itself in the form of tissue atrophy, scars in the skin and periprosthetic capsular region, and decreased blood supply to the breast parenchyma and nipple areolar complex (NAC), especially when the implant was placed in the subglandular space. For these reasons I believe that reoperative surgery following a previous breast augmentation carries a higher risk of complications and patient disappointment than does the primary augmentation procedure.

Because of this the plastic surgeon reoperating on a patient following a previous breast augmentation must spend the time necessary to communicate with the patient regarding the goals, risks, and possible complications of the surgery (Chapter 1, Appendix A). As outlined in Chapter 1, I find it helpful to review the potential benefits and limitations of the likely problems with the procedure with both the patient and a significant other—either a friend, relative, spouse, or significant other. This additional person is more likely to hear the scope of potential adverse outcomes following such surgery and be able to support the patient should a complication arise.

From the plastic surgeon’s perspective, careful analysis and planning are essential for producing a good outcome with the greatest chance for longevity in the setting of reoperation following a previous breast augmentation.


THE SCOPE OF REOPERATIVE SURGERY FOLLOWING BREAST AUGMENTATION

The incidence of reoperative surgery following the placement of an implant, for either breast reconstruction or breast augmentation, is significant. This has been documented by numerous published studies.11, 12, 13, 14, 15, 16 and 17 The reoperation rate at 5 years for breast augmentation—documented by Gabriel et al.7 in a study of 1,800 patients at the Mayo Clinic—was 12% at a 5-year follow-up, while 34% of patients who underwent implant placement for breast reconstruction required reoperation during that same time period. Additional studies have found reoperation rates of 15% to 20% following silicone gel breast augmentation.12,13 At the height of the concern about safety issues regarding breast implants in the early 1990s (popularly termed the “breast implant crisis”),3 this rate was even higher because of the number of women requesting removal of their implants.

After April of 1992 plastic surgeons in the United States were confined to the exclusive use of saline implants for primary breast augmentation.3 Data relating to this experience were collected by various authors and the implant manufacturers.13, 14, 15, 16 and 17 Once again, when one surveys the incidence of reoperation in this group of patients, the risk during the first 3 to 5 years is high. The Mentor Corporation,16 in a prospective premarket approval study, reported an incidence of reoperation in 13% during the first 3 years following saline implant breast augmentation. Similarly the McGhan Corporation in its study (AR95)17 reflected a 21% risk of reoperation at 3 years. A benchmark prospective, longitudinal study of saline breast implants published14 and updated15 demonstrates a 26% incidence of reoperative surgery within 5 years of saline implant placement for breast augmentation.

Additional studies, including that of Young et al.,13 disclose a high rate of reoperation in the form of explantation (24%) within 7 years of breast augmentation surgery, with many patients requiring more than one explantation. The most common reasons cited for explantation in these studies include capsular contracture, rupture or deflation, asymmetry, inadequate size, and patient request for implant change.13

A new source of data on the outcome of saline breast implant placement is the Saline Breast Implant Registry (NaBIR), which was begun in 2000,18 largely through the efforts of Dr. V. Leroy Young in conjunction with the Plastic Surgery Educational Foundation. It is a confidential registry of data submitted by plastic surgeons on saline implant placement for either breast augmentation or reconstruction that allows prospective tracking and comparison of results in an identifiable cohort of patients. The data compiled thus far again indicate that the reoperation rate for explantation is significant (15.4%) within the first 4 years following surgery.

From the foregoing studies it is apparent that reoperation following a previous breast augmentation is common. Furthermore, it is my opinion that the revision rate is too high for an elective cosmetic surgery procedure.

A significant portion of these reoperations are attributable to implant-related factors and therefore they are probably not preventable with the implants that are currently available for use. However, problems leading to early revisions (e.g., those due to size change and operations done to treat implant malposition and some asymmetries) are most likely due to inadequate preoperative communication with the patient, improper analysis of patient anatomic features, and incomplete preoperative planning and/or errors in surgical technique. I am firmly convinced that the rate of reoperation for the conditions just mentioned can be reduced by better preoperative planning and more consistent technical performance of the operation. Said another way, it seems apparent to me that such problems are best addressed by prevention. This view is shared by other authors as well.19,20

Toward this goal, I have adopted a methodical approach to the evaluation of the prospective patient seeking breast augmentation. This includes taking a careful history with an emphasis on size concerns and conducting a thorough physical examination with an anatomic and aesthetic analysis, which results in an individualized surgical plan for implant selection and the surgical approach. The procedure is performed with an awareness of the patient’s particular anatomy using mainly the electrocautery with minimal gentle blunt dissection of the lateral pocket as described. The goal is to achieve precise pocket dissection that will fit the chosen implant. This approach has been successful in my hands from the standpoint of decreasing the incidence of short-term problems related to doctor-patient communication (implant selection), inadequate planning, and technical errors. The details of this approach are described in the following section. Subsequently, my approach to revision of breast augmentation is discussed.


AN APPROACH TO PRIMARY BREAST AUGMENTATION—PATIENT EVALUATION AND DECISION MAKING

As in all of medicine, the interaction with the patient begins with a careful history and physical examination. This also applies when approaching the prospective breast augmentation patient. Careful attention must be paid to the patient’s chief complaint or desires regarding the operation, her anatomic features, and her breast development. The latter is investigated regarding whether the breast development has been symmetric. The patient’s personal history of breast problems, e.g., pain, menstrualcycle-related breast variations, and history of breast
masses, with any family history of breast cancer, is thoroughly investigated.
It is important to inquire about any lumps or masses that the patient may have had in either breast during the course of her lifetime and what the treatment of these was. Specifically, it is important to determine exactly what the diagnosis was and how it was resolved. In patients who are older than 35 years of age the physician must inquire about whether the patient has had a mammogram, and if so the results of the study must be known. I find it helpful to personally review these mammograms—often with the help of a radiologist. If the patient has not had a mammogram by this age, one should be ordered.

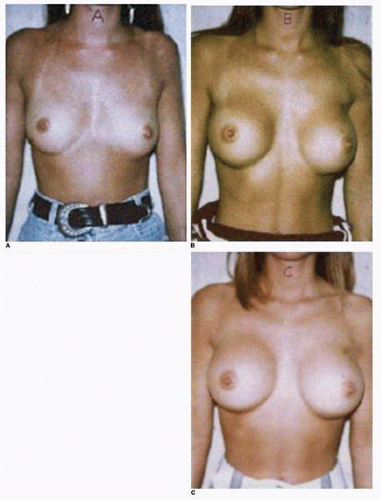
It is very important for the physician to understand, in as much as is possible, the patient’s desires relating to breast size. If a patient has been pregnant, I find it helpful to ask how large the breasts became during pregnancy and whether the patient was comfortable with or enjoyed the size of her breasts during her pregnancy. To help me better understand the patient’s desire for size and appearance of the breast following surgery, I prefer to have the patient bring in pictures of normal patients (not models) with similar body types who have an appearance that they find attractive and desirable. This gives me an insight into the look that the patient is after. Such photos are available on a variety of websites (Fig. 3-1).

Similarly, in the setting of a previous pregnancy, it is important to inquire about the changes in the breast following such pregnancies. Many patients are bothered by the loss of volume and the change in shape that has occurred. Carefully noting the patient’s opinion regarding breast settling or ptosis is important, and when appropriate, suggestions regarding breast ptosis correction in conjunction with breast augmentation should be made. I am increasingly performing a mastopexy in conjunction with an augmentation in this population of patients, especially as part of a revision procedure. If the plan entails a mastopexy, I believe that it is critical to discuss the position of scars, the fact that they will be permanent, and the fact that recurrent breast ptosis is part of the picture with every mastopexy—including augmentation mastopexy. I find that this operation carries a higher risk of complications than either of these procedures performed separately.

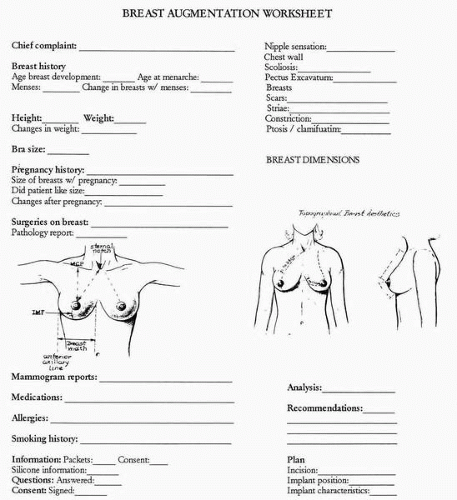
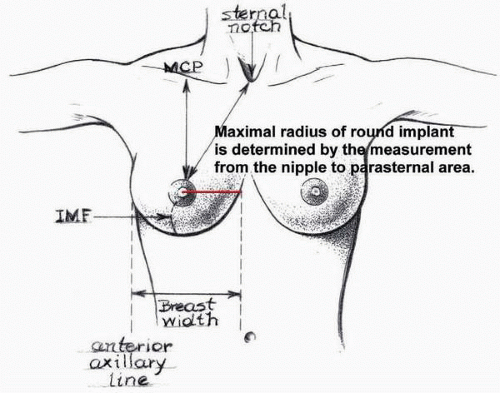
Systematic examination of the breast is carried out as described in Chapter 2. The surgeon should note the general appearance of the breasts, scanning them for symmetry in terms of contour, fullness, nipple areola position, and the position of the breast relative to chest wall structures. Both obvious and subtle asymmetries are noted. As alluded to previously, I find it helpful to measure the dimensions of the breast, including the base width, height (the extent of upper pole fullness when the breast is gently compressed against the chest wall), and various distances of the breast architectural features from a fixed point on the torso. Most often I find it helpful to measure the distance from the nipple to the suprasternal notch (SSN) on each side, followed by the distance of nipple to the inframammary (IM) fold in the midmeridian of the breast and also the distance from the inferior aspect of the NAC to the IM fold. I record all these measurements on a breast diagram or a worksheet I use for breast augmentation in the patient’s chart (Fig. 3-2).

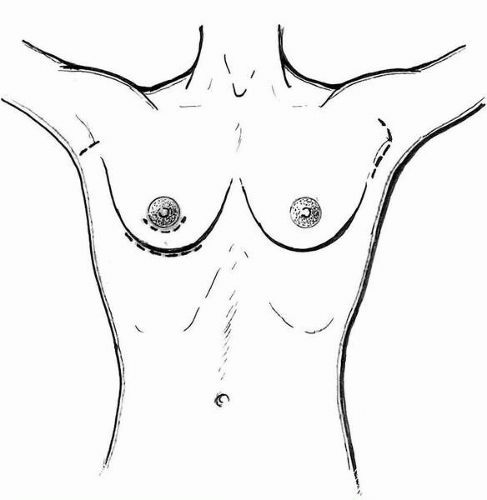
After performing a complete and systematic examination, I discuss with the patient the potential incisional and implant position options. The incisional approaches I use are the IM (60%), transaxillary (30%), and periareolar (10%) (Fig. 3-3). All of these incisional approaches can work well in the appropriate situation and usually leave inconspicuous scars. Patients often have a preference for which scar position they would like, and it is usually possible to accommodate their wishes. Exceptions would be grade II or greater ptosis in a patient who desires a transaxillary breast augmentation.


CHOOSING AN IMPLANT

The choice of implant is patient specific. Most patients who undergo breast augmentation in the United States seek a breast volume increase of two cup sizes.1 Concepts about breast attractiveness relative to size are different in different cultures, with women in Europe21 and South America21 in general desiring less breast volume enhancement from a breast augmentation. I try to listen very intently to every idea and intention a particular patient has about her perceived postoperative size. I have come to understand that what patients want and find desirable is often very different than what the plastic surgeon considers to be an aesthetically desirable result. As previously mentioned, reviewing photographs brought in by the patient can yield an important insight into a particular patient’s desires and expectations for both volume and shape following breast augmentation.

Preoperative planning and implant selection depend to a significant degree on patient anatomic factors including breast dimensions, torso dimension, degree of ptosis, preexisting asymmetry(ies), and tissue quality, including elasticity, thickness, and ability to stretch.20 In my practice implant selection is governed mostly by anatomic surface relationships, and I key into breast and torso dimensions. The most important is the base width (Fig. 3-2) of the breast, or the distance from the area immediately lateral to the lateral edge of the sternum to the lateral silhouette of the breast. This distance determines the largest base width of the implant that can be placed, especially if a round implant is selected. The center of a round implant should be positioned beneath the nipple. If the implant has too great a diameter (is too large dimensionally), then the breast will elongate vertically or produce an abnormal horizontal contour. A helpful rule of thumb is that when using a round implant the largest radius that should be used is equal to the distance from the nipple to the ipsilateral parasternal take-off of the breast (Fig. 3-4). This is because the tissues between the nipple and the parasternal area are fixed. The height of the implant is also important, but because the IM fold is often lowered the accommodative height can vary. The distance from the nipple to the lateral silhouette of the breast on anteroposterior (AP) view is also variable due to the distensibility of those tissues. Therefore, the horizontal distance from the nipple to the parasternal region represents the greatest implant radius that should be selected when a round implant is used. I will generally choose an implant that is smaller in dimension than this distance.


FIGURE 3-1. Example of downloaded photographs from a website illustrating, A, preoperative appearance of the breasts in an augmentation patient. B, The smaller breast implant and, C, larger breast implant in the same patient.


FIGURE 3-2. Worksheet illustrating topographical relationships of the breast to the chest wall. Note relationship of suprasternal notch (SSN) to nipple and nipple to IM fold. Also note distance from the lower areola to the IM fold.


FIGURE 3-3. Incisional approaches I use for breast augmentation.


FIGURE 3-4. Measurement of nipple to parasternal area yields maximum possible radius if a round implant is selected.

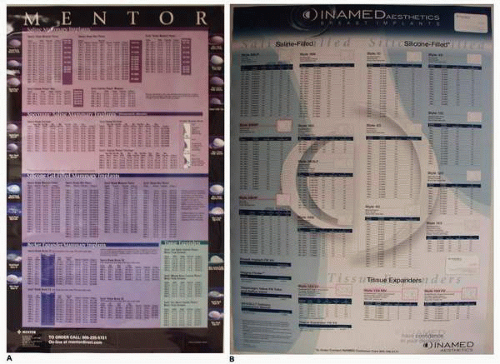
The distance from the midclavicular point to the nipple and the distance from the SSN to the nipple are also important dimensions, and they are recorded on the preoperative worksheet (see Fig. 3-2). After carefully recording these dimensions, I consult various implant charts provided by the manufacturers to select an implant that will best satisfy the patient’s desires and fit her anatomy (Fig. 3-5A-B).

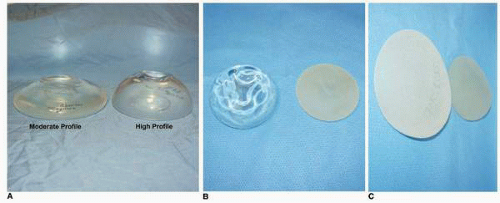
If there are other anatomic considerations, such as petite or small stature or narrow torso, it is often desirable to select an implant with more volume for a given base dimension. In such a patient a high-profile implant (one with greater projection and volume for a given base diameter) may be helpful (Fig. 3-6A,B). Such implants are very helpful in patients who place a premium on a large volume in the face of smaller breast and torso dimensions. Alternatively, a shaped textured implant can be used. These implants are designed with variable heights and volumes for a given base width, and they give the illusion of greater projection and volume for a given base diameter dimension (Fig. 3-6C). I use a shaped implant with a relatively short vertical dimension in patients of small stature who desire a very full breast.22 Conversely, I have found that shaped implants that have a long vertical dimension may be helpful in the very tall patient (greater than 6 feet in height) who require tapered upper pole fullness as part of their augmentation.

Although most plastic surgeons acquire the majority of their individual experience with a certain style or type of implant (I prefer a smooth round implant for most patients seeking breast augmentation), the surgeon must have experience with and facility using various types of implants. This permits using the most individualized approach with each patient.


IMPLANT POSITION

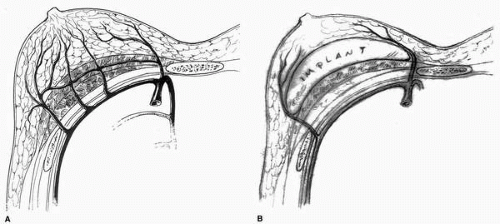
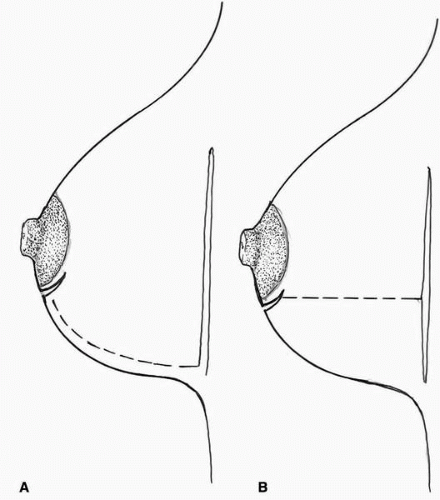
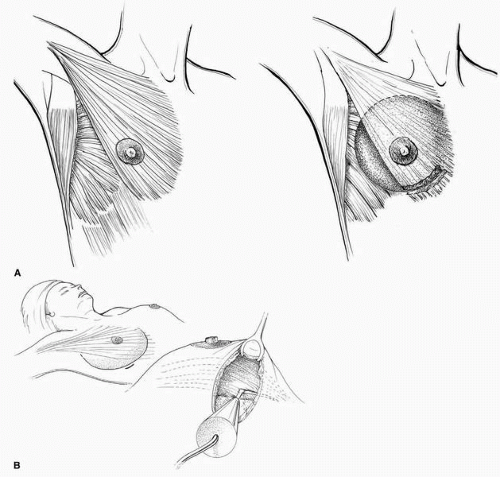
The two alternatives for implant position are either the subglandular or the submuscular space (Fig. 3-7A-B). The choice, again, depends on the patient’s anatomy, surgeon analysis, and a combination of patient and surgeon preference. Placing the implant in the subglandular space simplifies the procedure in terms of the dissection, is associated with less postoperative discomfort, and generally results in a quicker recovery.23 This position for the implant is especially good for patients who have glandular, grade I, and some mild forms of grade II mammary ptosis. For the surgeon to use this position, the patient must have sufficient upper pole breast tissue to cover or camouflage the edges of the implant. I determine the adequacy of the tissue in the upper part of the breast by using the pinch test as described by Tebbetts.22 I too believe that there should be at least 2.5 cm of tissue in the upper pole of the breast to adequately conceal a subglandular implant (Fig. 3-8). If there is not, it is best to use the subpectoral position for implant placement—especially if a saline implant is selected because this type of implant has a definite predilection for visibility and palpability. The major disadvantages of the subglandular position of an implant are that there is an increased risk of capsular contracture24,25 and that mammograms are less sensitive,26 i.e., more of the breast tissue is hidden. Finally, the dissection to place an implant in the subglandular space results in greater decrease in the blood supply to the remaining breast parenchyma with the division of many perforating vessels from the pectoralis major muscle (PMM; Fig. 3-9A,B).


FIGURE 3-5. Charts for surface dimensions and volume of various implants manufactured by the Mentor (A) and the McGhan Corporation (B).


FIGURE 3-6. A, Standard profile and similar volume high-profile implant. There are important differences in volume and projection for a given base dimension. These dimensional and volume differences often play a significant role in revision of a previous breast augmentation. B, Implants have either a smooth or textured (right image) surface. C, Shaped textured implants available as saline or silicone devices.


FIGURE 3-7. A-B, Breast implants can be positioned in the subglandular or submuscular position. Implants in the submuscular space are covered by muscle in only their upper 70%. The lower 30% sits behind the breast gland or in the subcutaneous position.

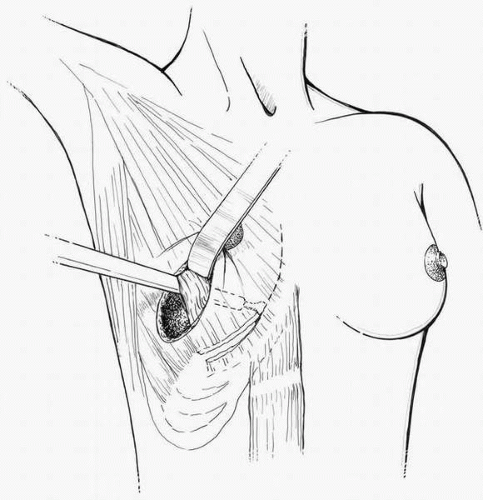
In this era of saline implants, by far the most common position is the submuscular or, more precisely stated, a partial retropectoral position for the implants (see Fig. 3-7B). This is because such positioning will maximally camouflage any type of irregularity related to the implant edge or changes in implant shape related to the distribution of the sterile saline filler substance within the implant. In addition, subpectoral placement is associated with a decreased incidence of capsular contracture regardless of implant type.24 Finally, the subpectoral position affords the best possible breast surveillance in terms of postoperative mammograms.26 This may be an important consideration for many patients, and increasingly I find it to be a particular advantage. The dissection is a little more technically demanding, and it most often involves the release of the origin of the PMM from the fifth and sixth ribs (Fig. 3-10). After the release of this portion of the muscle, the inferior aspect of the breast implant sits beneath the lower pole of the breast, or even beneath the subcutaneous tissue in those patients who have a lowering of their previous IM fold. There is also more postoperative discomfort associated with this approach than that seen following subglandular placement of a breast implant.


FIGURE 3-8. Pinching upper pole of the breast parenchyma is an accurate way of estimating the thickness of the breast tissue in that region.


FIGURE 3-9. A, Blood supply to the breast parenchyma is derived from various sources. B, Subglandular implant placement results in a substantial decrease in the blood supply to the breast parenchyma and NAC.


FIGURE 3-10. Release of part of the origin of the PMM from the fifth and sixth ribs in the lower aspect of the breast.


SELECTION OF INCISION

In my current practice the incisions I offer to patients are the inframammary (IM), infra-areolar, and axillary. I currently do not perform transumbilical breast augmentation.

The IM incision is the most commonly used and most versatile of the incisions used for breast augmentation. This is reflected in my practice and by data recorded in NaBIR.18 It provides direct visualization of the subglandular and subpectoral planes and offers the most direct approach for managing any problems in the lower pole such as IM fold asymmetries. This incision has a tendency to ride up on the implanted breast as the implant settles, and therefore it should be positioned adequately low or approximately 1 to 2 mm below the intended level of the new IM fold. A careful three-layered closure of the wound, which includes the tissue adjacent to the implant, the deep dermis, and an intracuticular apposition of the skin wound, is routinely performed.


INFRA-AREOLAR INCISION

The infra-areolar incision is also commonly used. It also affords excellent access to the lower pole of the breast, whereby the surgeon can address asymmetries or treat discrepancies or constriction of the IM fold. It can be incorporated into a periareolar incision, thereby making it an excellent choice for cases that are likely to include an augmentation mastopexy. It is also very useful for treating patients with a constricted breast deformity (Fig. 3-11) because it allows a setback of the pseudo-herniation of the NAC, which is a salient feature of that deformity. The incision should be placed in the junction of the more darkly pigmented areolar skin and adjacent breast skin. In this position it is less conspicuous. Placing it within the areola itself may result in visibility due to potential hypopigmentation of the resulting scar. Access to the subglandular or subpectoral space is attained by dissecting directly through the breast parenchyma or by inferior elevation of a breast skin flap above the breast fascia and entrance into either of these planes from below (Fig. 3-12A,B). I prefer to dissect through the breast parenchyma as this route provides a direct exposure to either plane. The incision often yields excellent cosmetic results, but it may result in a slightly greater chance for decreased nipple sensibility.


FIGURE 3-11. Constricted breast deformity (oblique view) is best approached through periareolar incision.


FIGURE 3-12. A-B, Dissection using periareolar incision is done either around the lower pole of the breast or directly through the breast parenchyma.


AXILLARY INCISION

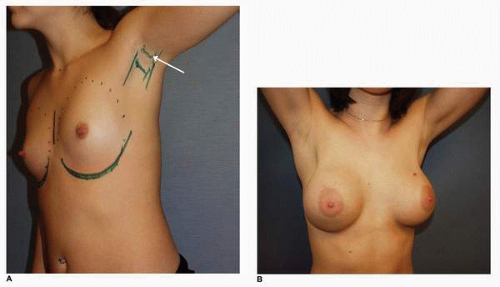
The transaxillary approach to breast augmentation avoids a scar on the breast, and in my practice it is a popular approach for young unmarried women. I believe that the incision should be positioned transversely, and I generally tend to place it in or just above the highest skin crease in the axilla. It should be kept posterior to the posterolateral edge of the PMM and anterior to the latissimus dorsi muscle (Fig. 3-13A,B). The incision should be limited to between 3.0 and 3.5 cm. With this approach the skin should be undermined for a distance of 2 cm in both an anterior and inferior direction, and dissection through the clavipectoral fascia gives access to the subpectoral space. The resulting scar is almost always inconspicuous by 1 year following surgery. There is an incidence of numbness and paresthesias involving the upper inner arms related to retraction of or injury to the intercostal brachiocutaneous nerves, but in my experience this is less than 5%. In every case of transaxillary breast augmentation I inform the patient preoperatively that should she require re-exploration for bleeding or other problems, this will usually require another incision on the breast, either in the IM fold or infra-areolar area.


FIGURE 3-13. A, The appropriate incision for a transaxillary augmentation is high in the axilla and lies posterior to the posterior edge of the PMM and anterior to the latissimus muscle. B, The high axillary scar heals well and is barely perceptible at 1 year following surgery.

Information about the options just discussed is presented to the patient in an interactive format to encourage active participation in the decision-making process on the part of the patient. During this time instructions regarding postoperative care are also given to the patient. Finally, a detailed enumeration of the potential risks and complications concerning breast augmentation is presented to the patient. During this discussion we emphasize that a breast implant will in all likelihood not be a lifetime device and that the two most common inherent risks following this operation are those of capsular contracture and the need for reoperative surgery on the breast(s) at some point in the future.7 A sample of the consent form I use for primary breast augmentation is shown in Appendix A of this chapter Finally, we discuss cost implications regarding unplanned reoperative surgery after breast augmentation (surgeon’s fees, facility charges, and anesthesia fees), both in the rare circumstance of surgery done immediately following the procedure (e.g., to drain a hematoma) or surgery undertaken at a later date.

Once decisions about the type of implant, position of the implant, and selection of incision have been made, the patient must decide whether to proceed with surgery. I find that there is a high patient sign-up rate (>80%) for patients I see in consultation for breast augmentation.


SURGICAL PLANNING AND TECHNIQUE

There is no doubt in my mind that careful preoperative planning and precise, consistent pocket dissection are important in every breast augmentation. Furthermore, I strongly believe that the incidence of immediate postoperative and short-term problems (implant malposition and palpability, breast asymmetry), and perhaps long-term problems as well (implant rupture or deflation and even capsular contracture), following breast augmentation can be reduced by individualized surgical planning and consistent technique.

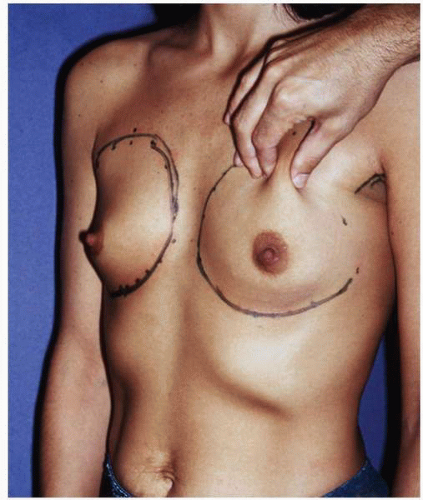
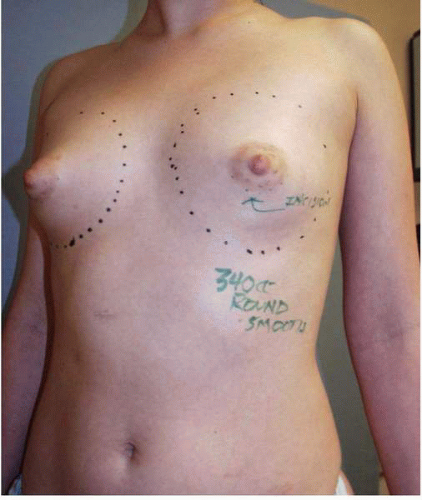
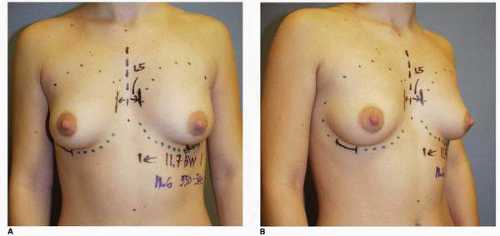
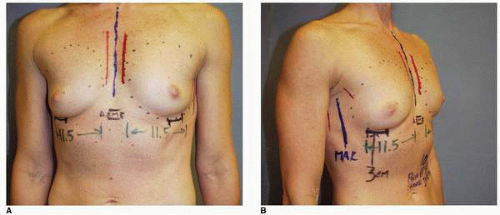
The patient is carefully marked before surgery in the upright position to ensure precise pocket dissection and placement of incisions. Outlines of the existing IM fold and breast base width are inscribed on the skin. Next, the precise position of implant placement is noted (Fig. 3-14A). If the IM fold is to be lowered, the exact extent of this lowering is noted (Fig. 3-14B). I do not dissect the largest possible pocket because this may predispose to implant malposition. To create a more precise pocket I next outline the extent of superior pocket dissection. I find it helpful to have the patient compress her breast gently against the chest wall, and in this way the most superior aspect of the breast is apparent (Fig. 3-15). To limit the possibility of excess medial dissection I next draw a vertical line in the middle of the sternum. Then I draw two additional lines, one on either side of this first line 1.5 cm lateral to it over the lateral sternal area (Fig. 3-16A). These lines denote the medial-most extent of the dissection (Fig. 3-16A). I do not dissect medial to them. I have found that this will minimize the possibility of creating medial implant malposition (symmastia if it is seen bilaterally). The midaxillary line on the lateral chest wall should be noted. This vertically oriented line
lies midway between the lateral border of the PMM and the anterior edge of the latissimus dorsi muscle, which can be easily appreciated in most patients (Fig. 3-16B). I do not dissect lateral to this point. Limiting the extent of lateral pocket dissection is an important factor in limiting the likelihood of lateral implant malposition.
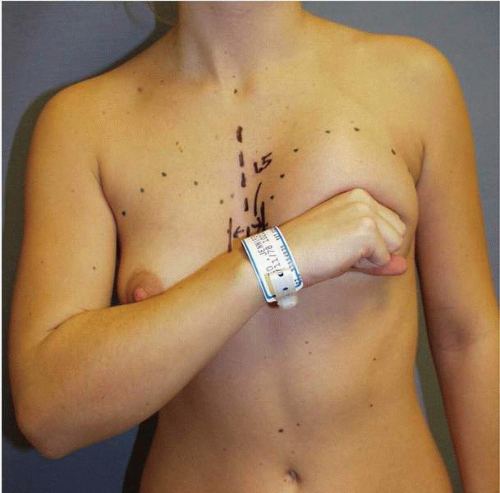


FIGURE 3-14. A, Outline on the patient’s skin of the IM fold and proposed position of the implant is noted. B, Outline of proposed lowering of the IM fold is also marked on the skin. Note that the position of the incision is off the patient’s breast.


FIGURE 3-15. The superior extent of the patient’s breast tissue is noted by gently compressing the breast against the chest wall.


FIGURE 3-16. A, Vertical midsternal line drawn from SSN to xyphoid. Lines are drawn 1.5 cm lateral to this line on each side, and the medial dissection should not proceed medially to this line. B, The lateral dissection should not go beyond the midaxillary line. This will minimize the frequency of lateral implant malposition.


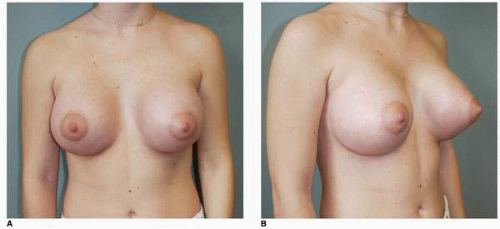
FIGURE 3-17. One-year postoperative AP (A) and oblique (B) views of the patient noted in Figure 3-14.

Planning the surgery in this way provides a guide to precise pocket development. In my hands the combination of planning and consistent surgical technique optimized postoperative breast symmetry and has limited the occurrence of breast asymmetry and implant malposition and early reoperations related to them.


The 1-year postoperative results of the patient noted in Fig. 3-14 on AP and oblique views is illustrated in Fig. 3-17 A, B).


POCKET DISSECTION

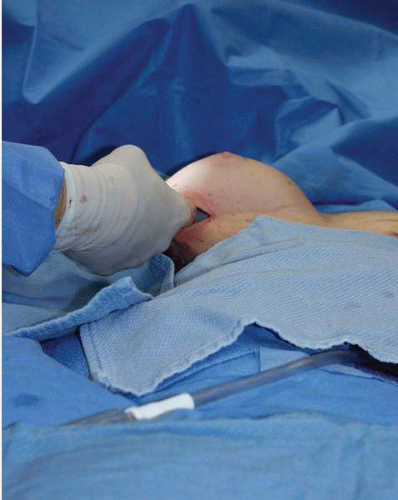
Dissection of the pocket for implant insertion should be done in a gentle manner with attainment of meticulous hemostasis. I perform almost all of the dissection under direct vision with the electrocautery with the exception of the lateral aspect of the pocket, which is performed last with gentle digital dissection (Fig. 3-18) after the sizer has been positioned. Minimal, blunt gentle digital dissection minimizes injury to the lateral sensory nerves and the possibility of lateral implant subluxation (Fig. 3-18) while allowing me to maximize the medial fullness or cleavage. The lateral sensory nerves very often can be palpated and/or directly visualized. Most recently when I have visualized the nerves through an IM incision, I have occasionally performed this lateral pocket dissection with the electrocautery, dividing tissue adjacent to the nerves with minimal danger of injuring them.

When using a saline implant sizer I inflate this device with air in situ using a one-way valve. The maneuver is carried out with the patient placed in the sitting position at 90 degrees on the operating table (Fig. 3-19). Most often I use implant sizers to assess the adequacy of pocket dissection and breast contour rather than to establish which size implant I will choose. This decision is usually established before the operation.


SUBGLANDULAR POCKET DISSECTION

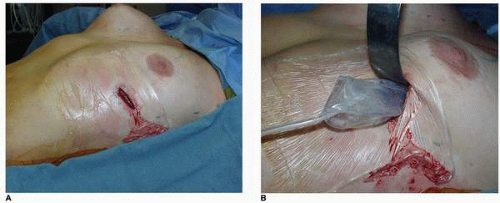
The subglandular space is easily dissected through either an IM or infra-areolar incision using a headlight or lighted retractor. I perform the dissection inferior to medial to superior according to the preoperative skin markings. The lateral dissection is initially limited. I then place an OpSite dressing on the skin to eliminate contact of the implant with the patient’s skin and associated skin flora (Fig. 3-20A). The sample sizing implant or the implant to be used for the procedure is inserted through an incision made in the OpSite (Fig. 3-20B). Before inserting this device I analyze this implant sizer for its base dimension by measuring it. In addition, both pockets are irrigated with a solution containing 50,000 IU of bacitracin, 500 mg cefazolin (Ancef), and 80 mg gentamicin in 1,000 cc of sterile saline intravenous (IV) fluid.27

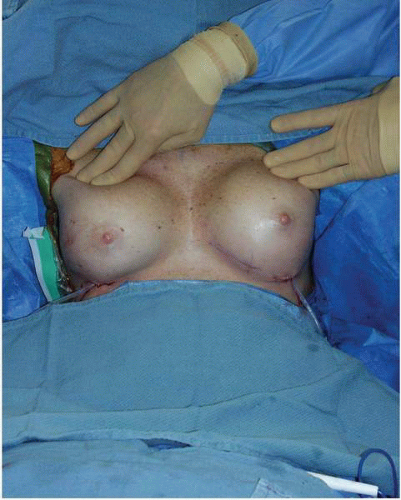
The symmetry of the breasts, including implant position and inferior level of the implants, is checked with both implants in place while exerting gentle downward pressure on the upper poles of the breast (see Fig. 3-19). This maneuver is very helpful in minimizing asymmetries of the IM-fold level of the augmented breasts.

When I am completely satisfied with the implant position and breast appearance, I perform a three-layer closure of the wound as described earlier, applying a circumferential dressing consisting of both a Kerlix (Tyco Healthcare Group, Mansfield, Mass) roll application and Ace (Becton Dickinson, Franklin Lakes, NJ) wrap. The dressing remains in place for approximately 3 days, at which time the patient is taken out of her dressing and switched to a sports bra. Bra support of the breasts is maintained for 1 month following surgery. When an IM incision is used, I request that patients refrain from using an underwire bra for 3 months to minimize any adverse effect on the incision.


SUBPECTORAL POCKET DISSECTION

The subpectoral space can be developed using any of the incisions described earlier. From the IM approach I identify the lower pole of the breast tissue and gently sweep it superiorly using the electrocautery set to the coagulation mode. This allows identification of the lateral border of the PMM, and the plane beneath it is easily entered under direct visualization (Fig. 3-21A). This plane is developed with electrocautery dissection directed superior-medially toward the NAC. A narrow Deaver retractor is then inserted and the remainder of the dissection is performed with the electrocautery. The origins of the PMM are released on its deep surface along the length of the lower aspect of the breast proceeding from lateral to medial, establishing the desired inferior position of the implant pocket. The PMM is completely released in most cases to the parasternal area (Fig. 3-21A). The exception to this is the exceedingly thin patient in whom the muscle is released but the pectoralis fascial layer is maintained intact by gently stretching this layer with blunt dissection. This provides an additional layer of tissue to pad the implant in the lower breast. More important, this layer may help to support the weight of the implant. Along the lateral sternal area the PMM is not divided but rather it is attenuated on its deep surface (Fig. 3-21B). Releasing the muscle here can produce an abnormal contour, often leading to a step-off along the lateral sternum that is difficult to correct.

Instead the medial PMM is attenuated on its deep surface (Fig. 3-21B). This is accomplished by scoring the muscle on its deep surface with the electrocautery set to the coagulation mode. The deep muscle surface is gently touched in a doting-type fashion. The depth of the dissection within the deep surface of the muscle is usually 3 to 5 mm. This attenuation of the PMM allows a favorable drape over the implant and produces the best possible cleavage when the subpectoral position is chosen for breast augmentation. I believe that detaching the medial or parasternal PMM should be avoided, and this view is shared by others.28 Next, the superior extent of the pocket is established. The lateral dissection is initially limited. The dissected pocket is then irrigated with the antibiotic solution noted earlier. A sizer is placed as noted earlier, and the final adjustments to the lateral implant pocket are completed with the patient in the sitting position using gentle digital dissection (see Fig. 3-18). Very often the surgeon will feel the lateral intercostal nerves as transverse bands. These can be slightly stretched, but they must be preserved intact. Once again, the lateral dissection should never be carried posterior to the midaxillary line. This line is also routinely drawn on the patient’s skin preoperatively. The final breast appearance is checked with sizers in both implant pockets, and if it is completely satisfactory, implants are inserted and then the incision is closed in three layers.


FIGURE 3-18. Lateral dissection is performed with gentle digital dissection to maximally preserve the sensory nerves to the nipple.


FIGURE 3-19. Following insertion of the implant, the lower poles of the breasts are inspected for symmetry by applying gentle pressure over the upper poles of the breasts with the patient sitting at 90 degrees on the operating table.


FIGURE 3-20. A, Sterile OpSite barrier drape is placed over the incision on patient’s skin before implant insertion. B, The implant is inserted through an opening in the barrier drape.


FIGURE 3-21. A, Release of inferior origin of the PMM from the lateral edge of the muscle to the lateral sternal edge. B, The PMM is attenuated on its deep surface with a superficial incision into the deep surface of the muscle with the electrocautery device along the sternal margin.

The subpectoral space can be developed through the infra-areolar incision by dissecting through the breast parenchyma and splitting the medial PMM in the direction of its fibers. This provides immediate and excellent access to the underside of the PMM, and release of its origin from the fifth and sixth ribs can be accomplished as outlined in the preceding paragraph. The remainder of the procedure is as outlined earlier.

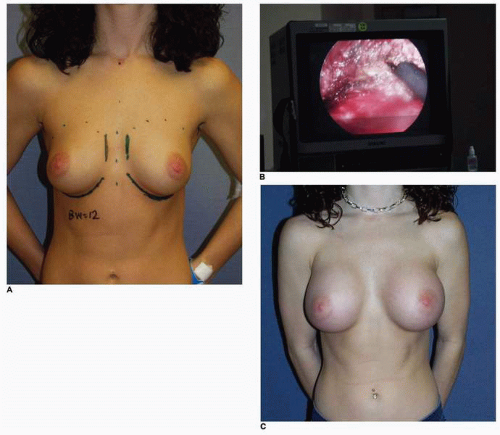
When using an axillary incision, standard markings are used (Figs. 3-13A and 3-22A). I currently prefer using endoscopic assistance to perform the PMM release from its origin on the fifth and sixth ribs inferiorly as opposed to using blunt dissection. As noted earlier, after the incision is made the skin is undermined for a distance of 2 cm, and then the dissection is deepened through the clavipectoral fascia and the lateral border of the PMM is noted. The muscle fibers themselves are not exposed. The interval between the PMM and pectoralis minor muscle is directly visualized, and the subpectoral plane is developed by gentle blunt dissection with an Agris-Dingman dissector inferiorly toward the origin of the PMM. A special balloon dissector is inserted and inflated to create the optical
cavity. I have found that a sample sizing implant works equally well for this maneuver. Next the endoscope is inserted, and operating through the same transaxillary incision the origin of the PMM is visualized (Fig. 3-22B). This technique provides a controlled release of the muscle (Fig. 3-22C) and can also facilitate hemostasis. The final inferior dissection to establish the inferior aspect of the implant pocket is done with the Agris-Dingman dissector. After completing the dissection of both pockets, the space is irrigated with a solution containing 50,000 IU of bacitracin, 500 cc cefazolin (Ancef), and 80 cc gentamicin in 1,000 cc of sterile saline IV fluid27 and the sample sizing implants are placed. Symmetry between the breasts is checked with the patient in the sitting position. I find that it is helpful to gently compress the upper poles of the sizers to ensure symmetry of the lower aspect of the breasts (see Fig. 3-19). When the appearance of the breasts is completely satisfactory, the implants are inserted and the axillary incision is closed in two layers, including the deep dermis and skin wound. I prefer to approximate the skin incision with 5-0 nylon sutures. A similar dressing to that described earlier is placed.


FIGURE 3-22. A, Preoperative AP view of transaxillary endoscopic-assisted augmentation mammoplasty patient. B, PMM origin revealed under endoscopic visualization. C, Postoperative AP view at 6 months following surgery.


POSTOPERATIVE MANAGEMENT

Following the procedure, patients are generally managed with a period of abstinence from heavy exercise of approximately 6 weeks. They are started on a program of implant displacement exercises (Fig. 3-23A-C) on postoperative day 1 or 2 when a smooth-walled implant is used according to their comfort level. The purpose of this
treatment is to maximize the mobility of the implant and the distensibility of the periprosthetic capsule. I personally believe that this maneuver helps keep the implant as soft as possible, and it may limit the occurrence or extent of capsular contracture. This opinion is shared by many plastic surgeons.29,30 More important, this maneuver is something that the patient can do to help her recovery and preserve the softness and natural feel of her result.


FOLLOW-UP CARE

In addition to the displacement exercise regimen, we emphasize the importance of clinical breast examinations31 (CBEs) to all patients. More important than this is long-term physician follow-up examinations. I offer patients yearly follow-up visits for the rest of their lives at no charge to them. I do this so that I can be satisfied that they are being examined by a physician who is experienced in the examination of the breast that has undergone an augmentation. Most important, we recommend postoperative mammograms on the schedule as prescribed by the American Cancer Society.32 Mammography remains the most accurate way of making the diagnosis of breast cancer. In breast augmentation patient, special views that involve displacing the implant are routinely employed.33 When this technique is employed, implant-related complications are rare.34 Although there is a decreased sensitivity of mammograms following breast augmentation,26,35 there is no evidence that the diagnosis of breast cancer is made at a later stage in patients in patients who have undergone breast augmentation when compared with patients who have not undergone breast augmentation.34, 35 and 36


REVISION OF BREAST AUGMENTATION—HISTORY AND PHYSICAL EXAMINATION


As previously noted, revision of a previous breast augmentation is not an uncommon operation.7,11, 12, 13, 14, 15, 16 and 17 When patients present for such surgery, they are almost always a number of years removed from their previous procedure(s). In this setting, the surgeon must be very clear about exactly what is bothering the patient. Again, this understanding comes from a very careful history of not only the previous surgery(ies), but also any changes that have occurred since the time of her last operation. A good deal of time must be spent with each patient seeking a revision of a previous breast augmentation to understand her particular problem and to formulate the best possible treatment plan. The surgeon must communicate with the patient, emphasizing realistic goals, limitations, and potential
complications. This will build the best possible doctor-patient relationship that I find so helpful during the recovery from additional surgery—especially if there are additional complications.
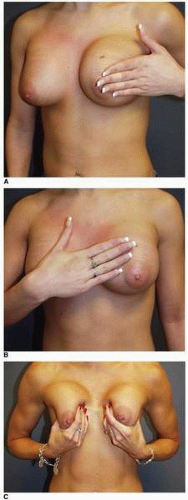


FIGURE 3-23. Implant displacement exercises following breast augmentation. A, Medial displacement. B, Lateral displacement. C, Vigorous superior displacement may also be helpful.


TABLE 3-1 Overview of Reoperative Breast Augmentation


  1. Gather patient history


    1. Breast development


    2. Changes in breast volume and appearance with menstrual cycle


    3. Breast cancer history


    4. Family history of breast cancer


    5. Previous breast surgery(ies)


    6. Breast pain


    7. Nipple sensitivity


    8. Mammogram history


  2. Identify specific patient desires


    1. What exactly bothers the patient


    2. Is she satisfied with size, fullness, shape


    3. Is there capsular contracture


    4. What is status of nipple areolar symmetry


  3. Examine the patient


    1. Amount of breast tissue


    2. Distribution of breast tissue


    3. Scars on the breast


    4. Breast skin appearance and elasticity; presence of striae


    5. Thickness of subcutaneous tissue and breast parenchyma (tissue “padding”)


    6. Dimensions of breast


      1. Base width


      2. Breast height when chest is gently compressed


      3. Nipple to IM fold distance


      4. SSN to nipple distance


      5. Midclavicle to nipple distance


    7. Position of breast on chest wall; cleavage: wide or tight


    8. Capsular contracture


      1. Presence and degree


      2. Baker classification (I-IV)


    9. Implant visibility: ridges, ripples, folds


    10. Implant edge palpability


    11. Ptosis: relationship of nipple to breast tissue


      1. Grade of ptosis


      2. Relationship of breast tissue to underlying implant


    12. IM fold development: any element of constriction


    13. Asymmetry


      1. Breast volume or volume distribution


      2. Contour


      3. Nipple areola height, size, inclination


    14. Chest wall deformity: pectus excavatum


      1. Ribs


      2. Pectoralis muscles


    15. Scoliosis


  4. Diagram the breasts: breast worksheet


  5. Create photographic documentation


    1. AP/lateral/oblique


    2. Special views: lying down, bending forward


  6. Collect implant data


    1. Chronology of operations


    2. Incisional approaches


    3. Size


    4. Type


    5. Position


  7. Collect breast imaging data


    1. Mammogram/sonogram


    2. MRI


  8. Make diagnosis and formulate plan


  9. Propose surgical approach to patient


  10. Review informed consent


  11. Proceed with surgery if appropriate


IM, Inframammary; SSN, suprasternal notch; AP, anteroposterior; MRI, magnetic resonance imaging.


I always ask the patient if she was happy after the original operation. Her response often not only gives me insight into her specific complaints or concerns about the augmentation procedure, but also reflects the patient’s general sense of satisfaction and can be an indication of whether she can be content with the results of additional surgery. Comments such as “they were never large enough,” or “they were always so hard,” or “they never felt natural” can be very telling, especially if the physical inspection of the breast and the examination is at variance with these comments. Occasionally the patient will make an unsolicited comment about her previous surgeon or surgeons, and this too may provide some insight as to whether I will be able to achieve an improvement in her situation with which she will be happy.

The patient’s chief complaint should be as focused as possible. Is the patient bothered by the size, lack of superior fullness, or any asymmetry (i.e., of the shape, contour, IM fold level or definition of the fold, or position of the implants)? It is important to understand the patient’s feelings about her nipple position, the degree of firmness of the implant, and the relationship of the breast parenchyma to the implant. Is there evidence of significant capsular contracture? Are there problems with implant edge palpability, obvious folds that show through the skin, or implant malposition? When such malpositions (e.g., lateral, superior, inferior, or medial displacement of the implant) exist, they may be increased in certain postures or positions. If there are
particular positions that bother the patient, specific descriptions of these circumstances should be elucidated. Is there pain or discomfort in the breast(s)? The etiology of such breast pain or mastodynia in the setting of a previous breast augmentation is often difficult to establish and most of the time is multifactorial. I most often tell the patient that there is no surgical solution or surgical cure for breast pain. Has there been a change in the appearance of the breast, and if so what is the time course of the change? Is there a history of previous implant rupture or deflation of a breast implant, and if so how was that problem treated?

As I have suggested, it is important to have a complete understanding of all of the patient’s previous breast procedures. This includes the chronology of and time interval between the operations, as well as implant types, sizes, and position of placement. It is important to inquire about whether any of the procedures were associated with acute complications, and if so how these complications were managed. Any history of trauma to the breast(s) must be noted. Not uncommonly the surgeon will elicit a history of a closed capsulotomy that was done after a silicone gel breast augmentation. In the past many patients routinely would undergo such a manipulation if early firmness of the implant was detected following breast augmentation.37 This practice has been documented to be associated with an increased incidence of breast implant rupture.38,39 Such treatment of mechanically squeezing the previously augmented breast is now discouraged and it should no longer be done.

A systematic examination of the breasts is then carried out as described in Chapter 2. The surgeon should note the general appearance of the breasts, scanning them for symmetry in terms of contour, fullness, nipple areola position, and position of the breast relative to the chest wall structures. Any obvious asymmetries are immediately noted. Next, more subtle asymmetries are examined. The relationship of the patient’s native breast tissue to the implant must be noted. Has there been any settling of the breast tissue away from the implant?

I find it helpful to measure dimensions of the breast, including base width, height, and the extent of upper pole fullness when the breast is gently compressed against the chest wall. I then carefully measure the distance of the nipple from the fixed point of the SSN on each side, followed by measurements of the distance from the nipple to the IM fold in the midmeridian of the breast, and also the distance from the inferior aspect of the NAC to the IM fold. I then record all of these measurements on a breast diagram in the patient’s chart (see Fig. 3-2). I find that it is very helpful to refer to this initial diagram of the breast whenever I perform any breast surgical procedure. This diagram is especially helpful when planning a revisional procedure.


COMPLICATIONS OF BREAST AUGMENTATION

A simple and useful way to think about complications following breast augmentation is to divide them into those that are related to the surgical procedure itself, and those that are related to the implant or to the biologic integration of the implant by the body. Surgical complications that are noted within the first 4 weeks following surgery are referred to as acute complications. These include hematomas, seromas, infections, and problems with wound healing, including wound separation with implant exposure. A rare complication is that of superficial venous thrombosis in the superficial veins on the inferior breast, known as Mondor’s disease. More commonly seen is a thrombosis of the small superficial veins in the axillary region in patients who undergo breast augmentation using a transaxillary approach (Fig. 3-24).

Complications seen within the next 2 months are termed as subacute complications, and these mainly refer to implant malposition. Most often this consists mainly of excessive fullness in the upper pole of the breast that is noted in the early postoperative period. This is not uncommon when the implant has been placed in the subpectoral position. In my experience this is the most
commonly noted abnormality early on after breast augmentation. From my perspective, in these situations there is little concern that the implant will descend to the appropriate level if the implant was noted to be in the appropriate position at the completion of the operation. Most often the implant will settle into a lower position as the pectoralis major muscle stretches out during the first 4 months following surgery. However, if significant malposition of the implant in a medial, lateral, or inferior location is present at 3 months following surgery, it can lead to a permanent breast asymmetry or deformities that very well might represent an indication for revisional surgery on the breast(s) later in the postoperative course. Additional surgical or technique-related complications are decreased nipple sensibility; breast asymmetry; implant edge palpability; and the presence of ripples, ridges, or folds that can be seen through the skin. The latter three conditions are noted if the dimensions of pocket dissection is inappropriate—either too large or too small.
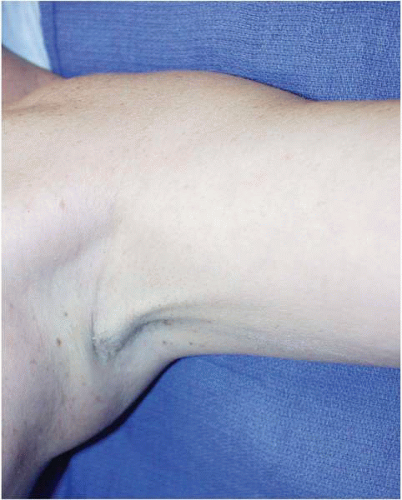


FIGURE 3-24. The typical appearance of superficial thrombophlebitis in the axillary veins. Note cord below skin.

Late complications following breast augmentation are seen much more frequently. Most of these are implant related. These would most notably include implant palpability,18 ridges or rippling at the edges of the implant,40 implant malposition either inferior or superior in location and that result in either inadequate or excessive superior pole fullness respectively, lateral implant subluxation, medial implant malposition, or symmastia if medial implant malposition is bilateral. Implant malposition is noted with increased frequency due to the use of increasingly larger saline implants. Contour deformities may occur long after the placement of the implant and these can be related to capsular contracture.9

Inherent risks of breast implant placement are the result of the patient’s biologic incorporation of the implant or problems related to this process. The most commonly occurring of these is capsular contracture.8, 9 and 10 Also seen are dynamic deformities of the implant related to contraction of the pectoralis muscles in patients who have undergone retropectoral positioning of their implants (Fig. 3-25), which is a difficult problem to address. Finally, implant failure marked by rupture41, 42, 43, 44 and 45 with gel extrusion if silicone gel has been used, or deflation if a saline implant has been employed,14, 15, 16 and 17,46 is commonly seen following a previous breast augmentation.


ACUTE COMPLICATIONS


Hematoma Formation

Excessive accumulation of blood in the periprosthetic capsular space is a relatively rare complication following breast augmentation. It occurs in less than 2% of the cases as noted by various reports.42 Certainly a significant degree of dissection is done to create a pocket for the implant in either the subglandular plane or subpectoral space. As noted, my approach is to perform almost all of this dissection gently and precisely with the electrocautery device under direct vision with a headlight or lighted retractor or using an endoscope. Meticulous hemostasis is checked for and procured following the completion of such a dissection before the implant is placed.


FIGURE 3-25. AP view 3 years after subpectoral augmentation with smooth-walled saline implants. Distortion of the breast implant produced by voluntary contracture of the PMM following a subpectoral breast augmentation.

I strongly believe that it is important for all patients to refrain from the ingestion of aspirin and all products containing cyclooxygenase inhibitors for at least 1 week before surgery. I will cancel a breast augmentation procedure if a patient has ingested any medicine containing aspirin within a week before surgery.

I do not feel that it is necessary to obtain a bleeding time, prothrombin time, or platelet count before a routine breast augmentation in a patient without a history of previous bleeding disorders. I do inquire about bleeding tendencies marked by easy bruising, very heavy menstrual flows, excessive bleeding after dental work, or explained bleeding after previous surgery. If any of these conditions are present and are mentioned in the history, I then request are bleeding time. If this bleeding time is abnormal, the patient should be informed about this and a consultation with a hematologist initiated to investigate this situation. Any problems that the patient has had with episodic hypertension should also be sought and treated before surgery.


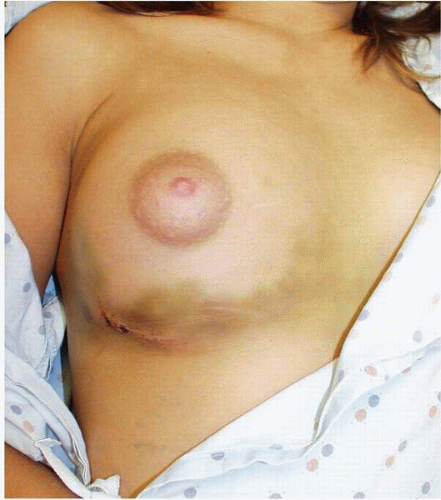
FIGURE 3-26. A hematoma in the right breast following a partial subpectoral breast augmentation seen on postoperative day 6. Note ecchymosis and size difference between the breasts.

Despite careful surgical technique, hematomas occur in approximately 2% of patients.42,45 The clinical symptoms most often include localized discomfort in the breast. In more pronounced cases (Fig. 3-26) there may be associated swelling and ecchymosis of the breast. Treatment of breast hematoma is directly related to the severity of the process. A patient who complains of pain in the breast that is increasing, and especially if it is localized to one side, should be seen as soon as possible to be examined. After this examination, if it is deemed that the hematoma is small or of minor severity, i.e., there is no sign of visible difference between one breast and the other, and no difference between breast appearance noted immediately at the completion of surgery in the operating room and what is now present, then observation with careful breast support in terms of a dressing or a well-fitting bra is provided. Most of the time this breast immobilization is all that is needed. Such patients can usually begin displacement exercises within a week to 10 days after surgery.

On the other hand, if there has been significant accumulation of blood (see Fig. 3-26), it is best to advise the patient that re-exploration for drainage of the hematoma is necessary. It is my practice to preoperatively discuss with each patient the potential need for operative intervention in the acute postoperative period. I specifically tell patients that if a hematoma occurs they may require additional surgery. I also tell them that I will provide this service to them without an additional professional fee, but in the hospital environment in which I currently operate, patients are told that they would be responsible for charges related to the use of the hospital operating room and anesthesia services. (I give this information to all of my cosmetic surgery patients.)

If the diagnosis of significant hematoma is made, the exploration of the periprosthetic capsular space can be done through the previous incision, except if it was placed in the axilla. I find that reopening an axillary incision and exploring the submuscular space, even using an endoscope, is a difficult operation and, in my opinion, it should not be attempted. Therefore, I tell patients who select a transaxillary approach that should they develop a hematoma, another incision on the breast, usually in the IM location, will be needed to allow the best possible exploration to evaluate any potential sources of bleeding and thus I will convert the patient to IM incision for an inspection of any bleeding.

At the time of reoperative surgery to evaluate a hematoma, most often no distinct bleeding point is found. This is true in spite of careful evaluation of the previously dissected space. Any blood in the space is evacuated, and careful irrigation of the space is performed with sterile saline and antibiotic irrigation. When the surgeon is satisfied that there is no active bleeding, the implant can be replaced. Most often I insert a small suction drain, which is brought out laterally on the chest wall within the bra line, locating it in the midaxillary line. The surgeon should inform the patient about potential drain placement before surgery. These drains [most often a 10-mm Jackson-Pratt (Cardinal Health, McGaw Park, Ill)] are left in place until the drainage is less than 30 cc per 24 hours.

Such a case is illustrated by this 18-year-old patient with a developmental breast asymmetry related to a constricted breast deformity (Fig. 3-27A-C). She requested bilateral breast augmentation with silicone gel implants. The approach consisted of an IM incision for the partial retropectoral placement of different sized implants. We used a 260-cc smooth normal-profile silicone device on the left side and a 325-cc smooth low-profile silicone gel implant on the constricted right side to increase the apparent base width of the breast. When we contacted the patient the day following surgery, she reported significantly more pain on the right side than on the left and she was immediately seen in the office. There was no difference in size at that point and the discomfort on palpation was not excessive. Her discomfort persisted, and when she was seen on postoperative day 5 there was obvious swelling of the right breast and signs of ecchymosis (see Fig. 3-26). She was advised that surgical re-exploration was necessary and was returned to the operating room on postoperative day 8 for an evacuation of a 60-cc

Only gold members can continue reading. Log In or Register to continue

Stay updated, free articles. Join our Telegram channel

Jun 4, 2016 | Posted by in Reconstructive surgery | Comments Off on Revising the Unsatisfactory Breast Augmentation

Full access? Get Clinical Tree
Get Clinical Tree app for offline access