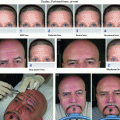
Fig. 6.1a, b
: Zygomatic body (green circle) and zygomatic arch (red signs). Reproduction of a lithograph plate from Gray’s anatomy (Henry Gray, Anatomy: Descriptive and Surgical)
Few noble structures have to be preserved during this procedure:
The zygomatic nerve, also named temporomalar nerve or orbital nerve, is a branch of the maxillary nerve (a trigeminal nerve branch) that enters the orbit and helps to give sensitivity to the skin over the zygomatic and temporal bones (Fig. 6.2a, b blue arrow). The zygomatic nerve is not to be confused with the zygomatic branches of the facial nerve.
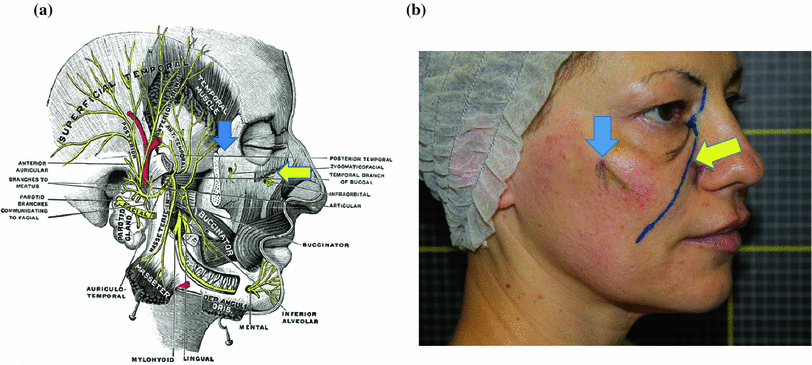
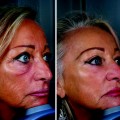
Fig. 6.2
The blue arrow indicates the zygomatic nerve at its exit point on the bone. The zygomatic nerve is a branch of the maxillary nerve (a trigeminal nerve branch) that helps to give sensitivity to the skin over the zygomatic and temporal bones. The yellow arrow shows the infraorbital nerve coming out from the infraorbital foramen. The infraorbital foramen is an opening in the skull located below the infraorbital margin of the orbit. It allows passage for the infraorbital artery, vein, and nerve. The infraorbital foramen distance varies between 6.10 and 10.9 mm from the inferior orbital margin. It is often palpable 1 cm below the lower orbit margin, on the pupil axis. Reproduction of a lithograph plate from Gray’s anatomy (Henry Gray, Anatomy: Descriptive and Surgical)
In correspondence with the exit of the nerve, a little artery (zygomatic artery) is present.
The zygomatic branches of the facial nerve run across the zygomatic bone to the lateral angle of the orbit, where they supply the orbicularis oculi and join with filaments from the lacrimal nerve and the zygomaticofacial branch of the maxillary nerve.
The infraorbital nerve exits the infraorbital foramen of the maxilla and is a branch of the maxillary nerve. This nerve innervates the lower eyelid, upper lip, and part of the nasal vestibule Fig. 6.2a, b yellow arrow).
The infraorbital foramen is an opening in the skull located below the infraorbital margin of the orbit. It allows passage for the infraorbital artery, vein, and nerve. The infraorbital foramen distance varies between 6.10 and 10.9 mm from the inferior orbital margin. It is often palpable 1 cm below the lower orbit margin, on the pupil axis (Fig. 6.3).
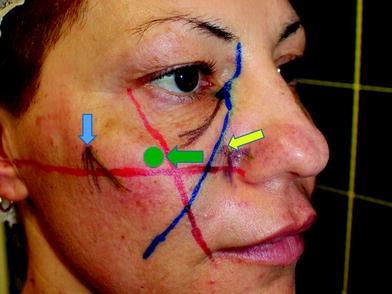
Fig. 6.3
The green arrow shows the safe point of injection. The blue arrow shows the zygomatic nerve, and the yellow arrow the infra orbital nerve.
6.2 Pitfalls
While injecting this area it is important to avoid the damage of the infraorbital nerve with the needle or compromise this noble structure injecting the material in the foramen, leading to nerve compression.
A correct planning of the treatment is essential: traditionally, a set of easy lines define the areas without risk of damaging the infraorbital nerve.
Those lines are called Hinderer’s lines (Fig. 6.4). The practitioner should paint on the patient’s face a first line joining the external cantus of the eye to the lateral rim of the mouth and a second line going from the nasal wing to the tragus. The intersection of the two lines delineates four quadrants. The superomedial quadrant represents the high-risk area. The superolateral quadrant is that usually chosen to perform the injection.
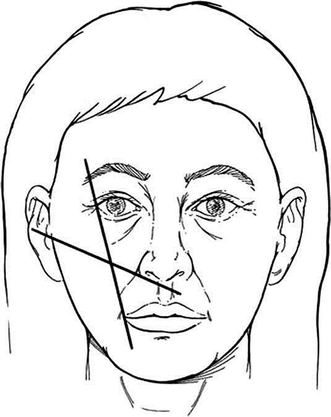
Fig. 6.4
Hinderer’s lines. A first line joining the external cantus of the eye to the lateral rim of the mouth and a second line going from the nasal wing to the tragus. Reproduced with permission from Woffles et al. [1]
In the superolateral quadrant, we can eventually come in contact with the zygomatic nerve, but this event does not lead to any severe clinical consequences: just pain during the treatment.
Safe point: the point of injections is in the superolateral quadrant individuated with Hinderer’s lines.
6.3 Indications
Malar atrophy is often congenital but can be also age related. It has been calculated that the malar area loses approximately 3 mm of lateral thickness due to bone reabsorption from 25- to 60-year old. This causes soft tissues of the medium part of the face to collapse, due to gravity. Comparing patient’s old pictures with recent ones, this phenomenon can often be emphasized.
Collapse of the mid-face tissues is responsible for the formation of nasolabial folds, marionette lines and prejowl sulcus.
Correction of the age-related malar atrophy is often the best treatment to perform in a patient with mid-face tissue fall, often representing a unique treatment that can resolve this important problem in only one session, with very little pain, excellent results and great satisfaction for the patient and the surgeon.
The most important conditions that are suitable for this treatment are: reduced trophism and reduced lateral projection of the malar area, correction of the prejowl sulcus, correction of the marionette lines, correction of the nasolabial folds. Correction of asymmetries consequent can also benefit from malar augmentation.
6.4 Contraindications
The filler should not be injected in areas that lack sufficient blood supply or that have an infection or inflammation.
No injection should be done if the area that has been previously treated with liquid silicone or other permanent fillers because new injection could lead to inflammation or infection of the implants.
Hypersensitivity to any components of the filler obviously constitutes a contraindication for the treatment.
6.5 Augmentation of the Malar Arch with Calcium Hydroxylapatite and Cannula
6.5.1 Operating Time
The procedure usually takes from 10 to 15 min.
6.5.2 Materials (Fig. 6.5)
1.5 cc of Calcium Hydroxylapatite.
Cannule 27G.
37mm length Needle 26G, 13mm length.
0.2 cc of local anesthetic (2% lidocaine or 2% mepivacaine) with epinephrine 1:100 000.
Bandages and antiseptic solution.
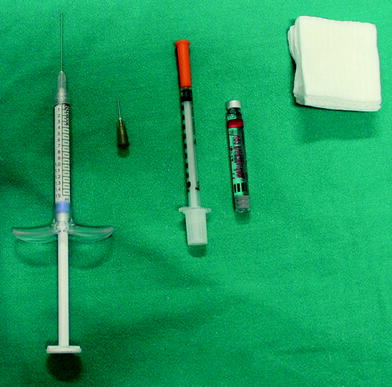
Fig. 6.5
Materials for augmentation of malar area
6.5.3 Material Choice
In Europe, Asia, and America Radiesse can be used.
6.5.4 Methods
Procedure is shown in Figs. 6.6, 6.7, 6.8, 6.9, 6.10, 6.11, 6.12 and 6.13a, b
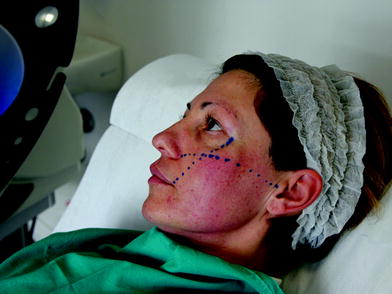
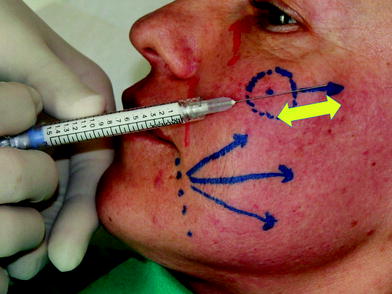
Fig. 6.6
Hinderer lines designed on patient’s face
Fig. 6.7
The point of introduction of the cannula and its pattern during the treatment is shown
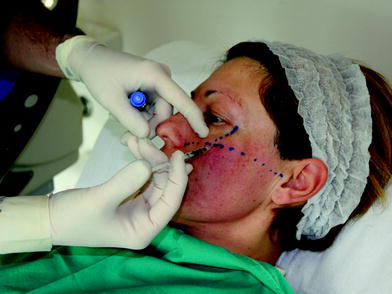
Fig. 6.8
Anesthesia should be performed before starting the treatment. Malar area augmentation is not really a painful treatment, but anesthesia can increase significantly the compliance of patients with low level of pain tolerance. 0.5 cc of Mepivacaine with Adrenaline solution can be used. The anesthetic injection can be made in the risk-free area obtaining a plexical anesthesia, but we can obtain a better anesthetic effect performing a troncular anesthesia: in this case, we have to inject directly near the infra orbital nerve area paying attention to inject very slowly

Fig. 6.9
An initial opening is made right above the Hinderer’s lines intersection point with a small and thin needle of 26 G
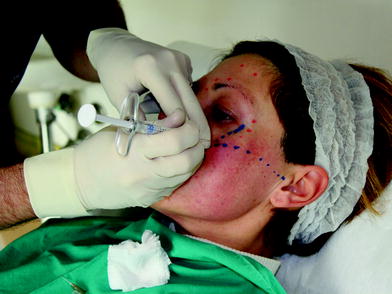
Fig. 6.10
A 27-G cannula 40 mm length is introduced perpendicularly to the skin plane through the hole created with the needle
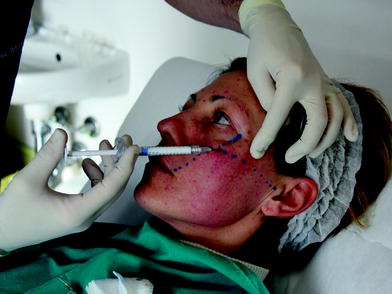
Fig. 6.11
The cannula will then slide in the subcutaneous tissue proceeding from the medial entering overture in a upper lateral direction. The cannula slides in a natural plane so no hard resistance should be perceived by the practitioner. It is useful to keep in mind where the tip of the cannula is located touching it with the finger through the skin in order to check the position reached
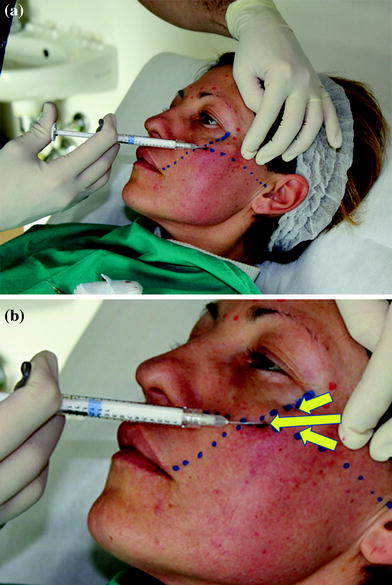
Fig. 6.12
A fan of 3 concentric lines can be disposed beneath the skin of the malar area with the retrograde injection technique
Fig. 6.13
The treatment has to be concluded by massaging the part treated and exercising a good pressure laterally and upwards
6.5.5 Considerations About Malar Arch Augmentation
Injection with the microcannula is designed to be really superficial, in a subdermal plane. Advantages of using the cannula are as follows: reduced probability of bruising and of pain perceived by the patient; limited tenderness and post-treatment swelling. However, superficial injection does not give a big support to the jowl.
6.6 Augmentation of the Body of the Malar Bone with Calcium Hydroxylapatite with Standard Needle
6.6.1 Pitfalls
Related posts:

Stay updated, free articles. Join our Telegram channel

Full access? Get Clinical Tree


