48. Lip Augmentation
Michael Larsen, Robert K. Sigal
DEFINITION OF PROBLEM
THE AGING LIP
■ Collagen framework loosens, dermis thins, orbicularis oris thins and loses curve, redistribution of volume, cumulative solar damage
■ Contrary to previous teaching, there is not a loss of volume but a redistribution from thickness to length.1,2
■ Resultant stigmata
• Philtral flattening
• Vermilion border flattening
• Decreased pout
• Cheiloptosis (elongated cutaneous upper lip)
• Inverted vermilion (results in thin vermilion)
• Minimal dental show
• Attenuation and loss of Cupid’s bow curvature
• Downward tilt of oral commissures
• Perioral wrinkle
■ Congenital variations
• Hypoplastic lip, long cutaneous upper lip, short cutaneous upper lip with excessive incisor or gum show, lack of ideal vermilion contours, asymmetries
GOALS OF TREATMENT
RESTORATION OR CREATION OF AESTHETIC LIP CHARACTERISTICS
■ Volume: Projection of lips (upper lip in line with or in front of lower), central pout
■ Shape: Defined philtral columns and Cupid’s bow, projected “ski jump” transition at vermilion border3
■ Balance: Upper cutaneous lip/upper vermilion ratio <3 (ideal 1.1-2.3), upper/lower vermilion ratio of 1:1.6 (see Fig. 48-1)
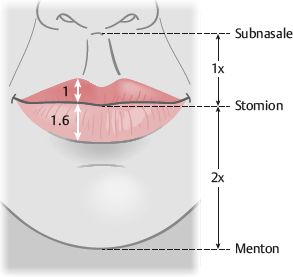
Fig. 48-1 Frontal lip view.
INDICATIONS AND CONTRAINDICATIONS TO TREATMENT
INDICATIONS
■ Enhance lip volume, shape, balance
• Improve self-image
CONTRAINDICATIONS
■ Body dysmorphic disorder
■ Emotional/psychological instability
■ Unrealistic expectations
■ Patient demands guarantees
■ Immunosuppression
■ Bleeding disorders
PREOPERATIVE EVALUATION
PATIENT HISTORY
■ Assess patient desires and expectations.
• Ask patients to provide photos of their lips from when they were happy with them.
■ Has the patient undergone prior lip augmentation?
• Which fillers or methods were used?
• Was the patient satisfied with those results?
■ History of:
• Bleeding disorders or immunosuppression
• Allergies or history of anaphylaxis
► Some products are impregnated with antibiotics.
• Hypersensitivities or excessive scarring with previous allogeneics
• Counsel patients to stop taking aspirin, NSAIDs, vitamin E, herbal supplements, and other anticoagulants or antiplatelets (if possible) at least 2 weeks before procedure to minimize bleeding and swelling.
• Pregnancy or lactation
• Smoking
► Counsel the patient to stop a minimum of 2 weeks ahead of the procedure; permanent cessation is best.
• Labial herpes
► Counsel to take acyclovir or valcyclovir perioperatively (3 days before and 3 days after procedure)
PHYSICAL EXAMINATION
■ Patient positioning: Upright and in repose
■ Exclude a current perioral infection.
■ Measure lip dimensions.
Ideal Lip Dimensions4
■ Frontal view (Fig. 48-1)
• The length of the lips should equal the distance from one medial corneal limbus to the other.
• Ratio of upper/lower vermilion show should be 1:1.6 (golden ratio) (see Chapter 2).
• Upper cutaneous lip/upper vermilion ratio <3 (ideal 1.1-2.3)
• Interpupillary line and stomion (commissural line) should be parallel and horizontal.
■ Aging leads to downward tilt of commissures (frown in repose).
• Subnasale-stomion distance should be half of stomion-menton distance.
• Lips are sealed when in repose.
► Incompetence can be caused by vertical maxillary excess, hypoplastic upper lip, open bite, or muscular dystrophy.
• With lips slightly parted, incisor show should be about 2 mm.
• When smiling, gum show should be minimal.
► Excessive gum show can be caused by vertical maxillary excess, gum overgrowth (necessitating gingivectomy), hypoplastic upper lip, or overactive muscles.
• Cupid’s bow forms a “gentle M” shape, the stomion forms a “lazy M,” and the lower lip vermilion forms a “gentle W” with its peaks 2-3 mm lateral to the corresponding M peaks of the upper lip.
• Three thickenings of the upper lip: A central tubercle and lateral thickenings, which are separated from the central tubercle by arches
• Two paramedian thickenings of the lower lip, which correspond to and contour to the upper arches
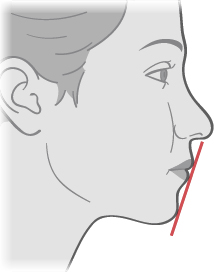
Fig. 48-2 Profile view of the lips. The red line depicts the Riedel line, connecting upper lip, lower lip, and chin.
• Nasolabial angle should be 85-105 degrees.
• Slight eversion at the vermilion border with a projected “ski jump” transition3
• Lips should project beyond line connecting subnasale and pogonion.
• Upper lip either in vertical plane with lower lip, or slightly anterior (∼2 mm)
• Lower lip anterior to (∼2 mm) soft tissue pogonion
• Upper lip, lower lip, and chin should touch an imaginary line (Riedel line).
• Chin should be within 1 mm of a vertical line drawn down from lower lip vermilion-cutaneous border (Frankfort plane).
• Mid-nares to chin (Steiner line) should touch upper lip.
• Labiomental groove ∼4 mm deep
■ Note asymmetries and contour irregularities.
■ Evaluate perioral region.
• Assess vertical lip lines, nasolabial fold, labiomandibular fold (marionette lines), and prejowl sulcus.
• Assess quality of rhytids (dynamic versus static).
• Consider adjuvants for perioral rejuvenation (see Chapter 41) such as botulinum toxin, chemical or laser resurfacing, fillers, or implants.
■ Assess structural/bony loss, dentition, and soft tissue volume loss.
■ Take preprocedure photos with good lighting (frontal and profile views in repose, frontal and profile views with lips parted) to show the patient postoperative improvement (see Chapter 3).
PATIENT COUNSELING AND OPERATIVE PLANNING6
■ Outline aesthetic goals.
■ Discuss various procedures and options (discussed later in the chapter).
• There are many approaches to augmenting and enhancing the lips.
• Whenever many techniques to solve a problem exist, a universally optimal solution is probably not available.
• Each option has advantages and disadvantages in various situations.
• Develop an individualized plan with the patient.
■ Manage expectations, emphasizing realistic aesthetic outcomes.
■ If a surgical intervention will be performed, inform patient of the risk of hypertrophic or depressed scarring.
■ Patients are often concerned about pain.
• Explain what they can expect during the procedure and the plan to minimize pain.
■ Explain the postoperative plan.
AUGMENTATION USING INJECTABLE FILLERS7 (see Chapter 22)
ADVANTAGES
■ Minimally invasive
■ Reversible
■ Because fillers are temporary, they allow patients to “test-drive” lip augmentation before committing to an intermediate-duration or permanent treatment.
DISADVANTAGES
■ Good for mild to moderate volume needs, but not high-volume needs
■ Results are suboptimal in the aged, inelastic, ptotic lip.
■ Does not correct an elongated upper cutaneous lip.
• Can produce “duck bill” or “trout pout” lips in such patients
■ Should not be used in patients with a history of anaphylaxis, multiple severe allergies, or allergies to bacterial proteins
EXAMPLES
Collagen
■ Bovine (Zyderm and Zyplast, Allergan): 3%-5% have hypersensitivity reaction. Must perform a skin test several weeks in advance
■ Human (Cosmoderm and Cosmoplast, Allergan): No hypersensitivity reactions
■ Porcine (Evolence, Ortho-McNeil Pharmaceutical): Longer duration than other collagen (>6 months)
• No skin testing is required, but do not use it in patients with a history of anaphylactic or recurrent allergic reactions.
■ It has been reported to cause nodule formation.
■ Collagen injectables, in general, have a short duration (3-6 months).
■ Because of low viscosity, they are good for superficial vertical lip lines and the vermilion border.
Micronized Acellular Dermal Graft (Cymetra, LifeCell)
■ Short duration (3 months)
■ Rarely used
Hyaluronic Acid (HA) (Restylane, Galderma; Juvéderm, Allergan)
■ Most commonly used filler for lip augmentation
■ Natural constituent of extracelluar matrix; hydrophilic nature draws in fluid volume.
■ Native human HA lasts only days, so synthesized products are cross-linked for increased stability and longevity.
■ Rare complications
■ Longer duration than collagen (6-12 months)
■ Softer gels (Juvéderm) might be better for the lips, where the skin is thin.
Calcium Hydroxyapatite (Radiesse [formerly Radiance], Merz)
■ High viscosity and elasticity
■ Long duration (>12 months)
■ Used for deep creases and regional volume
■ Some experts use it along the vermilion border; however, many experts say to avoid its use in lips.
• The lips are highly dynamic and can cause fillers to clump on animation.
• This leads to lumps and nodules that are hard to treat when long-term or permanent fillers are used.
SENIOR AUTHOR TIP: Do not inject Radiesse into the lip vermilion. Fig. 48-3 shows an example of the white clumps that often form after injection. These take a long time to disappear and need to be meticulously excised. Clear HA fillers, fat, and dermis are far better alternatives.
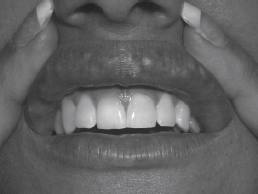
Fig. 48-3 Visible nodules after Radiesse injection into the lip vermilion.
Poly-L-lactic Acid (PLLA) (Sculptra, Galderma)
■ Injected into deep dermis and subcutaneous space
■ Mechanism of action: Causes inflammatory reaction that leads to collagen deposition replacing filler
■ Requires multiple treatments to achieve desired augmentation
■ Long duration
■ Use in the lips is highly discouraged.
Silicone (Silikon 1000, Alcon)
■ Permanent
■ Contraindicated in thin skin
■ Not intended for use in the lips
Polymethylmethacrylate (PMMA) (Bellafill, Suneva Medical)
■ PMMA microspheres suspended in 3.5% bovine collagen
• Therefore skin testing for sensitivity is needed before use.
■ Bovine collagen absorbed in 1-3 months, but the PMMA microspheres are surrounded by fibrous tissue and macrophages
■ Permanent
■ Can form nodules or granulomas
• However, newer preparations have lower complication rates, ∼0.01%.
■ Successfully used in nasolabial fold, radial lip lines, and white roll
■ Proper injection technique is vital.
• Injected into deep dermis using linear tunneling method with constant pressure through a 26-gauge needle
■ Not intended for use in the vermilion lip
• Many experts warn that it should not be used in this location because of a high risk of lump and nodule formation.
INFORMED CONSENT
■ Needle marking, swelling, redness, ecchymosis, pain, itching
■ Local reactions to filler or anesthetics
• These are usually self-limited.
■ Asymmetries and contour irregularities
■ Undercorrection or overcorrection
■ Complications (as listed later in the chapter)
EQUIPMENT
■ Good overhead lighting
■ Very small needle, 30- to 32-gauge for low-viscosity products, or slightly larger (∼27-gauge) for high-viscosity products
■ Anesthetic
■ Prepare filler.
• Powdered fillers should be reconstituted 2-4 hours before injection.
TECHNIQUE8
■ The technique for HA or collagen injections is described here.
■ Perform postprocedure massage (pinch and roll) if blending is needed.
Apply Anesthetic
■ There are several viable approaches.
• Cryoanalgesia: Apply ice or a cold compress to the site before injection.
• EMLA or other topicals: Must apply 45-60 minutes before injection
• Local anesthetic injections: Avoid liberal infiltration, because it distorts tissues.
• Buffer the anesthetic with sodium bicarbonate because of the lips’ great sensitivity.
• Inject along the vermilion border and areas to be augmented.
• Swelling should dissipate after 10 minutes.
• Some fillers come premixed with a local anesthetic.
► For those that do not, a local anesthetic can be added.
■ Regional: 0.5 ml of 1% lidocaine can be injected along the upper and 0.5 ml along the lower gingival sulci.
• Alternatively, topical benzocaine can be applied along the mucosal sulci using either a cotton-tipped applicator or a 2 × 2 gauze.
• Because of the rapid absorption through mucosal surfaces, the anesthetic only needs to be applied a few minutes before injecting filler.
■ Nerve blocks: Inject ∼0.25 ml at both the infraorbital and the mental foramina.
• This can prevent normal motion of the lips, compromising aesthetic outcome.
• Some think that this allows too-aggressive injections.
Sterile Technique
■ Using sterile technique is imperative to prevent infections and biofilm: Remove makeup, prepare the injection site with antiseptic, and do not breach the mucosa.
Injection Technique
■ Injection techniques: Anterograde linear threading, retrograde linear threading, radial fanning, serial puncture, and cross-hatching9 (Fig. 48-4).
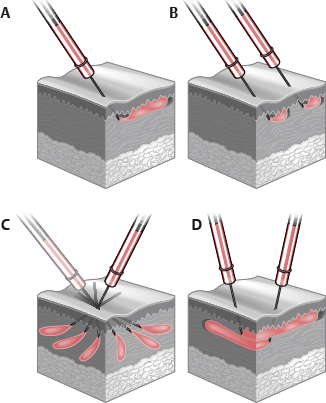
Fig. 48-4 Injection techniques. A, Linear threading. Filler is injected either as the needle is advanced (anterograde) or withdrawn (retrograde). B, Serial puncture. Filler is deposited in multiple, adjacent injections. C, Radial fanning. Filler is injected by linear threading but is redirected and advanced in a new radial direction before the needle is completely withdrawn. D, Cross-hatching. Filler is injected by linear threading along multiple parallel and perpendicular passes.
• Anterograde and retrograde linear threading and serial puncture are the techniques most used for lip augmentation.
• Anterograde linear threading: A thread of filler is pushed out ahead of the advancing needle.
► Do not inject large boluses into one area.
• Retrograde linear threading: The needle is advanced to the desired location, then, as it is withdrawn, a thread of filler is injected.
• Serial puncture: The needle is inserted, and a small depot is deposited until resistance is met. The needle is withdrawn and then reinserted a short distance farther, and another small depot is deposited.
■ Stretch or pinch the lip with nondominant hand to provide a firm, nonmobile surface.
■ Position needle with bevel facing deep to prevent superficial deposition.
■ Aspirate before injecting to prevent intravascular deposition.
■ Inject vermilion lip, vermilion border, and philtral columns as needed for individualized enhancement, seeking to accentuate patient’s anatomy.
• A slow (<0.3 ml/minute) and gentle injection technique causes less pain. It also reduces the risk of vascular occlusion and other adverse effects.
■ Pay careful attention to lip-defining structures.
• Be conservative with the philtral columns. Minor alterations are visible.
• Preserve the Cupid’s bow. Small alterations are noticeable and can be distorting.
• Avoid creating fullness above upper vermilion. This blunts the vermilion border and gives a flat “simian” look.
• Accentuate the three upper lip and two lower lip thickenings.
■ Overfilling effaces lip-defining structures, leading to “sausage” or “duck bill” lips.
■ Taking a conservative approach, undercorrecting initially with gradual shaping over time, will lead to a more natural look.
Plane of Injection
■ Vermilion (mucosal): Submucosal, just above orbicularis oris
■ Vermilion border: Needle in potential space between red and white lip
► Low resistance when in correct plane
► This provides vermilion definition (ski jump transition).
■ Philtrum (cutaneous): Mid-dermis9 (Fig. 48-5)

Fig. 48-5 Injection pattern. A, Young lips. B, Aging lips.
• Young lips: Inject caudal half of philtrum, central three fifths of upper and lower vermilion lips.
• Senile lips: Inject full philtrum and across entire vermilion lips.
■ Some vermilion eversion and shortening of the cutaneous upper lip can be obtained by injecting submucosally in the wet vermilion.
■ If using collagen, overcorrect by 10%-20%.
■ Apply ice intermittently for swelling and cryoanalgesia.
Generic Augmentation Approaches
■ Numerous generic augmentation approaches exist. Two are included here:
• Anterior flow or serial puncture technique3,10,11 (Fig. 48-6)
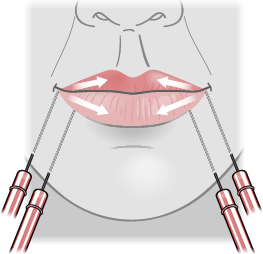
Fig. 48-6 Anterior flow or serial puncture technique. Inject vermilion from lateral to medial, inject corner of lips to create “supportive buttresses” from mandibular to lower lateral lip.
► The patient is in an upright, sitting position.
► Inject while standing at the patient’s side. Intermittently reassess from frontal view.
► Inject from right to center and then from left to center.
► Stretch the lip to ensure the needle enters at the commissure (labiomandibular groove).
► Insert needle into potential vermilion space at 45-degree angle on mucosal side. Redirect it at 20-degree angle from lip.
► Inject filler, pushing ahead of the needle.
► When resistance is met and filler will not flow, injection is moved to next point.
► Finish half of lower lip. Then inject along the side of mouth, where lower and upper lip connect, thereby elevating the corner of lip and decreasing the labiomandibular groove.
► Inject upper lip.
► Inject from mandibular margin to lower lateral lip, creating “supportive buttresses” to reestablish vertical height (lost secondary to bone resorption).
► Repeat procedure on the other side.
► The total injected volume is ∼1 cc into the upper lip and ∼3 cc into the lower lip and buttresses.
• Six-step technique12 (Fig. 48-7)
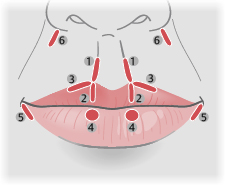
Fig. 48-7 Six-step technique. 1, Define philtral columns. 2, Cupid’s bow. 3, Define a portion of the vermilion-cutaneous junction. 4, Lower lip paramedian tubercles. 5, Support the oral commissures. 6, Nasolabial fold.
► 12 injections of ∼0.1 cc each
► Patient is in a supine position.
► Step 1: Define philtral columns. Pinch philtral column with nondominant hand while injecting in retrograde threading fashion in dermis. Repeat procedure in other philtral column.
► Step 2: Cupid’s bow. Insert needle at the base of the philtral columns and advance down to the wet-dry margin. Inject in a retrograde threading fashion, creating a strut for each Cupid’s bow apex.
► Step 3: Define a portion of the vermilion-cutaneous junction. Inject a thread along the vermilion-cutaneous junction from the apex of Cupid’s bow laterally and halfway to the oral commissure. Repeat procedure on the other side.
► Step 4: Lower lip paramedian tubercles. With patient everting lower lip, insert needle into the wet-dry margin at about a third of the way from the midline to the commissure. Deposit 0.1 cc into the orbicularis oris muscle. Repeat procedure on the other side.
► Step 5: Support the oral commissures. Inject in the lateral lower cutaneous lip, just below the oral commissure. Repeat procedure on the other side.
► Step 6: Nasolabial fold. Inject superiorly in the nasolabial folds. This allegedly helps to evert the lip.
SENIOR AUTHOR TIP: When injecting lips with filler, microcannulas are a surgeon’s best friend. Labial artery anatomy is notoriously variable.13 The blunt tip of a 25-gauge microcannula introduced from each commissure and extending medially allows bruise-free volumization (Fig. 48-8, A and B). Philtral augmentation needs to be done sharply, however.
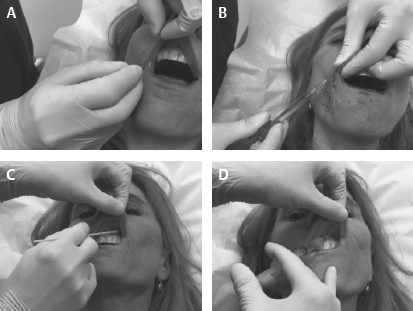
Fig. 48-8 A and B, The blunt tip of a 25-gauge microcannula introduced from each commissure and extending medially allows bruise-free volumization. C and D, Topical followed by local anesthetic for painless injections.
Numbing the sensitive vermilion is trivial and should be done with serial submucosal injections of lidocaine 1% with epinephrine at the sulcus. To make these relatively painless injections completely pain free, paint a topical anesthetic onto the mucosa 1-2 minutes before injections (Fig. 48-8, C and D). We use a combination of lidocaine 10%, prilocaine 10%, and tetracaine 4%. This technique prevents the problem of distorting the anatomy by direct injection of anesthetic into the lips.
POSTPROCEDURE CARE
■ Schedule next appointment (possibly for touch-ups in 2-4 weeks) to ensure patient retention.
■ Little to no downtime
■ Continue intermittent ice application for the next few hours.
■ Avoid massaging perioral region, and minimize facial movements for the short-term.
■ Sleep with head elevated for 1 night.
■ Resume skin care and makeup application after 24 hours.
■ Take postprocedure photos at follow-up visits.
COMPLICATIONS14–17
■ Complications for HA and collagen injections are listed (Fig. 48-9).
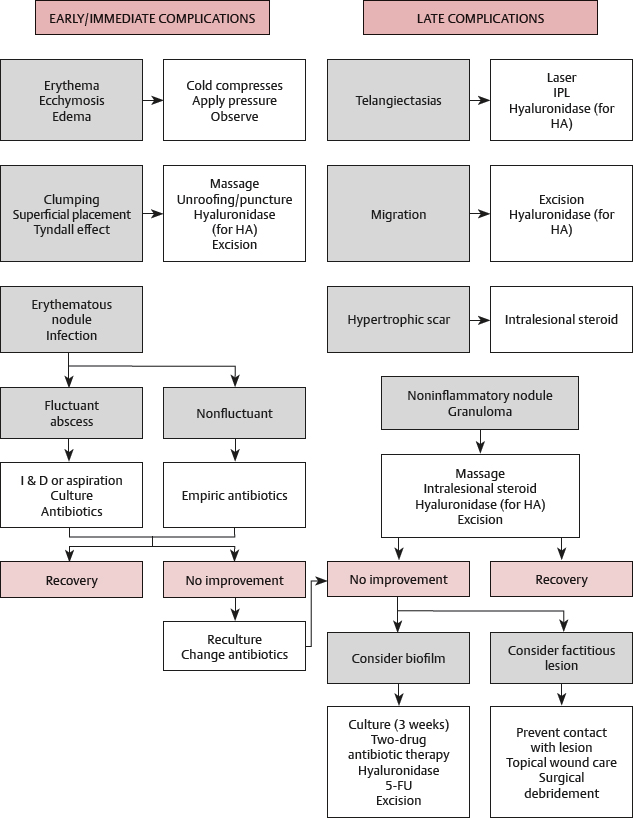
Fig. 48-9 Complications and treatment algorithm for hyaluronic acid and collagen injections. (5-FU, 5-fluorouracil; HA, hyaluronic acid; I & D, incision and drainage; IPL, intense pulsed light.) © Oxford University Press.
Minor
■ Swelling (∼73%-89% of cases), ecchymosis (∼10%-61% of cases), erythema (∼40%-93% of cases). These are self-limited, usually resolving within 7 days.
■ Transient hyperpigmentation
■ Infection (as high as 5%)
• Treatment: Antibiotics
■ Telangiectasias
• Treatment: Pulsed dye laser
■ Lumps or nodules (∼11%)
• These are caused by excessive or misplaced filler, migration with muscle movement.
• Treatment
► Massage the area and observe whether they resolve in a few days.
► If it persists and is a solitary lesion, insert a 22- or 25-gauge needle and drain the fluid.
► When multiple or deep lumps exist, or if a nodule persists, inject hyaluronidase (start with 150 IU and titrate up) and massage the area. This will dissolve the HA.
► If lumps arise after patient leaves the office, abstain from manipulation for 12-24 hours, because these are often caused by swelling from needle entry.
■ Delayed nodules
• Biofilm purportedly plays a role.
• Difficult to treat, because the bacteria’s metabolism is slow and they secrete a protective matrix
• Treatment
► Hyaluronidase helps to break down protective matrix.
• Consider antibiotics (fluoroquinolone AND third-generation macrolide), intralesional 5-FU, intralesional laser therapy.
■ Bluish discoloration, or Tyndall effect, from injecting too superficially
• Treatment
► Hyaluronidase
► Usually 15-50 IU is sufficient.
■ Hypersensitivity reactions, local or systemic (angioedema, anaphylaxis)
• Occurs in 3%-5% of cases with bovine collagen, and in <0.5% with HA
• Treatment
► 0.1% tacrolimus ointment
► Local or systemic steroids plus antihistamines or cyclosporine
• Granulomas
► These are a type IV hypersensitivity reaction and appear weeks to months later.
► Incidence is 0.01%-1.3% of cases.
► Treatment
♦ Intralesional steroids are effective.
♦ Incision and drainage or excision
Severe
■ Very rare, estimated to be <0.001% of cases
■ Vascular occlusion
• Caused by needle injury to vessels, intravascular embolism of filler, external vascular compression by filler
• Patients usually present with pain on injection, then develop blanching, duskiness, or ecchymosis.
• Delayed presentation can also occur, possibly from the volume of HA compressing vessels.
• Symptoms evolve over the next 1-2 days (erythema, edema, discoloration, constant pain)
• Treatment
► Massage
► Warm compress
► Nitroglycerine paste
► Hyaluronidase, regardless of filler type, because of its ability to reduce edema and associated pressure
► Consider steroids to reduce inflammation and associated injury.
Tissue Necrosis
■ A result of untreated vascular occlusion
■ Treatment
• Local wound therapy
• Antibiotics
• Debridement
AUGMENTATION WITH IMPLANTS (see Chapter 27)
ADVANTAGES
■ Permanent
■ Biocompatible: They have been used in medical devices for years.
■ Reliable amount of bulk with little shrinkage
■ Reversible
DISADVANTAGES
■ Does not fully integrate: Possibility of migration or extrusion
■ Does not treat a long cutaneous upper lip
■ Carries the risk of inflammatory response and infection
■ Although advertised as soft and pliable, many think that they have an unnatural feel.
• This probably depends on which product is used.
■ Some think they inhibit natural lip motion (in upper lip more than in lower).
■ Expensive
SENIOR AUTHOR TIP: Implants to the lips are almost never a good idea. Objects placed into this highly mobile area, whether they integrate or not, are likely to distort the anatomy and become visible—most notably at extremes of expression. Because little or no shrinkage occurs over time, what might look proportional at 50 years of age will look overdone at 70 years of age. Finally, removing them is often not trivial. Integrating implants can be difficult to dissect free from investing tissue, and ones which do not integrate often leave capsules that are problematic in their own right.
Stay updated, free articles. Join our Telegram channel

Full access? Get Clinical Tree


