The definitive diagnosis of inherited epidermolysis bullosa is best made with positive immunofluorescence antigenic mapping, transmission electron microscopy, and epidermolysis bullosa–related monoclonal antibody studies. However, immunofluorescence microscopy is faster and easier as compared with electron microscopy for subtyping epidermolysis bullosa. The severity of the disease varies with the structural protein involved. A proper diagnosis should be made as soon as possible, and skin biopsies help with diagnosis. This article describes the technique of skin biopsy.
The definitive diagnosis of inherited epidermolysis bullosa (EB) is best made with positive immunofluorescence (IF) antigenic mapping (IFM), transmission electron microscopy (EM), and EB-related monoclonal antibody studies, the IF microscopy being faster to complete and more sensitive and specific than EM for subtyping of EB. These are key diagnostic tools that not only confirm the clinical diagnosis but also help to identify the particular subtype of EB. This information ultimately sheds light on the likely prognosis and level of care required and provides a basis for genetic testing.
People who are afflicted with EB have varying degrees of severity depending on the structural protein involved. However, major subtypes of EB may be indistinguishable clinically, especially in the neonatal period. It is therefore essential that a proper diagnosis be made as soon as possible, and skin biopsies, when properly performed, can aid us in this.
This article provides information on the correct way of obtaining skin biopsies in EB, collecting and storing skin samples, and transporting specimens for analysis.
Materials needed
Basic Materials
Rubber eraser or pencil with rubber eraser (to induce a new blister)
Suture set containing tissue forceps, needle holder, and scissors
Biopsy punches (2 mm, 3 mm)
Suture material (4-0 or 5-0 nonabsorbable or absorbable sutures)
Antiseptic, nonstick dressings.
Transport Media
IF mapping
Normal saline (0.9% sodium chloride) solution or liquid nitrogen (for storage <24 hours) is ideal
Michel medium (for storage from 24 hours to 6 weeks ).
Electron microscopy
2.5% glutaraldehyde or appropriate fixative.
Preparing the patient
As in all surgical procedures, before any biopsy, informed consent must be taken from the patients or from parents in case the patient is a minor.
Choose an area of skin that seems clinically unaffected but preferably adjacent to the site where the patient usually gets blisters (ie, on the arms or legs). In neonates with more extensive forms of EB, a nonblistered site that has been freshly rubbed, such as the lower abdomen or the upper inner arm just above the elbow, is usually suitable. Skin should not be obtained from the palms or soles, as the overall thickness of the tissue will make it difficult to demonstrate skin cleavage. If possible, choose an area where the resulting scar will not be so obvious.
The best areas to take skin biopsies in EB patients are fresh blisters, as these will yield better results. Blisters that are more than 12 hours old, especially those with bloodstained contents, are not ideal because these may have false immunostaining caused by proteolytic antigen degradation and reepithelialization under the roof of the blister, resulting in multiple cleavage planes. An area of nonblistered skin, which has been gently rubbed to produce mild erythema, is ideal because this will contain a cleavage plane without secondary changes.
In general, attempts at inducing microscopic cleavage should be done before the biopsy. Exceptions would be in the case of severe junctional and recessive dystrophic EB, where there is such inherent mechanical fragility that skin cleavage planes are readily demonstrable just with a routine punch biopsy technique. The biopsy site should be identified, prepared in a sterile manner (ie, cleaned with an alcohol swab), and encircled. Rubbing is performed by applying firm downward pressure with a pencil eraser and then rotating it laterally (at least 180° each way).
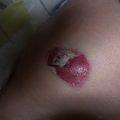
In newborns or infants, the selected area on the skin is rubbed with an eraser or pencil eraser at least 20 times at first ( Fig. 1 ). The area may turn red but you should ideally wait for at least 5 minutes for a blister to develop microscopically before taking the biopsy.
In cases of adults or children with less-severe forms of EB, such as EB simplex or dominant dystrophic EB, after identifying and marking the target area with a pen, have the patient or parent take the eraser or pencil eraser and rub on the area many times until it turns red ( Fig. 2 ). They should stop rubbing if the skin starts to tear or peel off. They may need to arrive early at the clinic to be instructed to do this and leave the clinic for a few hours with the eraser, to return later for the biopsy. Alternatively, they can do whatever exercise induces their blisters the day before to ensure that the blisters are fresh.
Related posts:
 Immunofluorescence Mapping for the Diagnosis of Epidermolysis Bullosa
 Wound Management for Children with Epidermolysis Bullosa
 Genitourinary Tract Involvement in Epidermolysis Bullosa
 Growth and Pubertal Delay in Patients with Epidermolysis Bullosa
 Epidermolysis Bullosa Care in Germany
Epidermolysis Bullosa Care in Israel
Epidermolysis Bullosa Care in Germany
Epidermolysis Bullosa Care in Israel
Stay updated, free articles. Join our Telegram channel

Full access? Get Clinical Tree


