23. Fat Grafting
George Broughton II, Sydney R. Coleman
PREOPERATIVE EVALUATION1
■ Consultation with the patient to establish realistic goals and expectations (see Chapter 4)
■ Comprehensive medical and surgical history and physical examination
• Surgical implants are at risk for rupture or puncture with fat grafting techniques.
• Bleeding complications/risks are possible from prescription and herbal medicine.
• History of cold sores requires herpes simplex prophylaxis.
• Patients planning weight loss should wait until weight goal is achieved.
■ Standard preoperative photographs for surgical planning (see Chapter 3)
• Patients being evaluated for facial rejuvenation are asked to provide photographs of their younger selves in repose.
• Preoperative and postoperative photographs are helpful for patients who had prior surgery on their face.
■ Presurgical arrangement and understanding financial responsibilities for revisions
■ Analysis and operative planning based on patient desires, clinical examination, and photographs
INFORMED CONSENT1
RECOMMENDED ITEMS TO BE INCLUDED IN THE INFORMED CONSENT
■ Locations where fat will be harvested and placed
■ A statement that reads, “Dr.___ has placed markings on my face and/or body. I have examined these markings completely with Dr.__, and I understand they represent the location for placement and/or removal of fat and planned incisions.”
■ No warranties, guarantees, or special contracts about the success and longevity of the procedure
■ Possible need for additional surgeries/procedures
■ Complications (including donor site complications)
EQUIPMENT AND PREPARATION1–3
CHOICE OF HARVEST SITE
■ There is no difference on grafted fat longevity based on donor site.
■ Fat should be harvested from sites that will enhance body contour and are easily accessible in the supine position.
■ Most common sites used are the abdomen and medial thigh. Other sites include the knees, and lateral and anterior thigh.
■ Incisions should be placed in creases, previous scars, stretch marks, and hirsute areas. The pubic region is the most useful site—it allows access to the abdomen, medial thigh, and anterior thigh.
■ Incisions are closed with a single stitch of nylon or plain gut.
■ Recommended incision sites are shown in Fig. 23-1.
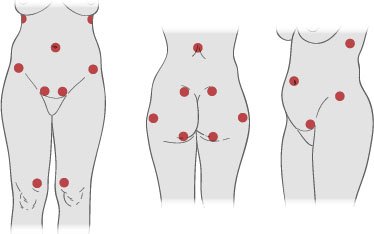
Fig. 23-1 Recommended incision sites for fat harvest.
HARVEST CANNULAS
■ A two-holed cannula with a blunt tip and dull distal openings at the end is used for harvesting (Fig. 23-2). Cannula lengths are 23 and 15 cm. The advantageous greater reach of the 23 cm cannula can be offset by the frustration of broken syringe tips, resulting from the greater torque generated by the longer cannula.
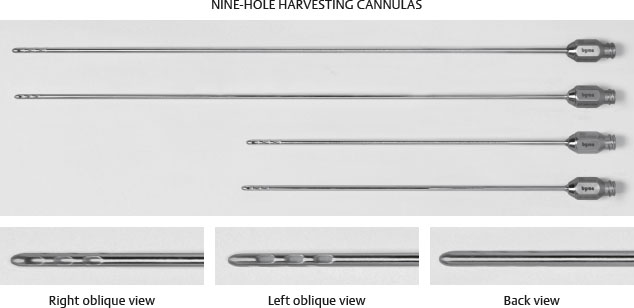
Fig. 23-2 Harvest cannulas.
■ A 10 cc Luer-Lok syringe is used.
TECHNIQUE
■ The harvest areas are surgically prepared.
■ A solution of 0.5% lidocaine with 1:200,000 epinephrine is infiltrated at the incision site using a 25-gauge needle.
■ A stab incision is made with a No. 11 blade just large enough for the harvesting cannula (2-3 mm).
■ A Lamis infiltrator can be used to infiltrate lidocaine at a volume of 1 ml of lidocaine for every cubic centimeter of fat harvested. For larger volumes or multiple sites, a solution of lactated Ringer with a 1:400,000 epinephrine is used instead. Wait 7 minutes before harvesting.
SENIOR AUTHOR TIP: Superwet or tumescent techniques are not used during the harvesting phase, because the large volumes of fluid may break up the parcels of fatty tissue into smaller components of tissues and cells. This will decrease the survival of the injected fat. The extra volume of liquid aspirated with the harvested fat will decrease the yield of fat for each syringe and increase operative time.
■ The plunger is manipulated on a 10 cc syringe to generate 1 to 2 cc of negative pressure space.
TIP: If excessive fluid is in the syringe, set it on the back table with the plunger side down to allow the fat and liquid to separate. Express the excess liquid out of the syringe and continue to use it to collect more fat.
TIP: The oil separated from the fat can be used to lubricate the cannula to minimize the risk of superficial burns.
■ After the syringe is filled, the cannula is removed and a dual-function Luer-Lok plug is used to cap the syringe (Fig. 23-3). With the syringe tightly capped, the plunger is removed and the syringe placed in a centrifuge for 3 minutes at 3000 rpm.
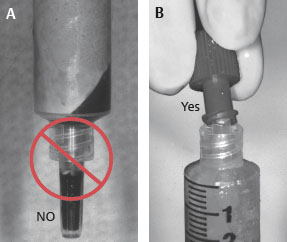
Fig. 23-3 Separating the fat. A, The plugs that accompany the syringe should not be used, because they frequently allow the aqueous portion of the contents to leak. B, The preferred plug is a dual-function Luer-Lok plug, which is twisted on to create a seal that will prevent spillage during the centrifuging process.
SEPARATION OF COMPONENTS
After centrifugation, the harvested fat will separate into three layers (Fig. 23-4).

Fig. 23-4 Three different layers of harvested fat after centrifugation.
■ The dual-function Luer-Lok plug SHOULD NOT be removed. First, pour the upper oil layer into a medicine cup and save it for lubricating the cannulas.
■ After the oil is decanted, the syringe is kept upright (Luer-Lok–side down) and the Luer-Lok plug removed. The lower aqueous layer will run out. If a tissue plug prevents the aqueous layer from draining, the syringe should be gently tapped or pulled out.
■ The syringe is placed with the middle viable fat cells in a test tube rack (Luer-Lok–side down) and a Codman neuropad is placed into the syringe to wick the fat. The wick should be replaced every 4 minutes, and this should be done at least twice (Fig. 23-5, A).
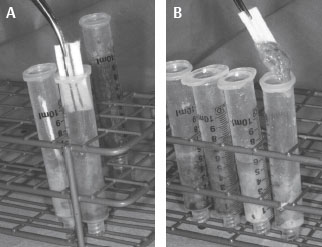
Fig. 23-5 Wicking. A, The wick should be replaced every 4 minutes, and this should be done at least twice. B, Fat is seen sticking to the Codman neuropad. This is an indication that the fat has been exposed to the air too long. This syringe of fat should be discarded.
NOTE: Fat sticking to the Codman neuropad is an indication that the fat has been exposed to the air too long and should be discarded (Fig. 23-5, B).
■ The plunger is replaced and the excess air carefully expressed out of the syringe.
■ The fat is transferred into a 1 cc Luer-Lok syringe by inserting the Luer-Lok tip of the 10 cc syringe into the back of the plungerless 1 cc syringe. (The syringes must be vertical and nothing should block the tip of the 1 cc syringe, to allow air to escape). The plunger to the 1 cc syringe is replaced once it is filled (Fig. 23-6).
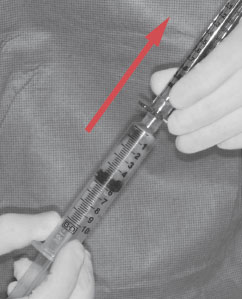
Fig. 23-6 Transfer of fat into a 1 cc Luer-Lok syringe.
■ Alternatively, a double-sided female connector can be used to join both syringes together (and their plungers), and fat from the 10 cc syringe is passed into the 1 cc syringe. (The plunger on the 1 cc syringe should be fully mobile before the transfer so it can slide to accommodate the transferred fat).
FAT PLACEMENT1,3,4
■ The recipient site is surgically prepped and draped.
■ The recipient site is infiltrated with a dilute solution of epinephrine (1:400,000 in lactated Ringer solution) to minimize bruising, hematoma, and the possibility of arterial embolization.
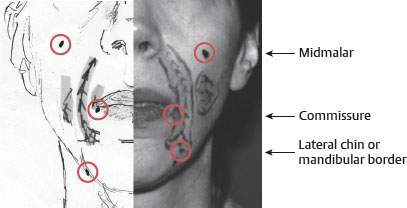
■ Incisions should be placed in wrinkle lines, folds, or hair-bearing areas.
■ The level of fat placement is dictated by the goal:
• To strengthen soft tissue projection over bony prominences, fat should be injected deep against bone or cartilage.
• To support skin for an aesthetic appearance, fat should be layered immediately under the skin.
• To fill, plump, or restore fullness, fat is placed in the intermediate layers between skin and the appropriate underlying tissue.
■ The volume of fat to be infused is a difficult decision. The recipient site will be distorted by accumulating volumes of blood and infiltration solution. The volume of fat to be injected will be diluted with blood, lidocaine, and oil. It will be displaced by postoperative muscle contraction and lost to necrosis/absorption.
■ Fat is infiltrated into the desired sites with a blunt cannula or a V-dissector (pickle fork). There are three types of blunt cannulas, and the recipient site determines which one is best.
■ Cannula types (Fig. 23-7)
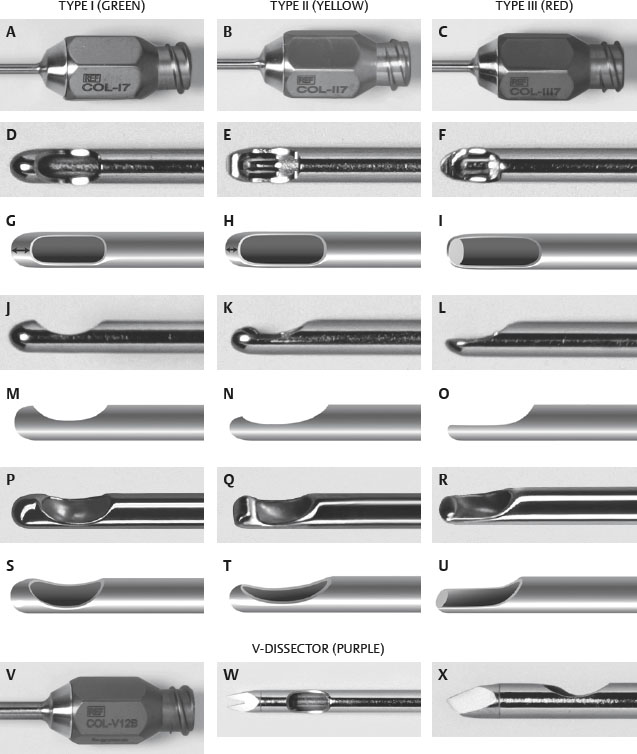
Fig. 23-7 Cannula types.
• The V-dissector is used for correction of scars.
• Type I: Completely capped on the tip, it minimizes injury to nerves, vessels, glands. It lays out the most stable placement of fat.
• Type II: Similar to type I, but not completely capped at the tip
• Type III: Flat on the end, it allows dissection through tissue. Useful for scars or fibrous tissue and for placing fat in intermediate subcutaneous tissue such as lower eyelid or the white roll of the lip.
POSTOPERATIVE CARE1
EDEMA
■ Postoperative edema is the most common problem.
■ Patients are informed PREOPERATIVELY about what to expect.
SENIOR AUTHOR TIP: The following is a timetable “of what to expect”:
Week 1, “Monster”: Patients are not recognizably human—swelling at worst on day 3.
Week 2, “Human”: Patients begin to look like a younger, “beat-up version” of themselves. The bruising is resolving but swelling remains.
Week 3, “Recognizable”: Patients begin to recognize themselves.
Weeks 3-5, “Acceptance”: Patients begin to understand and like their new look.
Up to 16 weeks: Some swelling is present in varying degrees.
TREATMENT AND PREVENTION OF EDEMA1
■ Elevation and cold therapy should be used immediately for up to 48 hours postoperatively.
■ Microfoam tape is placed immediately over the treated areas and left in place for 3 to 4 days. The tape helps to keep the transplanted fat in place and minimizes edema.
■ Patients are counseled against placing any pressure on their treated areas, especially while they sleep.
■ Patients are encouraged to massage their donor site as soon as tenderness in the area will permit. The recipient site should not be massaged until 2 weeks after the procedure.
CAUTION: Fat placed in folds or grooves should not be massaged.