Fig. 11.1
Skin incision for emergency department thoracotomy in a male patient

Fig. 11.2
Incision extended through the skin, subcutaneous tissue, and most thoracic musculature
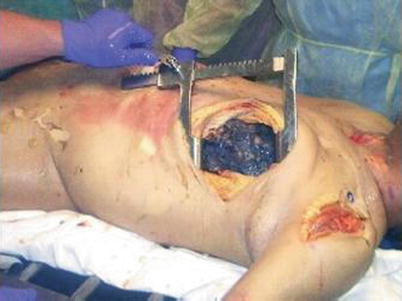
Fig. 11.3
Left anterolateral thoracotomy with retractor in place and opened widely
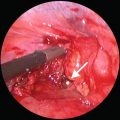
Once you have completed positioning your retractor and adequately lengthening the incision, you should first turn your attention to the pericardium. Complete the remainder of the exploration in a systematic manner. Your assistant should retract the left lung posteriorly, allowing visualization of the anterior mediastinum and pericardium. Locate the phrenic nerve following its craniocaudal path along the lateral aspect of the pericardium (Fig. 11.4). While taking care not to injure the phrenic nerve, use forceps to grasp the pericardium 1 cm anterior to the nerve and make an incision with scissors. The initial incision should allow you to confirm the presence of pericardial blood. Occasionally, a tense cardiac tamponade will be present, making it difficult to grasp the pericardium with forceps. In these cases, you may make the initial pericardiotomy with a small stab incision using a scalpel. Next, lengthen the pericardiotomy cranially and caudally with scissors, about 1 cm anterior and parallel to the path of the phrenic nerve (Fig. 11.5). By enlarging the pericardial incision, you can evacuate pericardial tamponade and deliver the heart into the wound. This will allow you to repair any cardiac injury that may be present.
Fig. 11.4
The phrenic nerve following its craniocaudal path along the lateral aspect of the pericardium
Fig. 11.5
Extension of pericardiotomy with scissors
If the heart is in asystole, then repair is obviously quite easy. However, if there is an organized cardiac rhythm, you will need to gently stabilize the heart in order to perform the repair. You should be able to fix most cardiac injuries with a simple interrupted suture repair; the author usually uses a 2-0 polypropylene suture on a tapered needle. You do not need to use pledgets during the initial repair, but if the tissue tears during repair, you may consider adding pledgets to reinforce the repair. You may also use a running stitch, figure-of-eight, or horizontal mattress. If the cardiac wound is in close proximity to a coronary artery, you may need to alter your approach. If the injury is near a distal coronary artery, then a repair that ligates the artery distally should be well tolerated by the myocardium. However, if the injury is near the proximal portion of a coronary artery (particularly the left anterior descending artery), the ligation will surely lead to a massive myocardial infarction and death. In these cases, you should perform a horizontal mattress suture around the laceration and the coronary artery, so as not to ligate the myocardial blood supply (Fig. 11.6).
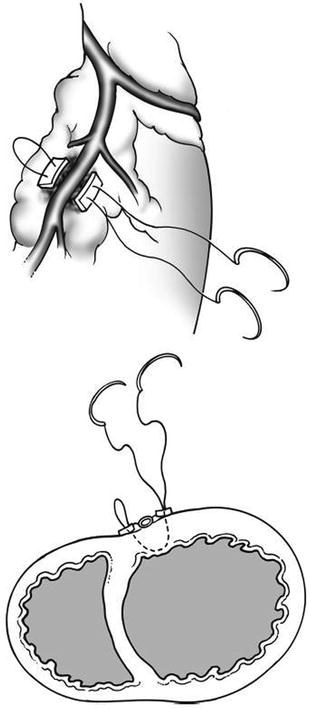
Fig. 11.6
Horizontal mattress repair of laceration adjacent to a coronary artery
If the repair proves difficult or you are not accustomed to performing cardiac repairs, a few optional approaches exist. You may temporize bleeding from a cardiac wound by placing a urinary catheter through the laceration and inflating the balloon (Fig. 11.7) and then applying gentle traction after making sure to clamp the proximal part of the catheter. Rather than placing sutures, you may be able to repair the laceration with a skin stapler and perform the definitive suture repair in a delayed fashion in the operating room. You may also control the bleeding from a cardiac laceration using a Satinsky clamp, particularly for right atrial lacerations (Fig. 11.8). Finally, if the wound is on the posterior surface of the heart, you can elevate the heart by grasping the apex with a Duval lung clamp to allow visualization (Fig. 11.9). If the heart is beating while elevating the apex, venous return to the heart may be impeded and may lead to cardiac arrest, so you should perform this maneuver gently and only elevate enough to complete the repair. After cardiac repair or if no cardiac wound is identified, attention should be turned to the descending thoracic aorta.
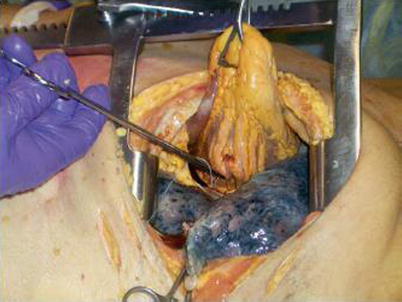
Fig. 11.7
Temporary control of cardiac laceration using a urinary catheter
Fig. 11.8
Temporary control of right atrial laceration with a Satinsky clamp
Fig. 11.9
Elevation of the tear with a Duval clamp grasping the apex in order to repair a posterior cardiac laceration
The left lung should now be retracted anteriorly by your assistant. You should evacuate any significant hemothorax to allow visualization of the descending thoracic aorta. The descending thoracic aorta lies posterior and medial in the left chest, running along the left, anterior thoracic spine. With the left lung retracted anteriorly and the left chest evacuated of blood, you should recognize the thick, white, muscular descending aorta (Fig. 11.10). Remember, the esophagus lies anterior and medial to the descending thoracic aorta and you should keep its position in mind when cross-clamping the thoracic aorta in order to avoid iatrogenic esophageal injury. You may consider placing a nasogastric tube to make it easier to identify the esophagus in the chest. Before you can reliably apply a cross-clamp, you must incise the parietal pleura that covers the descending thoracic aorta. You should grasp the parietal pleura with forceps and make the initial incision with scissors. You can perform the remainder of the exposure bluntly with finger dissection of the parietal pleura off of the aorta, both in a cranial and caudal direction. Keep in mind you do not need to circumferentially mobilize the descending aorta, as this wastes precious time and may cause iatrogenic injury to intercostal branches. Once you have swept away the parietal pleura, you should cross-clamp the descending aorta with a DeBakey aortic aneurysm clamp or Satinsky clamp (Fig. 11.10).
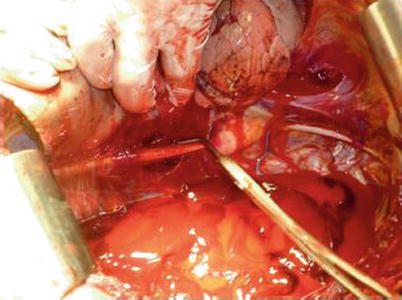
Fig. 11.10
Cross-clamp of the descending thoracic aorta with a Satinsky clamp
Cross-clamping the descending thoracic aorta during EDT improves resuscitation via three mechanisms. First, when you begin internal cardiac massage, having the thoracic aorta cross-clamped will improve cerebral blood flow and perfusion pressure during systole. Second, the coronary arteries, which fill during diastole, will receive better perfusion during internal cardiac massage. Third, aortic cross-clamping will slow down intra-abdominal hemorrhage until a definitive abdominal operation can be performed. You should cross-clamp the thoracic aorta as distally as possible in order to maintain adequate perfusion to the spinal cord during the cross-clamp time. Furthermore, you should remove the aortic cross-clamp as soon as possible and preferably within 30 min. Once you have successfully applied the aortic cross-clamp, you can turn your attention to internal cardiac massage.
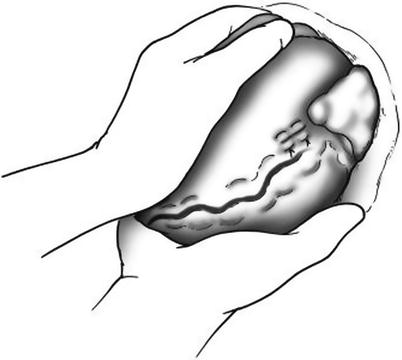
With the pericardium already opened widely and the heart delivered into the wound (with or without a previous cardiac repair), you should be able to easily evaluate the heart’s rhythm and contractility. Patients with an organized rhythm and adequate contractility do not need internal cardiac massage, but may require intravenous drugs such as atropine and epinephrine to support heart rate and blood pressure. Patients with asystole should receive internal cardiac massage. To begin, cup your hands and place one anterior and one posterior to the heart (Fig. 11.11). Using the palm of each hand, begin internal cardiac compression at a rate of about 100 beats/min, compressing the heart from its apex to its base. Take care to use only your palms to avoid iatrogenic injury from point pressure on the heart from your fingers or thumbs. Simultaneously, the patient should receive intravenous epinephrine providing at least 1 min of internal cardiac massage to assist with resuscitation. If the patient develops ventricular fibrillation, use internal paddles and defibrillate with an initial setting of 10–15 J. The internal paddles should be positioned with one paddle anterior and one paddle posterior to the apex of the heart (Fig. 11.12). Continue with internal cardiac massage, defibrillation, and advanced cardiac life support (ACLS) protocols until the patient has a return of spontaneous cardiac activity or you decide the care is futile.