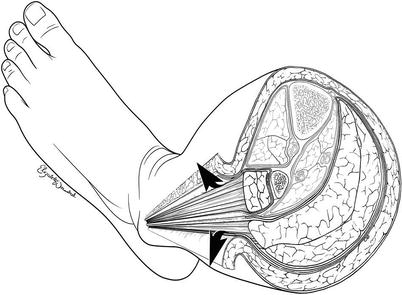
Fig. 61.1
Cross-sectional anatomy of the midportion of the left lower leg depicting the four compartments that must be released when performing a lower leg fasciotomy
It is important that you understand the anatomical arrangement of these compartments as well as some key structures within each compartment in order to perform a proper four-compartment fasciotomy. It is not necessary for you to remember the names of all the muscles in each compartment, but it is useful for you to remember that the anterior compartment contains the anterior tibial artery and vein and the deep peroneal nerve; the lateral compartment, the superficial peroneal nerve (which must not be injured); the superficial posterior compartment, the soleus and gastrocnemius muscles; and the deep posterior compartment, the posterior tibial and peroneal vessels and the tibial nerve.
There is absolutely no role for getting fancy when doing fasciotomy of the lower extremity. The use of a single incision for four-compartment fasciotomy of the lower extremity is mentioned to condemn it, and now that it has been mentioned, you should promptly forget it. Attempts to make cosmetic incisions should also be condemned, and your mantra should be “bigger is better.” Compartment syndrome of the lower extremity dictates two-incision four-compartment fasciotomy with generous skin incisions, and you should accept no substitute.
There are several key features that will enable you to perform a successful two-incision four-compartment fasciotomy. The most commonly missed compartments are the anterior and the deep posterior. One of the key steps is proper placement of the incisions. As extremities needing fasciotomy are often grossly swollen or deformed, marking the key landmarks will aid in the placement of the incisions. The tibial spine serves as a reliable midpoint between the incisions, and the lateral malleolus and fibular head are used to identify the course of the fibula on the lateral portion of the leg (Fig. 61.2). The lateral incision is usually made just anterior (~1 fingerbreadth) to the line of the fibula or a finger in front of the fibula. It is important to stay anterior to the fibula as this minimizes the chance of damaging the superficial peroneal nerve. The medial incision is made one thumb breadth below the palpable medial edge of the tibia or a thumb below the tibia (Fig. 61.3). The extent of the skin incision should be to a point approximately three fingerbreadths below the tibial tuberosity and above the malleolus on either side.
Fig. 61.2
The fibular head and lateral malleolus are used as reference points to mark the edge of the fibula, and the lateral incision (dotted line) is made one finger in front of this. The tibial spine serves as a midpoint reference between the two skin incisions. The lateral aspect of the right lower extremity is depicted
Fig. 61.3
The medial incision (dotted line) is made one thumb breadth below the palpable medial edge of the tibia (solid line). The medial aspect of the right lower extremity is depicted
It is very important that you mark the incisions on both sides prior to opening them, as the landmarks of the swollen extremity will become rapidly distorted once the incision is made.
61.4.1 The Lateral Incision of the Lower Leg
The lateral incision (Figs. 61.1, 61.2 and 61.4) overlies, and is made, one finger in front of the fibula and should in general extend from three fingerbreadths below the head of the fibula down to three fingerbreadths above the lateral malleolus. The exact length of the skin incision will depend on the clinical setting. Care must be taken to make sure that it is long enough so that the skin does not serve as a constricting band. The skin and subcutaneous tissue are incised to expose the fascia encasing the lateral and anterior compartments. Care should also be taken to avoid the lesser saphenous vein and peroneal nerve when making these skin incisions.
Fig. 61.4
Two-incision four-compartment fasciotomy. The lateral incision (left side of the picture) provides access to the lateral and anterior compartments. The medial incision (right side of the picture) traverses the superficial compartment allowing entry into both the superficial and deep posterior compartments
Once the skin flap is raised, the intermuscular septum is identified. This is the structure that divides the anterior and lateral compartments. In the swollen or injured extremity, you may have difficulty finding the intermuscular septum. Often you can find the septum by following the perforating vessels down to it (Fig. 61.5a). Classically the fascia of the lower leg is opened using an “H”-shaped incision. To do this you will make the cross piece of the “H” using a scalpel which will expose both compartments and the septum. You will then construct the legs of the “H” with curved scissors using just the tips which are turned away from the septum to avoid injury to the peroneal nerve (Figs. 61.5b and 61.6). The fascia should be opened by pushing the partially opened scissor tips in both directions on either side of the septum opening the fascia from the head of the fibula down to the lateral malleolus. Inspection of the septum and identification of the deep peroneal nerve and/or the anterior tibial vessels confirm entry into the anterior compartment. The skin incision should be closely inspected and extended as needed to ensure that the ends do not serve as a point of constriction.
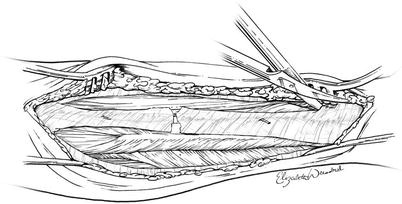
Fig. 61.5
(a) The intermuscular septum separates the anterior and lateral compartments and is where the perforating vessels exit. (b) The fascia overlying the anterior and lateral compartments is opened in an “H”-shaped fashion. The lateral aspect of the right lower extremity is depicted
Fig. 61.6
The fascia overlying the anterior and lateral compartments is opened using scissors in an “H”-shaped fashion with the scissor tips turned away from the septum
61.4.2 The Medial Incision of the Lower Leg
The medial incision (Figs. 61.3 and 61.4) is made one fingerbreadth below the palpable medial edge of the tibia. As you make this incision, it is important to both identify and preserve the greater saphenous vein, as well as ligate any perforators to it. In most individuals, the fascia that you will next encounter will be that which overlies the superficial posterior compartment which contains the soleus and gastrocnemius muscles. If you open this fascia from the tibial tuberosity to the medial malleolus, you will have effectively decompressed this compartment (Fig. 61.7). The key to entering the deep posterior compartment is the soleus muscle. The soleus muscle attaches to the medial edge of the tibia, and dissecting these fibers completely free from and exposing the underside of the tibia ensures entry into the deep posterior compartment (Fig. 61.8). Identification of the posterior tibial neurovascular bundle confirms that the compartment has been entered. The muscle in each compartment should be assessed for viability. The viable muscle is pink, contracts when stimulated, and bleeds when cut. The dead muscle should be debrided back to the healthy viable tissue. The skin incision is left open and either covered with a gauze or a vacuum-assisted wound closure device which has been shown in recent studies to speed up and improve the chances for definitive closure of these wounds.
Fig. 61.7
The medial incision is placed such that the saphenous vein can be identified and preserved, and the fascia is opened to expose the soleus and gastrocnemius muscles in the superficial posterior compartment
Fig. 61.8
The soleus muscle is dissected off of the inferior border of the tibia allowing entry into the deep posterior compartment
61.4.3 Pitfalls Associated with Fasciotomy of the Lower Leg
The major pitfall that should be avoided during lower extremity fasciotomy is failure to open one of the four compartments. The anterior compartment is the one most commonly missed during lower extremity fasciotomy. One of the reasons for missing the anterior compartment stems from making the incision too far posteriorly, either directly over or behind the fibula. When the incision is made in this manner, the septum between the lateral and the superficial posterior compartments may be directly below the incision and is erroneously identified as the septum between the anterior and lateral compartments (Fig. 61.9). When the lateral incision is made one finger in front of the fibula, the intramuscular septum between the anterior and lateral compartments is found directly below the incision making successful decompression likely (Fig. 61.10).