CHAPTER 36 Silicone Six-Pack: Abdominal Enhancement with Subfascial Anatomical Implants
Summary
A sleek, contoured abdominal appearance can be achieved through insertion of implants in the rectus abdominis subfascial muscular pocket, providing an anatomically accurate silicone six-pack augmentation. The chapter details the procedure, including preoperative markings, anesthesia, operative preparations, and patient positioning and postoperative care. Overall, abdominal six-pack implant placement is an effective and safe technique to achieve a sleek and muscular male abdominal contour.
Introduction
A sleek, contoured abdominal appearance can be achieved through insertion of implants over the rectus abdominis, providing a silicone six-pack. The rectus musculature extends from the level of the xiphoid to the pubis and is typically divided into three to four segments by tendinous inscriptions. These divisions result in the sought-after muscular appearance of the male abdomen. In this procedure, six to eight silicone gel implants are placed after precise pocket dissection, typically using two small incisions. Implant size and projection should be carefully selected and contoured intraoperatively based on meticulous assessment of individual patient anatomy. Slight asymmetry is acceptable and even desired to achieve a natural appearance. Ideal candidates are those within 30% of their ideal body weight with good basal muscle tone and minimal skin laxity. Excess abdominal and flank adiposity as well as skin laxity or striae may be addressed with adjunctive liposuction and skin excision, respectively. Postoperatively, surgical form and garments are used to apply gentle compression around the implants, maintaining the concave contour of surrounding tissue to the convexity of the implants. Overall, aesthetic outcomes are excellent. Overall, abdominal six-pack implant placement is an effective and safe technique to achieve a sleek and muscular male abdominal contour.
Physical Evaluation
For evaluation, markings, photographs, and videos, the patient is standing and the surgeon should remain sitting on a chair at the level of the patient’s abdomen.
The patient is evaluated for any asymmetry of the abdominal musculature. Any asymmetries, which can be common, are noted, documented, photographed, and discussed with the patient.
Small asymmetries in abdominal musculature can appear natural and accentuate the final surgical result in the absence of dramatic deviation for the standard inscriptional anatomy. This, likewise, should be discussed with the patient when asymmetries are noted upon evaluation.
Assess overall patient build and body weight; patients within 10% of their ideal body weight are appropriate candidates.
Examine abdominal and flank contour for excess adiposity; these patients may benefit from adjunctive liposuction.
Inspect abdominal skin quality; the presence of significant skin laxity or striae may compromise the aesthetic outcome after placement of abdominal implants and benefit from adjunctive skin excision.
Palpate bilateral rectus abdominis muscles for size, quality, and number of inscriptions.
Assess for presence of rectus diastasis that may result in a widened appearance when implants are placed.
Inspect for abdominal wall or umbilical hernias.
Examine for previous abdominal scars or evidence of prior abdominal liposuction.
Anatomy
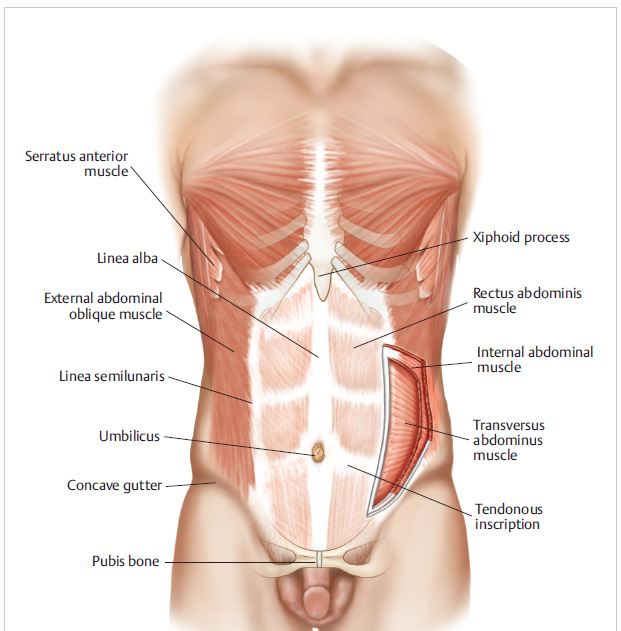
The rectus abdominis is a paired muscle extending from the xiphoid and costal cartilages of the fifth to seventh ribs superiorly to the pubis inferiorly. 1 The muscle is encased in an anterior sheath along its entire course as well as posterior sheath superiorly to the level of the arcuate line.1 Its blood supply arises from the bilateral superior and inferior epigastric arteries, while it is innervated by segmental thoracolumbar spinal nerves meeting the muscle on its posterolateral surface. 2 , 3 Three to four tendinous inscriptions typically divide the muscle into three to four muscular sections on each side. 1 These inscriptions are often present at the level of the xiphoid, the umbilicus, as well as at a level halfway between these two landmarks. These muscular divisions provide the often sought-after contoured, muscular abdominal six-pack appearance. Laterally, the rectus abdominis joins the oblique musculature at the linea semilunaris bilaterally ( Fig. 36.1 ).
An aesthetic, concave gutter often extends from the origin of the rectus abdominis on the pubis extending toward the flanks. These gutters and flank concavity highlight the sculpted nature of the rectus muscle along with overlying implants and may be accentuated using adjunctive liposuction. The natural shadows along the linea semilunaris offer an excellent site for a single, small access incision allowing for upper implant placement. The umbilicus is preferred for lower implant placement given its superior ability to hide any scarring.
Patient Selection
Ideal candidates for rectus abdominis implants are very lean young men who have very little fat to be enable BodyBanking to the abs. Active patients with good muscle tone may still have difficulty achieving a sculpted appearance of the rectus abdominis musculature. Often, these patients will present with a flat abdominal contour with a greater amount of adiposity overlying the inferior, suprapubic portion of the rectus musculature compared to the superior portion. Further, the superior portion of the rectus, which inserts into the xiphoid and costal cartilage, may be more prominent because of the adjacent bony support. Implants with differential profiles and sizes may therefore be utilized as one progresses from superior to inferior along the rectus abdominis.
Many patients present with complete disarray to the fascial inscription architecture, which the senior author has deemed: “spaghetti abs” analogous to the “spaghetti wrists” he used to see on the NYU hand service at Bellevue Hospital every year on the 4th of July. Patients who have a “spaghetti” abdomen may not be suitable candidates for subfascial abdominal six-pack silicone implant augmentation. If proceeding in patients with such anatomy, implants may need to be placed in the suprafascial, subcutaneous plane for proper implant alignment, as subfascial implant placement will follow the abnormal course of the native rectus musculature. Although not preferred, suprafascial placement has produced acceptable results. This possibility should be discussed with patients preoperatively and noted in the surgical consent.
Steps for Abdominal Silicone Six-Pack MuscleGel Implant Augmentation
Equipment
Headlight.
MuscleGel abdominal six-pack implants
Set of graduated urethral sounds.
Abdominal implant lighted “pigtail” retractor (preferred) or lighted submental retractor.
Ioban antimicrobial drape (3M, St. Paul, MN).
Sutures
4–0 Vicryl suture (Ethicon US, Somerville, NJ).
4–0 Monocryl suture (Ethicon US, Somerville, NJ).
Preoperative Markings
Prior to marking, preoperative photographs and a video are taken of the patient’s abdomen in repose as well as with the rectus abdominis muscles flexed.
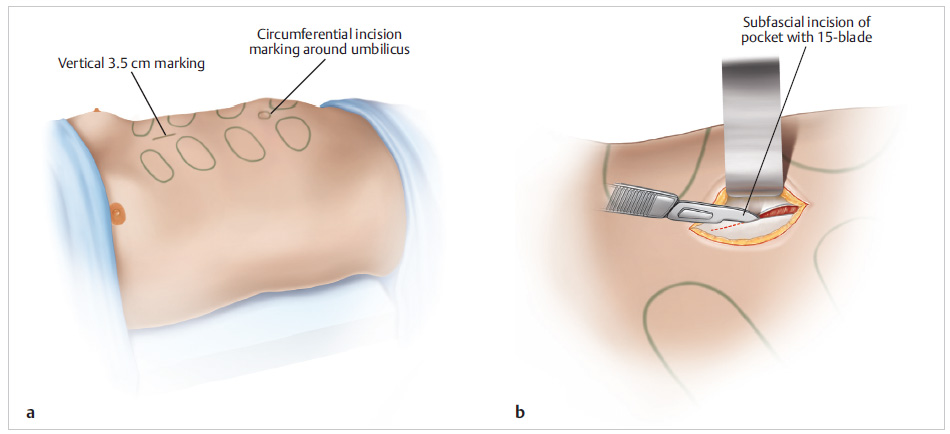
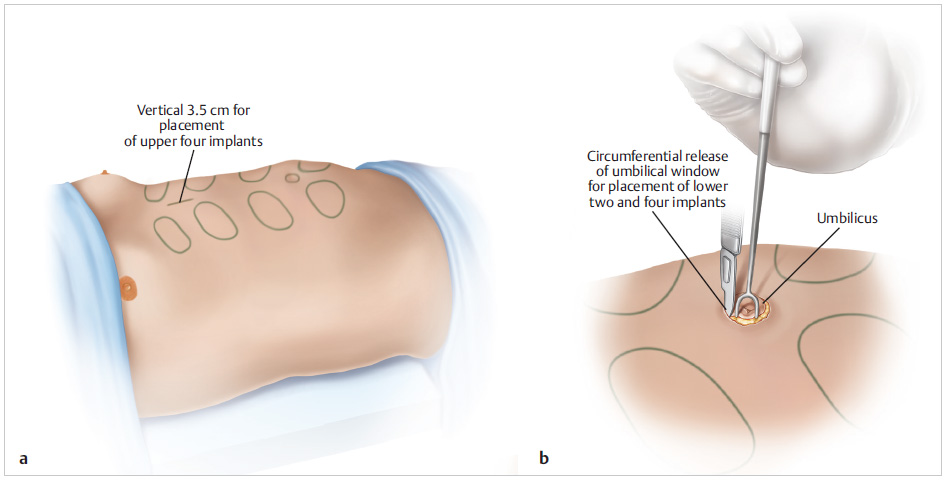
A vertical 3.5-cm incision is marked in the natural crease of the linea alba centrally between the superior (first) and second set of muscular sections of the rectus abdominis.
Circumferential incisions are marked around the native umbilicus ().
The muscular sections of the rectus abdominis, which correspond with the proposed areas for implant placement, are noted and marked with the abdominal muscles in repose as well as when flexed and extended.
Corresponding proposed pockets for subfascial dissection for ultimate implant placement with documented dimensions are then drawn.
Mark out any areas for adjunctive augmentation using BodyBanking.
Mark out any areas in which concomitant
MuscleShadowing will be performed.
A final set of preoperative patient photographs and videos, complete with markings, are taken with abdominal muscles in repose and flexed ( Fig. 36.2 ).
Use of Anesthesia
Abdominal silicone MuscleGel implant augmentation may be safely performed under local anesthesia only, with or without sedation, as well as general anesthesia based on surgeon and patient preference as well as patient tolerance.
Preoperative Preparation and Patient Positioning
A standing surgical prep is performed with the patient’s arms extended. Care is taken to prep from the neck superiorly to the pubic area inferiorly.
After prepping, the patient then lies supine on the operating room table lined with sterile drapes. The arms are abducted on arm boards at 90° from the body.
Technique
To begin the procedure, proposed incisions and each pocket are injected with 2% lidocaine with epinephrine using a spinal needle. Injection into these potential pocket spaces will facilitate hydrodissection of the pocket along with hemostasis and pain control. The previously marked incisions are then made using a No. 15 blade scalpel. Dissection proceeds bilaterally in a subcutaneous plane to expose the medial edges of the rectus abdominis fascia. Using a marking pen, a 1-cm vertical incision is marked at the medial edge of the first rectus abdominis muscle pocket, which had been marked preoperatively, to prepare for subfascial implant pocket dissection on top of the rectus abdominis musculature. This marking is then incised gently using a No. 15 blade ( Fig. 36.2 ).
The subfascial plane is entered through this incision, and the implant pocket is initially dissected gently using a tonsil clamp. During this initial dissection, any medial rectus abdominis perforators must be anticipated and cauterized to maintain a bloodless field with optimal visualization for precise pocket dissection. Progressively larger urethral sounds are then utilized to expand the pocket to the correct size for a “hand-in-glove” fit of the implant. Meticulous care is taken not to overdissect the pocket, especially laterally off of the rectus abdominis muscle ( Fig. 36.3 ).
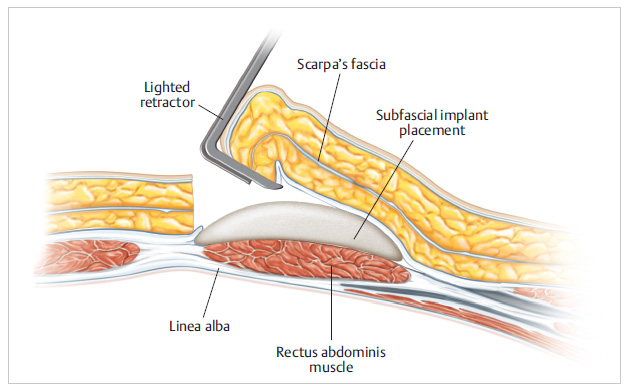
At this point in the procedure, an abdominal implant lighted “pigtail” retractor (preferred) or a lighted submental retractor is inserted into the pocket for unimpeded visualization and inspection to ensure adequate dissection. Meticulous hemostasis is next achieved using electrocautery ( Fig. 36.4 ).
Rinse the pocket copiously with triple antibiotic solution composed of cefazolin, gentamicin, and bacitracin. The MuscleGel implant is then carefully inserted into the dissected pocket. The implant should fit exactly into the dissected pocket in a “hand-in-glove” manner. If necessary, the implant may need to be trimmed and customized to improve the implant fit, profile, contour, or tapering from the implant to the native abdominal wall. In rare cases, the implant pocket may need to be further dissected, but, again, great care must be taken not to overdissect the pocket to mitigate risk of implant migration and ultimate malposition. The implant must then be secured in its ideal position by placing a 4–0 Vicryl suture (Ethicon US, Somerville, NJ) between the anterior surface of the implant and the overlying fascia of the implant pocket. This will “lock in” the implant position and minimize risk of migration and malposition. The fascial pocket is closed using a running 4–0 Vicryl suture (Ethicon US, Somerville, NJ) to isolate the implant within the pocket using local vascularized tissue and to minimize the risk of contamination ( Fig. 36.5 ). The preceding steps are then repeated for each subsequent abdominal implant to be placed.
After all implants are placed, any adjunctive abdominal liposuction, MuscleShadowing, and/or BodyBanking, is gently performed to refine, blend, and/or augment the result. Great care is taken not to damage the implants or disturb the implant pockets with these maneuvers. Incisions next are closed in a layered fashion using 4–0 Vicryl (Ethicon US, Somerville, NJ) and 4–0 Monocryl suture (Ethicon US, Somerville, NJ). Last, topical skin adhesive and wound closure strips are placed over all incisions.
Related posts:

Stay updated, free articles. Join our Telegram channel

Full access? Get Clinical Tree


