CHAPTER 31 Pectoral Augmentation with Silicone Implant
Summary
The main goal of this chapter is to get surgeons as excited about male pectoral augmentation as they are about women’s breast augmentation. Hundreds and thousands of women have breast augmentation every year, yet very few men undergo the procedure, because they do not realize the procedure exists, they are not educated by their local plastic surgeon’s practice about the procedure, and most plastic surgeons are not trained how to correctly do the procedure in their residency or even fellowship.
The objectives of the chapter are to introduce the anatomy, guide the beginning surgeon through the steps, and give a few pearls and pitfalls to allow the surgeon to become sufficiently educated to consider adding this to her or his armamentarium.
Introduction
Male chest contouring with silicone implants was first described in 1965 for reconstruction of chest wall deformities related to pectus excavatum. 1 The use of pectoral implants in chest wall deformities such as pectus excavatum, 2 , 3 , 4 Poland’s syndrome, 5 and pectoralis major rupture has comprised the majority of the literature to date. 6 Early procedures involved subcutaneous implant placement through a presternal incision and were plagued with complications related to implant exposure and seroma formation. The recent use of subpectoral pocket dissection through an axillary incision has significantly improved outcomes. 7 , 8
The first pectoral implants were produced using a papier mache moulage as a model to create a customized silicone implant. 2 , 3 In the early 1990s, prefabricated pectoral implants for male patients became available. 7 , 8 These implants contained a cohesive silicone gel within a textured seven-layer capsule. The design was rectangular in shape with oval borders and a lateral axillary extension. Various sizes, shapes, and projections are now available for use.
More thorough understanding of male chest aesthetic anatomy, improved implant design, and refinements in surgical technique have enabled pectoral implants to evolve from a primarily reconstructive procedure into a powerful tool for cosmetic male chest enhancement. 9 , 10 , 11 , 12
Physical Evaluation
The Ideal Candidate
Young patient.
Realistic expectations and goals.
Compliant with instruction.
Lean, very little body fat.
Symmetric chest anatomy.
Good skin quality.
Pretty in, pretty out.
Implant Goals
A natural result.
Central cleavage.
Undetectable implant borders.
Matches the other muscle groups.
Chest wall harmony.
Physical Examination
Quality of skin and subcutaneous tissue is examined for laxity and fatty deposits.
Pectoralis muscle evaluated at rest and in flexed position while standing; clavicular, sternal, and costal attachments are defined.
Width is measured from sternum to anterior axillary line along the lower pole. Height is measured from the clavicle to the lower border in the midclavicular line.
The shoulders, rib cage, sternum, scapula, and spine are evaluated for skeletal abnormalities such as scoliosis, pectus excavatum or carinatum, or Poland’s syndrome.
Asymmetry is noted and pointed out to the patient at the time of examination.
Anatomy
Male chest aesthetics are predominantly defined by the shape and development of the pectoralis major muscles. A muscular male chest exhibits superior fullness with a transition to a flat inferior chest at the level of the inframammary fold and medially over the central sternum. The lateral edge of the pectoralis muscle extends upward from the linea semilunaris to the anterior axillary line.
The pectoralis major is divided into clavicular and sternocostal heads. The clavicular head originates from the anterior border of the medial half of the clavicle, while the sternocostal head originates from the anterior surface of the sternum, the superior six costal cartilages, and the aponeurosis of the anterior rectus sheath and external oblique muscle. The fibers converge to insert on the anteromedial proximal humerus along the lateral lip of the bicipital groove. The pectoral branch of the thoracoacromial artery and perforating vessels from the internal mammary artery provides blood supply to the pectoralis major.
The lower two-thirds of the pectoralis major muscle is innervated by the medial pectoral nerve, which is closely associated with the lateral thoracic vessels. The medial pectoral nerve is at risk for injury during lateral subpectoral dissection, as it passes through or around the pectoralis minor muscle to enter the pectoralis major along the inferolateral border. The lateral pectoral nerve travels more superiorly with the thoracoacromial vessels and innervates the upper third of the pectoralis major muscle. This nerve may also be damaged during more superior subpectoral dissection.
The pectoralis minor is a thin triangular muscle beneath the pectoralis major. It arises from the superolateral surfaces of ribs 3 through 5 and inserts onto the medial border of the coracoid process of the scapula. Arterial supply is derived from the pectoral branch of the thoracoacromial artery, and the medial pectoral nerve provides innervation. The muscle is covered anteriorly by the clavipectoral fascia and divides the axillary lymph nodes according to their position relative to the muscle: level 1 lateral, level 2 deep, and level 3 medial.
The axilla is the region directly below the shoulder joint and contains the axillary artery and vein, brachial plexus, and lymph nodes. The anterior boundary consists of the lower border of the lateral pectoralis major, which forms the anterior axillary fold, and is separated from the overlying subcutaneous tissue by the clavipectoral fascia. The posterior boundary is formed by the latissimus dorsi and teres major muscles, which comprise the posterior axillary fold.
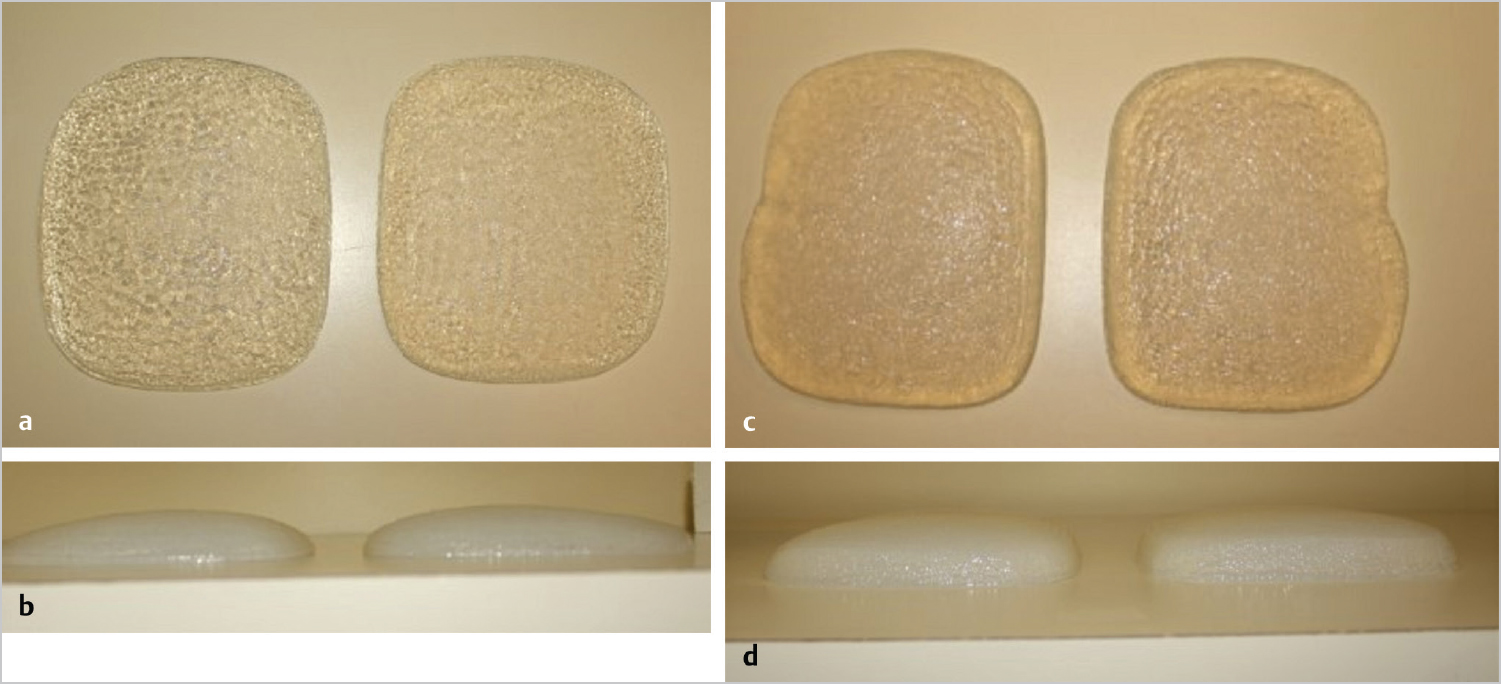
Solid Silicone Implant
The silicone pectoral implants are made from a variety of companies in several shapes and sizes ( Fig. 31.1a–d). The American implants tend to be soft solid implants of varying degrees of firmness. I have used all the products on the market, and generally find patients tend to prefer the firmness of an implant that mimics the pectoralis muscle in the reposed (unflexed) state, as this agrees with the other tissue and thus is not detectable. When the patient flexes the overlying muscle, his own muscle is firm enough to mask the feeling of any implant and again the implant remains relatively undetectable. Using an implant that is too firm will be palpable by the patient or others when the chest is in repose and thus may be detectable. Implants that are too soft have greater possibility of fracture with insertion or folding and possibly inverting with time.
Steps for Pectoral Augmentation with Silicone
Preoperative Markings
Markings are performed with the patient standing fully upright and the surgeon sitting. The chest anatomy is precisely delineated and with particular attention to any asymmetry present. Abducting the patient’s arm and then raising it over the head helps to clearly define the lateral muscular border. Repeated flexing of the pectoralis muscle with the arm down also assist in delineation of borders for precise markings. In addition to noting the differences between sides and incorporating this into the operative plan, any asymmetry should be pointed out to the patient and clearly documented. Preoperative photographs are especially helpful to illustrate the asymmetry for the patient. While the implant size and/or shape and pocket position should be adjusted to correct asymmetry as best as possible, preoperative identification is paramount to achieving aesthetic success and for managing patient expectations.
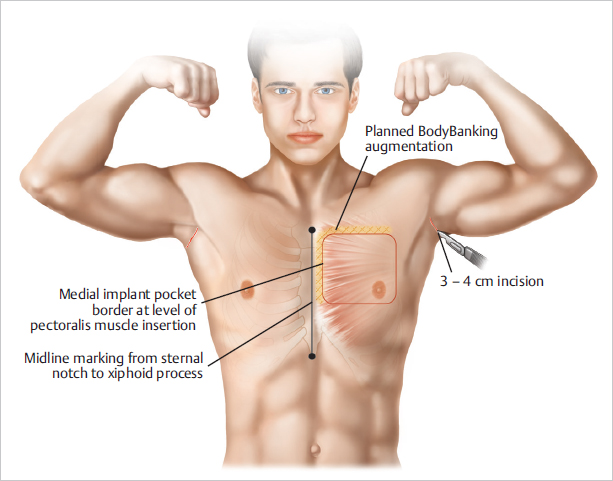
With the arm abducted 90°, the access incision is marked along a natural crease in the hair-bearing area of the axilla. Typically, this incision is 3 to 4 cm long to allow insertion of a folded implant. Returning the arms to the patient’s sides, the infrapectoral fold (IPF) is marked out. They are then instructed to flex their pectoral muscles to delineate the medial insertion of the pectoralis major on the sternum to determine how far medially to make the implant pocket. At this point, areas for BodyBanking augmentation are also delineated ( Fig. 31.2 ).
The inferior edge of the implant is marked so that it lies under the inferior aspect of the areola. Accordingly, the areas of release to create the implant pocket are marked out. It is important to ensure that the implant is not too large laterally as it may rub against the arm and cause discomfort. It is also preferable to have the implant higher rather than lower, and the pocket should be designed with that in mind. Finally, the chest midline is marked by a line dropped from the sternal notch and extending through the xiphoid toward the umbilicus.
Once all areas of interest have been marked and highlighted, the surgeon should stand up and step a few feet back to assess the overall symmetry. While it is important to be exacting in your delineation of anatomical boundaries, minor unilateral variation is typically present, and it is paramount that each side of the chest matches the other. Precise markings translate to operative success and have potential to prevent patient dissatisfaction postoperatively.
Related posts:

Stay updated, free articles. Join our Telegram channel

Full access? Get Clinical Tree


