CHAPTER 30 360° Torso Tuck with Gluteal “Wallet-Flap” Autoaugmentation
Summary
A 360-degree Torso Tuck with gluteal autoaugmentation is a modern approach that targets a specific patient population so that they may have an incredible cosmetic result, which, when done well, leaves little to no signs of their previous body shape. The purpose of this chapter is to help guide surgeons on the technical steps and the importance of attention to detail with regard to the male patient who has lost from 50 to 120 pounds to achieve more chiseled definition and hide incisions to achieve the best cosmesis. There is ample information in the literature regarding female body contouring in the presence of rectus diastasis. The chapter, however, yields great insight into creating a more defined appearance to the torso and lower abdomen in the male patient without diastasis.
Introduction
While treatment of the male massive weight loss patient has been described extensively, there is a growing segment of the population who has lost weight, that is, less than 100 pounds. Over and over in our practices, we hear the same young man’s story: “I came from a ‘big’ family and my mother showed her love with food and would always make us ‘clean our plates.’ Then when I went off to college, I lost 70 pounds.” This tends to be a patient population that has the opportunity to have an incredible cosmetic result that, when done well, leaves little to no signs of their previous body shape. Our goal is to provide this patient type with a procedure that allows for his more chiseled musculature to be revealed, waistline contour to be transformed, and the incision to remain as low as possible. The goal is to keep the incision low to be concealed under low boardshorts or a Speedo.
The shift toward modern abdominoplasty started in the 1960s, and the anatomical differences between the male and female body form have been described in Chapter 38. Despite this, the approach to male body lifting is limited.
There is ample information about abdominoplasty and body-contouring procedures for women, especially to correct the physical changes that develop as a result of childbearing like rectus diastasis, atrophic skin of the lower and central abdomen, extensive skin striae, and distorted umbilical shape. Men, however, tend to have minimal diastasis but oftentimes lack the definition of the lower abdomen and waistline. The purpose of this chapter is to help guide surgeons on the technical steps and the importance of attention to detail with regard to the male patient who has lost from 50 to 120 pounds to achieve more chiseled definition and hide the incision to achieve the best cosmesis. For patients with greater weight loss, Dr. Hurwitz has outlined his superb techniques in Chapter 39 that may be more suitable for an outstanding result in that particular pattern population.
Physical Evaluation
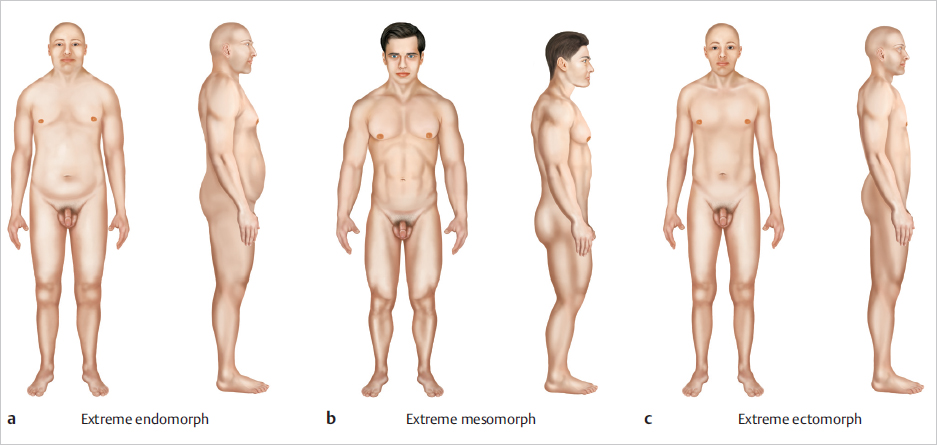
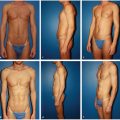
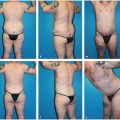
Assess general body somatotype of the patient ( Fig. 30.1 ):
Ectomorph—Tall, slender, lean muscle mass.
Mesomorph—Medium height, large muscle mass.
Endomorph—Medium height, doughy, portly, little muscle mass.
Assess for quantity of excess skin—What areas are of concern?
Is location anterior only?
Does transverse excess require a vertical (fleurde- lis) incision?
Does an umbilical transposition need to be performed?
Is there laxity of the pubic region?
Is there excess flank skin?
Is there laxity of the buttock area with a significant infragluteal fold?
Assess the quality of the patient’s skin:
Is there extensive striae?
Is the dermis thick or atrophic?
Assess for excess adiposity:
Flank area?
Pubic area?
Central abdomen?
Lateral abdomen?
Assess the projection of the gluteal area:
Is there good shape, projection?
Autoaugmentation with tissue flap or free fat grafting?
Is there sufficient adiposity in the lower back and flank area?
If lacking adiposity, would using gluteal implants offer a solution for lack of projection?
Assess incisions from previous surgical procedures:
Open cholecystectomy (right upper quadrant) or chevron scars.
Yes? This would limit anterior dissection.
Midline scar.
Can be used to remove skin in the patient with excess skin in the transverse dimension?
Infraumbilical scars.
This may be removed entirely.
Assess the abdominal wall for masses or hernias.
Assess the rectus muscles for diastasis.
Anatomy
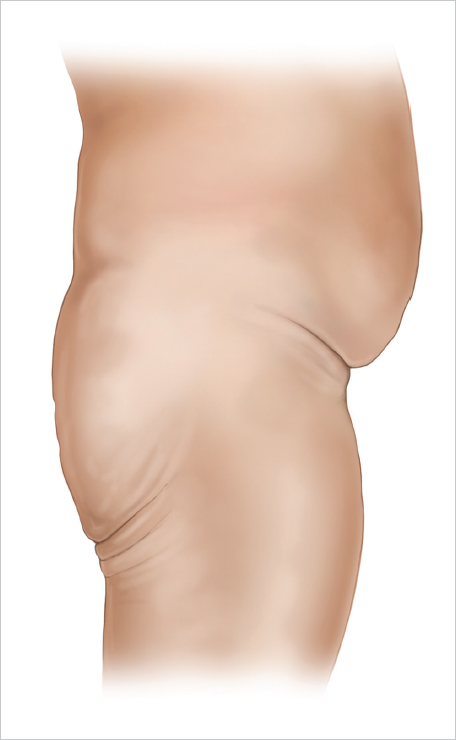
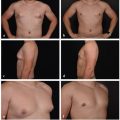
The male abdominal musculature plays a vital role in planning and transforming the waistline in the Torso Tuck. Having a fundamental understanding of the overall body shape we are creating and the associated underlying musculature is imperative ( Fig. 30.2 ). The goal is to enhance and reveal the underlying male muscular anatomy with this procedure. This patient is most often a fit guy who has good muscle tone and mass but is camouflaged by excess skin in the central and lower abdomen, lateral thighs, lower back, and buttock region ( Fig. 30.3 ). This patient has a long infragluteal fold and may have several folds of skin in this area that gives an aged appearance to the buttock region.
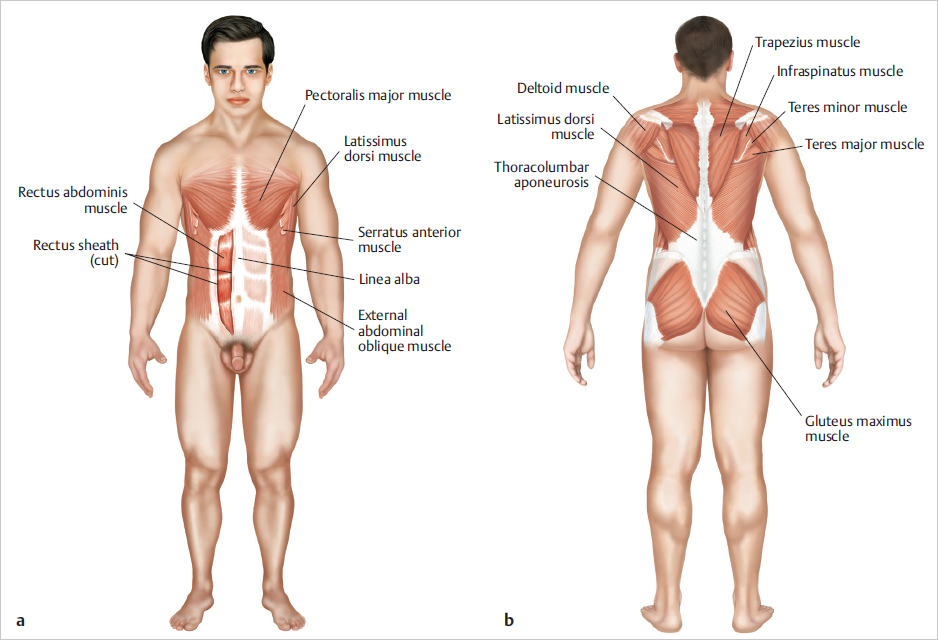
This patient most commonly does not have rectus diastasis and has well-developed abdominus rectus muscles. Plication is not always necessary and will remove the central groove that is considered to be attractive in men. It is important to identify the inscriptions. Each segmental portion of the rectus muscle can be enhanced if needed to improve the visibility with body banking or the use of a subfascial implant if needed.
While the rectus muscle is important, the junction of the oblique muscle group and lateral rectus becomes a key area to define and sculpt when liposuction is used as an adjunct modality. Liposculpting of the abdominal skin flap can judiciously be performed at the time of the boardshort lift, so an understanding of this anatomy will allow you to achieve great success in creating an attractive male abdomen.
The serratus anterior and oblique muscle groups are often overlooked in a male patient and can create a more natural appearance when this is enhanced with fat transfer in body banking procedures. The origin of this muscle is the anterior surface of ribs 8 and 9. Enhancing the origin on ribs 7 and 8 will create a more balanced and natural result.
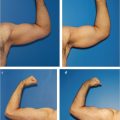
The latissimus dorsi is a large wide muscle that covers the lower half of the back and side of the ribcage. It tapers while traveling up under the scapula to connect to insert on the humerus. When looking at the back with this muscle flexed, the back has a “V-shaped” appearance and is considered to be a distinct male characteristic. This can be easily seen in the “ swimmer’s” body type, which is a lean muscular male. It is our goal to reveal this body type and underlying anatomy with this procedure.
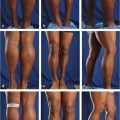
The gluteal muscle group cannot be forgotten. The excess skin and long gluteal fold can be improved significantly with the skin being removed along the superior portion of the gluteal muscles. However, a combination of gluteal implants or even a gluteal autoaugmentation with adjacent tissue transfer can give great balance to the region rejuvenating the buttocks. The challenge in lean muscular weight loss patients is that they lack significant soft tissue and fat to properly enhance the gluteal muscle group, thus implants (Alpha Male Aesthetics, Carson City, NV) tend to be the better option.
Paraspinous muscles cannot be forgotten in the lower abdomen. Body sculpting in this region will reveal these muscles and create anatomical balance in the lower back. Selective fat reduction centrally and laterally to outline and define the erector spinae may enhance this.
Paying attention to the detail associated with underlying muscular anatomy, enhancing this where it needs to be augmented, liposculpting the junctions and borders of adjacent muscle groups will create a more balanced, natural, masculine result.
Steps for 360° Torso Tuck with Gluteal Autoaugmentation
Preoperative Markings
We begin with the patient supine, intubated, and with a preliminary Betadine prep and limited sterile draping for anterior liposuction ( Fig. 30.4 ). Plan your liposuction incisions so that these will be removed in the lower abdominal tissue. Inject the area with 2% lidocaine with epinephrine to the liposuction incisions. Then, with a No. 15 blade, make small nick incisions for tumescence placement. Place tumescent solution into the soft tissues and allow this to dwell for 10 minutes achieving optimal hemostasis. During this 10-minute time period, shift your attention to the planned abdominal skin incisions. Inject these areas with 2% lidocaine with epinephrine so vasoconstriction will be achieved upon incising the skin.
Once adequate time has passed, perform power-assisted liposuction with curved cannula of anterior areas, carefully sculpting these areas to improve the muscle visibility especially in the lateral abdominal area. Specially designed curved and swan neck cannulas are preferred to avoid unnecessary telltale lateral access port incision scars. While you are suctioning, remember to capture all fat into a sterile closed system on the field for body banking, which will allow you to create muscle definition of the anterior abdominal wall.
Upon completion of the anterior lipocontouring, reposition the patient into the prone position, prep and drape in the standard sterile surgical fashion.
Tumesce tissues and perform liposuction from the posterior approach to address the flanks laterally and to reveal the paraspinous muscles in the central lower back ( Fig. 30.5 ). This adipose tissue will also be used for body banking. Once adequate lipocontouring has been achieved to create an aesthetic male body shape, focus your attention on posterior and lateral skin removal.
Excise the posterior marked elements with a No. 10 blade, incising the skin and then using electrocautery to sculpt excise the underlying soft tissue, while maintaining excellent hemostasis. In this process, it is important to elevate the back flap so that you may score the superficial fascial system (SFS) to release and unfurl the flank areas ( Fig. 30.6 ). This will allow you to drape the lower back and flank tissues achieving optimal outcome and male body shape.
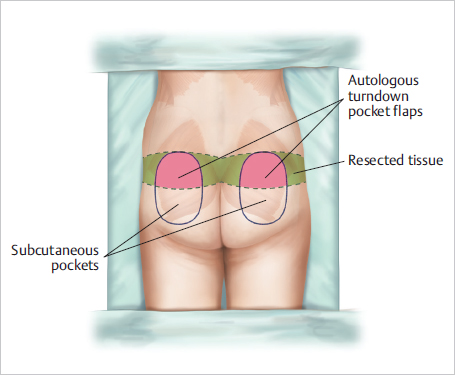
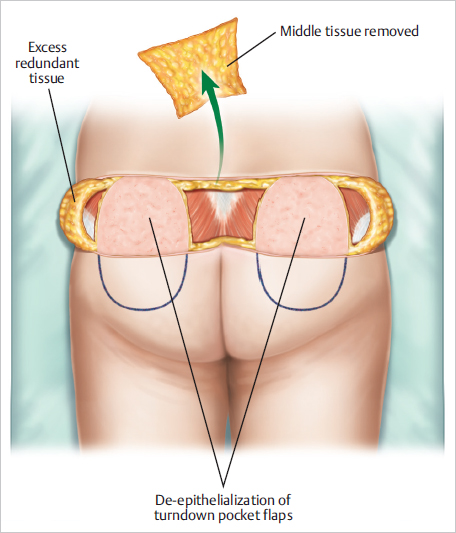
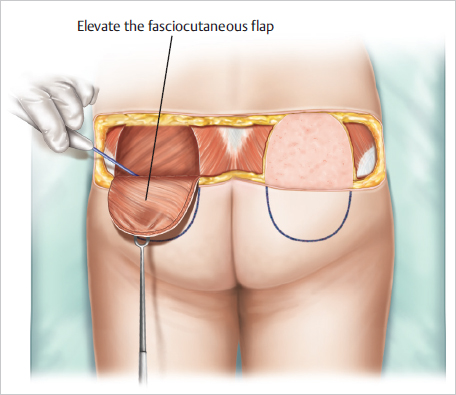
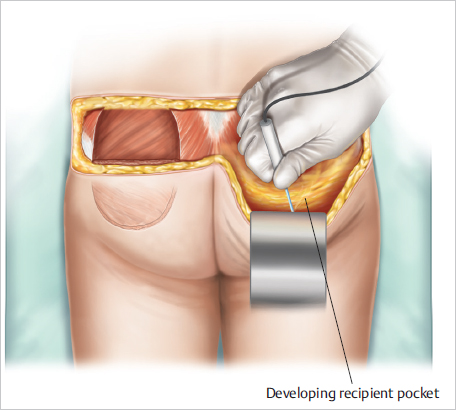
Gluteal autoaugmentation plays a key part of enhancing the male body shape in the boardshort lift. Turn your attention to developing the gluteal pocket pad before fully excising the soft tissue. The skin will need to be de-epithelialized over the gluteal pocket pads, allowing you to create two dermal split myocutaneous flaps. Elevate “wallet flap” reception tissue compartments (pockets) at levels above gluteal fascia. The inferior dissection should extend almost to the inferior gluteal crease ( Fig. 30.7 ).
Once the pockets have been dissected, mobilize and reflect the “wallet flaps” inferiorly into the tissue compartment pocket. Secure them into position with 2–0 interrupted Vicryl sutures.
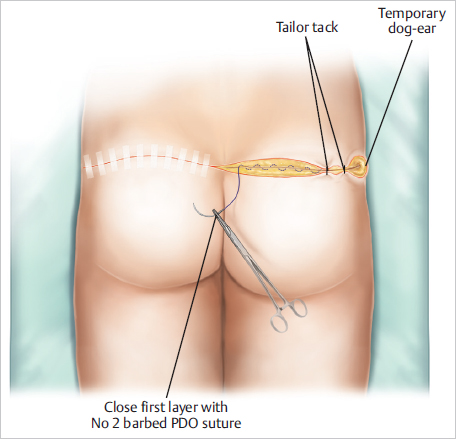
At this time, confirm that hemostasis has been achieved, and then advance the soft tissues to create a tension-free layered closure. First, reapproximate lower body tissues and secure SFS from upper and lower flaps to muscle fascia ( Fig. 30.8 ). This will greatly decrease tension on your skin closure. Close in layers with No. 2, 0, and 2–0 barbed sutures.
Use a skin stapler to approximate the lateral excess tissue creating temporary “dog ears,” which will be excised completely from the anterior skin excision. Apply Mastisol, 1-inch linear and crossing Steri-Strips to the posterior incision now prior to the patient turns.
To complete the anterior skin excision, return patient to a supine position. Prep one final time and then drape in the standard, sterile fashion. Incise and release umbilicus taking great care to preserving a small cuff of soft tissue and associated perforator vessels and lymphatic channels to ensure viability of the umbilicus at the base and stalk without leaving excess skin on the surface leaving an unsightly “lily-pad, patchwork” umbilicus. Next, incise the lower incision as marked preoperatively. Use electrocautery to dissect the subcutaneous tissue identifying and marking Scarpa’s fascia that will facilitate closure of the soft tissue at the end of the procedure. Elevate abdominal flap to xiphoid and bilateral costal margins, taking great care not to disrupt perforator vessels at the costal margin. Identify and mark central laxity and/ or diastasis in the abdominal fascia. Perform central imbrication with a No. 2 PDO (or a No. 0 PDO for a lighter patient) barbed suture, if necessary.
Once completed, place the patient in a flexed, semi-Fowler, beach chair position, and excise the excess skin centrally and laterally. At this time, place progressive tension sutures or insert two No. 10-French Jackson–Pratt drains along the fascia. Place the right drain across the superior portion of the abdomen egressing along the right side of the anterior abdominal incision. Place the left drain across the lower abdomen egressing along the left lateral anterior abdominal incision. In smaller patients, open penrose drains may be substitued. Progressively decrease tension at the anterior lower abdominal tissue closure by using a 2–0 Vicryl in the midline securing Scarpa’s fascia to the abdominal fascia in the midline. Start near the xiphoid by placing interrupted sutures approximately 3 cm apart. Progressively march from superior to inferior in the midline. This will decrease tension at the skin closure in the midline. At this time, mark neoumbilical window with inverted chevron and tailor tack the skin edge to ensure symmetry of the soft-tissue closure and the umbilical position on the skin flap. Then, in a layered fashion, close the tissue in layers with 0-PDO Stratafix barbed suture, 3–0 Monocryl as interrupted deep dermal sutures, and a 2–0 Monocryl Stratafix suture as a running subcuticular closure. Finally, inset umbilicus with 3–0 Monocryl sutures as both interrupted deep dermal and running subcuticular sutures.
Body banking will now play an integral role in sculpting the abdomen by enhancing and revealing the existing male abdominal musculature. Refer to Chapter 36 for more details on body banking.
Related posts:

Stay updated, free articles. Join our Telegram channel

Full access? Get Clinical Tree


