CHAPTER 15 Cheek Shaping with Implants and Fillers
Summary
Shaping the cheek has historically been accomplished with solid implants, which are surgically placed. However, the availability of relatively firm and durable injectable fillers since the early 2000s, followed by the introduction of specific firmer and longer-lasting fillers targeting cheek contouring have sparked a transition from surgical to nonsurgical approaches. Both surgical and injectable implants are used for altering and rejuvenating facial appearance and will be discussed in this chapter.
Introduction
Shaping the cheek has historically been accomplished with solid implants, which are surgically placed. Biomaterials, which are well tolerated over years, can be fabricated in a variety of sizes and shapes, and can be sculpted in the operating room, have enabled the widespread augmentation of cheek contour. A similar effect has been seen in chin augmentation but even more so because of the relative difficulty and infrequency with which cheek augmentation is performed using autogenous materials and with no simple osteotomy to effect augmentation such as horizontal osteotomy of the mandible.
The availability of relatively firm and durable injectable fillers since the early 2000s, followed by the introduction of specific firmer and longer-lasting products targeting cheek contouring have sparked a transition from surgical to nonsurgical approaches.
Injectable fillers allow tremendous control of shape for small-to-moderate augmentations. Such shaping capability and the ensuing discussion of cheek aesthetics have brought a new level of nuance, accuracy, and customization to cheek augmentation treatments resulting in a level of verisimilitude that has not been previously routinely attained. Both surgical and injectable implants are used for altering and rejuvenating facial appearance. Autogenous fat transplantation is also playing an increasing role, particularly during other surgical procedures for facial rejuvenation.
Physical Evaluation
Facial width at the zygomaticomaxillary junction should be assessed.
Superolateral malar prominence and the curve of the inferior malar contour are important aesthetic features.
Submalar hollowing and loss of confluence between cheek fat pads are obvious signs of facial aging that must be evaluated.
Multiple asymmetries are common and need to be clearly addressed during treatment and pointed out to the patient a priori.
Imbalances with other parts of the face must be identified, and planning considers the face as a whole rather than any individual part.
The infraorbital foramen should be identified based on typical anatomical landmarks as well as palpation.
Skin laxity, fat pad prolapse, and festoons should be evaluated but volume planning should be based on aesthetic balance and not on full effacement of these features.
Anatomy
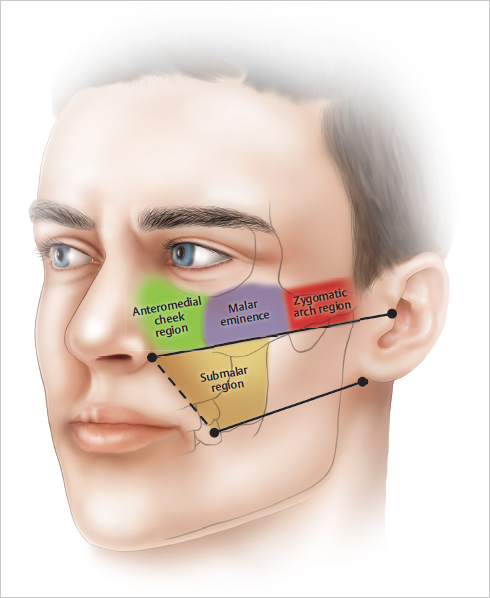
Surface shapes on the face do not have absolute locations as they vary to a degree in size and shape in proportion to other facial features. In addition, they will shift position based on aging changes such as skin laxity and volume loss. Nonetheless, an approximate gauge of the boundaries and demarcations between surface shapes on the face is useful in planning treatments. These shapes represent a combination of soft tissue volume overlying bony contours positioned by various support structures. The malar eminence is typically ovoid, angled, and peaks somewhere lateral to the lateral limbus. The exact position of the point of greatest prominence varies from individual to individual and from men as a group to women. There is a hemispheric curvature and projection to the malar eminence extending beneath the peak based on a combination of the shape of the maxilla and the overlying maxillary fat pads medially and the body of the zygoma laterally. Some medial fullness exists in youth, which diminishes with age and ultimately reveals the demarcation between individual fat pads and the nasojugal fold. The lateral portion of the malar eminence tapers into the shape of the zygomatic arch. This point, arch to arch, is the widest part of the face in youth. Beneath the malar eminence is the submalar area delineated by the nasolabial fold and crease medially and the transition to the zygomatic arch, laterally. The submalar area is delineated at its upper border by a line approximately between the nasal ala and the top of the tragus, excluding any portion of inferior curvature of the malar eminence. The inferior border is roughly bounded by a line between the oral commissure and the medial attachment of the lobule ( Fig. 15.1 ). Posteriorly, the submalar area is bounded by the anterior border of the masseter muscle and anteriorly by the nasolabial fold (not crease). Posterior to this area are the ramus and angle areas of the mandible, which comprise a separate and distinct area of volume loss in aging. Each area should be assessed individually and in concert with the entire malar complex to determine appropriate aesthetics, which are then translated into technical decisions about filler (type, volume) or implant (shape or style and position) selection and placement.
Neurovascular anatomy is most significant for the infraorbital nerve and vessels. These typically exit the maxilla at the medial limbus 3 mm below the orbital rim. The infraorbital foramen can usually be palpated to confirm the location. Multiple arterial and venous branches arborize from this location creating risk of intravascular injection over most of the medial cheek area. The zygomaticofrontal and zygomaticotemporal vessels and their branches pose a risk at the malar eminence and inferior orbital rim laterally.
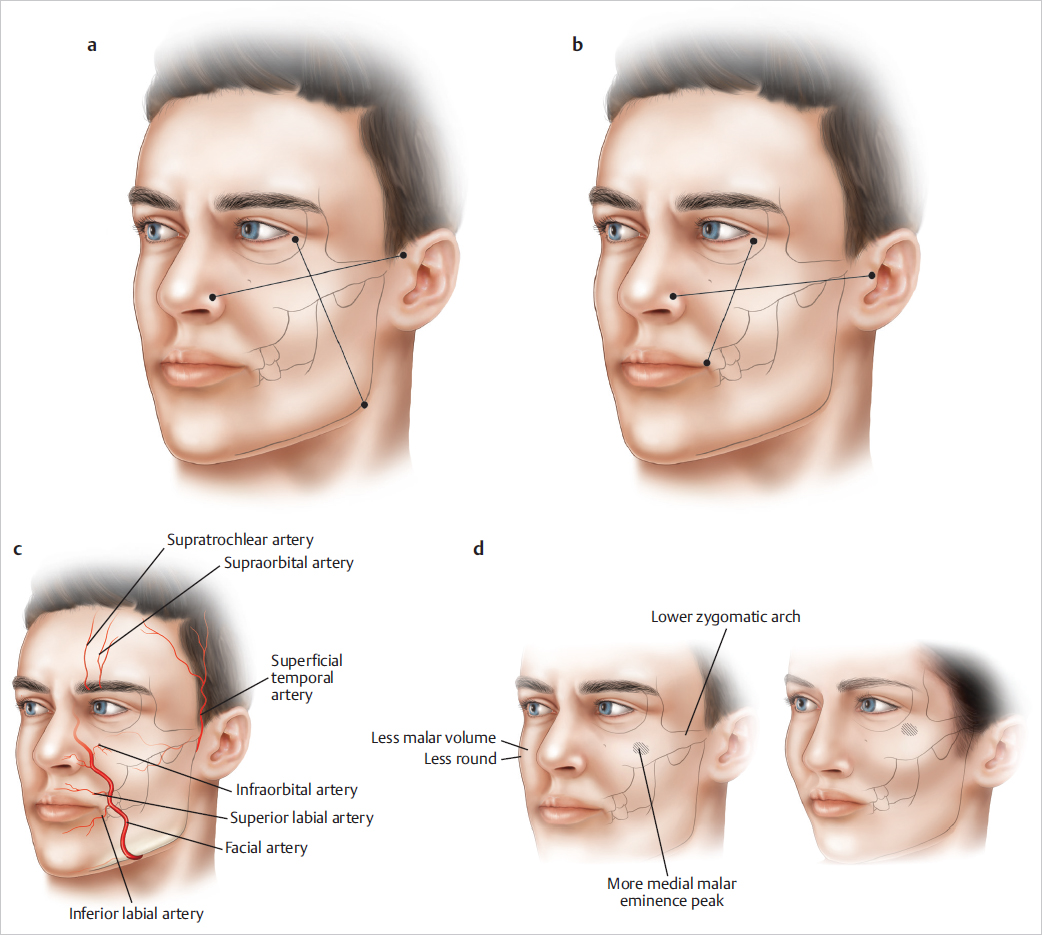
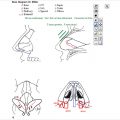
There are a number of significant differences between the typical male and female cheek in youth. The medial cheek typically contains less volume in men making it flatter with less curvature. The malar eminence is more medially positioned and less prominent. The zygomatic arch is typically positioned slightly inferiorly compared to surrounding structures in men compared to women, which may also contribute to a lower and less well-defined malar eminence in men. Classically, Hinderer’s lines were used to determine the peak of the malar eminence ( Fig. 15.2a). These are obtained by drawing a line from the top of the helix to the nasal ala and another line from the lateral canthus to the mandibular angle. The intersection represents the point of maximal prominence for the malar eminence. Others have suggested using a line from the top of the tragus to the top of the nasal ala intersected with a line from the lateral canthus to the oral commissure ( Fig. 15.2b). This results in a point that is slightly lower and somewhat more medial. The best option for men seems to be at this height and perhaps slightly lateral to the intersection point.
Steps for Cheek Augmentation with Implants
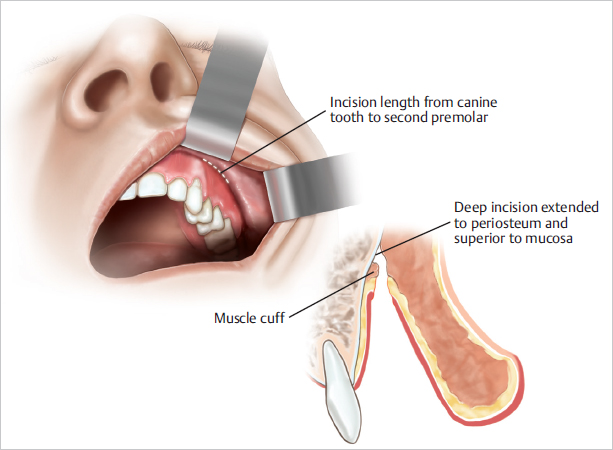
Placement of cheek implants is typically accomplished through a gingival–buccal sulcus incision, although subciliary and preauricular incisions are occasionally employed. The incision starts at the canine and extends for an adequate length to allow insertion of the implant, typically to the second premolar. The length of incision will depend on which type of implant is selected, with the deformability of silicone implants allowing placement through much smaller incisions compared to fixed–shape implants like porous polyethylene.The intraoral incision is hidden, and if properly made, heals well but several details are important. The incision should be placed superior (typically 5–7 mm) to the apex of the sulcus on labial mucosa, not at the apex itself or on the gingiva ( Fig. 15.3 ). The incision is extended deeper to the periosteum again superior to the level of the mucosal incision to leave a cuff of muscle inferiorly and attached to the maxillary alveolus. Just enough muscle should remain attached to bone to allow a deeper layer of closure after placement of the implant, again typically 5 to 7 mm. Too large a muscular cuff will result in long-term or permanent alteration in lip function. This often occurs during the first few weeks after surgery in any case but typically abates quickly if the cuff has been kept minimal.
The exposed periosteum is incised with needle tip cautery, and dissection of a precise pocket for the intended implant proceeds, referencing external markings using a periosteal elevator. The infraorbital nerve and vessels are identified and preserved. Hemostasis is obtained with electrocautery as needed, but this is usually only in the region of the incision. Hemostasis in the remainder of the pocket is usually obtained by gentle pressure or packing with a sponge, while the contralateral dissection or implant fashioning is performed. Fiberoptic retractors or a headlight can be used to visualize the pocket for any reason, but this is not generally necessary.
Sizers may be used to try different styles and sizes. In addition to aiding implant selection, asymmetries or under- or overdissection of the pockets can be identified and remedied using the sizers. Once an appropriate size and style of implant has been selected, a pair is brought onto the sterile field and soaked in betadine or an antibiotic solution of cefazolin, bacitracin, and gentamicin. The actual implants are then trialed in the pockets and can be tailored on the operative field to accommodate a patient-specific shape. This is most easily done with solid silicone implants using conventional scalpels. Porous polyethylene implants require power tools for precise contouring, which may not be available in an office-based operating room. Likewise, these implants often require fixation to prevent malposition and facilitate stable fixation during healing. Such fixation may require additional equipment and incisions.
Meticulous attention to obtaining symmetry is essential. A small difference in cheek size can be compensated at this point in the procedure. If matching implants are used but one cheek is slightly larger than the other, the undersurface of the implant intended for the large side can be hollowed out to allow it to produce less augmentation and projection in the anterior–posterior plane while preserving a matching size and shape on the surface. Larger asymmetries require selection of implants of different sizes with much more extensive tailoring of implant shape and relate more to reconstructive approaches to cheek asymmetry from pathological or traumatic causes.
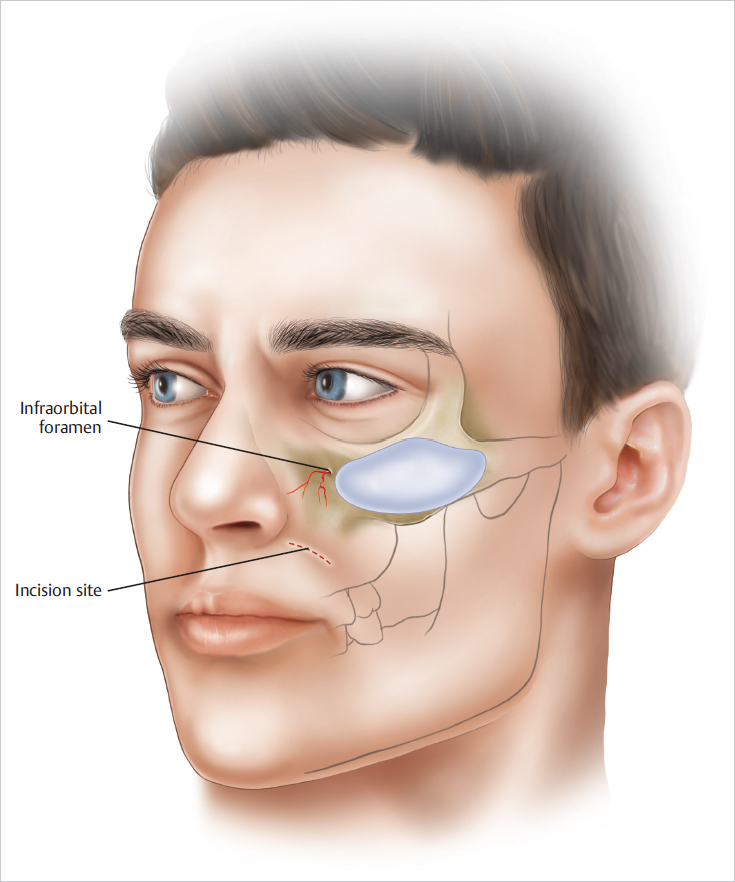
Once symmetric implant positioning and/or fixation is obtained, the implants are inspected within the pockets to ensure they are not abutting the infraorbital nerve and vessels ( Fig. 15.4 ). The implant can be repositioned or the medial border trimmed to prevent possible interaction between the implant and these critical structures. Next, the muscular cuff fashioned initially is used to obtain a deep layer of closure using running absorbable suture. The mucosa is then closed with a running absorbable suture. No dressing, garment, or other external fixation is used. Cool compresses and limited activity in the first 48 hours are used to minimize ecchymosis, edema, and discomfort.
Related posts:

Stay updated, free articles. Join our Telegram channel

Full access? Get Clinical Tree


